Faster Workflow: Mastering Emmet, Part 1
Key Takeaways
- Emmet is a free plugin for text editors that speeds up the process of writing HTML and CSS code. It converts simple abbreviations into complex code snippets when expanded using keyboard shortcuts.
- The plugin is compatible with several popular text editors and online services, enabling faster coding wherever you are. It uses CSS-like selector syntax and a variety of operators to create elements, apply id’s and classes, create child and sibling elements, multiply elements and more.
- Emmet also offers shorthand for CSS properties and provides a range of actions and keyboard shortcuts that can greatly improve the editing experience, especially when editing existing code. More advanced features and actions will be covered in later parts of this series.
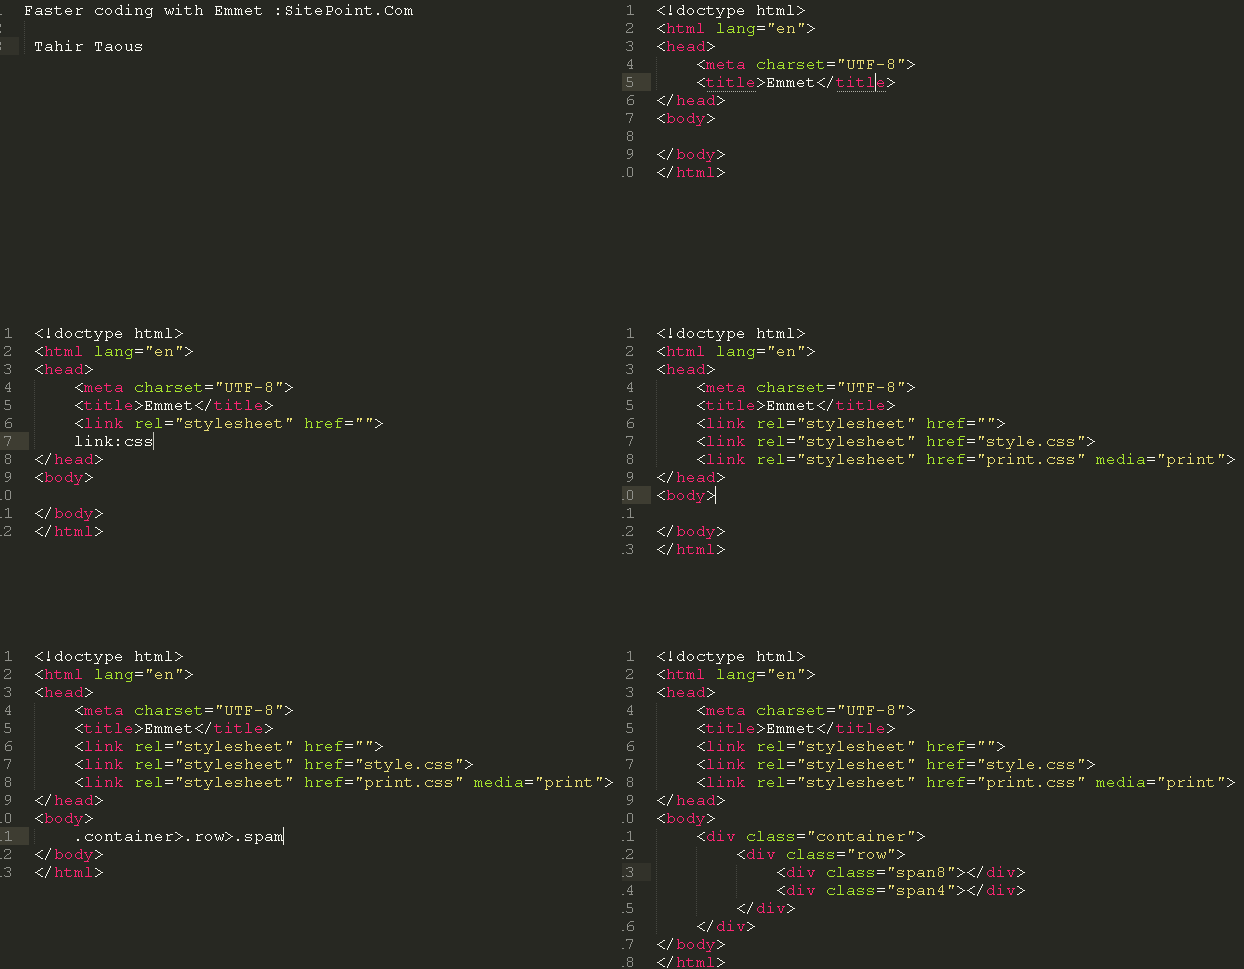
Emmet is a free plugin for text editors to write HTML and CSS code faster. In this multi-part series, I will show you how to write HTML and CSS code faster then ever with Emmet, profiling all the features of Emmet and how to use syntax, abbreviation and keyboard shortcuts to save your time.
Emmet is a must use web developer toolkit. With Emmet you can rapidly create your markup. You write simple abbreviations and just press Tab or Ctrl+E or any other other supported keyboard shortcut and Emmet expands the simple abbreviations into complex HTML and CSS code snippets. Emmet will make your HTML and CSS workflow much faster.
If you make a lot of HTML templates with nav bars, tables and/or multi column layouts, you will find Emmet immensely helpful. Once you get used to the Emmet syntax, it will change your way of creating web pages. I assure you, you will love Emmet when you use it in your workflow. Emmet may well change your way of writing HTML and CSS code.
You can install Emmet as a plugin available for many popular text editors. Below I’ve listed some of the code editors that support Emmet. Documentation on how to install and use Emmet in eahc of these text editors is available online.
- Dreamweaver
- Eclipse
- SublimeText
- TextMate
- Espresso
- Coda
- Brackets
- and many others
You can view the complete list of supported text editors at http://emmet.io/download/
Many popular online services support Emmet. It means you can write code faster wherever you are. Here are some services that support Emmet.
Why use Emmet?
The answer to that is simple: to make your coding workflow faster. Emmet lets you write lightning fast code. Simple CSS-like abbreviations expand into complex code. You can generate lorem ipsum text easily, use many keyboard shortcuts and much more.
How Emmet Works?
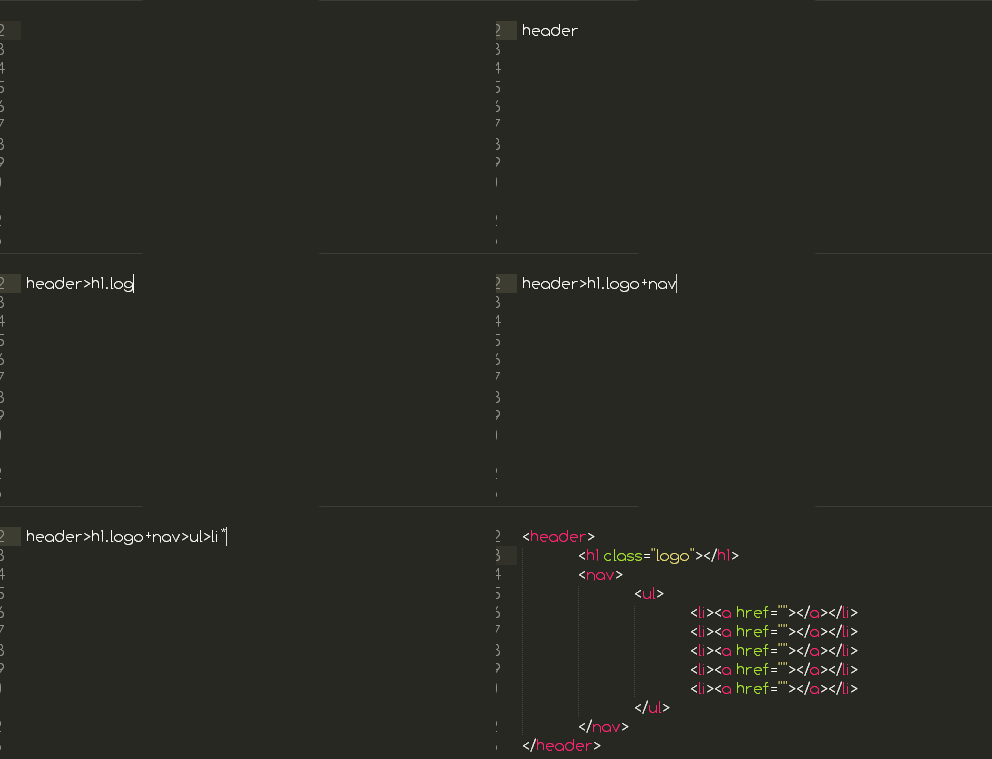
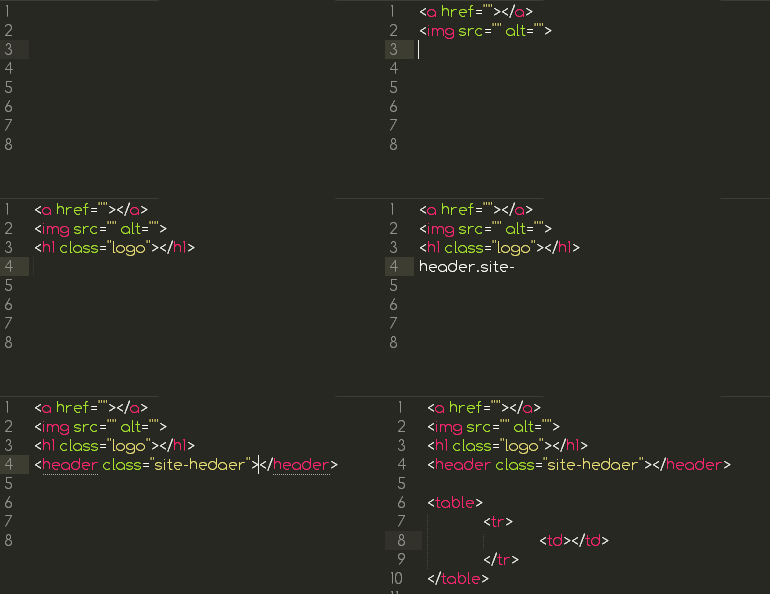
Emmet uses CSS-like selector syntax, You write CSS-like abbreviations, place your cursor at the end of abbreviation and then press Tab, Ctrl+E or any other keyboard key configured to expand abbreviations into actual HTML code. Emmet expands a into <a href=""></a>. You can also specify values, but if you don’t specify values, <a> will produce <a href=""></a> with tab stops inside each empty attribute. You can insert a target URL and hit Tab to go to the next edit point, where you can insert the next desired value.
Let’s see another example. If you write
div#header>h1.logo>a{site Name}You will have following code:
<div id="header">
	<h1 class="logo"><a href="">site Name</a></h1>
</div>
Expand Abbreviation Function
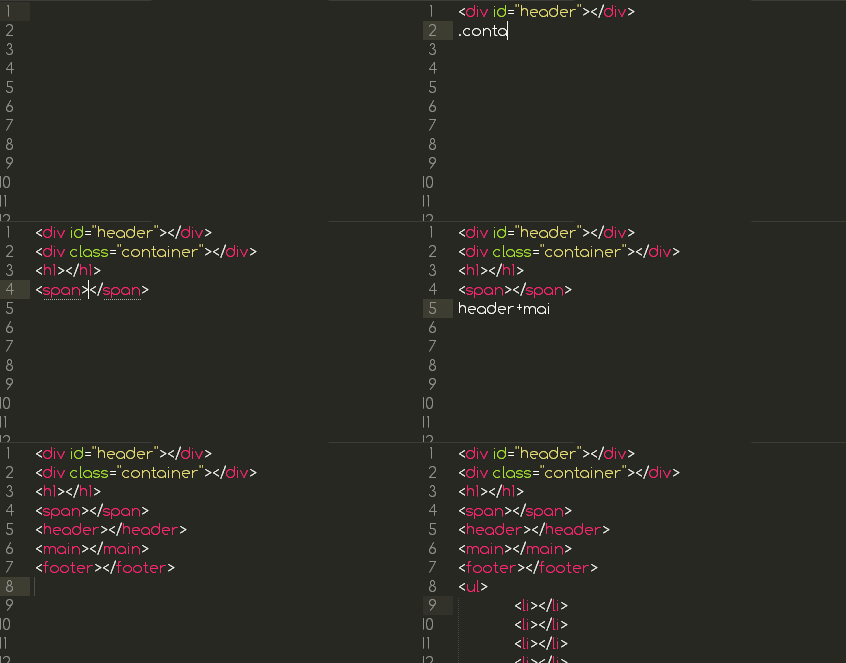
Here is a list of some supported operators.
-
Element : (Div,p,span)
- Type the element name and hit Tab to expand.
-
divwill be expanded to<div></div>. -
Element with id (div#header,E#id)
-
#is used to apply id’s to any element. -
Element with class(div.container, aside.sidebar)
-
.is used to apply classes to any element. -
Child elementdiv.header>div.main>.post
-
>is used to create child elements. -
Sibling Elements E+N(h1+h2)
-
+sign is used to create sibling elements. -
Multilpication of Elementsli*5
-
*symbol will create defined multiple numbers of any element. Useful to create list items. -
Item numberingli.item$*5
-
$symbol create item number. You can use it with*to create multiple items with numbering. - Climb-up: ^ : header>#main^footer
- With
^operator, you can climb one level up the tree and change context where following elements should appear: - Grouping: ()
-
{}Parentheses can be used for grouping sub-trees in complex abbreviations. - Adding text {} : E{text}
{}is used to add text to an element.
Emmet also offers some more great features that I will discuss in detail later.
CSS Abbreviations
While Emmet abbreviations are good for generating HTML, XML or any other structured markup, they are also very useful for CSS. Emmet provides you with shorthand for CSS properties. For CSS syntax, Emmet has many predefined snippets for properties. you can expand the bd abbreviation to get a border: ; snippet, and br for border-right: ;. You can also specify a value for this property. Just type bl:10 for border-left: 10px;.
If you want to specify multiple values, use a hyphen to separate them: m10-20 expands to margin: 10px 20px;. To specify negative values, precede the first value with a hyphen and all the rest with double hyphens: m-10--20 expands to margin: -10px -20px;
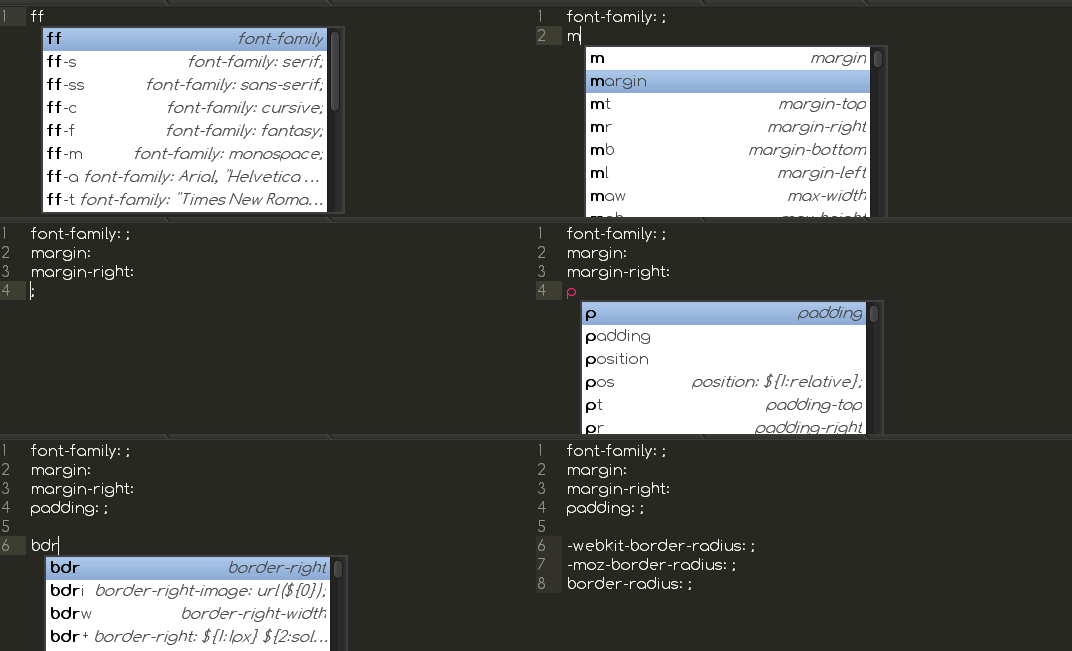
Actions and keyboard shortcuts
Emmet offers many useful and timesaving actions and keyboard shortcuts. Emmet offers unique tools that can greatly improve your editing experience, and is very helpful when you have to edit your HTML and CSS code to fix bugs and add new features. Some of Emmet’s actions are useful for editing existing HTML code, such as the Wrap with Abbreviation function. With this function you can wrap your navigation items in a navigation menu.
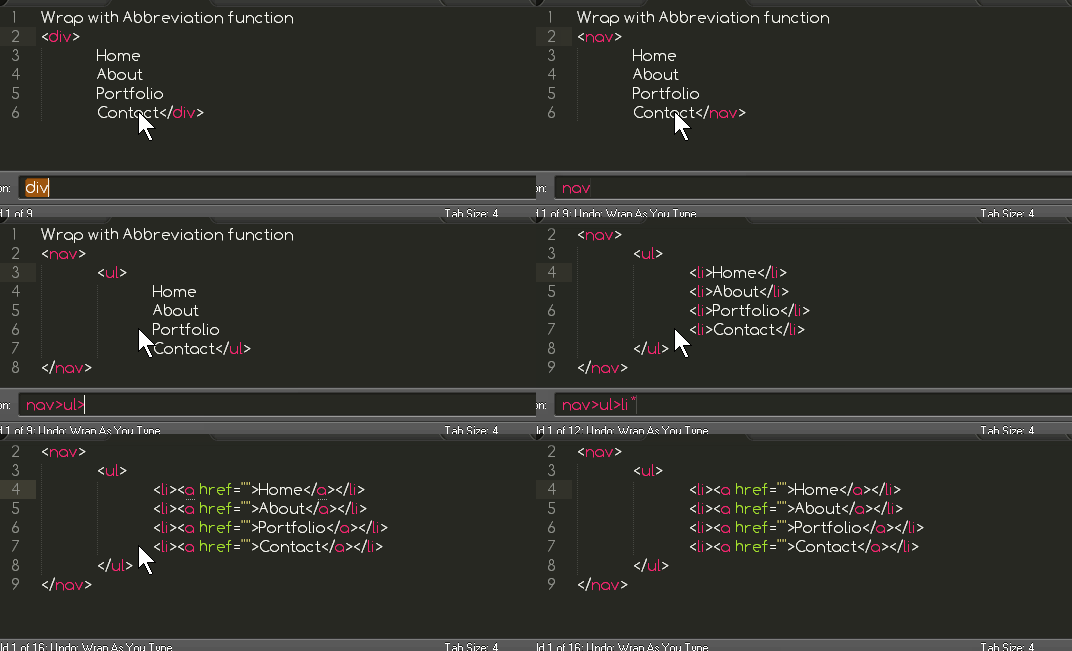
Some other available actions include:
- Expand Abbreviation
- Match Tag Pair
- Go to Matching Pair
- Go to Edit Point
- Update Image Size
We will learn about all of these actions, and more, in forthcoming Parts 2, 3 and 4 of this series.
Frequently Asked Questions (FAQs) about Mastering Emmet
How can I use Emmet with Visual Studio Code?
Emmet is built right into Visual Studio Code, and you don’t need to install any additional plugins to use it. To use Emmet in Visual Studio Code, you simply need to type the Emmet abbreviation and then press the Tab key. For example, typing ‘ul>li’ and then pressing Tab will automatically expand to ‘
What are some useful Emmet cheat codes for writing HTML and CSS faster?
Emmet provides a wide range of abbreviations that can help you write HTML and CSS code faster. For example, ‘!’ expands to a basic HTML boilerplate, ‘ul>li*5’ creates an unordered list with five list items, and ‘.header’ creates a div with the class of ‘header’. In CSS, ‘m10’ expands to ‘margin: 10px;’, ‘p+’ expands to ‘padding: ;’, and ‘ffv’ expands to ‘font-family: Verdana;’. These are just a few examples of the many Emmet cheat codes available.
How can I customize Emmet settings?
Emmet settings can be customized in the settings.json file in Visual Studio Code. You can access this file by going to File > Preferences > Settings and then searching for ‘Emmet’. Here, you can customize various Emmet settings such as the trigger key, the syntax profiles, and the variables used in Emmet abbreviations.
What is the use of Emmet in web development?
Emmet is a productivity tool for web developers that allows you to write HTML and CSS code faster and more efficiently. It provides a range of abbreviations and snippets that can be expanded into full pieces of code, saving you the time and effort of typing out each piece of code manually. Emmet also supports a range of different file types, including HTML, CSS, JavaScript, and XML, making it a versatile tool for web development.
How can I use Emmet with other code editors?
In addition to Visual Studio Code, Emmet can also be used with a range of other code editors, including Sublime Text, Atom, and Brackets. To use Emmet with these editors, you will need to install the Emmet plugin for the respective editor. Once the plugin is installed, you can use Emmet abbreviations and snippets in the same way as in Visual Studio Code.
Can I create my own Emmet snippets?
Yes, you can create your own Emmet snippets. This can be done in the snippets.json file in Visual Studio Code. Here, you can define your own snippets by specifying the abbreviation, the type of file the snippet should be used in, and the code that the snippet should expand to.
How can I use Emmet for responsive web design?
Emmet can be a great tool for responsive web design. It provides a range of abbreviations and snippets for creating responsive layouts, such as ‘m+’ for adding media queries, ‘f+’ for adding flexbox properties, and ‘g+’ for adding grid properties. These abbreviations can help you write responsive CSS code faster and more efficiently.
How can I use Emmet for writing JavaScript code?
While Emmet is primarily used for writing HTML and CSS code, it can also be used for writing JavaScript code. Emmet provides a range of abbreviations and snippets for JavaScript, such as ‘f+’ for creating a function, ‘v+’ for creating a variable, and ‘c+’ for creating a console.log statement. These abbreviations can help you write JavaScript code faster and more efficiently.
Can I use Emmet with JSX?
Yes, you can use Emmet with JSX. To do this, you will need to configure your code editor to recognize JSX syntax. In Visual Studio Code, this can be done by adding the following line to your settings.json file: “emmet.includeLanguages”: {“javascript”: “javascriptreact”}. Once this is done, you can use Emmet abbreviations and snippets in your JSX code in the same way as in HTML and CSS code.
How can I improve my productivity with Emmet?
There are several ways to improve your productivity with Emmet. One way is to learn and use the Emmet abbreviations and snippets, which can help you write code faster and more efficiently. Another way is to customize your Emmet settings to suit your coding style and preferences. You can also create your own Emmet snippets for pieces of code that you use frequently. Finally, you can use Emmet with a code editor that supports Emmet, such as Visual Studio Code, to take full advantage of Emmet’s features.
Tahir Taous is founder of Just Learn WordPress, a training site where you can learn how to create and manage websites with WordPress, WordPress essential training, theme development courses free video tutorials and articles.
Published in
·Canvas & SVG·Design·Design & UX·HTML·HTML & CSS·Illustration·UI Design·September 16, 2015

