
This is the first installment of a series of articles on SitePoint covering the API libraries that constitute Google Play Services. Each article in the series will be self contained, so you don’t have to read the others to follow along.
The Google Play Services APIs we’ll cover include:
- Face Detection
- Barcode Scanner
- Location and Context
- Analytics
- AdMob
- Maps
- Identity
- Play Games Services
Key Takeaways
- The Mobile Vision API, part of Google Play Services 7.8, enhances Android’s ability to detect human faces in images and videos using advanced object recognition techniques.
- The Face API specifically focuses on detecting facial landmarks such as eyes, nose, and mouth, and can assess facial expressions to determine if a person is smiling or if their eyes are open.
- The API requires Android 2.3 (Gingerbread) or higher, and while it supports face detection, it does not support face recognition, meaning it cannot determine if two faces are the same person across different images.
- To implement face detection, developers need to add specific dependencies in their Android project’s build.gradle file and ensure their device or emulator supports Google Play Services.
- For real-time applications, developers can utilize the CameraSource class from Google Play Services to perform face detection directly from camera feeds, enhancing the functionality of applications that require dynamic face detection.
Introduction to the Mobile Vision API
The recent release of Google Play Services 7.8 added new Mobile Vision APIs which provide a framework for finding objects in photos and videos. The framework includes detectors, which locate and describe visual objects in images or video frames, and an event driven API that tracks the position of those objects in video.
Currently, the Mobile Vision API includes face and barcode detectors, which can apply separately or together. In this article, we’ll look at the Face API which can find human faces in images, live streams and videos. It can find and track positions of facial landmarks such as eyes, nose, and mouth, and provide information about the state of facial features e.g. are the eyes open, is there a smile, etc.
Note
To run the app, you should have a device that runs Android 2.3 (Gingerbread) or higher and includes the Google Play Store. This means that unless you have installed Google Apps on your virtual device, you won’t be able to test the code on the emulator. The default Android emulator doesn’t support installing Google Apps on the device, but if you use an emulator like Genymotion you will be able to (despite the team discontinuing support for Google Apps).
Face Detection
Face detection is not a new feature on Android. Previously it was possible to perform face detection using the FaceDetector.Face API introduced in Android API level 1. The face detection framework provided by the Mobile Vision API is an improvement of this API.
You should note that at the moment, the Google Face API only provides functionality for face detection and not face recognition. It can detect the presence of human faces in an image or video, but it cannot determine if two faces correspond to the same person. It can infer from changes in the position frame to frame that faces in consecutive frames of video are the same face. If a face leaves the field of view and re-enters, it isn’t recognized as a previously detected face.
To get started with the API, create a new project named FaceDetectionDemo select the defaults in the Next screens of the Android Studio project creation wizard, selecting API level 15. The Mobile Vision API is backward compatible for all devices that support Google Play Services (i.e. Android 2.3 Gingerbread and higher).
Find the completed project here.
Add the following dependency to the build.gradle(Module: app) file.
compile 'com.google.android.gms:play-services:7.8.0'Sync the gradle files, the Gradle console may require you to download the library.
Download the images that we’ll use in the tutorial.
In the res folder, create a new Android Resource Directory. Set its Directory Name to raw and the Resource Type to also raw. Paste the 3 downloaded images to this res/raw directory.
In MainActivity.java change the onCreate(Bundle) method as shown.
@Override
protected void onCreate(Bundle savedInstanceState) {
    super.onCreate(savedInstanceState);
    setContentView(R.layout.activity_main);

    InputStream stream = getResources().openRawResource(R.raw.image01);
    Bitmap bitmap = BitmapFactory.decodeStream(stream);

    FaceDetector detector = new FaceDetector.Builder(getApplicationContext())
            .setTrackingEnabled(false)
            .build();

    // Create a frame from the bitmap and run face detection on the frame.
    Frame frame = new Frame.Builder().setBitmap(bitmap).build();
    SparseArray<Face> faces = detector.detect(frame);

    TextView faceCountView = (TextView) findViewById(R.id.face_count);
    faceCountView.setText(faces.size() + " faces detected");

    detector.release();

}
Add an id to the TextView that is in the generated activity_main.xml file as shown.
android:id="@+id/face_count"Run the app and you should see the number of faces found in the image.
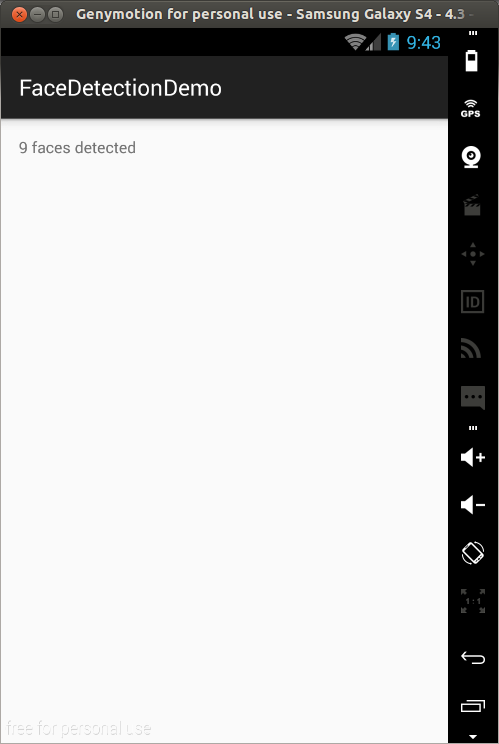
Actually, if you ran the app, you probably got a wrong result from the above. We’ll soon see why, first lets look at the code just run.
We first create a Bitmap from the image labelled image01.jpg. Then we create a detector for finding faces in a supplied image. The FaceDetector is created via an associated builder class, specifying the relevant detection options. In the above example we set tracking to false which is recommended for detection with unrelated individual images (as opposed to video or a series of consecutively captured still images). For detection of unrelated individual images, this will give a more accurate result. For detection on consecutive images (e.g. live video), tracking gives a more accurate (and faster) result.
The face detector can run with low resolution images (e.g. 320×240). Running face detection on low resolution images is faster than high resolution images. Keep in mind that at lower resolutions, the face detector may miss some smaller faces due to having less detail.
We then create a frame from the bitmap and run face detection synchronously on the frame.
Next we change the text of the TextView in the view layout with number of faces detected.
When finished with the detector, release it to free native resources.
The first time an app using Face API runs on a device, GMS downloads a native library to the device. Usually this completes before the app runs for the first time. But if that download has not yet completed, then the call to detect faces will not detect any faces. So you might have run the app and got an output of 0 detected faces
.
You can use isOperational() to check if the required native library is available and take some action if it isn’t, like notify the user. You could, for example, do something like the below.
if (!detector.isOperational()) {
    Toast.makeText(this, "Face detector dependencies are not yet available.", Toast.LENGTH_SHORT).show();
}
The detector will automatically become operational once the download completes. If you got the wrong number of faces on your app, running it again should give a correct count.
A better solution is to add the vision functionality dependency to your project’s AndroidManifest.xml file to indicate to the installer that it should download the dependency on application install.
Add the following to the manifest file as a child of the application tag.
<meta-data android:name="com.google.android.gms.vision.DEPENDENCIES" android:value="face"/>If you have used Google Play Services in your app before, you might be used to adding the following to the manifest file which sets the version number of Google Play Services your app uses. But as of version 7.0 of Google Play Services, if you are using Gradle, it’s included automatically.
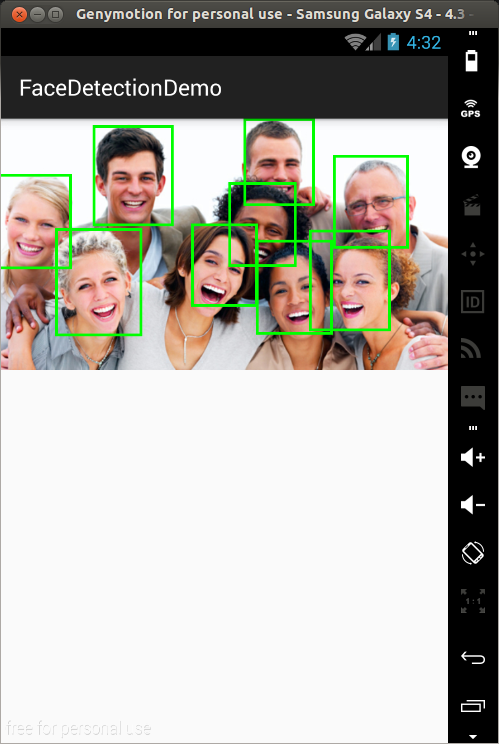
<meta-data android:name="com.google.android.gms.version" android:value="@integer/google_play_services_version"/>To get a visual of the detected faces, we’ll create a custom view to show the image and draw on it to indicate areas that contain a face.
Create a class that extends View named CustomView. Modify it as shown (the code is based on the Google sample FaceView).
package com.echessa.facedetectiondemo;

import android.content.Context;
import android.graphics.Bitmap;
import android.graphics.Canvas;
import android.graphics.Color;
import android.graphics.Paint;
import android.graphics.Rect;
import android.util.AttributeSet;
import android.util.SparseArray;
import android.view.View;

import com.google.android.gms.vision.face.Face;

/**
 * Created by echessa on 8/31/15.
 */
public class CustomView extends View {

    private Bitmap mBitmap;
    private SparseArray<Face> mFaces;

    public CustomView(Context context, AttributeSet attrs) {
        super(context, attrs);
    }

    /**
     * Sets the bitmap background and the associated face detections.
     */
    void setContent(Bitmap bitmap, SparseArray<Face> faces) {
        mBitmap = bitmap;
        mFaces = faces;
        invalidate();
    }

    /**
     * Draws the bitmap background and the associated face landmarks.
     */
    @Override
    protected void onDraw(Canvas canvas) {
        super.onDraw(canvas);
        if ((mBitmap != null) && (mFaces != null)) {
            double scale = drawBitmap(canvas);
            drawFaceRectangle(canvas, scale);
        }
    }

    /**
     * Draws the bitmap background, scaled to the device size.  Returns the scale for future use in
     * positioning the facial landmark graphics.
     */
    private double drawBitmap(Canvas canvas) {
        double viewWidth = canvas.getWidth();
        double viewHeight = canvas.getHeight();
        double imageWidth = mBitmap.getWidth();
        double imageHeight = mBitmap.getHeight();
        double scale = Math.min(viewWidth / imageWidth, viewHeight / imageHeight);

        Rect destBounds = new Rect(0, 0, (int)(imageWidth * scale), (int)(imageHeight * scale));
        canvas.drawBitmap(mBitmap, null, destBounds, null);
        return scale;
    }

    /**
     * Draws a rectangle around each detected face
     */
    private void drawFaceRectangle(Canvas canvas, double scale) {
        Paint paint = new Paint();
        paint.setColor(Color.GREEN);
        paint.setStyle(Paint.Style.STROKE);
        paint.setStrokeWidth(5);

        for (int i = 0; i < mFaces.size(); ++i) {
            Face face = mFaces.valueAt(i);
            canvas.drawRect((float)(face.getPosition().x * scale),
                (float)(face.getPosition().y * scale),
                (float)((face.getPosition().x + face.getWidth()) * scale),
                (float)((face.getPosition().y + face.getHeight()) * scale),
                paint);
        }
    }

}
The above overrides the View’s onDraw() method and makes a call to drawFaceRectangle() which draws a rectangle around each detected face.
Change activity_main.xml as shown.
<RelativeLayout xmlns:android="http://schemas.android.com/apk/res/android"
            xmlns:tools="http://schemas.android.com/tools"
            android:layout_width="match_parent"
            android:layout_height="match_parent"
            tools:context=".MainActivity">

    <com.echessa.facedetectiondemo.CustomView
        android:id="@+id/customView"
        android:layout_width="match_parent"
        android:layout_height="match_parent" />

</RelativeLayout>
In the code above we removed the previous TextView and created a component of the custom view.
In MainActivity modify onCreate(Bundle) as shown.
@Override
protected void onCreate(Bundle savedInstanceState) {
    super.onCreate(savedInstanceState);
    setContentView(R.layout.activity_main);

    InputStream stream = getResources().openRawResource(R.raw.image01);
    Bitmap bitmap = BitmapFactory.decodeStream(stream);

    FaceDetector detector = new FaceDetector.Builder(getApplicationContext())
            .setTrackingEnabled(false)
            .build();

    // Create a frame from the bitmap and run face detection on the frame.
    Frame frame = new Frame.Builder().setBitmap(bitmap).build();
    SparseArray<Face> faces = detector.detect(frame);

    CustomView overlay = (CustomView) findViewById(R.id.customView);
    overlay.setContent(bitmap, faces);

    detector.release();

}
Above we instantiate a CustomView object and call its setContent() method, passing in the bitmap and the array of detected Faces.
Run the app and you should see a green rectangle marking each detected face.
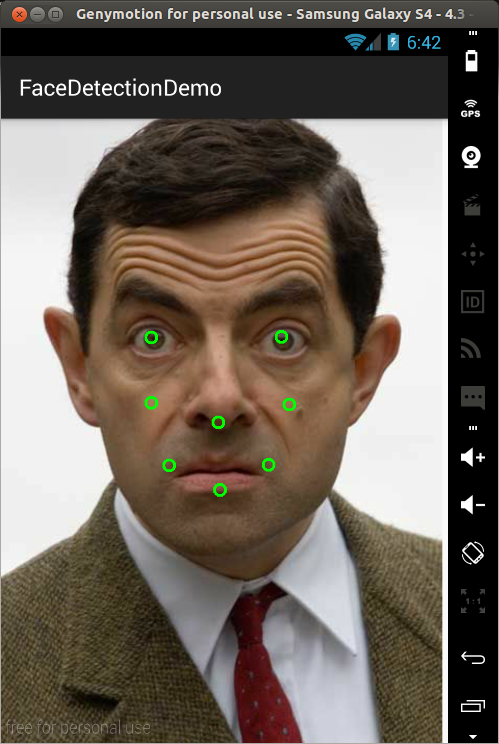
Landmarks
A landmark is a point of interest within a face. The left eye, right eye, and nose base are all examples of landmarks. The Face API provides the ability to find landmarks on a detected face.
In MainActivity, change the statement that creates a FaceDetector as shown.
FaceDetector detector = new FaceDetector.Builder(getApplicationContext())
            .setTrackingEnabled(false)
            .setLandmarkType(FaceDetector.ALL_LANDMARKS)
            .build();
Still in onCreate(), change the statement that opens the resource file as shown.
InputStream stream = getResources().openRawResource(R.raw.image02);Here we use image02.jpg instead of image01.jpg. The same image could be used, but since image01.jpg contains more faces, there will be a lot of markings when we mark all detected landmarks. image02.jpg contains one face and so it will be better suited for this use.
Add the following function to CustomView.
/**
 * Draws a small circle for each detected landmark, centered at the detected landmark position.
 *
 * Note that eye landmarks are defined to be the midpoint between the detected eye corner
 * positions, which tends to place the eye landmarks at the lower eyelid rather than at the
 * pupil position.
 */
private void drawFaceAnnotations(Canvas canvas, double scale) {
    Paint paint = new Paint();
    paint.setColor(Color.GREEN);
    paint.setStyle(Paint.Style.STROKE);
    paint.setStrokeWidth(5);

    for (int i = 0; i < mFaces.size(); ++i) {
        Face face = mFaces.valueAt(i);
        for (Landmark landmark : face.getLandmarks()) {
            int cx = (int) (landmark.getPosition().x * scale);
            int cy = (int) (landmark.getPosition().y * scale);
            canvas.drawCircle(cx, cy, 10, paint);
        }
    }

}
The above iterates through the landmarks on a detected face and draws a mark at the point of the landmark.
Call the above method in onDraw() instead of the drawFaceRectangle() function.
drawFaceAnnotations(canvas, scale);Run the app and you should see the different Landmarks of the detected face. The Landmarks mark the eyes, nose, mouth and cheeks.
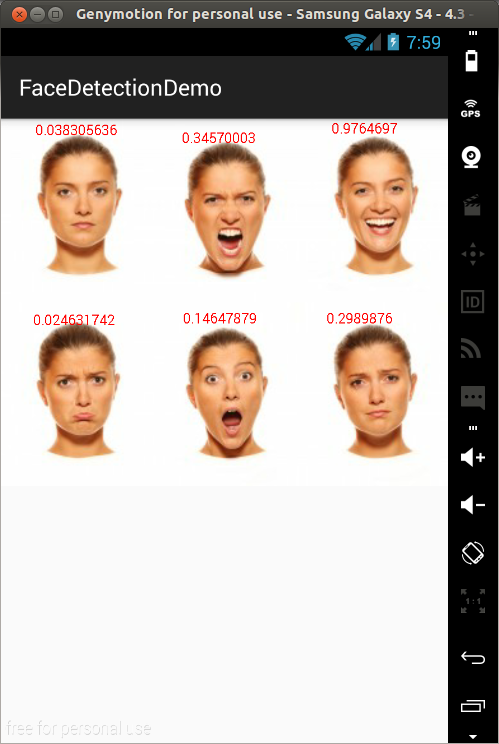
Classification
Classification determines whether a certain facial characteristic is present. For example, a face can be classified with regards to whether its eyes are open or closed. Another example is whether the face is smiling or not.
To detect facial characteristics, change the statement that creates a FaceDetector in MainActivity as follows.
FaceDetector detector = new FaceDetector.Builder(getApplicationContext())
            .setTrackingEnabled(false)
            .setLandmarkType(FaceDetector.ALL_LANDMARKS)
            .setClassificationType(FaceDetector.ALL_CLASSIFICATIONS)
            .build();
You can remove the setLandmarkType option if you aren’t going to use landmarks. This will help in processing speed.
Still in onCreate(), change the image used.
InputStream stream = getResources().openRawResource(R.raw.image03);In CustomView add the following function to the class.
/**
 * Detects characteristics of a face
 */
private void detectFaceCharacteristics(Canvas canvas, double scale) {
    Paint paint = new Paint();
    paint.setColor(Color.RED);
    paint.setStyle(Paint.Style.FILL);
    paint.setStrokeWidth(1);
    paint.setTextSize(25.0f);

    for (int i = 0; i < mFaces.size(); ++i) {
        Face face = mFaces.valueAt(i);
        float cx = (float)(face.getPosition().x * scale);
        float cy = (float) (face.getPosition().y * scale);
        canvas.drawText(String.valueOf(face.getIsSmilingProbability()), cx, cy + 10.0f, paint);
    }
}
We use drawText() to draw text onto the canvas. We use face.getIsSmilingProbability() which returns a value between 0 and 1 giving a probability that the face is smiling
Call this function in onDraw() instead of calling drawFaceAnnotations().
detectFaceCharacteristics(canvas, scale);Run the app and you should see the smiling probability of the different faces. As you can see, the grinning face on the top right has the highest probability.
Face Tracking
Face tracking extends face detection to video sequences. Any face appearing in a video for any length of time can be tracked. That is, faces detected in consecutive video frames can be identified as being the same person. Note that this is not a form of face recognition, this mechanism just makes inferences based on the position and motion of the face(s) in a video sequence. We won’t look at this in this tutorial, but you can read the official guides for more information.
Conclusion
We’ve looked at some of the features of the Face API. To find out more about the Mobile Vision API, you can find code for sample apps that use the API here.
Frequently Asked Questions (FAQs) about Face Detection in Android with Google Play Services
What are the prerequisites for implementing face detection in Android with Google Play Services?
To implement face detection in Android with Google Play Services, you need to have a few things in place. First, you need to have the Google Play Services SDK installed in your Android Studio. This SDK provides you with the necessary APIs for face detection. Secondly, you need to have an Android device or emulator running on Android 4.3 (Jelly Bean) or higher, as the face detection API is only available on these versions. Lastly, you need to have a basic understanding of Android development, including knowledge of Java or Kotlin programming languages.
How can I handle face detection in landscape mode?
Handling face detection in landscape mode can be a bit tricky as the face detection API in Google Play Services is designed to work best with portrait mode images. However, you can overcome this by rotating the image data by 90 degrees before passing it to the face detector. This way, the face detector will still be able to accurately detect faces even in landscape mode.
Can I detect multiple faces at once using Google Play Services?
Yes, the face detection API in Google Play Services is capable of detecting multiple faces in a single image. It provides a list of Face objects, each representing a face that was detected in the image. You can iterate over this list to get information about each detected face, such as its position, orientation, and whether it’s smiling or not.
How can I improve the accuracy of face detection?
The accuracy of face detection can be improved by using high-quality images and ensuring good lighting conditions. The face detection API in Google Play Services works best with clear, well-lit images where faces are not obscured or distorted. Additionally, you can adjust the ‘setMinFaceSize’ parameter of the FaceDetector.Builder class. A higher value will result in higher accuracy but slower processing time, while a lower value will result in faster processing time but lower accuracy.
Is it possible to detect facial features with Google Play Services?
Yes, the face detection API in Google Play Services can detect facial features such as eyes, nose, mouth, and ears. It provides the positions of these features as well as their contours. This can be useful for applications that need to apply effects or filters to these features.
How can I handle face detection in real-time applications?
For real-time applications, you can use the CameraSource class provided by Google Play Services. This class allows you to get preview frames from the camera and pass them directly to the face detector. This way, you can perform face detection in real-time as the camera feed is being displayed.
Can I use Google Play Services for face recognition?
No, the face detection API in Google Play Services is designed for face detection, not face recognition. It can detect faces in an image and provide information about them, but it cannot identify who the faces belong to. For face recognition, you would need to use a different technology, such as machine learning.
How can I handle errors during face detection?
The face detection API in Google Play Services provides the ‘onFailure’ method, which is called when an error occurs during face detection. You can override this method in your code to handle errors. Common errors include not having the Google Play Services SDK installed or the device not having a suitable camera.
Can I use Google Play Services for face detection in non-Android platforms?
No, the face detection API in Google Play Services is specifically designed for Android. It uses Android-specific classes and methods, and it requires the Google Play Services SDK, which is only available for Android. For non-Android platforms, you would need to use a different face detection technology.
How can I test the face detection feature in my app?
You can test the face detection feature in your app by using the Android emulator provided by Android Studio. You can load images into the emulator and run your app to see how it performs face detection. Alternatively, you can test your app on a physical Android device by installing the APK file on the device.