
Images can cause major headaches for web app developers, especially if your app allows users to upload their own images. They are problematic for two reasons:
Images are Bulky
Compared to most other types of data you store (other than video), images take the most space.
Images Need to be Resized
For both aesthetic and performance reasons, images must be resized for use in different parts of your application. You need thumbnails, headers, inline-floats, and detailed zoom versions of your images.
In the past, I’ve developed all kinds of solutions to solve this problem. My original solution was to store 10 different sizes of every image, each created at the time of upload. That worked okay, but it was a killer on disk space and it wasn’t always as flexible as I needed it to be. If I needed a new image size I had to resize every existing image in the system. What a pain.
 Using the original image obviously won’t work. It’s just way too big.
With the solution I will demonstrate, all you need to do is reference following URL in your source:
Using the original image obviously won’t work. It’s just way too big.
With the solution I will demonstrate, all you need to do is reference following URL in your source:
 That was easy! Simply prefixing the name of the image with “maxD_80” automatically resized it down to a maximum width of 80 pixels on its longest side.
That’s okay, but what if you want to use a square thumbnail as background image and you want to make sure wide or tall images don’t have white spaces on the edge? Easy solution:
That was easy! Simply prefixing the name of the image with “maxD_80” automatically resized it down to a maximum width of 80 pixels on its longest side.
That’s okay, but what if you want to use a square thumbnail as background image and you want to make sure wide or tall images don’t have white spaces on the edge? Easy solution:
 Now we’re talking! Using “minD_80” instead of “maxD_80” results in an image that is as small as possible, but keeping the smallest side at least 80 pixels. Now it looks perfect!
 Find the CloudFront tab in the management console, then click “Create Distribution”:
 The Create Distribution Wizard will pop-up. The entries you make here are important. First, select “Custom Origin”. In the Origin DNS name, enter your domain name where the imagestore directory and image.php file are hosted. Under Protocol Policy, I recommend selecting Match Viewer.
 You can breeze through the next two sections (Distribution Details and Review). After that you just need to wait about 15 minutes for AWS to create your distribution.
Once you create your distribution, you’ll get a DNS name to use. It will look like: abcdefg1234.cloudfront.net
Now it’s time to complete the solution. Instead of creating images like this:
You can breeze through the next two sections (Distribution Details and Review). After that you just need to wait about 15 minutes for AWS to create your distribution.
Once you create your distribution, you’ll get a DNS name to use. It will look like: abcdefg1234.cloudfront.net
Now it’s time to complete the solution. Instead of creating images like this:
 You’ll now reference your images like this:
Key Takeaways
- CloudFront provides a dynamic solution for resizing images in web applications. By simply prefixing the image name with a command like “maxD_80” or “minD_80”, the image can be automatically resized to the specified pixel dimensions.
- The image resizing process can be resource-intensive and could potentially slow down your server. To address this, CloudFront can cache resized images, reducing the load on your server and delivering content quickly to users.
- For further improvement, developers can handle 404s, add more filters, integrate with Amazon S3, add security measures, and set up the system to handle other image formats. Using CloudFront with these enhancements can provide a flexible, efficient, and secure method for managing images in web applications.
A Better Solution
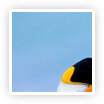
With CloudFront, there’s a better way. I’ll show you how to put it together, but first I want to show you how you’ll use it (that’s the fun part, right?) Here’s the scenario: You upload an image to your server called “Penguins.jpg” that is 1024 x 768 pixels. You want to use that image as a thumbnail that’s 80 pixels square– what do you do?
Using the original image obviously won’t work. It’s just way too big.
With the solution I will demonstrate, all you need to do is reference following URL in your source:
<img src="//dynamiccdn.example.com/maxD_80/imagestore/Penguins.jpg" alt="" /><img src="//dynamiccdn.example.com/minD_80/imagestore/Penguins.jpg" alt="" />Cool… but how?
You’ll be surprised how simple the solution is– all thanks to cloud computing. Here’s what you’re going to need.- An Amazon Web Services account with CloudFront enabled
- A web server running Apache (you can do it on Windows too with some extra work)
- A little bit of PHP skill (Can you copy and paste?)
Web Server Setup
Directory: imagestore Start by creating a directory called “imagestore” in the root of your web. This is where you’re going to store all the “original” images. You can organize them any way you want within this folder. For now, put a few large jpg files in there for testing. .htaccess File You need to add a few lines in the .htaccess file in the root of your web (just create the file if it doesn’t exist):RewriteEngine On
RewriteCond %{QUERY_STRING} (.*)
RewriteRule ^([^/]*)/imagestore/(.*).(jpg|jpeg)$ image.php?format=$1&path=imagestore/$2.$3The Code
Let’s walk through it a step at a time. To keep things simple we’re going to assume all of your images are jpg format. All of the following code snippets go right in the image.php file you just created. Let’s start by picking up the querystring variables (format and path) being submitted by the rewrite rule we previously added to our .htaccess file:$path = $_GET['path'];
$formats = explode(',', $_GET['format']);$image = imagecreatefromjpeg($path);header("Content-Type: image/jpeg");
header("Cache-control: Public");
$headerTimeOffset = 60 * 60 * 24 * 30;
$headeExpire = "Expires: ".gmdate("D, d M Y H:i:s",time()+$headerTimeOffset)." GMT";
header ($headeExpire);foreach ($formats as $format) {
$image = formatImage($format, $image);
}imagejpeg($image, Null, 100);
imagedestroy($image);// Translates commands (like maxD_80 or minD_40) from your URL
// into the correct resampling functions.
function formatImage($format, $image) {
// Get the original image sizes.
$curW = imagesx($image);
$curH = imagesy($image);
// Split the format into parts separeted by "_"
$formatParts = explode("_", $format);
switch ($formatParts[0]) {
// If the format command is maxD, resize the image
// so that the largest side is the specified
// number of pixels ($formatParts[1])
case "maxD":
if ($curW > $curH) {
$ratio = $curH / $curW;
$newW = (int) maxProtect($formatParts[1]);
$newH = (int) (maxProtect($formatParts[1]) * $ratio);
} else {
$ratio = $curW / $curH;
$newW = (int) (maxProtect($formatParts[1]) * ratio);
$newH = (int) maxProtect($formatParts[1]);
}
$image = resizeImage($image, $newW, $newH);
break;
// If the format command is minD, resize the image
// so that the smallest side is the specified
// number of pixels ($formatParts[1])
case "minD":
if ($curW 800) $value = 800;
return $value;
}Time to Test
Simply browse to images on your web in the imagestore folder. Now, in your URL, add the prefix with a maxD or minD command. Remember that these commands require a value after them separated by an underscore. Example: maxD_55 So if your original image URL looks like this: http://yourownwebsite.com/imagestore/Penguins.jpg Your new URL will look like this: http://yourownwebsite.com/maxD_55/imagestore/Penguins.jpgWhat about the Cloud?
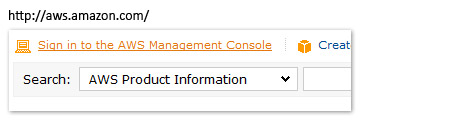
While it’s fun to dynamically create image sizes with simple changes to your image URL, it’s not practical to stop here. Image resizing is very processor-intensive and handing all the requests for all your images all the time will really bog down your server. CloudFront provides an extremely simple solution. It’s designed to allow you to easily distribute content with low latency via a global network of edge locations. In other words, it automatically takes the load off your server and puts your content closer (geographically) to your customers. We’re going to use CloudFront to keep cached versions of our resized images so our server only has to handle requests for new sizes periodically– not every time one needs to be served. Setting up CloudFront is a snap: Start by signing-in to your Amazon Web Services management console:
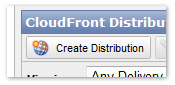
Find the CloudFront tab in the management console, then click “Create Distribution”:
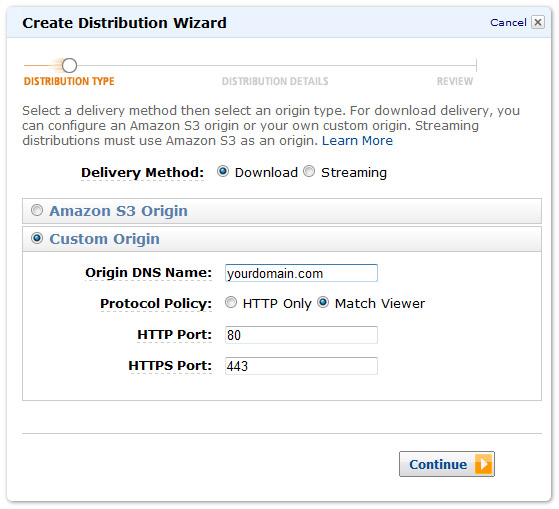
The Create Distribution Wizard will pop-up. The entries you make here are important. First, select “Custom Origin”. In the Origin DNS name, enter your domain name where the imagestore directory and image.php file are hosted. Under Protocol Policy, I recommend selecting Match Viewer.
You can breeze through the next two sections (Distribution Details and Review). After that you just need to wait about 15 minutes for AWS to create your distribution.
Once you create your distribution, you’ll get a DNS name to use. It will look like: abcdefg1234.cloudfront.net
Now it’s time to complete the solution. Instead of creating images like this:
 You’ll now reference your images like this:
<img src="//abcdefg1234.cloudfront.net/minD_80/imagestore/Penguins.jpg" alt="" />What’s Next?
There is still a lot you can do to make this system work better for your application. Here are a few ideas: Handle 404s Make sure your script is setup to handle cases where images are requested that don’t exist on your server. Handle other Image Formats Setup the system to handle jpegs, pngs, gifs, and any other image format you use. Add More Filters The full example below includes a bunch of useful filters that I’ve created, including examples of transforming your image to grayscale and adding pixelation effects. With php GD you have many available options. Check out ImageMagick for even more options for manipulating your images. Watermarks, Cropping, and more! This type of system has so many possibilities. Easily set it up to add a watermark to every image or crop images to a specific size ratio. Integrate with Amazon S3 Storing the originals on your server is okay to start, but really you should be using Amazon S3 or another cloud storage service to store your originals. Making this change ensures you never have to worry about backups or scalability. Use a CNAME Don’t like serving images from a cloudfront.net domain name? No problem, you can configure CloudFront to use your own domain like cdn.yourdomain.com. Add Security This type of system allows people to “play around” with your images. If someone is malicious, they could actually use this system to really bog down your server (DoS attack). You can prevent this in many different ways. My favorite way is to use encoding and encryption for the format part of the image URL. This adds a little bit of work, but it prevents people from being able to hit your server with unlimited requests for infinite sizes of your image. There are plenty of other ways to prevent abuse… the main thing is to remember that you need to put something in place.Have fun with it!
This solution has transformed the way I design and develop using images in web applications. I no longer have to worry about rigid scenarios for image sizes and formatting. I can design whatever I want on the front end, and I never have to worry about disk space, performance, or creating routines to transform images in bulk. Hopefully you will find this concept useful as well. If you have any suggestions on how to improve or enhance the system, please post your comments below. And of course, if you have questions– please ask!FAQs
What if I need to access the original version of my image? No problem! Just use any prefix. I like to use “o” for original. So my original image URL would look like this: http://dynamiccdn.example.com/o/imagestore/Penguins.jpg Why can’t I just use querystring variables after my image to specify formatting? That would be cool… but Amazon CloudFront ignores those variables. This example only works for jpg file. I love pngs more. What gives?? To keep the code as simple as possible, this example only handles jpg files. But you can tweak the script to handle any image format you may be using. Why do you reference your images starting with “//” instead of “http://”? Good question. Using “//” forces the URL to reference the same protocol (http or https) as the page the user is currently viewing. It’s really handy and prevents some browsers from popping up “unsecure content” warnings.Full Script Example
Here is the full working image.php script. It includes a lot of extra handy format options. The whole thing is less than 100 lines of code!$path = $_GET['path'];
$formats = explode(',', $_GET['format']);
$image = imagecreatefromjpeg($path);
header('Content-Type: image/jpeg');
header('Cache-control: Public');
$headerTimeOffset = 60 * 60 * 24 * 30;
$headeExpire = "Expires: " . gmdate ("D, d M Y H:i:s", time() + $headerTimeOffset) . " GMT";
header ($headeExpire);
foreach ($formats as $format) {
	$image = formatImage($format, $image);
}
imagejpeg($image, Null, 100);
imagedestroy($image);
function resizeImage($originalImage,$toWidth,$toHeight) {
$width = imagesx($originalImage);
$height = imagesy($originalImage);
$imageResized = imagecreatetruecolor($toWidth, $toHeight);
imagecopyresampled($imageResized, $originalImage, 0, 0, 0, 0, $toWidth, $toHeight, $width, $height);
return $imageResized;
}
function formatImage($format, $image) {
$curW = imagesx($image);
$curH = imagesy($image);
$formatParts = explode('_', $format);
switch ($formatParts[0]) {
case 'filterGray':
#### Make it Grayscale
imagefilter($image, IMG_FILTER_GRAYSCALE);
break;
case 'filterBlur':
#### Blur It Up
imagefilter($image, IMG_FILTER_GAUSSIAN_BLUR);
break;
case 'maxD':
#### Maximum Either Dimension - maxD_100
if ($curW > $curH) {
$ratio = $curH / $curW;
$newW = (int) maxProtect($formatParts[1]);
$newH = (int) (maxProtect($formatParts[1]) * $ratio);
} else {
$ratio = $curW / $curH;
$newW = (int) (maxProtect($formatParts[1]) * ratio);
$newH = (int) maxProtect($formatParts[1]);
}
$image = resizeImage($image, $newW, $newH);
break;
case 'minD':
#### Minimum Smallest Dimension - maxD_100
if ($curW 800) $value = 800;
return $value;
}David lives in the woods outside a small town in North Carolina with his wife and children. During the day he ventures into town to where he envisions, launches, and grows web and mobile products.
Related articles


Dynamic Menu Builder for Bootstrap 3: Menu Manager
Published in
·Bootstrap·Cloud·Miscellaneous·Open Source·Patterns & Practices·PHP·Programming·Web·June 20, 2014