
Key Takeaways
- Swift is a modern, clean, and safe programming language that is ideal for beginner developers and is the future for iOS and Mac application development.
- Building a ‘Hello World’ app in Swift involves creating a project in Xcode, designing an interface, writing Swift code, creating an action, and creating an outlet.
- The ‘Hello World’ app is a stepping stone to more complex programming in Swift, offering beginners a basic understanding of outlets and actions, and challenging them to add more components to the interface.
Back in June, Apple announced the Swift programming language and if you’re like me, it probably made you think
“Maybe now is the time I learnt how to develop applications for iOS devices and the Mac”
Of course, the real “best time” to learn Swift was a while ago, but there’s a lot to love about Swift compared to Objective-C:
- It’s modern.
- It’s clean.
- It’s safe.
It’s not without its flaws, it’s a young language after all, but those flaws are not so significant that a beginner developer shouldn’t start with Swift. Objective-C has years of real-world use, but Swift is the future.
To step into this future, we’re going to make a simple “Hello World” example in Swift, while covering the absolute basics of iOS development.
Let’s begin.
Prerequisites
For this tutorial, download the latest version of Xcode from the Mac App Store. This is the IDE we use to make iPhone and Mac applications. Also be aware that this tutorial is not a complete beginner’s guide to programming. I will assume a basic understanding of ideas like variables and functions.
Step 1: Create a Project
After opening Xcode, click on the “File” menu, hover over the “New” option, and then select “Project”. You should see something like this:
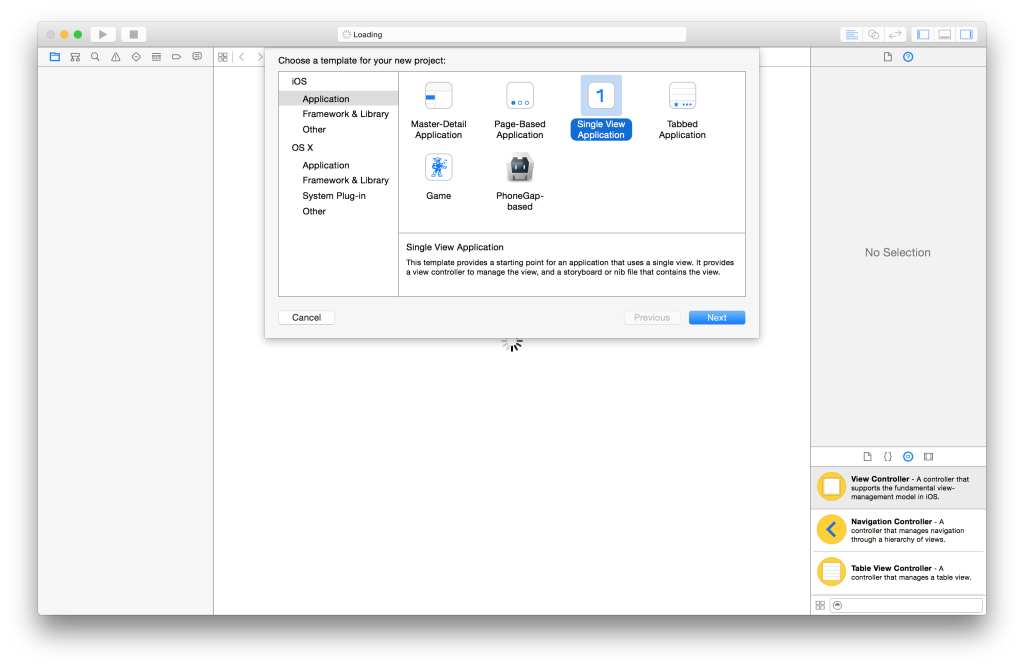
Here we see a number of templates for creating iOS applications. These templates all include some default code that can help save us time. We’ll choose the “Single View Application” option for now. This comes with the smallest amount of default code, making it the best option for learning the basics.
Click the “Next” button and fill out the following details:
- Product Name. This is the name of your application.
- Organization Name. Enter your name or your company’s name.
- Organization Identifier. Usually, this is formatted as a reverse domain name (so something like
com.davidturnbull). - Language. Set this to “Swift”.
- Devices. Set this to “iPhone”.
- Use Core Data. Leave this unchecked.
Click the “Next” button again. A dialog box will appear to save the project, so choose whatever location is convenient.
Once the project is saved, a range of different options will appear. This can make Xcode feel overwhelming, but rest assured, we can ignore most of what we see on the screen. For now we will only worry about the basics.
Step 2: Design an Interface
On the left side of the screen, we can see the “Navigator” pane. This is what we use to navigate the files in our project. There’s a few files that Xcode creates for us, but for the moment, click on the Main.storyboard file.
You should see the following:
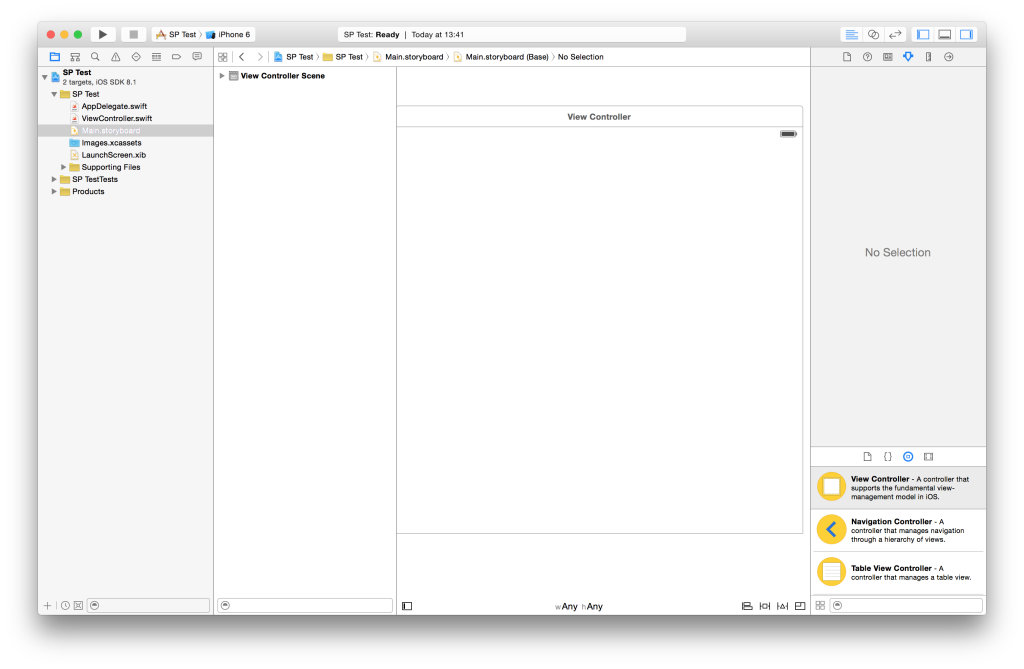
Here, we see a white “View Controller” square, and when making an iPhone application, a view controller is basically equivalent to a screen. So if you open the “Clock” app on an iPhone, we can see it has four main screens, and therefore at least four view controllers:
- World Clock
- Alarm
- Stopwatch
- Timer
This isn’t a perfect definition, but for the time being, it’s fine to assume that view controllers are a fancier name for screens.
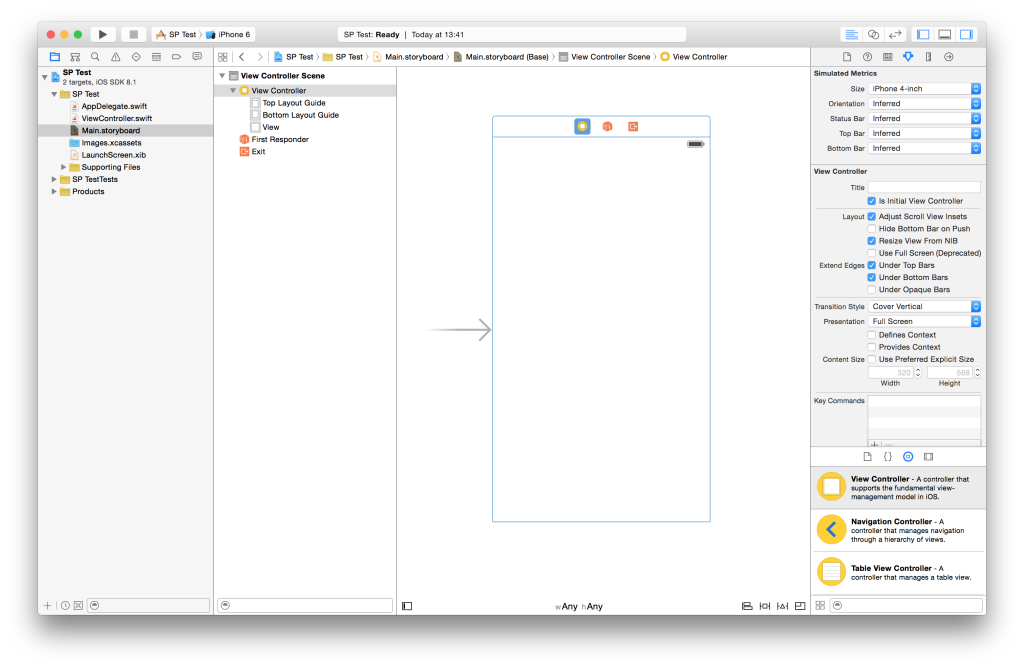
The weird thing about our view controller though is that it’s a square. But the iPhone itself isn’t square. What gives? Well, because different devices have different screen sizes, we are encouraged to design the interface so it can adapt to these different requirements.
To turn off this feature (it’s beyond the scope of this tutorial), complete the following steps:
- Click anywhere inside the white square to select the view controller.
- Select the “Attributes Inspector” from the right sidebar.
- Change the “Size” option to any of the “iPhone” options.
Because of this change, the view controller should now be rectangular.
At this point, we’ll make our interface mildly interesting by adding a button to the middle of it. To achieve this, take a look at the “Object Library”.
This library contains a range of objects we can drop into our interface, and if you scroll (or search) through the list, you’ll find a “Button” object:

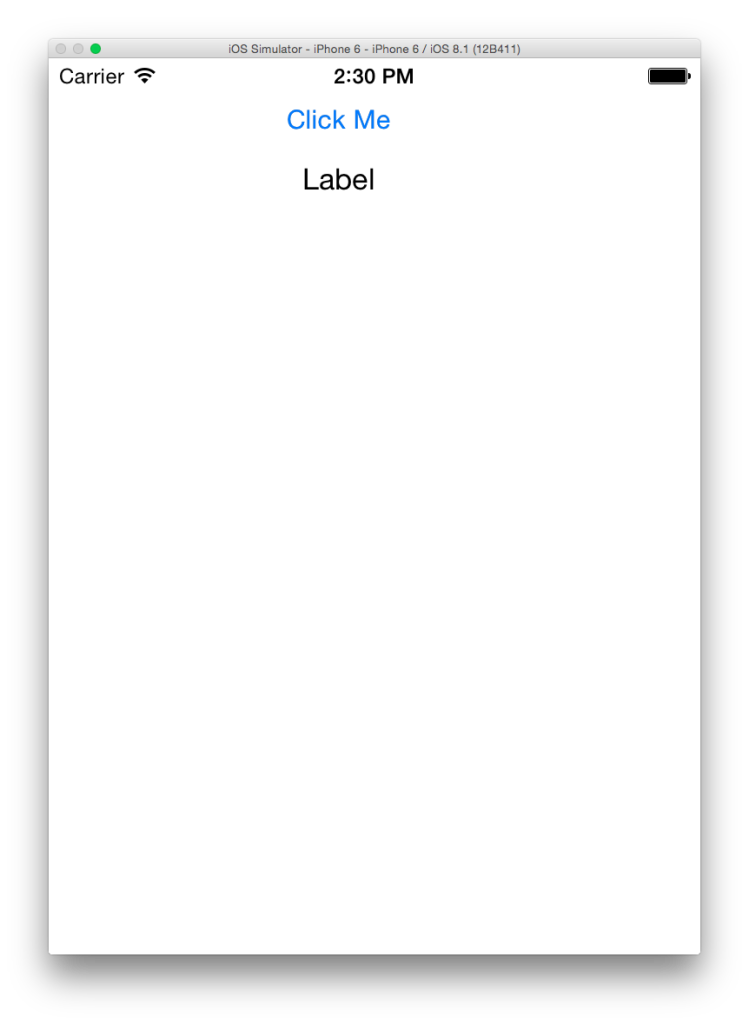
Drag this button from the library and into the view controller. You might see blue lines appear, which helps our designs adhere to Apple’s Human Interface Guidelines. To change the button’s text, double-click the button and change it to “Click Me”.
With this button in place, click on the “Player” arrow in the top-left corner of Xcode. This will run our application inside an iOS simulator, so we can get a better idea of how the application looks on a simulated device. After a few moments loading, you should see something like the below:
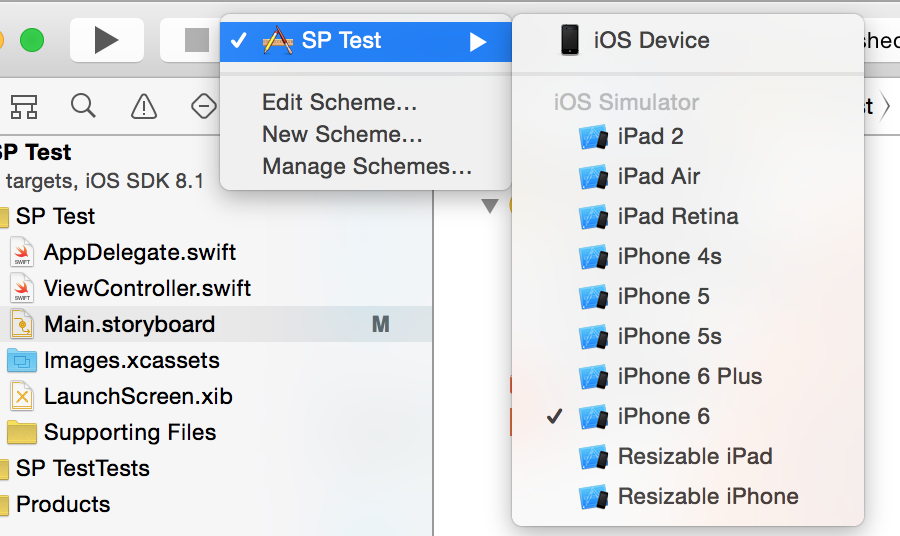
To test the application on a range of simulated devices, choose between the available options in the “schemes” menu next to the play button:
Step 3: Write Swift Code
To start writing some Swift code, open the “Assistant Editor”. You can find the button for this in the top-right corner of the screen. After clicking the button, a file with some code will appear. This is the ViewController.swift file, and it contains code that specifically relates to our view controller.
For the moment, ignore all of the code except for this part:
override func viewDidLoad() {

    super.viewDidLoad()

    // Do any additional setup after loading the view, typically from a nib.

}
Here, we have function called viewDidLoad, and this function will execute as soon as our view loads. Because our application only has one view, the code will execute as soon as the application loads.
To see this in action, write the following at the bottom of the function:
println("Hello world")
The println function is used to output something to the console. In this case, we’re outputting text with “Hello world”. Note that we haven’t used a semi-colon to end the statement. This is because Swift doesn’t expect a semi-colon. You can write them, but they’re unnecessary.
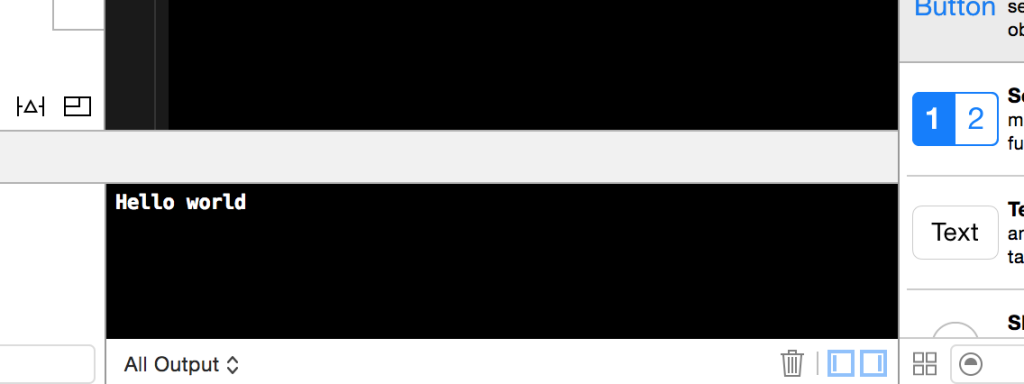
Run the simulator again and notice that, when the application loads, another pane appears at the bottom of the Xcode window. This is the “Debug” pane and, on the right side of it, we can see the console with our “Hello world” text.
Step 4: Create an Action
The next step is to make a message appear in the console when a user clicks on the “Click Me” button, rather than when the view loads.
To achieve this:
- Hold down the CTRL key.
- Click on the “Click Me” button.
- Drag the cursor into the
ViewController.swiftfile.
It’s best to drag the cursor just above the viewDidLoad function:
A window will appear with a range of options. We’ll change two of them:
- Set the “Connection” option to “Action”.
- Set the “Name” option to “buttonPressed”.
Here, we’re creating an action, and actions allow interface elements to respond to events. In this case, the “Click Me” button will respond to the “Touch Up Inside” event. (This is just a common “tap” event.)
As for the “Name” option, this allows us to reference the action. So our action will be referenced as buttonPressed.
After clicking the “Connect” button, the code below appear in the Swift file:
@IBAction func buttonPressed(sender: AnyObject) {

}
There’s a few things going on with this buttonPressed function but the important thing to know is that, when because we attached this action to our button, the code in this function will execute when the button is tapped.
To demonstrate this, add a println function inside our button’s function:
@IBAction func buttonPressed(sender: AnyObject) {

    println("You clicked the button")

}
So now, if we run the simulator, the “You clicked the button” message will appear in the console each time the user clicks the button.
Step 5: Create an Outlet
Last up, we’re going to make the “You clicked the button” text appear inside the interface so users can actually see it, and to achieve this, we’re going to start playing around with outlets.
Outlets allow us to modify parts of our interface through code. To see how they work, drag a “Label” object from the library into the interface. This object is simply used to display a string of text.
Then repeat the steps we went through with the button:
- Hold down the CTRL key.
- Click on the label object we just created.
- Drag the cursor into the
ViewController.swiftfile.
This time, don’t change the “Connection” option. Just leave it set to “Outlet”. The only thing you should change is the “Name” option, because this acts as a reference for our object. I’ve named mine “ourLabel”.
You should see the following appear inside our code:
@IBOutlet var ourLabel: UILabel!
Because of this statement, we can now reference this ourLabel variable from within our code, allowing us to modify our label programmatically.
So inside the buttonPressed function, remove the println function and replace it with the following:
ourLabel.text = "You clicked the button"
Here we’re doing a few things:
-
We reference the
ourLabelobject. -
We modify its
textproperty. -
We set the
textproperty to this “You clicked the button” string.
As a result, if we run the simulator again, clicking the “Click Me” button will change the value of the label to this static text.
Conclusion
In this tutorial, we’ve only covered the absolute basics of making an iOS application with Swift. You probably have a lot of lingering questions, and that’s fine, iOS development is a big topic and questions are your friend.
That said, a lot can be achieved with even just this basic understanding of outlets and actions, so here’s a challenge:
Add a text field to the interface and make it so whenever the user types into this field, it’s content will appear inside the label when they press the button. If you’re not sure where to start, note that the text field will need to be an outlet.
Frequently Asked Questions (FAQs) about Creating a Hello World App in Swift
What is the significance of the “Hello, World!” program in Swift?
The “Hello, World!” program is a simple program that outputs Hello, World! on the screen. Since it’s a simple program, it’s often used to introduce a new programming language to a beginner. In Swift, this program helps beginners understand the basic syntax and structure of the language. It’s a stepping stone to more complex programming where you can start learning about variables, data types, loops, decision making, and more.
How can I run my Swift program in Xcode?
To run your Swift program in Xcode, you first need to install Xcode on your Mac. Once installed, open Xcode and create a new project. Choose the template for your project, name your project, and save it. Then, in the editor area, you can write your Swift code. After writing your code, you can run your program by clicking the ‘Run’ button or pressing Command + R. The output of your program will be displayed in the console.
What is the role of the main.swift file in a Swift program?
The main.swift file is the entry point of a Swift program. When you run a Swift program, the code in the main.swift file is executed first. This file usually contains the main function, which is where the program starts execution. The main function can call other functions defined in the same file or in other files.
How can I print output in Swift?
In Swift, you can print output using the print function. The print function writes the textual representation of the items to the standard output. For example, to print “Hello, World!”, you can use the following code: print(“Hello, World!”).
How can I create a function in Swift?
In Swift, you can create a function using the ‘func’ keyword followed by the name of the function, a pair of parentheses for parameters, and a pair of braces for the body of the function. For example, to create a function that prints “Hello, World!”, you can use the following code:func printHelloWorld() {
print("Hello, World!")}
You can call this function using its name followed by a pair of parentheses: printHelloWorld().
What is the syntax of Swift?
Swift has a clean and expressive syntax that is easy to read and write. It uses English keywords and follows a clear and concise structure. For example, the syntax for defining a variable is: var variableName = value. The syntax for defining a function is: func functionName() { /* code / }. The syntax for a conditional statement is: if condition { / code / } else { / code */ }.
How can I declare a variable in Swift?
In Swift, you can declare a variable using the ‘var’ keyword followed by the name of the variable and an equal sign. After the equal sign, you can assign a value to the variable. For example, to declare a variable named ‘greeting’ and assign the value “Hello, World!” to it, you can use the following code: var greeting = “Hello, World!”.
How can I use comments in Swift?
In Swift, you can use comments to include non-executable text in your code. Comments are ignored by the Swift compiler and do not affect the execution of the program. You can use single-line comments that start with two forward slashes (//) and multi-line comments that start with a forward slash followed by an asterisk (/) and end with an asterisk followed by a forward slash (/).
How can I handle errors in Swift?
Swift provides a powerful error handling model that allows you to catch and handle runtime errors. You can use the ‘throw’, ‘throws’, ‘try’, ‘catch’, and ‘finally’ keywords to work with errors. When a function encounters an error condition, it can throw an error. A function that can throw an error must be marked with the ‘throws’ keyword. You can use a ‘do-catch’ statement to catch and handle the error.
How can I learn more about Swift programming?
There are many resources available to learn more about Swift programming. You can start with the official Swift documentation provided by Apple. There are also many online tutorials, courses, and books available. Practice is key in learning a new programming language, so make sure to write and run your own Swift programs.