

Key Takeaways
- The article explains how to create a Slack bot that interacts with a wiki, using MediaWiki as the wiki platform and Ruby gems for the bot development.
- The bot is designed to create and delete articles on the wiki, and can be customized to perform other functions.
- The bot is hosted on Heroku, a cloud platform that allows apps to be built, delivered, monitored, and scaled. The bot can also be integrated with other services that Slack provides.
- The author emphasizes the benefits of using bots for repetitive tasks, stating that they are fast, accurate, and can improve productivity.

Wiki platforms have been the “go to” tool for many teams. They are also used by many an open source projects as a communication and organization medium.
In the last few years Slack has come to the stage of tools used by many companies. It’s key goal being effective communication between the members of a team. Besides chat, Slack also offers apps which let you easily connect to other services, such as Trello, MailChimp, Blue Jeans, etc. But app integration is not the only feature Slack has to offer. Today we will look at something different. Bots in chat applications aren’t a new thing, they date back to the IRC days where we would have bots that took care of different things, like chat misbehavior, weather forecast, games, etc. The same concepts apply in Slack.
In this article we will work on a wiki bot. Your team could use some help from a bot here and there sometimes, right?
The wiki platform that we will use is MediaWiki. Mediawiki is an open source wiki package which originally began on Wikipedia. It is one of the most used wiki systems.
Setup
We are going to use two main Ruby gems in this tutorial: media-wiki-api and slack-ruby-bot. We also want our bot to live somewhere, so let’s use the Sinatra framework and host our bot on Heroku.
Start by creating a directory named slack-wikibot, and inside it create two Ruby files, called slack-wikibot.rb and Gemfile. In the Gemfile, add:
Gemfile:
source 'http://rubygems.org'

gem 'slack-ruby-bot'
gem 'celluloid-io'
gem 'puma'
gem 'sinatra'
gem 'dotenv'
gem 'mediawiki_api'
Let’s run bundle install to have these gems installed:
bundle install
Create another directory with the same name (slack-wikibot) and inside that directory create a Ruby file with the name bot.rb. The bot.rb file looks like:
bot.rb:
module SlackWikibot
  class Bot < SlackRubyBot::Bot
  end
end
Create a web.rb file that will hold our web application and make it easy for hosting the bot. Platforms like Heroku and OpenShift make it very easy to deploy Sinatra apps.
web.rb:
require 'sinatra/base'

module SlackWikibot
  class Web < Sinatra::Base
    get '/' do
      'Bot is running...'
    end
  end
end
MediaWiki
To create an article via the API, we need first to point to our MediaWiki API URL:
wiki_connection = MediawikiApi::Client.new "http://MEDIAWIKI-ADDRESS/api.php"
We use the create_page method to create an article, which requires two parameters: the title and content of the article.
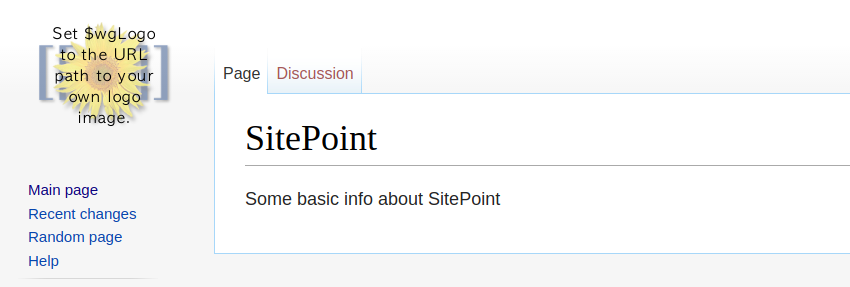
wiki_connection.create_page "SitePoint", "Some basic info about SitePoint"
This created a page, but when this code is run directly from a script, we don’t get anything back. There is an object we can use to have access to a parsed MediaWiki API response.
Input:
response = wiki_connection.create_page "SitePoint", "Some basic info about SitePoint"
If we call the data method now on response, we get a nice hash.
{"result"=>"Success", "pageid"=>26, "title"=>"SitePoint", "contentmodel"=>"wikitext", "nochange"=>""}
Now we have access to the pageid of the new wiki article. We can do a simple query http://MediaWiki-Address/?curid=26 and this will return the article.
Let’s take a look at another method that is used to remove our article. The delete method requires two arguments: the title of the page and the reason for deleting the article. Since MediaWiki offers revisions and it lets you go back in time, having a reason for deletion is very helpful.
wiki_connection.delete_page "SitePoint", "Reason for deletion"
To use this method, you need to have an account and be logged in. This is very easy:
wiki_connection.log_in "username", "password"
Now everywhere we use the wiki_connection object, we are authenticated. If you still are not authorized to delete articles, that means that you are not in the groups that allow this kind of action. I had this problem even though I was the first user of the MediaWiki install. In this case, you need to head to the Special:UserRights page and add yourself to the bureaucrat and sysop groups.
Now create a directory named commands where we will add the commands that the SlackWikiBot will use. Inside the commands directory, create a new file called wiki.rb. The path of this new file is slack-wikibot/slack-wikibot/commands/wiki.rb.
This is the place where our commands live, it can be structured in many different ways. I suggest you take a look at the documentation of the slack-ruby-bot gem. I am using the match operator, but there are other ways like command and scan. In this case, our bot is watching our chat and, whenever it sees that we have used the !wiki create or !wiki delete keywords, it will perform some action.
wiki.rb:
require 'mediawiki_api'
module SlackWikibot
  module Commands
    class Wiki < SlackRubyBot::Commands::Base
      wiki_connection = MediawikiApi::Client.new "http://MediaWiki-URL/api.php"
      wiki_connection.log_in "username", "password"
      match(/^!wiki create (?<titlewiki>\w*)\s(?<contentwiki>.*)$/) do |client, data, match |
        response = wiki_connection.create_page match[:titlewiki], match[:contentwiki]
        pageid = response.data["pageid"]
        client.say(channel: data.channel, text: "Your wiki is created http://MediaWiki-URL?curid=#{pageid}")
      end
      match(/^!wiki delete (?<titlewiki>\w*)\s(?<reason>.*)$/) do |client, data, match |
        wiki_connection.delete_page match[:titlewiki], match[:reason]
        client.say(channel: data.channel, text: "Article #{match[:titlewiki]} page is deleted. Reason: #{match[:reason]}")
      end
    end
  end
end
Let’s take a look at our project structure:
└── slack-wikibot
    ├── Gemfile
    ├── Gemfile.lock
    ├── slack-wikibot.rb
    └── slack-wikibot
        ├── bot.rb
        └── commands
            └── wiki.rb
Now edit slack-wikibot.rb, which we created in the root directory, and require the slack-ruby-bot gem. With that, our bot and wiki commands are created.
slack-wikibot.rb:
require 'slack-ruby-bot'
require 'slack-wikibot/bot'
require 'slack-wikibot/commands/wiki'
Create a config.ru file for our Rack application. We’ll create a thread for our bot and run the webserver:
config.ru
$LOAD_PATH.unshift(File.dirname(__FILE__))

require 'dotenv'
Dotenv.load

require 'slack-wikibot'
require 'web'

Thread.abort_on_exception = true

Thread.new do
  begin
    SlackWikibot::Bot.run
  rescue Exception => e
    STDERR.puts "ERROR: #{e}"
    STDERR.puts e.backtrace
    raise e
  end
end

run SlackWikibot::Web
Let’s use Foreman, as it allows us to easily manage our runtime dependencies. Foreman is also useful when we have environment variables, like in a .env file. Furthermore, Heroku also uses Foreman.
We need an API key from Slack so we can interact with the bot in chat. Visit the bot service page while you are logged in your slack team. The first step is to set a username for our bot:
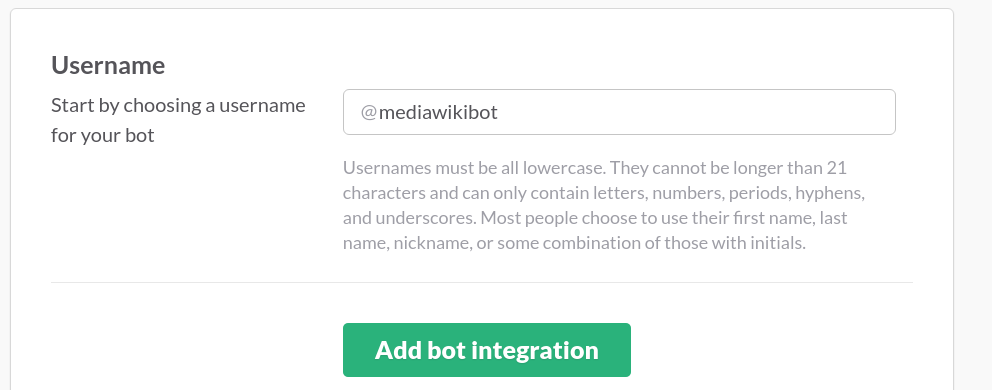
After clicking the “Add bot integration” button, the next step is to add information regarding our bot. We can set a name, upload an image, and set some other properties. Also, the needed API key is on this page:
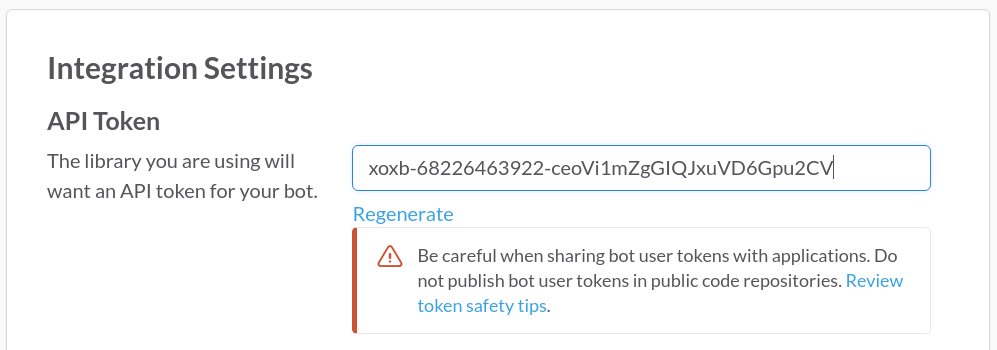
Create a .env file in the root directory of our project and add the API key:
SLACK_API_TOKEN=xoxb-68226463922-ceoVi1mZgGIQJxuVD6Gpu2CV
Create a Procfile in the root directory, which Foreman will use when you run the command below:
Procfile:
web: bundle exec puma -p $PORT
Now let’s run our bot:
foreman start
Deploy to Heroku
You will need to have the Heroku tools installed:
gem install heroku
Use the Heroku command to create the application:
heroku create
It will assign a random name and add a git remote repository. Now push your code to the Heroku repository.
Note: You will have to use git for this part, so if you haven’t, make sure to git add and git commit your code before pushing.
git push heroku master
Now if you visit your Heroku application URL (Yours will be different):
https://agile-retreat-96798.herokuapp.com/
You should get a page that says Bot is running…
Go back to Slack and use the /invite @YourBotsName to invite your bot to a channel. Then, try one of the commands we created:

Conclusion
Bots are a very handy tool to automate some of our work. You can find more information on making Slack bots in this post on SitePoint.
Every time you find yourself doing a repetitive work, think if it can be done by a bot. If the answer is “yes”, then there is no time to waste, start creating one. There are many benefits in having bots do our work: They are fast and make fewer to no mistakes, just to name a couple. Now is the time to accept our new Slack-bot based overlords :)
Frequently Asked Questions (FAQs) about Creating a Slack Bot for Your Wiki
What is the purpose of creating a Slack bot for my wiki?
A Slack bot for your wiki can serve multiple purposes. It can help you and your team to quickly search for information from your wiki without leaving the Slack interface. This can save time and increase productivity as you don’t have to switch between different platforms. The bot can also notify you about updates or changes made to the wiki, ensuring that everyone in the team stays informed.
How can I customize my Slack bot?
Customizing your Slack bot involves setting up the bot’s name, icon, and default message. You can also customize the bot’s responses to specific commands or queries. This can be done through the Slack API and requires some knowledge of programming.
Can I integrate my Slack bot with other tools or platforms?
Yes, you can integrate your Slack bot with other tools or platforms. Slack provides a robust API that allows for integration with a wide range of services, including project management tools, customer support platforms, and more. This can help streamline your workflow and improve team collaboration.
What programming language should I use to create my Slack bot?
You can use any programming language that supports HTTP to create your Slack bot. However, JavaScript (Node.js) is commonly used due to its simplicity and the availability of several libraries that simplify the process of creating a bot.
How can I ensure the security of my Slack bot?
To ensure the security of your Slack bot, you should follow best practices such as using secure HTTP connections, validating all incoming requests, and regularly updating your bot’s code to address any potential security vulnerabilities. You should also limit the permissions of your bot to only what is necessary for its functionality.
Can my Slack bot interact with users in real-time?
Yes, your Slack bot can interact with users in real-time. This can be achieved by using the Real Time Messaging (RTM) API provided by Slack. The RTM API allows your bot to receive and send messages in real-time, enabling interactive conversations with users.
How can I test my Slack bot?
You can test your Slack bot by creating a private channel in your Slack workspace and inviting the bot to join. You can then interact with the bot and verify its responses. You should also test the bot’s error handling capabilities by sending invalid or unexpected commands.
Can I use my Slack bot to send notifications to users?
Yes, you can use your Slack bot to send notifications to users. This can be useful for notifying users about updates or changes to your wiki. You can customize the content and format of these notifications based on your needs.
How can I troubleshoot issues with my Slack bot?
If you encounter issues with your Slack bot, you can use the logs and error messages provided by Slack to identify the problem. You should also ensure that your bot’s code is free of errors and that it is correctly integrated with Slack.
Can I make my Slack bot available to other Slack users?
Yes, you can make your Slack bot available to other Slack users by submitting it to the Slack App Directory. Before submitting, you should thoroughly test your bot and ensure that it complies with Slack’s guidelines and requirements.

