 Adobe Illustrator allows you to add extra fills and strokes to objects. We’re going to take advantage of that now to create the impression of text painted in watercolor. The best part about this is that the text is still editable after the effect is applied. Let’s get started.
1. In Illustrator, create a new document and add some text. I’m using the serif font Goudy Old Style. It doesn’t matter what color you choose at this point because we’ll be turning the color off in a few steps. It’s actually the color of the stroke that we’re going to add that makes the difference.
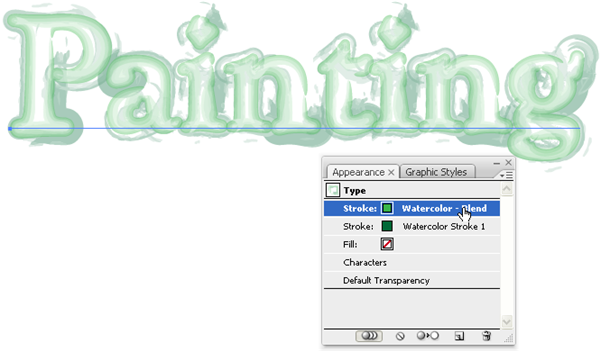
 2. Select the text using the Selection tool (Black arrow). Then open the Appearance Palette (Shift + F6).
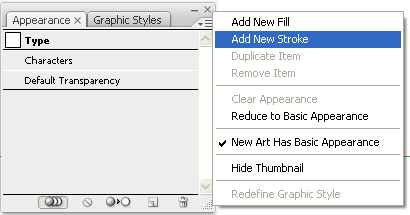
3. On the Appearance Palette pop-up menu, choose Add New Stroke. Although we can give text a stroke color using the color picker on the toolbar, in order for this effect to work we need to add a stroke using the Appearance palette.
 4. Open the Brushes Palette and from the palette menu choose Open Brush Library > Artistic > Artistic Watercolor.
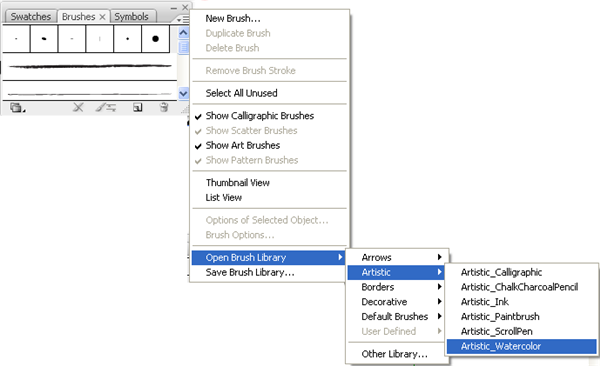 The Artistic Watercolor brushes open in a separate palette.
5. Make sure that the new stroke is still selected in the Appearance palette, then click on Water Color Stroke 1 in the brushes palette.
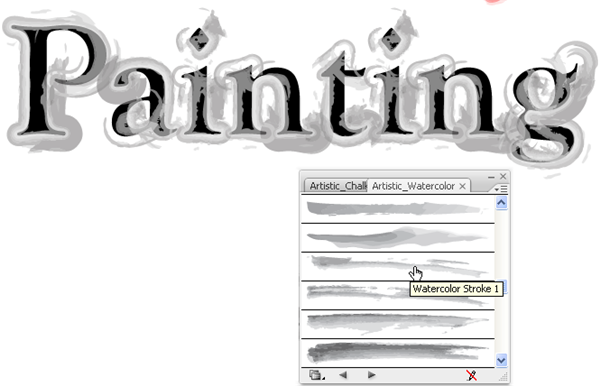 6. Once again, on the Appearance palette, choose Add New Stroke from the palette menu.
7. With the new stroke selected in the Appearance palette, choose Water Color Blend from the brushes palette.
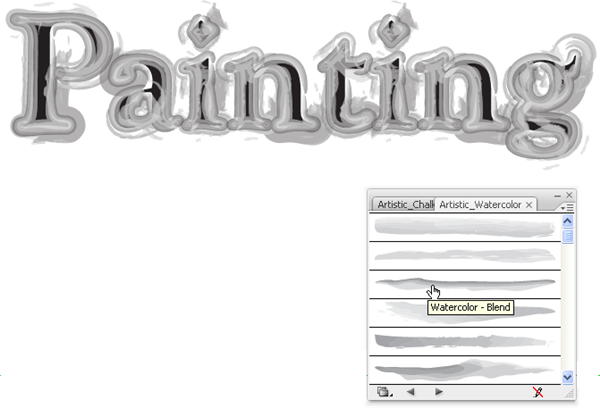 It’s starting to look nice and messy and hand painted. Now we need to hide our original text.
8. Double-click on the text to select it all. Then on the color picker on the toolbar, set the fill color of the text to none. You should get a result something like this.
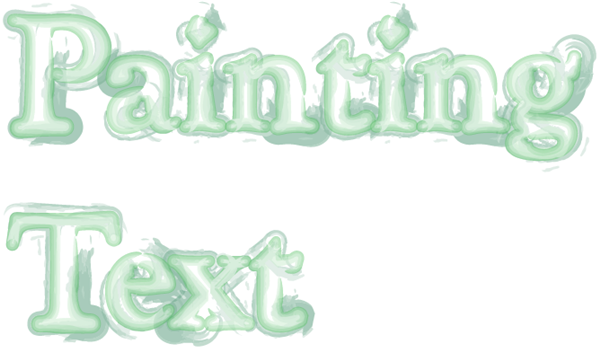
 9. If you want to change the color of the text, first make sure the text is selected with the Selection Tool. Then click once on the stroke in the Appearance palette and then change the color using Swatches or the Color palette. Here I’ve used two different greens.
 And that’s it. As I mentioned at the start, the really cool thing about this is that the text is still editable, so you can change what you already have or add more text with the same appearance.
Frequently Asked Questions (FAQs) about Creating a Painted Text Effect in Illustrator
What are the basic tools needed to create a painted text effect in Illustrator?
To create a painted text effect in Illustrator, you will need to familiarize yourself with a few basic tools. These include the Text Tool for typing your text, the Brush Tool for creating the painted effect, and the Gradient Tool for adding depth and dimension to your text. You may also need to use the Pathfinder Tool to merge shapes and the Transparency Panel to adjust the opacity of your strokes and fills.
How can I create a custom brush to achieve a painted effect?
Creating a custom brush in Illustrator is a great way to achieve a unique painted effect. To do this, first, draw a shape that you want to use as your brush. Then, select the shape and go to the Brushes Panel. Click on the New Brush button and choose the type of brush you want to create. You can adjust the settings of your brush to achieve the desired effect.
How can I add depth to my painted text using gradients?
Adding gradients to your painted text can give it a more realistic and three-dimensional look. To do this, select your text and go to the Gradient Panel. You can choose a linear or radial gradient and adjust the colors and positions of the gradient stops. You can also adjust the angle of the gradient to control the direction of the light source.
How can I use the Pathfinder Tool to merge shapes in my painted text?
The Pathfinder Tool in Illustrator allows you to combine multiple shapes into one. This can be useful when creating a painted text effect, as it allows you to merge your brush strokes with your text. To use the Pathfinder Tool, select the shapes you want to merge, then go to the Pathfinder Panel and click on the Merge button.
How can I adjust the opacity of my strokes and fills to create a more realistic painted effect?
Adjusting the opacity of your strokes and fills can give your painted text a more realistic look. To do this, select your text or shape and go to the Transparency Panel. You can adjust the opacity slider to control the transparency of your strokes and fills. You can also use the Blend Modes to create different effects.
Can I use different brush strokes to create a variety of painted effects?
Yes, you can use different brush strokes to create a variety of painted effects in Illustrator. The Brush Tool allows you to choose from a variety of preset brushes, or you can create your own custom brushes. By varying the size, shape, and color of your brush strokes, you can create a wide range of painted effects.
How can I use the Appearance Panel to modify my painted text effect?
The Appearance Panel in Illustrator allows you to modify the attributes of your painted text effect. You can add multiple strokes and fills, adjust their order, and change their blending mode and opacity. This can help you create a more complex and detailed painted effect.
Can I save my painted text effect for future use?
Yes, you can save your painted text effect for future use in Illustrator. To do this, select your text with the painted effect, then go to the Graphic Styles Panel and click on the New Graphic Style button. This will save your painted text effect as a graphic style that you can apply to other text or objects in the future.
How can I create a distressed or grunge effect with my painted text?
To create a distressed or grunge effect with your painted text in Illustrator, you can use texture overlays or custom brushes. You can also use the Roughen or Distort & Transform effects to give your text a worn or weathered look.
Can I animate my painted text effect in Illustrator?
While Illustrator is primarily a vector graphics editor, it does have some basic animation capabilities. However, for more complex animations, you may want to use a program like Adobe After Effects. You can export your painted text effect from Illustrator and import it into After Effects to animate it.
Jennifer Farley is a designer, illustrator and design instructor based in Ireland. She writes about design and illustration on her blog at Laughing Lion Design.

