

Many projects in Photoshop can be very easy if you know how to approach them. For example, creating a grid in Photoshop isn’t as straightforward as most designers think it would be. In Adobe Illustrator, there is an actual grid tool, but this feature is absent in Photoshop, leaving most designers wondering how they might create something such as graph paper or blueprint style designs. It turns out that it is all in how you approach the project.
First, open a new blank document. In the tools panel, select the rectangle tool with a medium gray as your color. While holding down the shift key, draw a square. It doesn’t really matter what the size is, mainly because of the method that we will be using to create our grid. Depending on what version of Photoshop you have, you can add a stroke in one of three ways.
If you have Photoshop CS6, simply go up to the Options bar, click on Stroke, and add a white stroke around your square. If you have CS5, double-click the layer containing the square, choose the stroke layer style, choose white as the color, and click “OK.” In CS4 and earlier, you can’t simply select the item and define it as a pattern. You will have to start out in a separate document, make it square, fill it with gray, and then add an inner stroke via the layer styles options. Then go to “Edit” > “Define Pattern,” and it will sample your entire document size.

Next, hold down the Command/Ctrl key and click on the layer icon of the square layer to load the square and stroke as a selection. Then, go to “Edit” > “Define Pattern.”


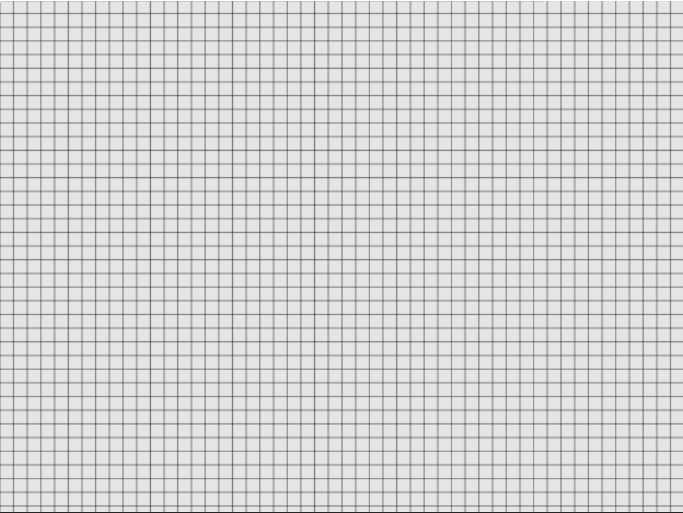
In the dialog box, name your pattern something specific, so that you’ll be able to easily identify it later. Since we have created the basis for our grid, you can delete the layer containing the square. Double-click the background layer to unlock it, and double-click it again to bring up the layer styles options. Click on “Pattern Overlay,” and you if you click on the pattern swatch, you should see the one that you’d just created at the bottom of the list.

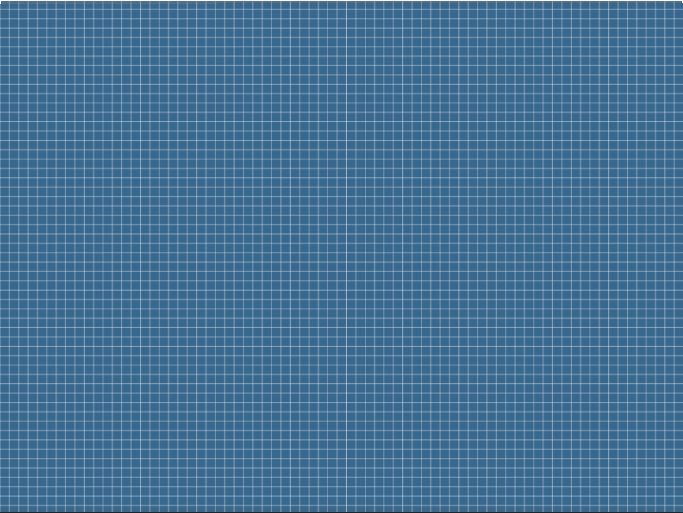
If the pattern is too big, you can lower the scale so that the grid is made up of small squares, just like a blueprint or graph paper. The result should look similar to the example below.

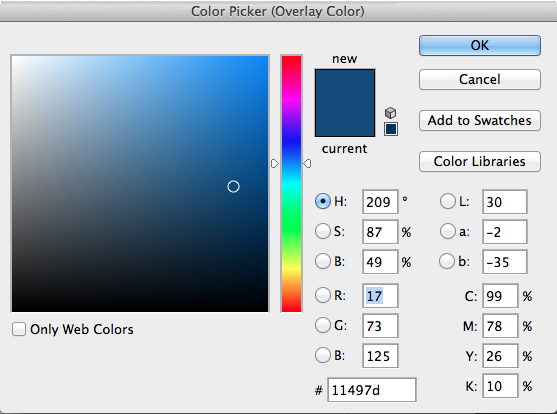
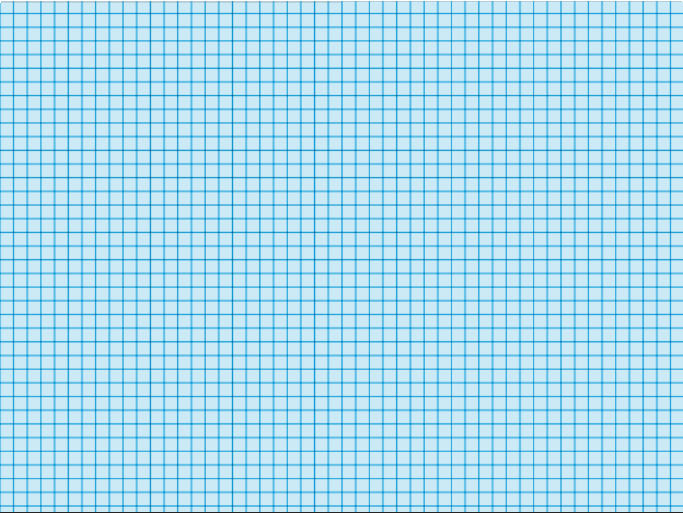
To make this into a blueprint style background, return to the “Layer Styles” dialog box, select “Color Overlay,” and choose a dark blue as your color. Select “Overlay” as your blend mode and click “OK.”

The result should be similar to the blue grid shown below.
Next, select a typeface to turn into a blueprint style effect. The best ones are usually bolder typefaces that are wide. I am using Interstate Condensed Black, but you could use something such as Arial Black to get a similar effect. Select white as your foreground color and type your message. Try to align the text edges with the lines shown in the grid for a more convincing effect.

Next, for the type layer, lower the fill to 0% so that the type disappears. Then, double-click the layer to bring up the layers styles options. Choose a 3pt stroke and set it to the inside. Then, change the color to white.

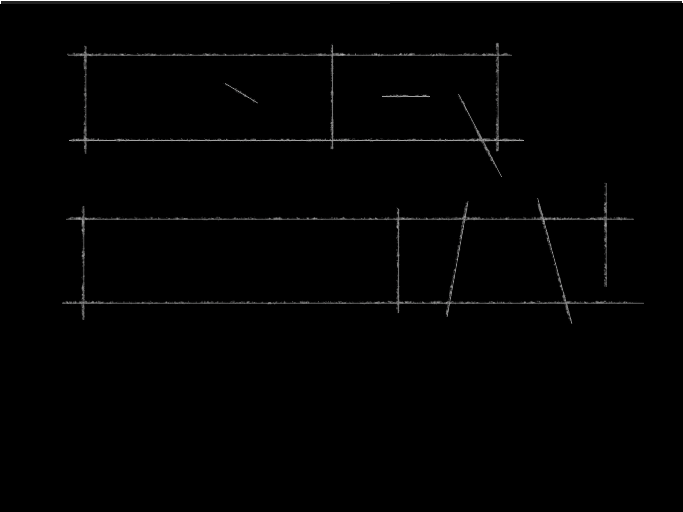
Next, we will select the pen tool, and we are going to create some lines that represent guidelines, as if someone was drafting the construction of the text, using the grid as a base. With the pen tool, begin drawing straight lines that follow random edges of the type but also have them extend beyond the boundaries of the text.
*Tip* Hold shift to draw a straight vertical, horizontal or diagonal 45° line. After Drawing a line segment, you can hold the Command/ Ctrl key, which will turn your cursor into the direct selection tool temporarily, and then click anywhere on the canvas except for on a path itself, and you will deselect the path you just made. Let go of Command/Ctrl to switch back to the pen tool, and draw your next line. When you are done, your paths should look similar to the example below. I temporarily placed black behind the type and paths to make it easier for you to see.


Next, we will select the brush tool and select chalk from the presets available. Select white as your foreground color and lower the size to around 9-10px. Keep the brush tool selected, and create a new blank layer. With the brush tool still selected and the new layer active, click on the paths panel and make sure that the paths that you just created are active and at the bottom of the paths panel, and click the second icon labeled Stroke Path With Brush. The results should look similar to the example shown below.

You could add as many lines as you want, adding paths and lines and really working up the drafted look, but if we remove the black background, we have the drafted look that we were looking for.

Bonus: Graph Paper
To make graph paper from this exact same pattern is easy. Create a new document and double-click the background layer to unlock it. Then, double-click the layer to bring up your layer styles. Select “Pattern Overlay” and lower the size to make small grid squared that fill your canvas. Then, click “OK.”

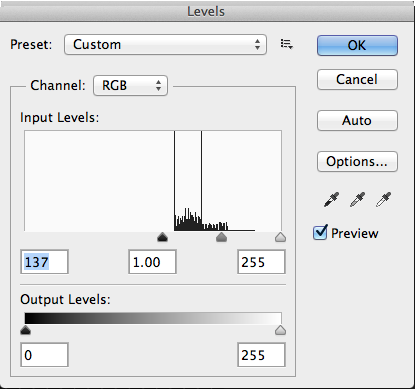
Right-click on your layer and select “Rasterize Layer Style.” This applies the layer style to the layer, leaving it a flat layer with no layer styles. Next, hit Command/Ctrl+ “L” to bring up your levels dialog box. Slide the far left slider to the right until the grey squares turn black.

Next, hit Command/Ctrl+ “I” to invert the layer, making black turn to white and white turn to black.
Create a new layer and select a medium blue color as your foreground color. Hit Option/Alt and tap the Delete key to fill the new layer with blue.
Then, change the layer’s blend mode to overlay. Notice that the lines are blue now. You have created digital graph paper quickly and easily.
Conclusion
Creating things from scratch in Photoshop isn’t difficult, as long as you think about the tools that you have available, and consider how to manipulate them to serve your needs. Creating your own patterns in Photoshop can save you a lot of time as opposed to creating and aligning all of those squares by hand. Also, we used the same pattern to create two different looks simply by rasterizing our effects and inverting them. Using these principles will save you time and help you to solve problems in Photoshop for all of your future projects.
Frequently Asked Questions about Creating a Blueprint Effect in Photoshop
What are the basic steps to create a blueprint effect in Photoshop?
The basic steps to create a blueprint effect in Photoshop involve opening your image in Photoshop, creating a new layer, and applying a blueprint-like texture to it. You then adjust the blending mode and opacity of this layer to create the desired effect. You can further enhance the effect by adding grid lines, text, and other elements typically found in blueprints.
Can I use any image to create a blueprint effect?
Yes, you can use any image to create a blueprint effect in Photoshop. However, images with clear lines and shapes work best for this effect. The blueprint effect emphasizes the outlines and structures in an image, so it’s ideal for architectural or mechanical images.
How can I adjust the intensity of the blueprint effect?
You can adjust the intensity of the blueprint effect by changing the opacity of the blueprint layer. A higher opacity will result in a stronger effect, while a lower opacity will make the effect more subtle. You can also adjust the blending mode of the layer to further customize the effect.
Can I add text to my blueprint?
Yes, you can add text to your blueprint in Photoshop. You can use the Text tool to add labels, dimensions, or other information to your blueprint. You can also adjust the font, size, and color of the text to match the style of your blueprint.
How can I add grid lines to my blueprint?
You can add grid lines to your blueprint by creating a new layer and using the Line tool to draw horizontal and vertical lines across the image. You can adjust the thickness and color of the lines to match the style of your blueprint. You can also use the Transform tool to rotate and scale the grid to fit your image.
Can I save my blueprint effect as a preset?
Unfortunately, Photoshop does not currently support saving the blueprint effect as a preset. However, you can save your work as a PSD file, which will preserve all your layers and settings. This way, you can easily apply the same effect to other images in the future.
Can I print my blueprint?
Yes, you can print your blueprint directly from Photoshop. Just go to File > Print, and adjust the print settings as needed. Make sure to choose a high-quality print setting to ensure the best results.
How can I make my blueprint look more realistic?
You can make your blueprint look more realistic by adding additional elements such as dimensions, labels, and notes. You can also use the Burn and Dodge tools to add shadows and highlights to your image, giving it a more three-dimensional look.
Can I create a blueprint effect in other Adobe software?
While Photoshop is the most commonly used software for creating a blueprint effect, you can also achieve similar results in Adobe Illustrator or Adobe After Effects. These programs offer different tools and features, so the process may vary.
What if I don’t have Photoshop?
If you don’t have Photoshop, there are several other graphic design software that you can use to create a blueprint effect. These include GIMP, Paint.NET, and Inkscape, which are all free to use. However, the process and results may vary depending on the software.