Create a Mobile Application Mockup with Codiqa
Before writing the actual code of web applications, every web designer or developer should create mockups or sketches of their work. On the web, there are several tools that you as a designer can use to envision and adjust your digital projects before you even start coding. Two of the most famous ones are Codiqa and Balsamiq. In this article, I’ll outline the features of Codiqa and I’ll explain you how to take advantage of its potential for saving time and developing better applications.
Planning a Project
When you start planning a new website or mobile application, the ideal first step is to define a detailed initial plan of work. Before starting to write the code, even a hand-drawn sketch of your plans could save you from making many future mistakes, and it could also lend additional clarity and depth to your ideas. It doesn’t matter if you’re planning a personal project or if you’re working on a professional basis. Although the content has obvious importance, the success of the project requires a solid development process in which you maintain a clear idea of the goals that you want to fulfill.
If your goal is to satisfy customer needs, you’ll have to analyze their anticipated requirements and draw up a design specification that contains sketches of the layouts, definition of the audience, and technical requirements. You’ll use this specification as guide in the next stages of the project. Each layout of a web app interface starts with a mockup, which is usually nothing more than a simple sketch of the desired outcome. This can be easily modified according to the feedback of the customer and the contributions of the design team, if you have one.
When the design becomes more stable, the mockup can evolve into a refined state and it often is named a “wireframe.” A wireframe shows a more complete version of a page layout, with the inclusion of navigation elements, search features, advertisement spaces, and other features. But, before starting a discussion about what a wireframe is and what it isn’t, let’s have a look at how to build a simple, clear mockup for your next app.
What’s Codiqa?
Codiqa is a simple interface-building tool for jQuery Mobile. It’s incredibly intuitive to use, and it’s composed of 100% HTML5 components. After prototyping your idea, you’ll obtain perfect usable code. In fact, there is no need to code again later. The strength of this application lies in its drag-and-drop interface, which allows for easy and fast mobile prototype building. You can access your project anywhere from the cloud, and moreover, the share function lets you share it with team members or other developers for live testing and feedback. The only “flaw” Codiqa has is that it is not a completely free tool. In fact, after a 30 days trial, if you want to continue using this tool, you’ll have to subscribe a plan. There are four plans from which you can choose: Personal, Starter, Pro, and Team, all of which are are described in detail on the Codiqa website.
How Codiqa Works
Now that you know more about Codiqa, it’s time to delve deep with its features. Please note that the 30 days free trial version restricts you to opening and working on only one project, and you can’t share your work with other users.
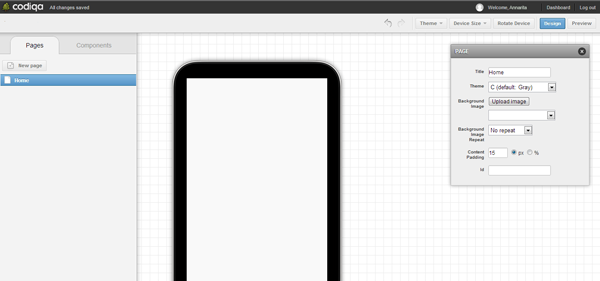
The first task is to define the size of the device for which you want to create a mockup. You can choose between iPhone (3,4,4S,5) , iPad (1/2/3), tablets 600 x 1024 pixel dimensions, and phones that range from 240 x 320 pixels to 800 x 1280. As a next step, let’s work on the style of the main page, called “Home” by default (you can change the title as you prefer). You can choose a theme between the five available, upload a background-image (also selecting the repetition on X and Y axes), and program your content padding in pixels or percentages.

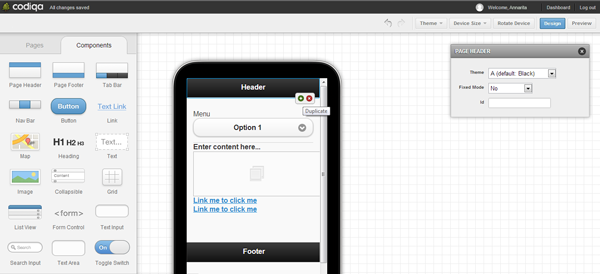
Let’s see what else we can add to our new homepage. If you click on the element called “Components” next to “Pages” on the left side of the page, you’ll find that you can add numerous elements, many of which are common and quite useful. At this point, let’s think about the elements that we might want to add: a header, a footer, a menu-list, a text box for some content, a little image, and some links. With Codiqa’s simple, intuitive drag-and-drop system, you can easily add everything you desire with a few clicks. After adding the elements we wanted, our mockup now looks something like this:

Now we start to customize all the components one by one using the menu on the right of the device screen. The header and footer can be chosen among the five available, and you can decide if you want these elements to be fixed or not. Clicking in the space where the titles are, you can easily change its text and size.
In the “Select Menu” box, which appears when you click on the corresponding space, you can set the name, the title you want to be shown, the theme, the size (choosing between the “normal” and “mini” options), and the items that will be offered within your menu. To add a new item on the menu, you have simply to click on “New Option,” the green button at the bottom of the box. You’ll find a typical text editor where you’ll be able to specify the characteristics and content of the paragraph.
Regarding images we’ve added an example image below the content box. Its size can be specified in pixels or percentages. Finally, in the link menu, you can build hyperlinks and specify all of the usual attributes for linking. For functionality, you can choose between fade, pop, flip, turn, flow, slide fade, slide, slide up, and slide down. Remember that at any time you can rotate your device to verify that your design choices work well in landscape mode.
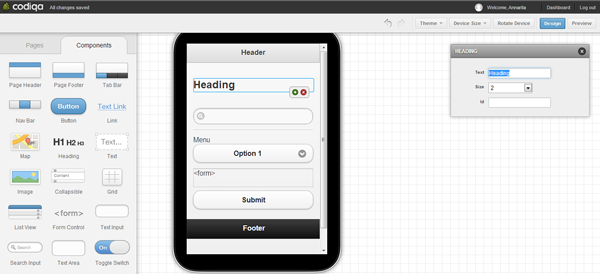
At this point, let’s create another page to learn a little more about other components that are at our disposal. Below, I’ve created a page called “Contact us” where in addition to the element header, menu, and footer, I’ve added a heading, a search input, a form, and a submit button. Look below for clarity.

For this contact form, you’ll have to indicate a URL, choose between a “GET” or a “POST” method, and decide if the submission will be done with AJAX or not. The submission button can be modified by size, title, inline disposition, and in this case you can also choose an icon. There are other few elements that don’t fit perfectly into my mockup example, but they are certainly worthy of mention:
- Map: like the images, its width and height can be specified in pixels. You can also determine the zoom level;
- List View: you can create a list defining both the theme of the divider and the items, the link transition, the path of the links, and the titles of the buttons;
- Radio Button: a radio button is an element that allows the user to choose only one of a predefined set of mutually exclusive options;
- Toggle Switch: it displays checked/unchecked states as a button with a “light” indicator and by default accompanied with the text “On” or “Off”. You can choose theme, name, size, and eventually the text you want to be displayed instead of “On” and “Off”.
Conclusion
This article shows how simple and intuitive is to create a mockup for a website or web application using the tools provided by Codiqa. This kind of careful upfront planning can save you countless development hours down the road, and it’s especially helpful to show a visual, interactive mockup of your idea to your partners in a collaborative environment.
Are you disciplined about creating mockups of your applications, or do you get right into coding without wasting any time? Do you find mockups to be useful in collaborative settings? Do they help you envision the details of your project?
Frequently Asked Questions (FAQs) about Mobile Mockup with Codiqa
What is Codiqa and how does it help in creating mobile mockups?
Codiqa is a powerful tool that allows you to design and prototype mobile applications. It provides a drag-and-drop interface that makes it easy to create interactive mobile app mockups. With Codiqa, you can design your app’s interface, add functionality, and test it on various devices. This tool is particularly useful for designers and developers who want to visualize their ideas before starting the coding process.
How does Codiqa compare to other mobile mockup tools?
Codiqa stands out for its simplicity and user-friendly interface. Unlike some other tools, it doesn’t require any coding knowledge, making it accessible to beginners. It also offers a wide range of pre-designed components, which can speed up the design process. However, it’s worth noting that other tools might offer more advanced features or customization options.
Can I use Codiqa for designing websites?
While Codiqa is primarily designed for mobile app mockups, it can also be used for creating website prototypes. However, it might not offer as many features as some dedicated website design tools.
Is Codiqa free to use?
Codiqa offers a free trial, but to access all its features, you’ll need to purchase a subscription. The cost varies depending on the plan you choose.
Can I share my Codiqa designs with others?
Yes, Codiqa allows you to share your designs with others. This can be particularly useful for getting feedback or collaborating with a team.
How can I add functionality to my Codiqa mockup?
Codiqa provides a range of pre-designed components that you can add to your mockup. These include buttons, forms, and navigation elements. You can also add custom JavaScript to make your mockup more interactive.
Can I test my Codiqa mockup on different devices?
Yes, Codiqa allows you to preview your mockup on various devices. This can help you ensure that your design looks good and works well on all screen sizes.
How does Codiqa help with the app development process?
By allowing you to create a visual representation of your app before you start coding, Codiqa can help streamline the development process. It allows you to test your ideas, get feedback, and make changes before you invest time and resources into development.
Can I export my Codiqa designs?
Yes, Codiqa allows you to export your designs in various formats, including HTML, CSS, and JavaScript. This can be useful if you want to use your mockup as a starting point for development.
What support is available for Codiqa users?
Codiqa offers a range of support options, including a comprehensive help center, tutorials, and customer support. This can help you get the most out of the tool and overcome any challenges you might encounter.
I have a Bachelor's degree in European languages, cultures, and literature from the University of Naples. I'm passionate about graphics and web design, and for several years I've been working on projects and designs for many companies. I'm a writer for the Audero User Group; my specialties are HTML, CSS, Web Design, and Adobe Photoshop.
