
Key Takeaways
- jQuery UI’s selectable behavior can transform basic lists into interactive, selectable components, enhancing user engagement and administrative efficiency.
- Implementing visual feedback for selected items is crucial, as the jQuery selectable method does not visually indicate selections without additional CSS.
- The ability to lasso and select non-sequential items using the Ctrl key mimics desktop application functionality, providing a familiar user experience.
- Educating users on nonstandard interactions, such as click and drag selections, is essential for usability, necessitating clear instructions and possibly on-page guidance.
- Duplicate tag management can be streamlined using jQuery’s event handling and utility methods, reducing administrative overhead and improving data quality.
- Sorting capabilities can be added to lists using JavaScript array methods and jQuery, allowing for dynamic reordering based on user input or predefined criteria.
This article is an excerpt from jQuery: Novice to Ninja, by Earle Castledine & Craig Sharkie. See more details below.
Lists are the real unsung heroes of the post table-based layout period of the Web. As designers were freed from the constraints of the tyrannical table cell, they started to look for other (semantically correct) ways to recreate common user interface elements such as menus, navigation panels, tag clouds, and so on.
And time after time, as the redundant layout cruft was stripped from the underlying data, all that was left behind was—a list!
The StarTrackr! site is already home to an extensive array of lists: they form the basis of our tabs, accordions, menus, image galleries, and more—but there’s far more we can do to augment and enhance the humble list.
jQuery UI Selectables
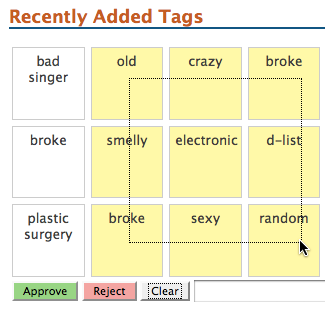
The ocean of user-generated content is proving a handful for our client. Thousands of tags are pouring in from the site’s users—but now the legal department is saying that as the manager, he has to approve every single one manually, to avoid a repeat of a recent nasty litigation.
Because the site employs an unconstrained tag system, there are stacks of duplicate tags in the lists—and with the current system that means stacks of extra administration. What the client really wants is a way to easily see tags, select them (and any duplicates), and click a button to approve or reject them.
Our plan of attack is to add jQuery UI’s selectable behavior to our list. Making an element selectable gives the user the ability to lasso any of the element’s children to select them: if you click on one element, then drag over subsequent elements, they become highlighted. You can than process the selection however you see fit. Perfect for administrating boring lists! The behavior we’re aiming to create is illustrated below.
In addition to lassoing, the selectable behavior also lets you add nonsequential items to the list using the Ctrl key (as you can do in most desktop applications)—and even navigate the selections with the keyboard.
Keep Your Users in the Loop
Although being able to click and drag selections on a list is very cool and very useful, it’s only cool and useful if your users know about it! Making selections in this manner is a nonstandard form of interaction on the Web, so you’ll need to provide instructions to your users to teach them how to use your new functionality.
Let’s have a look at the markup. The server spits out a long list of tags, which is a fine base for our selector grid. We’ll also throw in a few buttons to allow users to approve or reject the tags in their selection, as well as a button to reset the selection:
<ul id="tags">

  <li>bad singer</li>

  <li>old</li>

  <li>plastic surgery</li>

  <li>broke</li>

  ⋮

</ul>

<button id="approve">Approve</button>

<button id="reject">Reject</button>

<button id="clear">Clear</button>
A big long list is a bit intimidating, so we’ll use some basic CSS to make the list into a grid, and convert each tag into a small box. With our grid ready to go, we have to add the jQuery UI library to the page. Now it’s time to tell the tag list to become selectable:
$("#tags").selectable();Fire up your browser and check it out. Hrrm … has anything actually happened? Well yes, it has, but it’s invisible! The selectable method works by adding class attributes to selected items, unless we assign styles to those classes, we’ll be unable to see anything happening. If you inspect the list items with Firebug as you select them, you’ll see the changes occurring. Let’s have a stab at styling selected elements:
#tags .ui-selecting {

  background: #FEFF9F;

}

#tags .ui-selected {

  background-color:#eEeF8F;

}
The ui-selecting class is applied as the user is in the process of selecting elements, and the ui-selected class is added as soon they stop. If you try it now, you’ll see you can lasso some squares. It’s quite a natural interaction—which is exactly what you want from your page components. You can also click while holding down the Ctrl key to select individual items.
The next task we want to do is help with the duplicate tags. In a tagging system the number of tags for each term is important—so rather than just deleting duplicates, we’ll write some code to select any tags that match the user’s selection. For instance, if they click on “A-lister,” all the “A-lister” tags will be highlighted.
We need to know which events we can hook into from the jQuery UI component. Consulting the documentation, we find that we can capture the start, stop, selecting, unselecting, selected, and unselected events. We could capture the selecting event—and remove duplicates as the user moves the mouse—but it might be a bit confusing. We’ll stick with the stop event, which fires as soon as the user completes the selection:
$('#tags').selectable({

  stop: function() {

     // The user stopped selecting!

  }

});
Now we can begin our quest to find the duplicate tags. Our general approach will be to make a list of all the tags the user has selected, then search for any duplicates of those tags that appear in the greater tag list:
var names = $.map($('.ui-selected, this'), function(element, i) {

  return $(element).text();

});

$('li', this)

  .filter(function() {

    if ($.inArray($(this).text(), names) != -1) {

      return true;

    } else {

      return false;

    };

  })

  .addClass('ui-selected');
To find the duplicates, we’ve called on the service of an assortment of new jQuery features, so hold on to your hats!
The first of these is the oddest: $('.ui-selected', this). This looks like a regular jQuery selector, but there’s a second parameter. It turns out that the complete definition for the jQuery selector is actually $(expression, context)—we’ve just been omitting the second parameter. The context defines where jQuery should look for your selector; by default it looks everywhere on the page—but by specifying our unordered list as the context, the expression will be limited to elements inside the list.
$.map and $.inArray
Next we use a couple of jQuery utility methods: $.map and $.inArray to juggle the list items. The utility methods jQuery provides are mostly for working on JavaScript arrays—and that’s what we’re doing here. First we create an array called names, which we populate using the $.map method.
The $.map method allows you to take each element in the array, process it in some way, and return the results as a new array. You use it when you want to transform every element in the same way. We want to transform our jQuery selection into a simple list of tag text—so we pass in the selection, and define an anonymous function to return each element’s text. Hey presto: an array of tag text!
We next use the context trick as before to retrieve all the list item elements, and filter them based on whether or not they’re duplicates. Our filter function uses the $.inArray utility method, which searches an array (but only plain JavaScript arrays—not jQuery selections, unfortunately) for a specified value. Given an array and a search term, like $.inArray(value, array), it will return the value’s index in the array. Helpfully, it will return -1 if the value is not found in the array. Remember that filter expects us to return either true or false—so we just check to see if $.inArray returns -1, and return true or false as appropriate. Using filter in this way allows us to search our array of tag texts for each list item’s text—if it’s in there, it’s a duplicate, so we return it to the filter to be selected.
Accessing the Data
Now that we can make selections, how can we use them? The jQuery UI Selectable component works with class names, so we will too. To acquire the list of selected values, we simply search for any items that have the ui-selected class on them:
$('#approve').click(function() {

  $('#tags')

    .find('.ui-selected')

    .addClass('approve')

    .removeClass('ui-selected reject');

});

$('#reject').click(function() {

  $('#tags')

    .find('.ui-selected')

    .addClass('reject')

    .removeClass('ui-selected approve');

});

$('#clear').click(function() {

  $('#tags')

    .find('li')

    .removeClass('ui-selected approve reject');

  $('#approved').val('');

});
We’re just adding an approve or reject class when the user clicks on our buttons—also being sure to remove the ui-selected class, since we want to style approved tags differently from selected ones.
But what if we wanted to, say, send this information to the server? Perhaps it would be good to store the list of approved tags in a hidden form field, so that the server can access it for processing. Let’s update the #approve click handler to iterate over the approved items, and append each item’s index to a hidden field in a simple pipe-delimited format:
$('#approve').click(function() {

  var approvedItems = "";

  $('#tags')

    .find('.ui-selected')

    .addClass('approve')

    .removeClass('ui-selected reject')

    .each(function() {

      approvedItems += $(this).index() + "|";

    });

  $('#approved').val(approvedItems);

});
We’ll also add a line to our #clear button click handler to clear that input’s value:
$('#approved').val('');Thanks to the index method, we now know which items in the list have been approved. index will tell you an item’s position inside its parent element. Our control is impressive in how easy it is to use. The jQuery UI selectable behavior is doing a lot of work behind the scenes to allow lists to be selectable—but the end result is a natural-feeling component, and that’s exactly what we want.
Sorting Lists
With the tag system under control, it’s time to turn to some of the other lists that are scattered throughout the admin section. Many of these lists are populated by the server in the order they were entered into the system. This is good for seeing what’s new, but bad for finding particular items. Our client has asked us to build some sorting capabilities into all of the lists in the admin section, so he can click a button and have the lists sorted in ascending or descending alphabetical order.
The markup we’ll be dealing with is a simple unordered list made up of links:
<ul class="sortable">

<li><a href="#">Beau Dandy</a></li>

  <li><a href="#">Glendatronix</a></li>

  <li><a href="#">BMX Spandex Corporation</a></li>

  <li><a href="#">Maxwell Zilog</a></li>

  <li><a href="#">Computadors</a>

</ul>
jQuery objects lack any built-in sorting functionality. This makes sense, after all; a selection could include different kinds of elements located in different parts of the page, so sorting them in a consistent manner would be impossible. To sort our jQuery selections, therefore, we need to fall back on some JavaScript array methods. jQuery selections aren’t actually arrays, but they’re “array-like,” and they allow us to use the JavaScript sort function on them.
We’ll try to build a reusable list-sorting widget. We’ll call it SORTER, and we’d call SORTER.sort(list) to sort a list in ascending order, and SORTER.sort(list, 'desc') to sort in descending order. We’ll assume that the selector passed in will match ordered or unordered lists, but let’s see if we can make that happen:
var SORTER = {};

SORTER.sort = function(which, dir) {

  SORTER.dir = (dir == "desc") ? -1 : 1;

  $(which).each(function() {

    // Find the list items and sort them

    var sorted = $(this).find("> li").sort(function(a, b) {

      return $(a).text().toLowerCase() > $(b).text().toLowerCase() ?

        SORTER.dir : -SORTER.dir;

    });

    $(this).append(sorted);

  });

};
That code is deceptively short, because it happens to be doing a lot! First up, we check to see if desc was passed in as the dir parameter, and set the SORTER.dir variable accordingly. All we need to do is grab all of the first-level children list elements and give them a sort. We only want the first-level items; if we grabbed further levels, they’d be sorted and dragged up to the parent level. Because calling sort reverts our selections to raw JavaScript, we need to rewrap them in the $() to be able to call the jQuery text method and compare their values. We also convert the values to lowercase—which makes the sorting case-insensitive.
The sort Function
The sort function is plain old JavaScript: it sorts an array based on the results of the function you pass to it. sort will go over the contents of the array and pass them to your function in pairs. If your function returns 1, sort will swap the items and place the second one first. If your function returns -1, JavaScript will put the first item first. Finally, if your function returns 0, sort will consider that both items are equal and no sorting will take place.
We’re doing a little magic to let us use the same function for sorting in ascending and descending order: we’ve set our SORTER.dir variable to -1 or 1, depending on the direction. Then in the sort comparison function, we do a further calculation: if a is less than b, we return -SORTER.dir. If the direction comes in as -1, we process it as -(-1), which is 1—so if we’re trying to sort descending, the return values are swapped.
Once we’ve sorted the items, we can reinsert them into the list in the correct order. Remember, the append function removes the element first—so it removes the item and appends it in the correct position.
To test it out, we’ll add some buttons to our HTML and call SORTER.sort from their click event handlers:
$('#ascending').click(function() {

  SORTER.sort('.sortable');

});

$('#descending').click(function() {

  SORTER.sort('.sortable', 'desc');

});
Manipulating Select Box Lists
Here we’re going to examine select elements, especially those with multiple="multiple" (that is, select boxes which appear as selectable lists of items).
Swapping List Elements
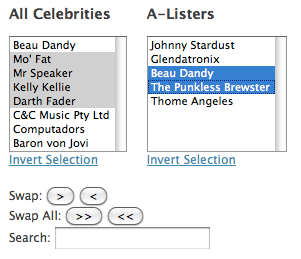
The StarTrackr! client has asked us to improve the admin functionality for assigning celebrities to the A-list. The current functionality consists of two select elements: one contains the A-list celebrities, and the other contains every other celebrity in the system. But the world of popularity is extremely fickle—and an A-lister today can be a nobody tomorrow. So the client wants to be able to easily swap the celebrities between each list. We’ll add a few controls to the interface to let him do just that, as shown below:
This is the HTML we’re dealing with, consisting of the two select elements, and a few buttons for performing various operations:
<select id="candidates" multiple="multiple" size="8">

  <option value="142">Beau Dandy</option>

  ⋮

</select>

<select multiple="multiple" size="8">

  <option value="232">Johnny Stardust</option>

  ⋮

</select>

<div>

  <input type="button" value=">" />

  <input type="button" value="<" />

  ⋮

</div>
As stated, the client wants the ability to swap selected items from one list to another. We’ll make a SWAPLIST object that will contain all the functionality we’ll build. This can then be reused anytime we need to play with select elements:
var SWAPLIST = {};

SWAPLIST.swap = function(from, to) {

  $(from)

    .find(':selected')

    .appendTo(to);

}
We’ve defined a swap function that accepts selector strings targeting two lists: a source list and a destination list. The first task we want to do is to grab any items that are currently selected. We can do this using the find action with the :selected form filter. This filter will return any form elements that have the attribute selected set. Then we can move the selection over to the destination list with appendTo. Easy! And once we’ve defined this functionality, we can apply it to any two lists by calling our swap method from appropriate click handlers:
$('#swapLeft').click(function() {

  SWAPLIST.swap('#candidates', '#a-listers');

});

$('#swapRight').click(function() {

  SWAPLIST.swap('#a-listers', '#candidates');

});
Now selected items can be swapped back and forth at will! Let’s add some more functionality to our SWAPLIST object. How about swapping all elements? That’s even easier:
SWAPLIST.swapAll = function(from,to) {

  $(from)

    .children()

    .appendTo(to);

}
We just take all the child elements (instead of only the selected elements) and append them to the bottom of the destination—the whole list jumps from source list to destination list.
Inverting a Selection
The next client request is to add a button that inverts the current selection, to make it easier for his staff when dealing with large selections. When this link is clicked, all currently selected items in the target list become deselected, and vice versa. Let’s make a function inside the SWAPLIST object that does this:
SWAPLIST.invert = function(list) {

  $(list)

    .children()

    .attr('selected', function(i, selected) {

      return !selected;

    });

}
All we have to do is retrieve every list item and swap its selected attribute. We use the attr function to set our list items to !$(this).attr('selected'). The JavaScript NOT (!) operator (the exclamation mark) inverts the Boolean value, so if the value was true it becomes false, and if it was false it becomes true!
Calling attr with a Function Parameter
This is a great trick: we’ve used the attr action—but it’s not the version we’re used to. Previously we used the attr(key, value) action to set attributes to a static value, but attr also lets us pass in a function to determine the value. The function will be passed two parameters: the index of the element and its current value. The return value of the function becomes the attribute’s new value. For our invert method, we return the opposite of the element’s current selection value—so each element is toggled. We can do this kind of dynamic processing with stacks of commands: text, html, val, addClass, wrap … and many more!
Searching through Lists
After having to listen to the client whine on and on about how hard it is to find the celebrities he’s trying to select, you decide to throw in a little freebie: a quick search feature that lets him type some characters and automatically select any matching elements:
SWAPLIST.search = function(list, search) {

  $(list)

    .children()

    .attr('selected', '')

    .filter(function() {

      if (search == '') {

        return false;

      }

      return $(this)

        .text()

        .toLowerCase()

        .indexOf(search) > - 1

    })

    .attr('selected', 'selected');

}
What’s going on here? First, we’re grabbing all list items and then clearing any previous selections (by setting selected to an empty string). Next, we’re using the filter action to find any elements we’re searching for.
The filter action accepts a function as a parameter, and runs that function against every jQuery object in the selection. If the function returns true, the element stays in the selection. But if the function returns false—it’s gone … out of the selection, and unaffected by further processing.
To find elements we care about, we check to see if the text they contain has the text we’re looking for in it. To do this we use the text action that gives us a string. We convert it to lower case (so the search will be case-insensitive), and check to see if our source text is located in the element string. The JavaScript indexOf method will find the position of a string inside another string; for example, "hello".indexOf('ll'); will return 2 (the index starts at 0, as usual). If the substring is not found, indexOf will return -1, which is what we’re checking for here.
Whichever elements remain in the jQuery selection after the filter function runs must contain the keyword we’re looking for—so once again we use the attr method to select them.
To use the search method we created, we could attach it to a click handler—so the user types a word and then clicks a search button. Even better is to attach a keyup handler to the input itself, so it selects as you type:
$('#search').keyup(function() {

  SWAPLIST.search("#a-listers, #candidates", $(this).val());

});Check out the book and buy it online at jQuery: Novice to Ninja, by Earle Castledine & Craig Sharkie. You can also download the book’s code archive, check on updates and errata or consult with the thriving community of JavaScript and jQuery developers on the SitePoint Forums.
Frequently Asked Questions (FAQs) about Controlling Lists with jQuery
How can I create a list using jQuery?
Creating a list using jQuery is quite straightforward. First, you need to select the element where you want to append the list. Then, you can use the append() or html() method to add list items. Here’s a simple example:$(document).ready(function(){
$("body").append("<ul id='myList'></ul>");
for(var i=0; i<5; i++){
$("#myList").append("<li>Item "+(i+1)+"</li>");
}});
In this example, we first append an unordered list (ul) with the id ‘myList’ to the body of the document. Then, we use a for loop to append five list items (li) to this list.
How can I manipulate list items with jQuery?
jQuery provides several methods to manipulate list items. For instance, you can use the text() method to change the text of a list item, the css() method to change its style, or the remove() method to remove it. Here’s an example:$(document).ready(function(){
// Change the text of the first list item
$("#myList li:first").text("New item");
// Change the color of the second list item
$("#myList li:eq(1)").css("color", "red");
// Remove the third list item
$("#myList li:eq(2)").remove();});
In this example, we first select the list item using its index (0 for the first item, 1 for the second, etc.), and then we apply the desired method.
How can I use the each() function with a list in jQuery?
The each() function in jQuery is used to iterate over a set of elements. When used with a list, it allows you to perform a specific action for each list item. Here’s an example:$(document).ready(function(){
$("#myList li").each(function(index){
$(this).text("Item "+(index+1));
});});
In this example, we select all list items and change their text to “Item” followed by their index plus one.
How can I make a list sortable with jQuery UI?
jQuery UI provides a sortable() method that allows you to make a list sortable by drag and drop. Here’s how you can use it:$(document).ready(function(){
$("#myList").sortable();});
In this example, we simply select the list and apply the sortable() method. Now, you can drag and drop the list items to reorder them.
How can I create a nested list with jQuery?
Creating a nested list with jQuery is similar to creating a regular list. You just need to append a new list to a list item. Here’s an example:$(document).ready(function(){
$("body").append("<ul id='myList'></ul>");
for(var i=0; i<3; i++){
$("#myList").append("<li>Item "+(i+1)+"<ul><li>Subitem</li></ul></li>");
}});
In this example, we append a new list with one item to each list item of the main list.
How can I select a specific list item with jQuery?
jQuery provides several selectors that you can use to select a specific list item. For instance, you can use the :eq() selector to select a list item by its index, or the :contains() selector to select a list item by its text. Here’s an example:$(document).ready(function(){
// Select the second list item
var item = $("#myList li:eq(1)");
// Select the list item that contains the text "Item 2"
var item = $("#myList li:contains('Item 2')");});
In this example, we first select the second list item by its index, and then we select the list item that contains the text “Item 2”.
How can I add a click event to a list item with jQuery?
You can use the click() method in jQuery to add a click event to a list item. This method takes a function as an argument, which will be executed when the list item is clicked. Here’s an example:$(document).ready(function(){
$("#myList li").click(function(){
alert("You clicked on "+$(this).text());
});});
In this example, we add a click event to all list items that shows an alert with the text of the clicked item.
How can I use the appendTo() method with a list in jQuery?
The appendTo() method in jQuery is used to append an element to another element. When used with a list, it allows you to append a list item to a list. Here’s an example:$(document).ready(function(){
$("<li>New item</li>").appendTo("#myList");});
In this example, we create a new list item with the text “New item” and append it to the list with the id ‘myList’.
How can I use the prepend() method with a list in jQuery?
The prepend() method in jQuery is used to insert an element at the beginning of another element. When used with a list, it allows you to insert a list item at the beginning of a list. Here’s an example:$(document).ready(function(){
$("#myList").prepend("<li>New item</li>");});
In this example, we insert a new list item with the text “New item” at the beginning of the list with the id ‘myList’.
How can I use the :first and :last selectors with a list in jQuery?
The :first and :last selectors in jQuery are used to select the first and last element of a set of elements. When used with a list, they allow you to select the first and last list item. Here’s an example:$(document).ready(function(){
// Select the first list item
var firstItem = $("#myList li:first");
// Select the last list item
var lastItem = $("#myList li:last");});
In this example, we first select the first list item, and then we select the last list item.