

Previously, we looked at some common caching mechanisms we can easily utilize to make our apps faster. In this part, we’ll walk through some of the additional software that we can use with PHP for caching.

Key Takeaways
- Memcached is an efficient in-memory key-value store used for caching small chunks of data, which can be easily installed and integrated with PHP to enhance application performance.
- Varnish acts as a powerful front-end accelerator by caching HTTP requests, which significantly speeds up web applications by reducing the load on web servers.
- Configuring Varnish involves setting up various parameters in the Varnish configuration file and ensuring it listens on the correct port to avoid conflicts with web servers like Apache.
- PHP libraries such as Doctrine Cache and Stash provide additional caching solutions, allowing developers to cache custom data and optimize database queries and expensive computations.
- Both Memcached and Varnish can be monitored and managed using specific tools that provide insights into performance metrics like cache hits and misses, helping to fine-tune caching strategies for better efficiency.
Memcached
Memcached is an in-memory key-value store. You can use it to store things like strings, numeric values, objects and arrays.
Installing Memcached
You can execute the command below to install memcached on ubuntu or other debian based OS:
sudo apt-get install memcached
To make it work with PHP, you also need to install the PHP extension:
sudo apt-get install php5-memcached
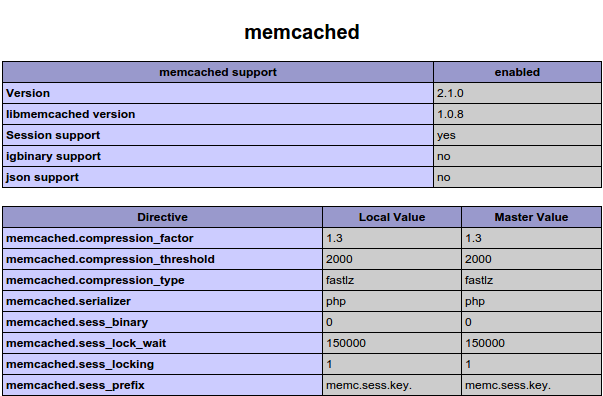
To check if memcached is working, look for ‘memcached’ in the output returned when you call the phpinfo() method from a page. You should see something similar to the following:
Using Memcached
To use memcached, first we create a new instance of the Memcached class. We then specify which server we want to connect to by calling the addServer method. $memcached_host is the IP or domain name of the server and the $memcached_port is the port where the memcached server runs. The default is 11211.
$mem = new Memcached();

$memcached_host = '127.0.0.1';

$memcached_port = 11211;

$mem->addServer($memcached_host, $memcached_port);
Once that’s done, you can use the set method to cache a specific key-value pair. The set method accepts a unique key as its first argument, and the data that you want to cache as the second, while the third is the duration of the data’s lifetime, in seconds:
$id = 23;

$my_data = array('name' => 'gon', 'occupation' => 'hunter');

$ttl = 60;

$mem->set($id, $my_data, $ttl);
If you want to get the data back, you can use the get method. Just use the unique key as the query:
$my_data = $mem->get(23);

if($my_data){

    return $my_data;

}else{

    //fetch data from database

}
To further optimize memcached, you can configure its settings. You can do that by editing the memcached configuration file: /etc/memcached.conf.
Here are some of the options that you might find useful. Just uncomment them or edit the existing values:
-v – if you want to show more information while memcached is running.
-vv – if you can’t find what you’re looking for in verbose mode, you can see even more information when you set this option. Very useful when debugging.
-m – the maximum amount of memory that memcached can use. By default this is set to 64mb.
-M – tells memcached to return an error when the maximum amount of memory is already exhausted. By default this option is not set. Instead, it automatically removes items from the cache.
-c – the maximum number of simultaneous connections allowed. The default is 1024.
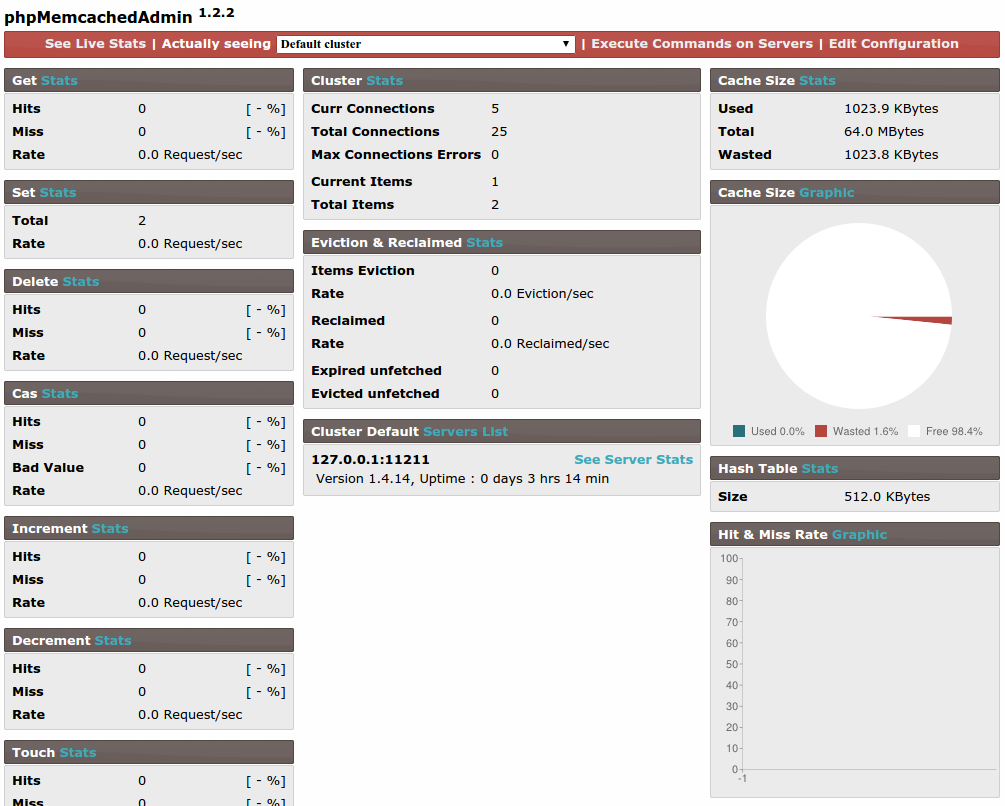
You can also install phpMemcachedAdmin on your memcached server. It will show you things like the total number of current connections, connection errors, current items, the total amount of memory used and more data that you might find useful. Here’s a screenshot:
Varnish
Varnish is a program that sits in front of the web server and speeds up web applications. This means that when a user accesses your website, Varnish receives the initial request instead of the web server. If the content being requested already exists in the cache, Varnish gets it from the cache and serves it. If it doesn’t exist, it asks the web server to serve it, puts the response into the cache, and then sends it to the user. The next time the same page is requested, it will pull it from the cache instead.
Installing Varnish
To install Varnish, you first have to add the repository to your sources:
sudo curl http://repo.varnish-cache.org/debian/GPG-key.txt | sudo apt-key add -
Next execute the following to install Varnish:
sudo apt-get update

sudo apt-get install varnish
Configuring Varnish
Next you need to configure Varnish based on your web server. For this tutorial, I’m going to assume that the web server is Apache. Start by opening up the Varnish configuration file at /etc/default/varnish.
Look for ‘DAEMON_OPTS’, the uncommented one. Make sure it’s the same as the one below:
DAEMON_OPTS="-a :80 \

             -T localhost:6082 \

             -f /etc/varnish/default.vcl \

             -S /etc/varnish/secret \

             -s malloc,256m"
Here’s the breakdown of the options we’ve used above:
-a– this is the address and the port Varnish listens to. In the configuration above, we didn’t specify the address. This means that Varnish will listen for requests on the same server where the web server is installed. Usually, you have to install Varnish on a different server, so that it’s not subjected to the same load as the web server.-T– the address and the port the management interface listens to.-f– allows you to specify your own VCL configuration file instead of the default.S– the path to the file containing the secret used for authorizing access to the management port.-s– used for specifying the storage backend. You can use any of the options on this page. Usually itsmalloc, which uses memory as the cache. This asks for the maximum memory size to be specified. In this case its256mwhich is 256MB.
Next, we need to edit the Varnish VCL Configuration file (/etc/varnish/default.vcl). This allows us to set the server that will serve as the source.
In this case, we’re using Apache on the same machine where Varnish is installed so we can set the host to localhost and the port to 8888.
backend default {

    .host = "localhost";

    .port = "8888";

}
By default Apache runs on port 80. Earlier, we configured Varnish to listen to port 80 so we need to replace Apache’s 80 with something else, otherwise there would be a conflict between Apache and Varnish.
We update the Apache configuration: /etc/apache2/sites-enabled/000-default.conf.
We make sure that the virtual host is now set to port 8888.
<VirtualHost 127.0.0.1:8888>
Next we also have to update the ports config file: /etc/apache2/ports.conf
We make sure it has a virtual host definition using the same host and port used in the Apache configuration file:
Listen 127.0.0.1:8888
We then restart Apache for changes to take effect.
sudo service apache2 restart
Using Varnish
Once that’s done, Varnish is now ready to do some caching. Let’s give it a try by creating a new PHP file that would show us some news from the database. If you want to follow along, use this github gist to get the data. Below you’ll find the PHP file that we will use for testing. It fetches the title and url of the article from the news table and outputs them in a table:
<?php

$db = new Mysqli(DB_HOST, DB_USER, DB_PASSWORD, DB_NAME);
$results = $db->query("SELECT title, url FROM news");

?>
<table border="1">

    <thead>

        <tr>

            <th>title</th>

            <th>url</th>

        </tr>

    </thead>

    <tbody>

    <?php

    while($row = $results->fetch_object()){

    ?>

        <tr>

            <td><?php echo $row->title; ?></td>

            <td><?php echo $row->url; ?></td>

        </tr>

    <?php

    }

    ?>

    </tbody>

</table>
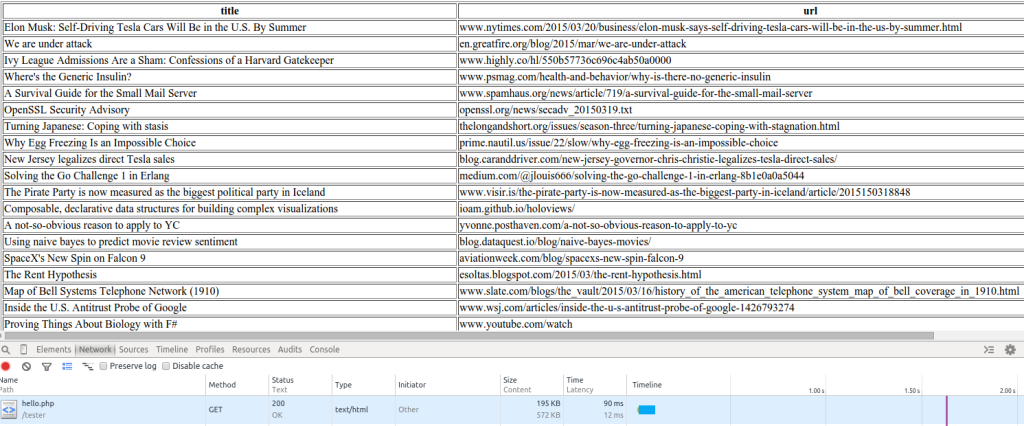
Open up the network panel in chrome dev tools and check the total time it takes to get the whole page. In my test it took 192 ms:

Now refresh the page and check the total time it takes again. It took 90 ms for me:
Let’s also inspect the response headers that we get from the second request:
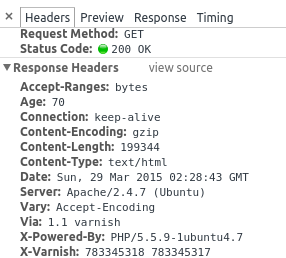
The important thing to note here is the Age and the X-Varnish headers. On the initial request for a specific page, the Age has a value of 0, and it will increment on subsequent requests. You know that Varnish is working when you can see that the Age increments every time you refresh the same page. The X-Varnish header has one value in it the very first time the page is requested. It will have two values when it’s getting something from the cache. The first value is the request ID – a unique ID assigned by varnish to that specific page request. The second value is the request ID of the request from which the cached response was populated, which is basically the request ID from the initial page request.
Libraries
In this section I’ll do a quick walkthrough of some of the PHP libraries that you can use for caching.
Doctrine Cache
Doctrine is the caching component of the Doctrine Object Relational Mapper. It allows you to use different drivers for caching custom data. Drivers include APC, Memcache, Memcached, XCache and Redis.
You can install it by executing the following command from your terminal:
composer require doctrine/cache
Here’s an example on how to cache custom data on a memcached server:
require 'vendor/autoload.php';
$memcached = new Memcached();

$port = 11211;

$memcached->addServer($memcache_host, $port);
$cacheDriver = new \Doctrine\Common\Cache\MemcachedCache();

$cacheDriver->setMemcached($memcached);

$cacheDriver->save($cache_id, $my_data);
First, we initialize memcached. Then we set the memcached server by calling the setMemcached method and pass the memcached instance that we declared earlier to it. Finally, we cache the data by calling the save method. This function requires a unique id as its first argument, and the data as its second argument.
You can find more information about how to connect using a specific driver in their official documentation.
Stash
Just like Doctrine Cache, Stash is a caching library for PHP. It allows us to cache results from database calls, expensive computations, and data that we can reuse throughout the whole app. It also supports different drivers:
- FileSystem – stores items in the filesystem.
- Sqlite – stores items in an sqlite database.
- APC – a memory-based cache that uses the APC PHP extension.
- Memcached – uses a memcached server for storing items.
- Redis – stores items in a key/value storage system.
- Ephemeral – caches item for the lifetime of the script.
- Composite – allows the use of the drivers above as a single cache.
In this article, I’m only going to walk you through the use of Stash with Memcached since we already used it earlier.
Installing Stash
You can install Stash with Composer:
composer require tedivm/stash
Trying Stash
If you have followed along in the Varnish section earlier and inserted the SQL data, you can connect to the same database. Next, connect to the Memcached server. Unlike Doctrine Cache, Stash provides its own wrapper for connecting to Memcached, so we’ll use that instead of the class provided by the Memcached PHP extension.
$driver = new Stash\Driver\Memcache();

$driver->setOptions(array('servers' => array(MEMCACHED_HOST, MEMCACHED_PORT)));
Now we can declare a new Pool to use the memcached driver. The Pool is a representation of the caching system. We use it for pushing in or pulling out items from the cache. Each item is represented by a unique key, and the value can be any datatype supported in PHP. That includes integers, booleans, strings, arrays and objects. From that pool we use the getItem method to pull out a specific item.
We then check whether the item that we are fetching already exists in the cache by using the isMiss() method. If this method returns true then the item doesn’t exist in the cache yet and we need to fetch it from its original source. In this case, the database. We loop through the results returned and store them in an array.
Once we’ve looped through all the items, we call the lock() method on the pool. This informs other processes that the current process is generating a new set of data. We then call the set() method to assign the data that we have fetched from the database to the pool. Once that’s done we call the get() method so we can extract the data that we have cached.
$pool = new Stash\Pool($driver);

$item = $pool->getItem('news');
if($item->isMiss()){
    $results = $db->query("SELECT title, url FROM news");
    while($row = $results->fetch_object()){

        $data[] = array(

            'title' => $row->title,

            'url' => $row->url

        );

    }
    $item->lock();

    $item->set($data);

}
$news_items = $item->get();

?>
<table border="1">

    <thead>

        <tr>

            <th>title</th>

            <th>url</th>

        </tr>

    </thead>

    <tbody>

    <?php

    foreach($news_items as $row){

    ?>

        <tr>

            <td><?php echo $row['title']; ?></td>

            <td><?php echo $row['url']; ?></td>

        </tr>

    <?php

    }

    ?>

    </tbody>

</table>
Conclusion
In this article we’ve seen some more of the techniques, software and libraries that we can use to improve the performance of apps and websites that we develop using PHP. Which caching approaches do you use? Let us know!
Frequently Asked Questions (FAQs) about Varnish, Memcached, and PHP Libraries
What are the key differences between Memcached and Varnish?
Memcached and Varnish are both caching systems, but they serve different purposes. Memcached is an in-memory key-value store for small chunks of arbitrary data from results of database calls, API calls, or page rendering. It is primarily used to speed up dynamic database-driven websites by caching data and objects in RAM to reduce the number of times an external data source must be read. On the other hand, Varnish is a web application accelerator also known as a caching HTTP reverse proxy. It is installed in front of any server that speaks HTTP and configured to cache the contents. Varnish is focused on HTTP, unlike Memcached which is a general-purpose distributed memory caching system.
How does PHP interact with Memcached?
PHP interacts with Memcached through the Memcached extension. This extension uses libmemcached library to provide API for communicating with Memcached servers. It is handy for storing and retrieving data from your PHP applications. The PHP Memcached extension supports a wide range of Memcached features, including the binary protocol, SASL authentication, and the ability to set, add, replace, and append data.
How can I install and configure Varnish for my PHP application?
Varnish can be installed and configured for your PHP application by following a few steps. First, you need to install Varnish on your server. This can be done through the package manager for your system. Once installed, you can configure Varnish by editing the default.vcl file, which is the main configuration file for Varnish. This file contains backend definitions and rules for how Varnish should handle requests and responses. After configuring, you can start Varnish and it will begin caching your PHP application.
What are the benefits of using PHP libraries with Memcached and Varnish?
Using PHP libraries with Memcached and Varnish can significantly improve the performance of your web applications. PHP libraries provide a set of functions and methods that allow you to interact with Memcached and Varnish in a more efficient and streamlined way. They can help you to manage caching, handle data storage and retrieval, and optimize the delivery of your web content. By using PHP libraries, you can leverage the power of Memcached and Varnish without having to write complex code.
How can I use Memcached with PHP for session storage?
Memcached can be used with PHP for session storage by changing the session handler in your PHP configuration. This can be done by setting the session.save_handler and session.save_path directives in your php.ini file to ‘memcached’ and the list of your Memcached servers respectively. Once these settings are in place, PHP will automatically use Memcached for session storage, which can improve the performance and scalability of your web applications.
How does Varnish handle HTTP requests and responses?
Varnish handles HTTP requests and responses through a process known as caching. When a client sends a request to a server, Varnish intercepts the request and checks its cache to see if it has a stored response for that request. If it does, it sends the stored response back to the client. If it doesn’t, it forwards the request to the backend server, stores the response it receives in its cache, and then sends the response back to the client. This process can significantly speed up the delivery of web content.
Can I use Memcached and Varnish together?
Yes, you can use Memcached and Varnish together to optimize the performance of your web applications. Memcached can be used to cache data and objects in RAM, reducing the number of times an external data source must be read. Varnish can be used to cache HTTP requests and responses, speeding up the delivery of web content. By using both together, you can achieve a high level of performance and scalability for your web applications.
How can I monitor the performance of Memcached and Varnish?
There are several tools available for monitoring the performance of Memcached and Varnish. For Memcached, you can use tools like phpMemcachedAdmin, MemcachedTop, and Memcache.php. These tools provide statistics on cache hits, misses, evictions, and other metrics. For Varnish, you can use tools like Varnishstat, Varnishlog, and Varnishtop. These tools provide information on cache hits, misses, backend connections, and other metrics.
What are some common use cases for Memcached and Varnish?
Memcached and Varnish are commonly used to improve the performance and scalability of web applications. They are particularly useful for dynamic, database-driven websites where data and objects are frequently read from an external data source. By caching this data and these objects in RAM, Memcached and Varnish can reduce the number of times the data source must be read, speeding up the delivery of web content. They are also useful for websites with high traffic, as they can help to manage the load on the server and ensure that the website remains responsive.
What are some best practices for using Memcached and Varnish?
Some best practices for using Memcached and Varnish include: using consistent hashing for key distribution, setting appropriate TTL values for your cache, monitoring your cache performance regularly, and using separate cache pools for different types of data. It’s also important to understand the limitations of your cache and to design your application in such a way that it can handle cache failures gracefully.