


Creating your business website with any CMS requires you to make the back-end user friendly, and that means making the forms meaningful and accessible. In this article, we’re going to explore OctoberCMS form widgets and create a widget called UniqueValue, which helps the user enter a unique value. This could be useful for entering emails, usernames, post slugs, etc. Let’s get started.
Key Takeaways
- OctoberCMS offers a range of simple field types and custom widgets for creating user-friendly forms in the back-end of a website; a notable example is the ‘repeater widget’ which allows for the dynamic generation of form fields based on user input.
- Building a form widget in OctoberCMS involves using the ‘create:formwidget’ scaffolding command to create the necessary folders and classes, defining properties for the widget, and implementing functions to prepare the widget for rendering and process user input.
- OctoberCMS widgets can be made interactive using AJAX; this involves adding ‘data-request’ attributes to the widget’s markup to specify the methods that should be called when the user interacts with the widget, and using ‘data-request-success’ attributes to specify the JavaScript functions that should process the AJAX request responses.
- Once a form widget has been created and tested, it can be registered as a system widget in the Plugin.php file, allowing it to be easily used in the same way as built-in form field types like ‘text’ and ‘checkboxlist’.
Available Form Widgets
OctoberCMS provides a list of simple field types like email input, password, dropdown options, etc. The documentation has a list of all available fields. Moreover, the CMS provides some custom widgets like the media manager widget which lets you select an item from your media library or the WYSIWYG editor, Markdown editor, etc.
An interesting widget we should mention here is the repeater widget. Let’s say you have a recipes website. The cook will enter the recipe name and start filling in the ingredients. You might ask the user “how many ingredients do you need?” and based on that, you can generate the form fields. Another clean way to do it is to have a button at the bottom of the form that says Add new ingredient, which will generate the necessary fields for the cook when needed.
Here is an example configuration for the recipe form:
// models/recipe/fields.yaml

fields:
    name:
        label: Name
        type: text
        required: true
    ingredients:
        label: Ingredients
        type: repeater
        prompt: Add new ingredient
        form:
            fields:
                ingredient:
                    label: Ingredient
                    type: text
                how_much:
                    label: How much
                    type: number
                unit:
                    label: Unit
                    type: dropdown
                    options:
                        spoon: Spoon
                        ounce: Ounce
                        # etc

Creating a Form Widget
If you read the previous OctoberCMS article (you should, it’s great!), you’ll know that we built a CRUD plugin. We’ll be using it in this article, so make sure to clone it into your OctoberCMS installation.
# Inside your plugins folder

git clone git@github.com:Whyounes/OctoberCMS_Sitepoint_plugin_demo.git rafie/sitepointDemo
You can check the final code for this tutorial in the uniqueValue-formwidget branch in the same repo.
To start building our widget, we use the create:formwidget scaffolding command which creates a view folder, assets folder and a FormWidgetBase class.
php artisan create:formwidget rafie.SitepointDemo UniqueValue
Our UniqueValue widget requires three properties:
modelClass: The model class that will have the unique field.selectFrom: The field name inside the model. Defaults toname.pattern: The displayed input type (text,email,number,url). Defaults totext.
After our form widget class is constructed, it will automatically call the inherited init method, which is responsible for preparing our widget for rendering.
// formwidgets/UniqueValue.php

class UniqueValue extends FormWidgetBase
{
    /**
     * {@inheritDoc}
     */
    protected $defaultAlias = 'rafie_sitepointDemo_uniquevalue';

    /**
     * {@inheritDoc}
     */
    public function init()
    {
    }
}
Our parent WidgetBase class provides a fillFromConfig helper method which maps the passed config properties from the fields.yaml file to the form widget class’ attributes.
// formwidgets/UniqueValue.php

class UniqueValue extends FormWidgetBase
{
    /*
     * Config attributes
     */
    protected $modelClass = null;
    protected $selectFrom = 'name';
    protected $pattern = 'text';

    /**
     * {@inheritDoc}
     */
    protected $defaultAlias = 'rafie_sitepointDemo_uniquevalue';

    /**
     * {@inheritDoc}
     */
    public function init()
    {
        $this->fillFromConfig([
            'modelClass',
            'selectFrom',
            'pattern'
        ]);
        $this->assertModelClass();

        parent::init();
    }

    // ...
}
After calling the fillFromConfig function, we assert that the model class exists and then call the parent init method.
// formwidgets/UniqueValue.php

class UniqueValue extends FormWidgetBase
{
    // ...

    protected function assertModelClass()
    {
        if( !isset($this->modelClass) || !class_exists($this->modelClass) )
        {
            throw new \InvalidArgumentException(sprintf("Model class {%s} not found.", $this->modelClass));
        }
    }

    // ...
}
// formwidgets/uniquevalue/UniqueValue.php

class UniqueValue extends FormWidgetBase
{
    // ...

    public function render()
    {
        $this->prepareVars();

        return $this->makePartial('uniquevalue');
    }

    /**
     * Prepares the form widget view data
     */
    public function prepareVars()
    {
        $this->vars['inputType'] = $this->pattern;
        $this->vars['name'] = $this->formField->getName();
        $this->vars['value'] = $this->getLoadValue();
        $this->vars['model'] = $this->model;
    }
}
OctoberCMS will look for the partial inside the partials folder and pass the $this->vars array to it.
// formwidgets/uniquevalue/partials/_uniquevalue.htm

<?php if ($this->previewMode): ?>

    <div class="form-control">
        <?= $value ?>
    </div>

<?php else: ?>
    <div class="input-group">
        <input
            type="<?= $inputType ?>"
            id="<?= $this->getId('input') ?>"
            name="<?= $name ?>"
            value="<?= $value ?>"
            class="form-control unique_widget"
            autocomplete="off"
        />
        <span class="input-group-addon oc-icon-remove"></span>
    </div>

<?php endif ?>
The input has a preview and an editing mode. When editing, we display an input and fill the type using the specified pattern. The value is automatically set in this case if we are updating a record. The span.input-group-addon element will display a check or a remove icon depending on the entered value.
Using AJAX
OcotberCMS has a set of scripts that let you update your content using HTML5 data attributes and AJAX handlers. We may cover it in detail in another article, but you can refer to the documentation for more details right now, if you’re curious.
We’re going to check if the entered value is unique when the input value changes. First we need to add the data-request attribute which specifies the backend method handler name.
// formwidgets/uniquevalue/partials/_uniquevalue.htm

// ...
        <input
            type="<?= $inputType ?>"
            id="<?= $this->getId('input') ?>"
            name="<?= $name ?>"
            value="<?= $value ?>"
            class="form-control unique_widget"
            autocomplete="off"
            data-request="onChange"
        />
// ...
Next, we specify the JS function that will handle a successful request’s response using the data-request-success attribute. It will receive a list of parameters, but the most important ones are $el, which refers to our input, and the data parameter, which holds the request’s result.
// formwidgets/uniquevalue/partials/_uniquevalue.htm

// ...
        <input
            type="<?= $inputType ?>"
            id="<?= $this->getId('input') ?>"
            name="<?= $name ?>"
            value="<?= $value ?>"
            class="form-control unique_widget"
            autocomplete="off"
            data-request="onChange"
            data-request-success="uniqueInputChanged($el, context, data, textStatus, jqXHR);"
        />
// ...
OctoberCMS’ AJAX framework provides a data-track-input attribute to trigger the data-request handler if the element has changed. It accepts an optional delay parameter which we can use to minimize the number of sent requests.
// formwidgets/uniquevalue/partials/_uniquevalue.htm

// ...
        <input
            type="<?= $inputType ?>"
            id="<?= $this->getId('input') ?>"
            name="<?= $name ?>"
            value="<?= $value ?>"
            class="form-control unique_widget"
            autocomplete="off"
            data-request="onChange"
            data-request-success="uniqueInputChanged($el, context, data, textStatus, jqXHR);"
            data-track-input="500"
        />
// ...
We still didn’t define our onChange handler method inside our form widget class. OctoberCMS will look for a handler with the same name inside the backend page controller or any other widgets used. To avoid conflicts, we use the fully prefixed handler name which will include our widget alias.
// formwidgets/uniquevalue/partials/_uniquevalue.htm

// ...
        <input
            // ...
            data-request="<?= $this->getEventHandler('onChange') ?>"
            // ...
        />
// ...
// formwidgets/uniquevalue/UniqueValue.php

class UniqueValue extends FormWidgetBase
{
    // ...

    public function onChange()
    {
        $formFieldValue = post($this->formField->getName());
        $modelRecords = $this->model->newQuery()->where($this->selectFrom, $formFieldValue);

        return ['exists' => (boolean) $modelRecords->count()];
    }

    // ...
}
$this->formField->getName() returns the input name that we use to get the input value from the post data. Then, we call the modelClass::where method with the selectFrom config value and the post data.
The only thing left is to process the request’s result using the JavaScript function defined in our data-request-success attribute. Our CSS and JavaScript assets are loaded inside the UniqueValue@loadAsserts method.
// formwidgets/uniquevalue/UniqueValue.php

class UniqueValue extends FormWidgetBase
{
    // ...

    public function loadAssets()
    {
        // $this->addCss('css/uniquevalue.css', 'rafie.SitepointDemo');
        $this->addJs('js/uniquevalue.js', 'rafie.SitepointDemo');
    }

    // ...
}
// formwidgets/uniquevalue/assets/js/uniquevalue.js

function uniqueInputChanged($el, context, data, textStatus, jqXHR)
{
    var addon = $el.parents('.input-group').find('.input-group-addon');

    if( !$el.val().trim() || data.exists )
    {
        addon.removeClass('oc-icon-check').addClass('oc-icon-remove');

        return;
    }

    addon.removeClass('oc-icon-remove').addClass('oc-icon-check');
}
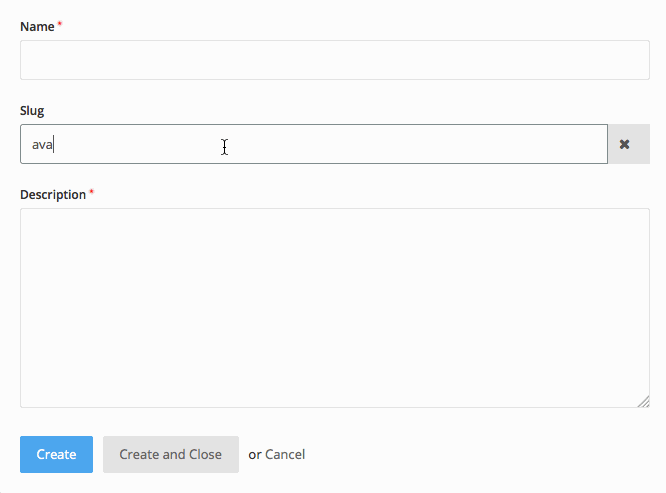
We query our addon element, test the return value, and set the appropriate icon class on the element. You can test the widget by inserting the below code inside your model fields configuration file.
// fields.yaml

fields:
    slug:
        label: Slug
        type: \Rafie\SitepointDemo\FormWidgets\UniqueValue
        modelClass: \RainLab\Blog\Models\Post
        selectFrom: slug
        pattern: text
This is a final demo of the widget.
As a final step, we will register our form widget as a system widget (text, checkboxlist, etc).
// Plugin.php

// ...
/**
 * Registers any form widgets implemented in this plugin.
 */
public function registerFormWidgets()
{
    return [
        'Rafie\SitepointDemo\FormWidgets\UniqueValue' => [
            'label' => 'Unique Value',
            'code' => 'uniquevalue'
        ],
    ];
}
// ...
Now, we can use our widget by using the registered code.
// fields.yaml

fields:
    slug:
        label: Slug
        type: uniquevalue
        modelClass: \RainLab\Blog\Models\Post
        selectFrom: slug
        pattern: text
Conclusion
In this article, we explored the OcotberCMS backend form field widgets and we built a simple demo widget to test it. You can extend the final widget by adding new functionality, like adding a preventSubmit option when the value is not unique, etc. You can check the final version on Github and if you have any questions or comments you can leave them below and I’ll do my best to answer them.
Frequently Asked Questions about Building OctoberCMS Form Field Widgets
What are the key steps to building OctoberCMS form field widgets?
Building OctoberCMS form field widgets involves several steps. First, you need to create a new widget class in your plugin directory. This class should extend the FormWidgetBase class. Next, you need to define the widget details by implementing the widgetDetails method. This method should return an array with the widget name and description. After that, you need to create a default markup file for the widget. This file should be located in a directory named after the widget class in your plugin’s widgets directory. Finally, you need to register the widget in the Plugin.php file of your plugin.
How can I customize the appearance of my OctoberCMS form field widget?
You can customize the appearance of your OctoberCMS form field widget by creating a custom CSS file in the same directory as your default markup file. This CSS file should be named after the widget class with a .css extension. You can then use this CSS file to style your widget as desired.
How can I add functionality to my OctoberCMS form field widget?
You can add functionality to your OctoberCMS form field widget by implementing methods in your widget class. These methods can be used to handle user interactions, such as clicks or form submissions. You can also use the OctoberCMS AJAX framework to make your widget interactive.
How can I use the OctoberCMS AJAX framework in my form field widget?
You can use the OctoberCMS AJAX framework in your form field widget by adding data-request attributes to your markup. These attributes should specify the method in your widget class that should be called when the user interacts with the element. You can also use data-request-update attributes to specify which parts of the page should be updated after the AJAX request is completed.
How can I validate user input in my OctoberCMS form field widget?
You can validate user input in your OctoberCMS form field widget by implementing a validation method in your widget class. This method should use the OctoberCMS Validator class to check the user input against a set of rules. If the input is not valid, the method should throw a ValidationException with a message that describes the error.
How can I use repeater fields in my OctoberCMS form field widget?
You can use repeater fields in your OctoberCMS form field widget by adding a repeater field to your default markup file. This field should have a data-control attribute with the value “repeater”. You can then use the addFromConfig method in your widget class to add fields to the repeater.
How can I handle errors in my OctoberCMS form field widget?
You can handle errors in your OctoberCMS form field widget by implementing an error handling method in your widget class. This method should catch any exceptions that are thrown during the execution of your widget and display an appropriate error message to the user.
How can I test my OctoberCMS form field widget?
You can test your OctoberCMS form field widget by creating a test page in your plugin. This page should include a form that uses your widget. You can then interact with the form and check if the widget behaves as expected.
How can I debug my OctoberCMS form field widget?
You can debug your OctoberCMS form field widget by using the OctoberCMS Debugbar plugin. This plugin provides a debug bar that shows detailed information about the execution of your code, including any errors or exceptions.
How can I optimize the performance of my OctoberCMS form field widget?
You can optimize the performance of your OctoberCMS form field widget by minimizing the number of AJAX requests that it makes. You can do this by using the data-request-confirm attribute to confirm user actions before making a request. You can also use the OctoberCMS Cache class to cache the results of expensive operations.