Build Your Own ASP.NET Website With C# And VB.NET: Chapter 1

This article was written in 2004 and remains one of our most popular posts. If you’re keen to learn more about ASP.NET, you may find this recent article on ASP.NET 4.5 of great interest.
ASP.NET is one of the most widely adopted Web application platforms available today. As a Web developer it’s therefore becoming increasingly important to expand your skills and learn the ins-and-outs of a technology that’s now used by major organizations such as Accenture, Compaq, AIG, Bank of Nova Scotia, Adobe, Dell, Ford and many others.
This series covers the basics the new (or practicing) .NET developer will need to know before they being to develop a Website in ASP.NET. It comprises 4 articles:
Chapter 1: Introduction to .NET
This chapter begins by asking the questions, “What is .NET?” and, “What is ASP.NET?” It then goes on to explain what you’ll need to get started, and how to install all the necessary software. Finish off by developing your first ASP.NET page! This chapter begins below.
Chapter 2: ASP.NET Basics
Roll up your sleeves — it’s time to talk turkey, as we launch into a detailed discussion of the basic concepts you’ll need to know as you proceed into the world of .NET. We’ll discuss ASP.NET page structure, and understand the View State. We’ll also see what’s involved in working with directives, and talk about the different ASP.NET languages. And you’ll see plenty of practical examples along the way.
Chapter 3: VB.NET and C# Programming Basics
This installment looks more closely at two of the most popular .NET languages — C# and VB.NET. First, we’ll work through a couple of examples that illustrate the basic principles that apply to programming in these languages such as control and page events, variables, arrays, functions, operators, conditionals, and more. Lastly, we discuss the concept of object-oriented programming and the philosophy of separating design from content as we look closely at code-behind.
Chapter 4: Web Forms and Web Controls
The Book
These 4 chapters are excerpts from my new book. Build Your Own ASP.NET Website Using C# and VB.NET contains not only the 4 chapters above, but 13 more chapters, which step you through the practical knowledge you’ll need in order to build your own dynamic ecommerce Website using these technologies. The chapters cover everything from the basics of database design and development, through ADO.NET, security and user authentication, and working with files and email, to building your own ASP.NET shopping cart and consuming XML Web Services. The book also comes with three very handy references, covering HTML Controls, Web Controls, and Validation Controls.
If you’d prefer to read the Adobe Acrobat PDF version of this information, you can download these 4 chapters FREE.
Your Feedback
If you have a question about any of the information covered in this series, your best chance of a quick response is to post your query in the SitePoint.com Forums. Suggestions for improvement as well as notices of any mistakes you may find (one or two may have slipped through the cracks) are especially welcome — submit these to SitePoint Book Support.
Now, without any more ado, let’s start building your ASP.NET Website!
Build Your Own ASP.NET Website Using C# & VB.NET, Chapter 1 – Introduction to .NET and ASP.NET
It’s being touted as the “next big thing.” Microsoft has invested millions in marketing, advertising, and development to produce what it feels is the foundation of the future Internet. It’s a corporate initiative, the strategy of which was deemed so important, that Bill Gates himself, Microsoft Chairman and CEO, decided to oversee personally its development. It is a technology that Microsoft claims will reinvent the way companies carry out business globally for years to come. In his opening speech at the Professional Developers’ Conference (PDC) held in Orlando Florida in July of 2000, Gates stated that a transition of this magnitude only comes around once every five to six years. What is this show-stopping technology? It’s .NET.
What is .NET?
.NET is the result of a complete make-over of Microsoft’s software development products, and forms part of the company’s new strategy for delivering software as a service. The key features that .NET offers include:
- .NET Platform: The .NET platform includes the .NET Framework and tools to build and operate services, clients, and so on. ASP.NET, the focus of this book, is a part of the .NET Framework.
- .NET Products: .NET products currently include MSN.NET, Office.NET, Visual Studio.NET, and Windows Server 2003, originally known as Windows .NET Server. This suite of extensively revised systems provides developers with a friendly, usable environment in which they may create applications with a range of programming languages including C++. NET, Visual Basic.NET, ASP.NET, and C#. Because all these products are built on top of .NET, they all share key components, and underneath their basic syntaxes you’ll find they have much in common.
- .NET My Services: An initiative formerly known as “Hailstorm”, .NET My Services is a set of XML Web Services (Don’t worry if you don’t yet know what a Web Service is. I’ll explain all about them in Chapter 17, XML Web Services.) currently being provided by a host of partners, developers, and organizations that are hoping to build corporate services and applications for devices and applications, as well as the Internet. The collection of My Services currently extends to passport, messenger, contacts, email, calendars, profiles, lists, wallets, location, document stores, application settings, favorite Websites, devices owned, and preferences for receiving alerts.
The book focuses on one of the core components within the .NET Framework: ASP.NET.
What is ASP.NET?
For years now, Active Server Pages (ASP) has been arguably the leading choice for Web developers building dynamic Websites on Windows Web servers. ASP has gained popularity by offering the simplicity of flexible scripting via several languages. That, combined with the fact that it’s built into every Microsoft Windows-based Web server, has made ASP a difficult act to follow.
Early in 2002, Microsoft released its new technology for Internet development. Originally called ASP+, it was finally released as ASP.NET, and represents a leap forward from ASP both in sophistication and productivity for the developer. It continues to offer flexibility in terms of the languages it supports, but instead of a range of simple scripting languages, developers can now choose between several fully-fledged programming languages. Development in ASP.NET requires not only an understanding of HTML and Web design, but also a firm grasp of the concepts of object-oriented programming and development.
In the next few sections, I’ll introduce you to the basics of ASP.NET. I’ll walk you through installing it on your Web server, and take you through a simple dynamic example that demonstrates how ASP.NET pages are constructed. First, let’s define what ASP.NET actually is.
ASP.NET is a server-side technology for developing Web applications based on the Microsoft .NET Framework. Let’s break that jargon-filled sentence down.
ASP.NET is server-side; that is, it runs on the Web server. Most Web designers start by learning client-side technologies like HTML, JavaScript, and Cascading Style Sheets (CSS). When a Web browser requests a Web page created with client-side technologies, the Web server simply grabs the files that the browser (the client) requests and sends them down the line. The client is entirely responsible for reading the code in the files and interpreting it to display the page on the screen. Server-side technologies, like ASP.NET, are different. Instead of being interpreted by the client, server-side code (for example, the code in an ASP.NET page) is interpreted by the Web server. In the case of ASP.NET, the code in the page is read by the server and used dynamically to generate standard HTML/JavaScript/CSS that is then sent to the browser. As all processing of ASP.NET code occurs on the server, it’s called a server-side technology. As Figure 1.1 shows, the user (client) only sees the HTML, JavaScript, and CSS within the browser. The server (and server-side technology) is entirely responsible for processing the dynamic portions of the page.
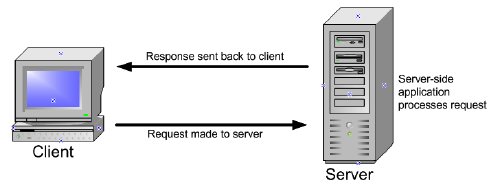
Figure 1.1. The Web server is responsible for processing the server-side code and presenting the output to the user (client).
ASP.NET is a technology for developing Web applications. A Web application is just a fancy name for a dynamic Website. Web applications usually (but not always) store information in a database on the Web server, and allow visitors to the site to access and change that information. Many different programming technologies and supported languages have been developed to create Web applications; PHP, JSP (using Java), CGI (using Perl), and ColdFusion (using CFML) are just a few of the more popular ones. Rather than tying you to a specific technology and language, however, ASP.NET lets you write Web applications using a variety of familiar programming languages.
Finally, ASP.NET is based on the Microsoft .NET Framework. The .NET Framework collects all the technologies needed for building Windows applications, Web applications, and Web Services into a single package with a set of more than twenty programming languages. To develop Websites with ASP.NET, you’ll need to download the .NET Framework Software Development Kit, which I’ll guide you through in the next few sections.
Even with all the jargon demystified, you’re probably still wondering: what makes ASP.NET so good? Compared with other options for building Web applications, ASP.NET has the following advantages:
- ASP.NET lets you use your favorite programming language, or at least one that’s really close to it. The .NET Framework currently supports over twenty languages, four of which may be used to build ASP.NET Websites.
- ASP.NET pages are compiled, not interpreted. Instead of reading and interpreting your code every time a dynamic page is requested, ASP.NET compiles dynamic pages into efficient binary files that the server can execute very quickly. This represents a big jump in performance when compared with the technology’s interpreted predecessor, ASP.
- ASP.NET has full access to the functionality of the .NET Framework. Support for XML, Web Services, database interaction, email, regular expressions, and many other technologies are built right into .NET, which saves you from having to reinvent the wheel.
- ASP.NET allows you to separate the server-side code in your pages from the HTML layout. When you’re working with a team composed of programmers and design specialists, this separation is a great help, as it lets programmers modify the server-side code without stepping on the designers’ carefully crafted HTML�and vice versa.
With all these advantages, ASP.NET has relatively few downsides. In fact, only two come to mind:
- ASP.NET is a Microsoft technology. While this isn’t a problem in itself, it does mean that, at least for now, you need to use a Windows server to run an ASP.NET Website. If your organization uses Linux or some other operating system for its Web servers, you’re out of luck.
- Serious ASP.NET development requires an understanding of object-oriented programming, which we’ll cover over the next few chapters.
Still with me? Great! It’s time to gather the tools and start building!
What Do I Need?
For the moment, if you’re going to learn ASP.NET, you’ll need a Windows-based Web server. Open source initiatives are underway to produce versions of ASP.NET that will run on other operating systems, such as Linux; however, these are not expected to be available in stable form for a while.
While developers had the option of getting their feet wet with ASP on Windows 95, 98, or ME, using a scaled-down version of IIS called a Personal Web Server (PWS), ASP.NET requires the real deal. As a bare minimum, you’ll need a computer equipped with Windows 2000 Professional before you can get started. Windows XP Professional will work fine too, as will any of the Windows 2000 Server packages and Windows 2003 Server.
Other than that, all you need is enough disk space to install the Web server Internet Information Services (18 MB), the .NET Framework SDK (which includes ASP.NET; 108 MB), and a text editor. Notepad or Web Matrix will be fine for getting started, and are certainly all you’ll need for this book. However, if you get serious about ASP.NET, you’ll probably want to invest in a development environment like Visual Studio .NET.
Installing the Required Software
This section tackles the necessary installation and configuration of software that you’ll need for this book, including:
- Internet Information Services (IIS): IIS is the Web server we will use. You’ll need your copy of the Windows CD for the installation and configuration.
- A Modern Web Browser: You can use any modern, standards-compliant browser to test your work. Throughout this book, we’ll be using Internet Explorer 6.
- The .NET Framework Redistributable: As you’ve already learned in this chapter, the .NET Framework is what drives ASP.NET. Installing the .NET Framework installs the necessary files to run ASP.NET.
- The .NET Framework SDK: The .NET Framework Software Development Kit (SDK) contains necessary Web application development tools, a debugger for error correcting, a development database engine in MSDE, and a suite of samples and documentation.
We’re also going to need a database. In this book, we’ll use:
- Microsoft Access: Access is a cheap and easy-to-use alternative to its more robust big brother, SQL Server, and can be purchased separately, or installed from a Microsoft Office CD.
Or alternatively, you might use:
- Microsoft SQL Server Desktop Engine (MSDE): SQL Server is the enterprise alternative to smaller databases such as Access. If you’re working within a corporation where your company’s data is its lifeblood, then SQL Server is the perfect choice. MSDE is a free, cut down version of SQL Server that you can use for development purposes.
- Web Data Administrator: If you’re going to use MSDE, then you’ll need a tool for modifying the data within the database. Web Data Administrator is Microsoft’s free Web-based database management tool.
Installing Internet Information Services (IIS)
Do you need to install IIS locally even if the final site will not be hosted locally? The answer is: yes. Even if you’re uploading your Web applications via FTP to your Web host, installing IIS allows you to view, debug, and configure your applications locally before deployment.
IIS comes with most versions of server-capable Windows operating systems, including Windows 2000 Professional, Server, and Advanced Server, Windows XP Professional, and Windows Server 2003, but it’s not installed automatically in all versions, which is why it may not be present on your computer. To see whether you have IIS installed and running, simply navigate to your Administrative Tools menu and check to see if Internet Information Services is an option. Users of Windows 2000 Professional will find the Administrative Tools in their Control Panels, while XP and Server family users also have shortcuts in their start menus.
If the shortcut is not visible, then you don’t have it installed. To install IIS, simply follow these steps:
- In the Control Panel, select Add or Remove Programs.
- Choose Add/Remove Windows Components. The list of components will become visible within a few seconds.
- In the list of components, check Internet Information Services (IIS).
- Click Next. Windows prompts you to insert the Windows CD and installs IIS.
Once IIS is installed, close the Add or Remove Programs dialog. You can check that IIS has installed correctly by seeing if you can find it within the Administrative Tools menu. If you can, it’s installed.
You are now ready to begin hosting Web applications. Although we won’t cover the configuration of IIS for external use, I will show you how to configure IIS to support local development of ASP.NET applications in order that they may be uploaded to your external Web hosting provider later.
Installing Internet Explorer
As a Windows user, you have Internet Explorer installed by default, but I recommend you run at least version 5.5. You can check your version by selecting About Internet Explorer from the Help menu.
If your version of Internet Explorer is earlier than 5.5, you can download the latest version (version 6 SP1 as of this writing) for free from the Internet Explorer Website. Remember, although ASP.NET will work with older versions of IE, certain ASP.NET functionality works best with the latest version.
The Internet Explorer Website does not allow you to install a version of your choice; it permits you to download only the most recent version that’s available. Because the newest versions of Internet Explorer will include the latest patches, it’s a good idea to stick with what they give you.
Installing the .NET Framework and SDK
To begin creating ASP.NET applications, you’ll need to install the .NET Framework and SDK. The .NET Framework includes the necessary files to run and view ASP.NET pages, while the .NET Framework SDK includes samples, documentation, and a variety of free tools.
The .NET Framework SDK also provides you with the ability to install MSDE, the free database server that you can use with this book. Once the .NET Framework and SDK are installed, little else needs to be done for you to begin working with ASP.NET. The .NET Framework is installed as part of the operating system if you’re lucky enough to be running Windows .NET Server 2003, in which case you can skip directly to installing the SDK. If not, you will need to download the .NET redistributable package, which is approximately 21 MB, and includes the files necessary for running ASP.NET applications.
To develop .NET applications, you also need to install the software development kit, which includes necessary tools along with samples and documentation. Be aware that the .NET Framework SDK is 108 MB in size�be prepared to wait!
Warning
Installing the .NET Framework before you install IIS will prevent your applications from working correctly.
Download and Install the Redistributable
The best method of acquiring the .NET Framework is to download and install it directly from the Web. To accomplish this, simply follow the steps outlined below:
- Go to the ASP.NET support site at http://www.asp.net/ and click the Download link.
- Click the Download .NET Framework Redist Now link. Remember, we will install the redistributable first, then we will install the SDK. The link will advance you to a download page.
- Choose the language version of the install you want, and click Download.
- When prompted, save the file to a local directory by choosing Save.
- After the download is complete, double-click the executable to begin the installation.
- Follow the steps presented by the .NET Setup Wizard until installation completes.
Download and Install the SDK
Now that you’ve installed the redistributable, you need to install the software development kit (SDK):
- Go to the ASP.NET support site at http://www.asp.net/ and click the Download link.
- Click the Download .NET Framework SDK Now link. The link will advance you to a download page.
- Choose the language version of the install you want to use and click Download, as you did to download the redistributable.
- When prompted to do so, save the file to a local directory by choosing Save.
- After the download is complete, double-click the executable to begin the installation. Before you do, I strongly recommend closing all other programs to ensure the install proceeds smoothly.
- Follow the steps outlined by the .NET Setup Wizard until installation completes./#eli#
The SDK will take slightly longer to install than the redistributable. Once it’s finished, check to see if it exists in your programs menu; navigate to Start > Programs > Microsoft .NET Framework SDK.
Configuring IIS
Although little configuration needs to be done before you begin working with IIS, I’ll use this section to introduce some basic features and functionality within IIS:
- Determining whether ASP.NET installed correctly
- Determining where files are located on the Web server
- Using localhost
- How to start and stop the Web server
- How to create a new virtual directory and modify its properties
Determining whether ASP.NET Installed Correctly
Once IIS is installed on your computer, you can open it by selecting Internet Information Services from the Administrative Tools menu. The first task is to make sure that ASP.NET was integrated into IIS when you installed the .NET Framework. Although, logically, ASP.NET should install automatically because it’s a component of the .NET Framework, sometimes it doesn’t. Don’t let this alarm you�it’s a common occurrence and is addressed in the Microsoft Knowledge Base. You can determine whether IIS was installed correctly by following these steps:
- Open IIS, if you haven’t already done so, and click on the + symbol next to your computer’s name.
- Right-click Default Web Site and select Properties.
- Navigate to the Documents tab. If default.aspx appears within the list, ASP.NET was installed correctly.
Another way to check whether ASP.NET installed correctly is by following these steps:
- Navigate to the Application Mappings menu by right-clicking the root Website node (your computer’s name) and choosing Properties.
- Select the Home Directory tab, and choose Configuration.
- The Application Mappings menu displays all of the extensions and their associated ISAPI Extension DLLs, as we see in Figure 1.2.
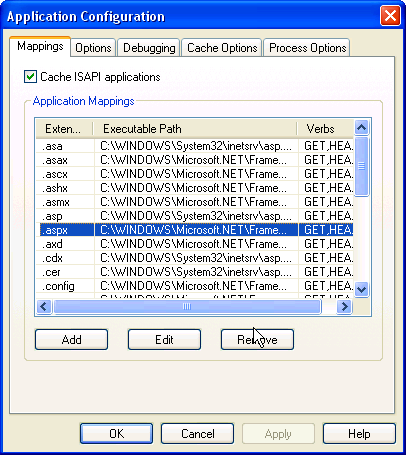
Figure 1.2. If the .aspx ISAPI Extension DLL appears within the Application Mappings menu, then ASP.NET was installed correctly.
Since I can imagine you’re dying to know what an ISAPI Extension DLL is, let me explain. You may know that a DLL is a Dynamically Linked Library, which is essentially a self-contained code module that any number of applications can draw on. When a Web server hosts a dynamic Website, page requests must be processed by program code running on the server before the resultant HTML can be sent back to the requesting browser (the client). Now, as was the case with traditional ASP, ASP.NET performs this processing with the help of its Internet Server Application Programming Interface (ISAPI) extension DLL. ISAPI allows Web requests to be processed through the Web server by a DLL, rather than an EXE, as is the case with Common Gateway Interface (CGI) pages. This approach is advantageous because DLLs are much more efficient, and require far less resources and memory than executables. IIS uses the file extension of a requested page to determine which DLL should process the request according to the mappings shown in the screenshot above. So, we can see that pages ending in .aspx, .asmx, or .ascx, among others, will now be passed by IIS to the ASP.NET DLL (aspnet_isapi.dll) for processing. OK, enough of the tech-talk. Let’s get back to it!
If you’ve come to the conclusion that ASP.NET was not installed on your computer, you’ll have to install it manually from the command prompt:
- Open the command prompt by selecting Start > Run, type CMD, and select OK.
- Type the following command (all on one line) to install ASP.NET on Windows 2000 Professional, Server, or Advanced Server:
C:WINNTMicrosoft.NETFrameworkveraspnet_regiis.exe -iOr on Windows XP Professional:
C:WINDOWSMicrosoft.NETFrameworkveraspnet_regiis.exe -iIn these commands, ver is the directory corresponding to the version of the .NET Framework you have installed.
If it still hasn’t installed, try visiting the Microsoft Knowledge Base for help.
Where Do I Put My Files?
Now that you have ASP.NET up and running, let’s take a look at where the files for your Web applications are kept on the computer. You can readily set IIS to look for Web applications within any folder of your choice, including the My Documents folder or even a network share. By default, IIS maps the wwwroot subfolder of C:Inetpub on the server to your Website’s root directory, and it is generally considered a good repository for storing and managing your Web applications.
If you open this wwwroot folder in Windows Explorer, and compare it with the folder tree that appears on the left of the IIS console, you’ll notice that the folders in Explorer also appear under your Default Web Site node. Note that, while several of these folders have the regular Explorer folder icon in the IIS view, others have a special Web application icon, indicating that these folders contain the pages and other items for a particular Web application. These special folders are what IIS calls Virtual Directories, and, in fact, they do not have to share the name of the physical folder to which they map. We’ll see more on this shortly.
Using Localhost
By putting your files within C:Inetpubwwwroot, you’ve given your Web server access to them. If you’ve been developing Web pages for a long time, habit may drive you to open files directly in your browser by double-clicking on the HTML files. Because ASP.NET is a server-side language, your Web server needs to have a crack at the file before it’s sent to your browser for display. If the server doesn’t get this opportunity, the ASP.NET code is not converted into HTML that your browser can understand. For this reason, ASP.NET files can’t be opened directly from Windows Explorer.
Instead, you need to open them in your browser using the special Web address that indicates the current computer, http://localhost/. If you try this now, IIS will open up some HTML help documentation, because we’ve not yet set up a default Website. This localhost name is, in fact, equivalent to the so-called loopback IP address, 127.0.0.1, IP which you can check out by entering http://127.0.0.1/ in your browser; you should see the same page you saw using localhost. If you know them, you can also use the name of your server or the real IP address of your machine to the same effect.
Note that if you do try any of these equivalents, a dialog will appear before the page is opened, asking for your network credentials, because you’re no longer using your local authentication implicit with localhost.
Stopping and Starting IIS
Now that we have IIS up and running, and ASP.NET installed, let’s look at how you can start, stop, and restart IIS if the need arises. For the most part, you’ll always want to have IIS running, except when you’re using certain programs locally that open ports and allow intruders to compromise the security of your computer. Some programs, like Kazaa, automatically stop IIS upon launch, because of potential security vulnerabilities. If you want to stop IIS when it’s not being used, simply follow the steps outlined below:
- With IIS open, select Default Web Site. The Play, Stop, and Pause icons will become visible.
- Select Stop, as shown in Figure 1.3.
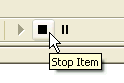
Figure 1.3. Select the Stop icon to stop IIS.
Virtual Directories
I’ve already briefly introduced the concept of virtual directories, which are a key mechanism in IIS; now I’d like to define a virtual directory a little more clearly.
A virtual directory is simply a name (or alias) that points to a local folder or network share on the server. This alias is then used to access the Web application held in that physical location. For instance, imagine your company has a Web server that serves documents from C:InetpubwwwrootmySiteA. Your users can access these documents through this URL:
http://www.mycompany.com/mySiteA/You could also set up another physical location as a different virtual directory in IIS. If, for instance, you were developing another Web application, you could store the files for it in C:devnewSiteB. You could then create in IIS a new virtual directory called, say, CoolPages, which maps to this location. This new site would then be accessible through this URL:
http://www.mycompany.com/CoolPages/As this application is in development, you would probably want to set IIS to hide this virtual directory from the public until the project is complete. Your existing Website would still be visible.
Let’s create a virtual directory on your server now:
- Right-click on Default Web Site and select Virtual Directory from the New submenu. The Virtual Directory Creation Wizard will appear. Click Next.
- Type in an alias for your virtual directory. I’ll type in
WebDocs. Click Next. - Browse for the directory in which your application is located. For this example, I’m going to choose the
My Picturesfolder located within theMy Documentsdirectory. Click Next. - Set Access Permissions for your directory. Typically, you’ll want to check Read, Run scripts, and Browse. You will not need to select Write until we get into accessing the file system, discussed in Chapter 15, Working with Files and Email. Click Next.
- Click Finish.
Once your new virtual directory has been created, it will appear within the Website list as shown in Figure 1.4.
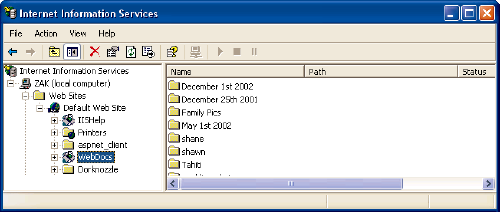
Figure 1.4. Once the virtual directory has been created, it will appear within the list of sites.
Now, if you type http://localhost/WebDocs/ in your browser, IIS will recognize that you’re looking for a Website held in the My Pictures directory. By default, when we request a virtual directory in this way, IIS looks for an index HTML page such as index.html or default.htm. If there is no index page�in this case there isn’t�IIS assumes we want to see the contents of the requested location. However, viewing the entire content of a location like this is not usually something we want our users to do; they could then freely see and access all the files and directories that make up our Web page. Not only is this a little messy and unprofessional, but it also can provide information to hackers that could let them attack our site. So, by default, IIS won’t allow this�we’ll receive a message reading, “Directory Listing Denied” in our browser.
Bearing that in mind, there are, however, circumstances in which we do want to allow directory listings, so let’s see how we can enable this in IIS. First, we have to right click the virtual directory in the IIS console, and choose Properties. Then, we select the Virtual Directory tab, and check the Directory browsing box. When we click OK and open (or refresh) the same URL in our browser, we’ll see a list of all the files within the My Pictures folder.
The Properties dialog that we’ve just used lets us configure various other useful properties, including:
Virtual Directory
Allows you to configure directory-level properties including path information, virtual directory name, access permissions, etc. Everything that was set up through the wizard is modifiable through this tab.
Document
Allows you to configure a default page that displays when the user types in a full URL. For instance, because default.aspx is listed as a default page, the user needs only to type in http://www.mysite.com/ into the browser’s address bar, rather than http://www.mysite.com/default.aspx. You can easily change and remove these by selecting the appropriate button to the right of the menu.
Directory Security
Provides you with security configuration settings for the virtual directory.
HTTP Headers
Gives you the ability to forcefully control page caching on the server, add custom HTTP Headers, Edit Ratings (helps identify the content your site provides to users), and create MIME types. Don’t worry about this for now.
Custom Errors
Allows you to define your own custom error pages. Rather than the standard error messages that appear within Internet Explorer, you can customize error messages with your company’s logo and an error message of your choice.
One thing to note at this point is that we can set properties for the Default Web Site node, and choose to have them ‘propagate’ down to all the virtual directories we’ve created. So, let’s now go ahead and enable directory browsing as the default for our Web applications. Please do remember what I’ve said about the dangers of allowing directory browsing on a production Web application, and keep in mind that you should never normally allow it in a publicly accessible environment (even on an intranet). However, during development, this facility can be very handy, as it allows us to navigate and run all our virtual directories by clicking on the listing in our browser, rather than having to type in long URLs each time.
To enable directory browsing:
- Right-click Default Web Site and select Properties. The Default Web Site Properties dialog will appear.
- First, we need to remove the default setting which opens up the IIS help documentation for our root directory, so choose the Documents tab.
- Select
iisstart.asp, and click Remove. - Now choose the Home Directory tab.
- Check the Directory Browsing check box and select OK.
- When the Inheritance Overrides dialog appears, click Select All and then OK.
To try it out, open your browser and type http://localhost/ in the address bar. The directory listing will appear within the browser as shown in Figure 1.5.
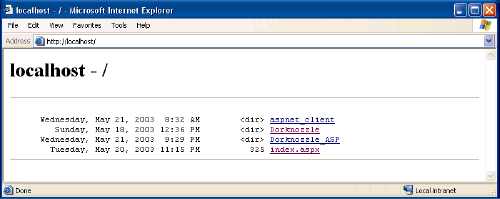
Figure 1.5. Enabling directory browsing for the Web server provides you with the ability to view directories in a way that’s similar to the view you’d see within Windows Explorer.
As you create Web applications, you’ll only need to select the directory that the Web application resides in to launch your work, but do remember to disable directory browsing should you later make your IIS Web server publicly visible.
Installing Microsoft Access
Access is Microsoft’s database solution for both developers and small companies who need to house data within a small yet reliable store. Because Microsoft Access is widely available, it’s usually the perfect choice for discussion and use within books such as this. Although we won’t be covering data access until Chapter 5, Validation Controls, you may want to start thinking about the scope of your or your company’s needs and choose a database accordingly. If you’re a small company looking for something cheap, reliable, and easy to use, then Access is for you. This book will cover examples using both Access and MSDE. Even if you plan on using MSDE, you may still want to read this section, as Access provides some good data modeling tools that aren’t available to you through Web Data Administrator.
You can find more information on Access from the Access Website. Here, you can find the latest updates, news, and purchase information for Microsoft Access.
Access is bundled with Professional editions of the Microsoft Office suite, so you may already have it installed. If you’ve already installed Microsoft Office on your computer, but didn’t install Access at the same time, you’ll need to add it to your installation. The following assumes that you have either Microsoft Office 2000 or XP Professional handy, and that you’ll be installing from that CD:
- Navigate to the Add or Remove Programs menu located within the Control Panel.
- Select your Microsoft Office installation from the Programs menu and select Change.
- When the Microsoft Office Setup dialog appears, select Add/Remove Features and click Next.
- Select Run from My Computer from the Access program menu.
- Click Update. You will be prompted to insert your Microsoft Office CD, so make sure you have it handy. Access will now install.
If you plan to purchase Access, you might like to consider purchasing the Microsoft Office bundle, as you receive Access, Word, Outlook, PowerPoint, and Excel for much less than the total cost of each of the components. Installing Access from either the Microsoft Access or Microsoft Office CDs is easy�just insert the CD, follow the onscreen prompts, and accept the default installation.
That’s all there is to it. You are now ready to begin working with database-driven Web applications.
Installing SQL Server Desktop Engine (MSDE)
SQL Server 2000 is Microsoft’s database solution for medium to large companies and enterprises. It is quite a bit more expensive than Access, generally requires its own dedicated “database server”, and, at times, requires the hiring of a certified database administrator (DBA) to maintain; yet it offers a robust and scalable solution for larger Web applications.
I’ll assume that if you’re reading this book, you probably don’t want to invest in something as massive as SQL Server, and that your needs are better suited to something free that’s nearly as powerful for testing and development purposes. If this is the case, then Microsoft’s SQL Server Desktop Engine, or MSDE, is perfect for you. MSDE is Microsoft’s free database alternative to SQL Server. It functions and stores data exactly as SQL Server does, but is licensed for development purposes only.
Once the .NET Framework SDK is installed, installing MSDE is a snap and can be completed as follows:
- Select Start > Programs > Microsoft Framework SDK, and choose Samples and QuickStart Tutorials.
- Choose the Download and Install the Microsoft SQL Server 2000 Desktop Engine link. You will be redirected to a download page on Microsoft’s Website.
- Select Step 1: Download the Microsoft SQL Server 2000 Desktop Engine (68.4 MB).
- Save the file onto your hard drive. At nearly 70 MB, this may take some time, so you may want to move onto
the section called "Your First ASP.NET Page"later in this chapter while the download continues, as our first example doesn’t use a database. Once the download is done, come back and continue the installation process. - Double-click the downloaded file and follow the instructions to unpack the MSDE setup files.
- Open the Command Prompt by selecting Start > Run; type
cmd, and select OK. - Change to the directory to which you extracted the files using cd on the command line. MSDE extracts to
C:sql2ksp3MSDEby default. - Type the following command (all on one line) in the MSDE directory to set up MSDE:
Setup.exe /qb+ INSTANCENAME=NetSDK DISABLENETWORKPROTOCOLS=1

SAPWD=PASSWORD
The complete set of commands is shown in Figure 1.6.
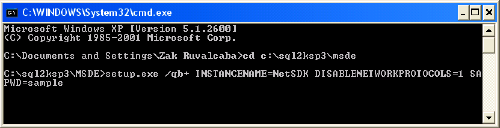
Figure 1.6. Install MSDE by running the command line executable and setting necessary parameters.It’s a good idea to set a suitable system administrator password using the SAPWD parameter as shown above, although you can apply the traditional blank password by using the
BLANKSAPWD=1parameter instead.
If all goes well, when the computer restarts, you’ll notice in the task bar tray a small icon that looks like a cylinder with a play icon on top, as shown in Figure 1.7.
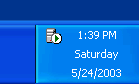
Figure 1.7. MSDE runs out of sight within the task bar tray.
That icon represents the database Service Manager. It lets you start and stop the database engine; all you have to do is double-click that icon within the task bar tray. Double-click the icon now to open the Service Manager Dialog, where you can select the Play icon to start the service, or the Stop icon to stop the service.
In some cases, you may not see either a green triangle or a red square; instead, you see an empty white circle. When you open Service Manager, you’ll see the message “Not Connected” appear in the status bar at the bottom. You’ll need to type YourComputernetsdk in the Server drop-down (where YourComputer is the name of your computer), and click Refresh services. MSDE should then connect, and the green triangle should appear.
Installing and Configuring Web Data Administrator
In order to use MSDE effectively, you’ll need some sort of administration tool to work with your databases. Web Data Administrator is another free tool provided by Microsoft that allows you to manage your instance of MSDE locally and remotely using a Web-based interface. You can download this program from Microsoft’s developer site. Scroll to the bottom of that page and you’ll find two search boxes. Leave the top one at All, and type Web Data Administrator in the bottom one, then click search. The search results should include the correct page.
Once you’ve downloaded it, simply double-click the .msi file to install. Once installed, Web Data Administrator can be accessed through your browser at the URL http://localhost/SqlWebAdmin, but before it can be used, you’ll need to enable what is known as SQL Mixed Mode authentication.
This involves making a small change to the registry, but don’t be put off. If you follow these instructions exactly, you won’t do any harm. Let’s do it! Click Start, then Run�. In the dialog, type regedit and press Enter to open the registry editor. Now expand the HKEY_LOCAL_MACHINE node in the left hand pane, then expand the SOFTWARE node. Next, find and open the Microsoft node, and, inside that, open one labeled Microsoft SQL Server. In there, you should find a node called NETSDK, which contains another, called MSSQLServer. Select that node, and find the key (in the right hand pane) called LoginMode. Double-click that, and change its Value data from 1 to 2, then click OK. Now, close regedit, and restart your computer. Phew! That was a bit of a trek, but I hope you found it easier in practice than it appears on paper!
Now, open the Web Data Administrator URL given above. You’ll be asked for the login, password, and server name for your instance of MSDE. Type sa in the user name box, and the password that you supplied during the installation of MSDE. If you’re unsure what the name of your server is, double-click the database engine icon within the task bar tray. The name of your server is located within the server drop-down menu.
Once you’ve done this and clicked Login, you will see a list of the databases that are currently available from MSDE, as shown in Figure 1.8.

Figure 1.8. Web Data Administrator allows you to work with your databases within MSDE.
More information on Web Data Administrator, MSDE, and databases will be covered in Chapter 6, Database Design and Development.
Your First ASP.NET Page
For your first run at ASP.NET, we’ll create the simple example shown in Figure 1.9.
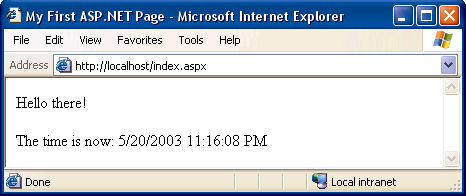
Figure 1.9. We’ll create a simple ASP.NET page that says “Hello there” and displays the time.
Let’s get started! Open your text editor (Notepad is fine – If you do use Notepad, be aware that to need to put quotes around any filename that doesn’t end with .txt in the Save As dialog. Most ASP.NET file names end with .aspx; if you forget to put quotes around them when saving, you’ll end up with files called filename.aspx.txt!). If you have software that creates ASP.NET pages automatically, such as Visual Studio .NET, please do not use it yet. These programs provide lots of powerful tools for building complex ASP.NET pages in a hurry, but for simple examples like this one, they tend to get in the way, rather than provide assistance.
Open your text editor, and start by entering the plain HTML for our page:
<html>

<head>

<title>My First ASP.NET Page</title>

</head>

<body>

<p>Hello there!</p>

<p>The time is now: </p>

</body>

</html>
So far, so good, right? Now, we’ll add some ASP.NET code that will create the dynamic elements of the page, starting with the time.
<html>

<head>

<title>My First ASP.NET Page</title>

</head>

<body>

<p>Hello there!</p>

<p>The time is now: <asp:Label runat="server" id="lblTime" /></p>

</body>

</html>
We’ve added an <asp:Label> tag to the document. This is a special tag that lets us insert dynamic content into the page. The asp: part of the tag name identifies it as a built-in ASP.NET tag. ASP.NET comes with numerous built-in tags; <asp:Label> is arguably the simplest.
The runat=”server” attribute identifies the tag as something that needs to be handled on the server. In other words, the Web browser will never see the <asp:Label> tag; ASP.NET sees it and converts it to regular HTML tags before the page is sent to the browser. It’s up to us to write the code that will tell ASP.NET to replace this particular tag with the current time.
To do this, we must add some script to our page. Like ASP before it, ASP.NET gives you the choice of a number of different languages to use in your scripts. The two most common languages are Visual Basic.NET (VB.NET) and C# (pronounced “C sharp”). Let’s take a look at examples using both. Here’s a version of the page in VB.NET:
Example 1.1. FirstPage.aspx
<html>

<head>

<title>My First ASP.NET Page</title>

<script runat="server" language="VB">

Sub Page_Load(s As Object, e As EventArgs)

  lblTime.Text = DateTime.Now.ToString()

End Sub

</script>

</head>


<body>

<p>Hello there!</p>

<p>The time is now: <asp:Label runat="server" id="lblTime" /></p>

</body>

</html>
Here’s the same page written in C#:
Example 1.2. FirstPage.aspx
<html>

<head>

<title>My First ASP.NET Page</title>

<script runat="server" language="C#">

protected void Page_Load(Object s, EventArgs e)

{

  lblTime.Text = DateTime.Now.ToString();

}

</script>

</head>


<body>

<p>Hello there!</p>

<p>The time is now: <asp:Label runat="server" id="lblTime" /></p>

</body>

</html>
Both versions of the page achieve exactly the same thing. If you’ve never done any server-side programming before, this may be starting to look a little scary. Let’s break down the new elements of this page:
Example 1.3. FirstPage.aspx (excerpt)
<script runat="server">This tag, otherwise known as a code declaration block, marks the start of server-side code. Like the <asp:Label> tag, this <script> tag uses the runat=”server” attribute to let ASP.NET know that the tag should be processed before sending the page to the browser.
Example 1.4. FirstPage.aspx (excerpt)
Sub Page_Load(s As Object, e As EventArgs)Example 1.5. FirstPage.aspx (excerpt)
protected void Page_Load(Object s, EventArgs s) {I won’t go into too much detail here. For now, all you need to know is that you can write script fragments that are run in response to different events, such as a button being clicked or an item being selected from a drop-down list. What the first line basically says is “execute the following script whenever the page is loaded.” Note that C# groups code into blocks with curly braces, while Visual Basic tends to use statements such as End Sub to mark the end of a particular sequence. So, the curly brace in the C# code above ({) marks the start of the script that will be executed when the page loads for the first time. For the technically minded, the code we’ve just seen is a method definition for a page load event handler, which is essentially the code that the server runs when the page is requested for the first time.
Finally, here’s the line that actually displays the time on the page:
Example 1.6. FirstPage.aspx (excerpt)
lblTime.Text = DateTime.Now.ToString()
Example 1.7. FirstPage.aspx (excerpt)
lblTime.Text = DateTime.Now.ToString();
You can see that these two .NET languages have much in common, because they are both built on the .NET Framework. In fact, the only difference with the above line is that C# ends code lines with a semicolon (;). In plain English, here’s what this line says:
Set the Text property of lblTime to the current date/time, expressed as a string of text.
Note that lblTime is the value we gave for the id attribute of the <asp:Label> tag where we want to show the time. So, lblTime.Text, the Text property of lblTime, refers to the text that will be displayed by the tag. DateTime is a class that’s built into the .NET Framework, and which lets you perform all sorts of useful functions with dates and times. There are thousands of these classes that do all sorts of useful things within the .NET Framework. These classes are also known as the .NET Framework Class Library.
The DateTime class has a property called Now that always contains the current date and time. This Now property has a method called ToString() that expresses that date and/or time as text (a segment of text is commonly called a string in programming circles). Classes, properties, and methods: these are all important words in the vocabulary of any programmer, and we’ll discuss them later on in the book. For now, all you need to take away from this discussion is that DateTime.Now.ToString() will give you the current date and time as a text string, which you can then tell your <asp:Label> tag to display. The rest of the script block simply ties up loose ends:
Example 1.8. FirstPage.aspx (excerpt)
End Sub

</script>
Example 1.9. FirstPage.aspx (excerpt)
}

</script>
The closing (End Sub) and (}) mark the end of the script to be run when the page is loaded, and the </script> tag marks the end of the script block.
Create a new subdirectory of C:Inetpubwwwroot on your Web server, and save your file there under the name FirstPage.aspx. Now, open your browser and point type this URL in the address bar:
http://localhost/test/FirstPage.aspx
Replace test with the name that you gave to the directory in which you saved the file. You should see a page similar to the one we saw in Figure 1.9.
If the time isn’t displayed, chances are that you opened the file directly in your browser instead of loading it through your Web server. Because ASP.NET is a server-side language, your Web server needs to access the file before it’s sent to your browser for display. If it doesn’t get access to the file, the ASP.NET code is never converted into HTML that your browser can understand, so make sure you load the page by typing an actual URL (e.g. http://localhost/test/index.aspx), not just a path and filename.
With the page displayed in your browser, use the View Source feature (View, Source in Internet Explorer) to view the HTML code for the page. Here’s what you’ll see:
<html>

<head>

<title>My First ASP.NET Page</title>

</head>

<body>

<p>Hello there!</p>

<p>The time is now: <span id="lblTime">10/13/2003 1:55:09

PM</span></p>

</body>

</html>
Notice that all the ASP.NET code has gone! Even the script block has been completely removed, and the <asp:Label> tag has been replaced by a <span> tag (with the same id attribute as the <asp:Label> tag that we used) containing the date and time string.
That’s how ASP.NET works. From the Web browser’s point of view, there is nothing special about an ASP.NET page; it’s just plain HTML like any other. All the ASP.NET code is run by your Web server and converted to plain HTML that’s sent to the browser. So far, so good: the example above was fairly simple. The next chapter will get a bit more challenging as we begin to introduce you to some valuable programming concepts.
The ASP.NET Support Site
The official Microsoft ASP.NET support Website can be found at www.asp.net. As you develop ASP.NET Web applications, you will undoubtedly have questions and problems that need to be answered. The ASP.NET support Website was developed by Microsoft as a portal for the ASP.NET community to answer the questions and solve the problems that developers have while using ASP.NET. The support Website provides useful information, such as news, downloads, articles, and discussion forums. You can also ask questions of the experienced community members in the SitePoint Forums.
Summary
In this chapter, you learned about .NET. You also learned of the benefits of ASP.NET and that it’s a part of the .NET Framework. First, you learned about the constructs of ASP.NET and how to locate and install the .NET Framework. Then, we explored the software that’s required not only for this book, but also in order for you or your company to progress with ASP.NET.
You’ve gained a solid foundation in the world of ASP.NET! The next chapter will build on this knowledge and begin to introduce you to ASP.NET in more detail, including page structure, languages to use, programming concepts, and form processing. Don’t stop — read Chapter 2 now!
Look out for more chapters from Build Your Own ASP.NET Website Using C# And VB.NET in coming weeks. If you can’t wait, download all the sample chapters, or order your very own copy now!
If you enjoyed reading this post, you’ll love Learnable; the place to learn fresh skills and techniques from the masters. Members get instant access to all of SitePoint’s ebooks and interactive online courses, like Introductory Web Development Using ASP.NEt and the latest edition of Build Your Own ASP.NET 4 Website Using C# & VB, 4th Edition.
Frequently Asked Questions (FAQs) about ASP.NET
What are the key differences between ASP.NET and other .NET frameworks?
ASP.NET is a framework for building web applications, while other .NET frameworks like VB.NET or C#.NET are used for building Windows applications. ASP.NET supports multiple languages, including C# and VB.NET, and it provides a unified model for developing web applications with a single, consistent method for web development. On the other hand, other .NET frameworks are more specific to certain programming languages and may not provide the same level of flexibility for web development.
How can I start developing with ASP.NET?
To start developing with ASP.NET, you need to install Visual Studio, which is the primary development environment for .NET applications. You can download it from the official Microsoft website. Once installed, you can create a new ASP.NET project and start coding. Visual Studio provides a range of tools and features to help you develop, test, and deploy your ASP.NET applications.
What are the benefits of using ASP.NET for web development?
ASP.NET offers several benefits for web development. It provides a robust and scalable framework for building web applications, with support for multiple programming languages. It also offers built-in features for security, state management, and error handling, which can save developers a lot of time and effort. Additionally, ASP.NET is backed by Microsoft, which means it has strong support and a large community of developers.
Can I use ASP.NET for mobile app development?
While ASP.NET is primarily used for web development, it can also be used for mobile app development. With ASP.NET, you can build mobile-friendly websites and web apps that can be accessed on any device. However, if you want to build native mobile apps, you might want to consider using Xamarin, which is another .NET framework specifically designed for mobile app development.
How does ASP.NET compare to other web development frameworks?
ASP.NET is a powerful and flexible framework for web development. It supports multiple programming languages, which gives developers a lot of flexibility. It also provides a range of built-in features for security, state management, and error handling. Compared to other web development frameworks, ASP.NET may have a steeper learning curve, but it also offers more capabilities and flexibility.
What is the future of ASP.NET?
The future of ASP.NET looks promising. Microsoft continues to invest in the development of ASP.NET, with regular updates and new features being added. The latest version, ASP.NET Core, is a cross-platform framework that can run on Windows, Linux, and macOS, which opens up even more possibilities for developers.
Is ASP.NET suitable for beginners?
ASP.NET can be a good choice for beginners who are interested in web development. While it may have a steeper learning curve compared to some other web development frameworks, it provides a comprehensive and flexible platform for building web applications. Plus, there are plenty of resources and tutorials available online to help beginners get started with ASP.NET.
What are some common challenges when working with ASP.NET?
Some common challenges when working with ASP.NET include dealing with state management, handling errors, and ensuring security. However, ASP.NET provides built-in features to help with these challenges, and there are plenty of resources available online to help developers overcome these challenges.
Can I use ASP.NET with other programming languages?
Yes, ASP.NET supports multiple programming languages, including C# and VB.NET. This means you can use the language you are most comfortable with or the one that is most suitable for your project.
What resources are available for learning ASP.NET?
There are plenty of resources available for learning ASP.NET. Microsoft provides extensive documentation and tutorials on their official website. There are also many online courses, books, and tutorials available from various sources. Additionally, there are many online communities and forums where you can ask questions and get help from other ASP.NET developers.
Involved in the Web since 1995, Zak is founder of and advisor to Module Media, a full service design and development firm in San Diego. He is author of �The Ten Minute Guide to Dreamweaver 4� and �Dreamweaver MX Unleashed�, and SitePoint's own Build Your Own ASP.NET Website Using C# and VB.NET.

Published in
·Design·Design & UX·Email·HTML & CSS·Mobile·Mobile UX·Resources·Responsive Web Design·UX·Web·November 20, 2014