Integrating impress.js into WordPress

Online presentation tools are rapidly gaining popularity over desktop presentations. Impress.js is one of the most popular open source libraries for creating amazing presentations using CSS transitions and transformations. Even though it’s highly popular library, not many tools are available for generating presentations with dynamic content. So here we are going to integrate impress.js into WordPress for automating presentation creation. Throughout this two part tutorial, we will be developing highly customizable plugin, while building an impress.js presentation.
Let’s get started.
Key Takeaways
- Impress.js is an open-source library that allows the creation of dynamic and visually appealing presentations using CSS transitions and transformations.
- The integration of impress.js into WordPress is achieved through the development of a customizable plugin, which automates the presentation creation process.
- Custom post types in WordPress are utilized to manage and organize presentations and their individual slides (steps), enhancing the structural organization within the WordPress environment.
- Meta boxes and custom fields are used within the plugin to allow users to specify transition effects and other settings for each slide, making each step in the presentation customizable.
- The plugin includes a custom template for displaying presentations in full-screen mode, bypassing typical WordPress theme components like headers and footers to focus on presentation content.
- The tutorial provides a step-by-step guide on creating and managing impress.js presentations within WordPress, highlighting the plugin’s capability to handle basic presentation needs and its potential for further enhancements in subsequent tutorials.
Awesome Impress.js Presentations
Before we dig deeper into plugin implementation, you might want to look at some of the amazing presentations created with this powerful library. Let’s look at some of the creative uses of impress.js.
Great Wall of Tees
Building a Personal Website with Impress.js
jgog.in Website/Portfolio
Pongoweb.it from creators of PongoCMS
These presentations and websites might have inspired you to learn more about this amazing tool. So I would like to recommend some tutorials on basics of impress.js before digging into the integration with WordPress.
Impress.js source
Creating Stunning Visualizations with Impress.js
Building Impressive Presentations with Impress.js
Having completed the articles for gaining basic knowledge, we can now move into the actual integration with WordPress.
Planning the Plugin
First, we need to identify the main requirements for presentation creation, before moving into plugin development. Let’s list the tasks considering the features of general presentations.
- We should be able to create slides with specific designs.
- Each slide needs to have transition effects.
- Slides need to be grouped together to create a presentation.
- Presentations should have customizable settings.
In this part, we will be implementing the first three tasks mentioned in the list. Presentation customization settings and plugin usage techniques will be discussed in the second and final part. So let’s get started.
Creating the plugin
We can start the implementation by creating a plugin folder called wimpress inside wp-content/plugins directory. All plugins has a main file that defines the information about the plugin using code comments. Let’s create the main plugin file as wimpress.php to contain the following code.
<?php
/*
  Plugin Name: WImpress
  Plugin URI:
  Description: WordPress integration of impress.js for online presentations.
  Author: Rakhitha Nimesh
  Version: 1.0
  Author URI: http://www.innovativephp.com/
 */
class WImpress {
}
?>
This plugin will use the object oriented approach and hence we have a main plugin class inside the main file. Implementation of all the plugin related functionalities resides within this class for the purpose of demonstration.
Initializing the plugin
Even though WordPress uses procedural style of functionality within the core, most developers prefer the use of OOP style for plugin creation. In this technique, we have a main class that provides most of the functionality. Consider the following code for initial implementation of such plugins.
class WImpress {
public function __construct() {
	}
}
$wimpress = new WImpress();
After the definition, we initialize an object of the main class. WordPress uses actions and filters for providing most of its core functionality. Therefore we use the WImpress class constructor to define the necessary actions for WordPress. Implementation functions for these actions and filters will be defined within the same class in most scenarios. Let’s identify the action definitions by creating the first action for WImpress plugin.
Defining Presentations and Slides
Presentations, and the slides contained within those presentations are the two most important components of this plugin. WordPress offers custom post types for adding various content types to websites. Here, we will be using two custom post types for implementing presentations and slides. Let’s see how custom posts are defined inside the plugin.
We can begin the process by updating the constructor of the class to contain the necessary action for custom post type definitions.
class WImpress {
private $presentation_type;
	private $step_type;
	public function __construct() {
    		$this->presentation_type = "wpresentations";
    		$this->step_type = "wsteps";
    		add_action('init', array($this, 'wimpr_generate_post_types'));
    	}
}
We have used two instance variables for defining custom post names. This should be preferred over hard coding the custom post names to keep the possibility of changing the names at later stage without too much effort. Names of the custom post type is assigned to the instance variables through the constructor.
In impress.js, a single slide is named as a step and hence we will be using steps to refer slides from here onwards.
Here, we have used wpresentations as the presentation post type and wsteps as the steps post type. Finally, we add a function called wimpr_generate_post_types on init action to define the custom post types as given in the following code.
public function wimpr_generate_post_types() {
    	// Register custom post type for creating impress presentations
    	$labels = array(
        	'name' => _x('Presentations', $this->presentation_type),
        	'singular_name' => _x('Presentation', $this->presentation_type),
        	'add_new' => _x('Add New', $this->presentation_type),
        	'add_new_item' => __('Add New Presentation'),
        	'edit_item' => __('Edit Presentation'),
        	'new_item' => __('New Presentation'),
        	'all_items' => __('All Presentations'),
        	'view_item' => __('View Presentation'),
        	'search_items' => __('Search Presentations'),
        	'not_found' => __('No Presentations found'),
        	'not_found_in_trash' => __('No Presentation found in the Trash'),
        	'parent_item_colon' => '',
        	'menu_name' => 'Impress Presentations'
    	);
    	$args = array(
        	'labels' => $labels,
        	'hierarchical' => true,
        	'description' => 'Presentation',
        	'supports' => array('title', 'editor'),
        	'public' => true,
        	'show_ui' => true,
        	'show_in_menu' => true,
        	'show_in_nav_menus' => true,
        	'publicly_queryable' => true,
        	'exclude_from_search' => false,
        	'has_archive' => true,
        	'query_var' => true,
        	'can_export' => true,
        	'rewrite' => true,
        	'capability_type' => 'post',
    	);
    	register_post_type($this->presentation_type, $args);
    	// Register custom post type for adding steps to impress presentations
    	$labels = array(
        	'name' => _x('Steps', $this->step_type),
        	'singular_name' => _x('Step', $this->step_type),
        	'add_new' => _x('Add New', $this->step_type),
        	'add_new_item' => __('Add New Step'),
        	'edit_item' => __('Edit Step'),
        	'new_item' => __('New Step'),
        	'all_items' => __('All Steps'),
        	'view_item' => __('View Step'),
        	'search_items' => __('Search Steps'),
        	'not_found' => __('No Steps found'),
        	'not_found_in_trash' => __('No Step found in the Trash'),
        	'parent_item_colon' => '',
        	'menu_name' => 'Impress Steps'
    	);
    	$args = array(
        	'labels' => $labels,
        	'hierarchical' => true,
        	'description' => 'Steps',
        	'supports' => array('title', 'editor'),
        	'public' => true,
        	'show_ui' => true,
        	'show_in_menu' => true,
        	'show_in_nav_menus' => true,
        	'publicly_queryable' => true,
        	'exclude_from_search' => false,
        	'has_archive' => true,
        	'query_var' => true,
        	'can_export' => true,
        	'rewrite' => true,
        	'capability_type' => 'post',
    	);
    	register_post_type($this->step_type, $args);
}
Here, we have defined two custom post types for presentations and steps using the register_post_type function with necessary arguments. This is one of the poorly implemented functions in WordPress, where we have to define extensive amount of unnecessary codes just to define a custom post type.
Notice the usage of instance variables in parameters to define the custom post name. In case we decide to change the name, we have only one place to change. Most of the preceding code contains default parameters and labels required for defining custom post types.
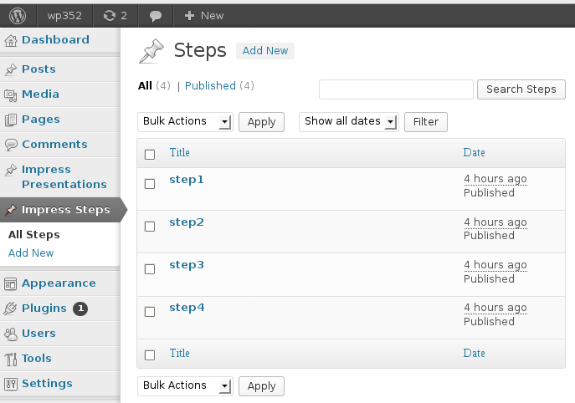
By now, you should have two custom post type menus in the left menu as illustrated in the following screen.
Creating Presentation Steps
Presentations contain multiple steps and each step can have any type of HTML content. In the previous section, we assigned title and editor to the supports parameter of wsteps post type. Title field will be used to uniquely identify the step in post list, while editor field will be used to insert the actual content and design for the step.
Power of impress.js comes with its CSS transitions and transformations. So we need to have transition settings section for each step as custom fields within meta boxes. Let’s see how we can define custom fields for steps. First, we have to update the class constructor, to include add_meta_boxes action for creating custom meta boxes on post screens.
add_action('add_meta_boxes', array($this, 'wimpr_generate_step_options'));Now let’s move onto the implementation of wimpr_generate_step_options function.
public function wimpr_generate_step_options() {
    	add_meta_box("wimpr-step-options", "Impress Step Options", array($this, 'wimpr_step_options_box'), $this->step_type, "normal");
}
Definition of meta boxes comes within this function using add_meta_box function. Parameters to this function includes unique key, display name, display function, post type and context. Here also we have used step_type variable for step post type instead of hardcoded value.
Context can be defined as one of three values, normal, side or advanced. Value of normal places the meta box under the editor field while side places the meta box in the right side with categories, tags etc.
Having defined the meta box, we can move into the implementation of the custom fields in the wimpr_step_options_box function. Since this function includes lengthy code, I am going to provide the explanations in three different sections. It’s ideal to work with source codes while reading the explanations.
public function wimpr_step_options_box() {
    	global $post;
    	$step_data = json_decode(get_post_meta($post->ID, "_step_data", true));
    	$presentation_id = get_post_meta($post->ID, "_step_presentation", true);
    	$query = new WP_Query(array('post_type' => 'wpresentations', 'post_status' => 'publish'));
	// Section 2 code
	// Section 3 code
}
First, we have to get the existing step data from database. Since we are in the creating process, we won’t have any data by default. Once the step is saved and viewed, these variables will be populated with existing data.
We use post_meta table for saving necessary details about steps. Each step should be within a presentation. So we use a key called _step_presentation to keep the presentation ID for the step. All the step effects are stored in a key called _step_data as a json encoded string.
Both keys have been prefixed with underscore. This allows us to hide these fields from custom fields section. Without the underscore, these fields will show up in both meta box as well as custom fields section, making it difficult to manage.
Finally, we get all the existing presentations available in the database to be displayed inside drop down field. Then we have to show the retrieved presentation list in a dropdown box for selection as shown in the section 2 of the preceding function.
public function wimpr_step_options_box() {
    	// Section 1
	$html .= "
      	<tr>
        	<th style=''><label for='Upload Images'>Select Presentation : </label></th>
        	<td><select class='widefat' name='wimpr_presentation' id='wimpr_presentation' >
                <option value='0' >Select</option>";
    	        foreach ($query->posts as $presentation) {
        	if ($presentation_id == $presentation->ID) {
            	$select = "selected";
        	}
        	$html .= "<option $select value='$presentation->ID' >$presentation->post_title</option>";
    	        }
    	$html .= "</select>
        	</td>
      	</tr>";
    	$html .= "<tr>
        		<th style=''><label >CSS Classes : </label></th>
        		<td><input name='wimpr_step_class' id='wimpr_step_class' class='widefat impress_text' type='text' value='" . $step_data->wimpr_step_class . "'  />
        		</td>
      		</tr>";
	// Section 3 code
}
Preceding code populates the presentations into a dropdown field while checking for the assigned presentation for the edit screen. We use the $query->posts array to get the presentations, which were stored as a custom post type inside wp_posts table. Next, we can move into the final section of the code.
I assume that you took time to read the basics on impress.js using the resources provided at the beginning of this article. If not, I suggest you to just go through the code and wait till the second part of this article where I’ll be explaining the basic concepts while building a presentation.
Impress.js is mainly built upon three effects called transition, scaling and rotation, in each of the three directions x,y,z. So we need to have 3*3 = 9 options for configuring the effects on each step. Let’s look at the section three of preceding function for creating fields for impress effects.
public function wimpr_step_options_box() {
    	// Section 1
	// Section 2
	$html .= "<tr>
        	<th style=''><label for='Upload Images'>Transition Settings : </label></th>
        	<td>
        	</td>
      	</tr>
      	<tr>
        	<td colspan='2'>
            	x:<input name='transition_x' id='transition_x' class='impress_text' type='text' value='" . $step_data->transition_x . "'  />
            	y:<input name='transition_y' id='transition_y' class='impress_text' type='text' value='" . $step_data->transition_y . "'  />
            	z:<input name='transition_z' id='transition_z' class='impress_text' type='text' value='" . $step_data->transition_z . "'  />
        	</td>
      	</tr>
      	<tr>
        	<th style=''><label for='Upload Images'>Rotation Settings : </label></th>
      	</tr>
      	<tr>
         	<td colspan='2'>
            	x:<input name='rotation_x' id='rotation_x' class='impress_text' type='text' value='" . $step_data->rotation_x . "'  />
            	y:<input name='rotation_y' id='rotation_y' class='impress_text' type='text' value='" . $step_data->rotation_y . "'  />
            	z:<input name='rotation_z' id='rotation_z' class='impress_text' type='text' value='" . $step_data->rotation_z . "'  />
        	</td>
      	</tr>
      	<tr>
        	<th style=''><label>Scaling Settings : </label></th>
        </tr>
        <tr>
        	<td colspan='2'>
            	<input name='scale' id='scale' class='impress_text' type='text' value='" . $step_data->scale . "'  />
                </td>
        </tr>
    	</table>";
    	echo $html;
}
Here, we have 9 text fields to configure the rotation, transition and scaling effects in x,y,z directions. In section 1, we used a key called _step_data to retrieve the values from database. This postmeta table key is used to store all 9 effect values as a json encoded string. So we assign the existing values into the text field using $step_data array, decoded from the json string. Next, we need to save these values when the user publish the presentation step.
Saving Step Data
Once you hit the Publish button, both step title and contents of the editor will be saved automatically into the database. But meta box values need to be saved manually using action hooks. So we have to use WordPress save_post action to call a custom function called wimpr_save_step_options. This action is executed on every post insertion or updating. Let’s walk through the wimpr_save_step_options function using the following code.
public function wimpr_save_step_options() {
    	global $post;
    	if (!wp_verify_nonce($_POST['wipmr_box_nonce'], "wipmr-step-meta")) {
        		return $post->ID;
    	}
    	if (defined('DOING_AUTOSAVE') && DOING_AUTOSAVE) {
        		return $post->ID;
    	}
    	if ($this->step_type == $_POST['post_type'] && current_user_can('edit_post', $post->ID)) {
        	$step_data = array();
        	// Retrive the transition data through form submission
        	$step_data['transition_x'] = (isset($_POST['transition_x']) ? $_POST['transition_x'] : '');
        	$step_data['transition_y'] = (isset($_POST['transition_y']) ? $_POST['transition_y'] : '');
        	$step_data['transition_z'] = (isset($_POST['transition_z']) ? $_POST['transition_z'] : '');
// Retrieve the rotation data through form submission
        	$step_data['rotation_x'] = (isset($_POST['rotation_x']) ? $_POST['rotation_x'] : '');
        	$step_data['rotation_y'] = (isset($_POST['rotation_y']) ? $_POST['rotation_y'] : '');
        	$step_data['rotation_z'] = (isset($_POST['rotation_z']) ? $_POST['rotation_z'] : '');
// Retrieve the scale data through form submission
                $step_data['scale'] = (isset($_POST['scale']) ? $_POST['scale'] : '');
        	$presentation = (isset($_POST['wimpr_presentation']) ? $_POST['wimpr_presentation'] : '');
        	update_post_meta($post->ID, "_step_presentation", $presentation);
        	// Update the custom field values upon successfull validation
        	update_post_meta($post->ID, "_step_data", json_encode($step_data));
    	} else {
        		return $post->ID;
    	}
}
First, we have to verify the nonce before saving the data into the database. Nonce is a short word for number used once. We have to generate a new nonce on each form submit, as a safety precaution from third party form submissions. In the previous function, we created the nonce value using wp_create_nonce function and now we are checking it against the submitted value from $_POST array. If the validation fails, we break the process by returning the post ID.
Once the none check is successful, we again check whether it’s an auto save to break the process and return the post ID. Finally, we check for the necessary post type and user permissions, before saving the data.
Omitting the post type check will execute the save post action for each and every post type creating the possibility of inconsistent data.
After all the checks are completed, we get all nine custom field values from $_POST array to configure the effects of impress.js steps. Finally, we save the effect values as a JSON encoded string by using the update_meta function. Now we have completed the process of creating necessary presentations, steps and presentation contents. Next, we need to display the presentation on the front end of WordPress application.
Creating Presentation Template
We looked at some of the amazing impress.js presentation at the beginning of this article. Most impress presentations including the ones we showed, takes the full screen dimensions of the browser window. Therefore we are going to design full screen template for displaying presentation generated by WImpress plugin. Most of the existing WordPress theme templates contains the common header and footer. Here, we need full screen display and hence we have to use a template without common header, footer and any other common component.
So we are going to load a unique custom template by intercepting the default WordPress routing process. WordPress offers an action called template_redirect for loading custom templates, instead of default ones. Let’s add the following code to the constructor of the plugin.
add_action("template_redirect", array($this, 'wimpr_template_redirect'));Now we can look at the implementation of wimpr_template_redirect function for loading the custom template.
public function wimpr_template_redirect() {
    	global $wp;
    	if ($wp->query_vars["post_type"] == "wpresentations") {
        		if (is_single ()) {
            		include(plugin_dir_path(__FILE__) . '/single-wpresentations.php');
            		exit;
        		}
    	}
}
First, we check for the post type for presentations and whether we are on the single presentation display screen. Then we load the custom template called single-wpresentations.php using the PHP include statement. Now we have to create the single-wpresentations.php file inside the plugin folder with HTML code for displaying the presentation.
<?php
global $post;
$presentation_id = $post->ID;
$query = new WP_Query(array('post_type' => 'wsteps',
        	'post_status' => 'publish',
        	'meta_query' => array(
            	array(
                	'key' => '_step_presentation',
                	'value' => $presentation_id
            	)
        	)
    	));
?>
We get the ID of the presentation by using the global $post object at the beginning of the template file. Then we query the database for retrieving the steps for the current presentation. Then we traverse through each step in the result set to generate the impress.js steps as shown in the following code.
<script src="https://code.jquery.com/jquery-1.10.1.min.js"></script>
<div id="impress">
	<?php
	foreach ($query->posts as $step) {
    	$step_data = json_decode(get_post_meta($step->ID, "_step_data", true));
    	$transition_x = (isset($step_data->transition_x) && !empty($step_data->transition_x)) ? "data-x='" . $step_data->transition_x . "'" : '';
    	$transition_y = (isset($step_data->transition_y) && !empty($step_data->transition_y)) ? "data-y='" . $step_data->transition_y . "'" : '';
    	$transition_z = (isset($step_data->transition_z) && !empty($step_data->transition_z)) ? "data-z='" . $step_data->transition_z . "'" : '';
    	$rotation_x = (isset($step_data->rotation_x) && !empty($step_data->rotation_x)) ? "data-rotate='" . $step_data->rotation_x . "'" : '';
    	$rotation_y = (isset($step_data->rotation_y) && !empty($step_data->rotation_y)) ? "data-rotate='" . $step_data->rotation_y . "'" : '';
    	$rotation_z = (isset($step_data->rotation_z) && !empty($step_data->rotation_z)) ? "data-rotate='" . $step_data->rotation_z . "'" : '';
        $scale = (isset($step_data->scale) && !empty($step_data->scale)) ? "data-scale='" . $step_data->scale . "'" : '';
        $css_class = (isset($step_data->wimpr_step_class) && !empty($step_data->wimpr_step_class)) ? $step_data->wimpr_step_class : '';
        echo '<div id="' . $step->ID . '" class="step slide ' . $css_class . '" ' . $transition_x . ' ' .
           $transition_y . ' ' . $transition_z . '
           ' . $scale . '        ' . $rotation_x . ' ' . $rotation_y . ' ' . $rotation_z . ' >
           ' . $step->post_content . '
        </div>';
	}
	?>
</div>
We get the step effects using get_post_meta function while looping through the resultset. Finally, we generate the DIV element to be used as an impress.js step with the configured effects and values. Effects with empty values will not be assigned to the DIV and hence will use the default values of impress.js. Finally, we use the following code to load the necessary CSS and initialize the impress.js library located inside the WImpress folder.
<link rel="stylesheet" href="<?php echo plugins_url('css/impress-demo.css', __FILE__); ?>" />
<style>
	body{
    		background : #FFF;
    		color:#000;
    		font-size:35px;
}
</style>
<script type="text/javascript" src="<?php echo plugins_url('js/impress.js', __FILE__); ?>" ></script>
<script type="text/javascript">impress().init();</script>
Now we have completed the process of integrating impress.js presentations into WordPress. You can use the admin dashboard to create dynamic presentations. Let’s go through the process of creating presentation using this plugin.
Step 1 – Upload and Activate the plugin to see the tabs called Impress Steps and Impress Presentations on the left menu.
Step 2 – Create Presentation using the Impress Presentations menu.
Step 3 – Create multiple steps by changing the values for effects.
Step 4 – Assign each step into a presentation using the drop down box.
Step 5 – Publish the presentation and click the View Presentation button to load the presentation.
You can access the demo presentation created with this plugin, using the following URL.
http://www.innovativephp.com/demo/wimpress-demo/
Wrap Up
In this tutorial, we integrated impress.js into WordPress to manage dynamic presentations using custom post type capabilities. Plugin created throughout this tutorial is capable enough to handle basic presentations. Presentations should have eye catching designs and contents to attract the audience.
So in the next part, we are going to enhance the capabilities of WImpress plugin by adding settings panel to configure background images and CSS styles. Also we are going to learn the basics of impress.js effects while creating a presentation using this plugiin.
Hope you enjoyed the tutorial and looking forward to your comments and suggestions. Stay tuned for the second and final part of this tutorial for enhancing the power of impress.js presentations.
Frequently Asked Questions (FAQs) about Integrating Impress.js with WordPress
What is Impress.js and why should I integrate it with WordPress?
Impress.js is a powerful JavaScript library that allows you to create stunning, interactive, and unique presentations. It uses CSS3 transformations and transitions to create a 3D viewport that adds depth and dimension to your slides. Integrating Impress.js with WordPress can significantly enhance the visual appeal of your website, making it more engaging and interactive. This can lead to increased user engagement, improved user experience, and potentially higher conversion rates.
How can I install Impress.js on my WordPress site?
To install Impress.js on your WordPress site, you need to download the Impress.js library from its official GitHub repository. Once downloaded, you can upload the library to your WordPress theme’s JavaScript directory. You can then enqueue the Impress.js script in your theme’s functions.php file to ensure it’s loaded on your site.
Can I use Impress.js with any WordPress theme?
Yes, Impress.js can be used with any WordPress theme. However, it’s important to note that the integration process may vary depending on the structure and design of your theme. Some themes may require additional customization to fully utilize the capabilities of Impress.js.
How can I create a presentation using Impress.js in WordPress?
Creating a presentation using Impress.js in WordPress involves creating a new page or post, and then adding your slides using HTML and CSS. Each slide is essentially a div element with a unique ID, and you can use CSS to style and position your slides. Impress.js then uses these IDs to navigate through your presentation.
Can I customize the transitions and transformations in Impress.js?
Yes, Impress.js allows you to customize the transitions and transformations for each slide. You can control the rotation, scale, and translation of each slide using CSS3 properties. This allows you to create truly unique and engaging presentations that stand out from the crowd.
Is Impress.js compatible with all browsers?
Impress.js uses advanced CSS3 features, so it’s compatible with modern browsers that support these features. This includes the latest versions of Chrome, Firefox, Safari, and Edge. However, it may not work as expected in older browsers or those that do not fully support CSS3.
Can I use Impress.js for commercial projects?
Yes, Impress.js is released under the MIT license, which means you can use it for both personal and commercial projects. However, it’s always a good idea to check the license terms before using any open-source library in a commercial project.
How can I add navigation controls to my Impress.js presentation?
Impress.js does not include built-in navigation controls, but you can easily add your own using JavaScript. You can create buttons or links that call the impress().next() and impress().prev() functions to navigate through your presentation.
Can I integrate Impress.js with other JavaScript libraries or plugins?
Yes, you can integrate Impress.js with other JavaScript libraries or plugins to add additional functionality to your presentations. However, you should be aware that some libraries or plugins may conflict with Impress.js, so it’s important to thoroughly test your presentations to ensure everything works as expected.
How can I troubleshoot issues with Impress.js in WordPress?
If you’re experiencing issues with Impress.js in WordPress, the first step is to check your browser’s console for any error messages. These can often provide clues about what’s causing the issue. You should also ensure that you’ve correctly enqueued the Impress.js script and that your slides are correctly formatted and styled.
Rakhitha Nimesh is a software engineer and writer from Sri Lanka. He likes to develop applications and write on latest technologies. He is available for freelance writing and WordPress development. You can read his latest book on Building Impressive Presentations with Impress.js. He is a regular contributor to 1stWebDesigner, Tuts+ network and SitePoint network. Make sure to follow him on Google+.