

This article was originally published on the Okta developer blog. Thank you for supporting the partners who make SitePoint possible.
React is a fast, and lightweight library, which has led to fast adoption across the SPA (single-page app) ecosystem. Preact is an even lighter-and-faster alternative to React, weighing in at a measly 3kb! For less complex applications, it can be a great choice.
In this tutorial, you’ll build a basic Preact application with a couple of pages and user authentication using the Okta Sign-In Widget.
Key Takeaways
- Utilize PreactCLI to efficiently scaffold a new Preact application, leveraging its compatibility with some React plugins while enjoying a lighter, faster framework.
- Integrate user authentication in your Preact app using the Okta Sign-In Widget, simplifying the process of managing user sessions and security.
- Implement Higher-Order Components (HOCs) for authentication to manage user login states and protect routes within your Preact application effectively.
- Employ Preact’s router and custom Redirect components to handle navigation and route protection, ensuring users are directed appropriately based on their authentication status.
- Update various components, such as the Login and Profile pages, to interact with the authentication logic, providing a seamless user experience and personalization based on user data.
Bootstrap Your App With PreactCLI
To get your project started, you’ll install the PreactCLI using NPM.
npm install -g preact-cli
Once you have the CLI installed, run the command to create a base Preact application:
preact create okta-preact-example
This command will chug along for a few minutes scaffolding a basic Preact app and installing all the dependencies. Once it’s done, you should see a bunch of information on the command line informing you of what you can do next.
Change into the application directory.
cd okta-preact-example
Then start the application, just to make sure everything worked as expected.
npm start
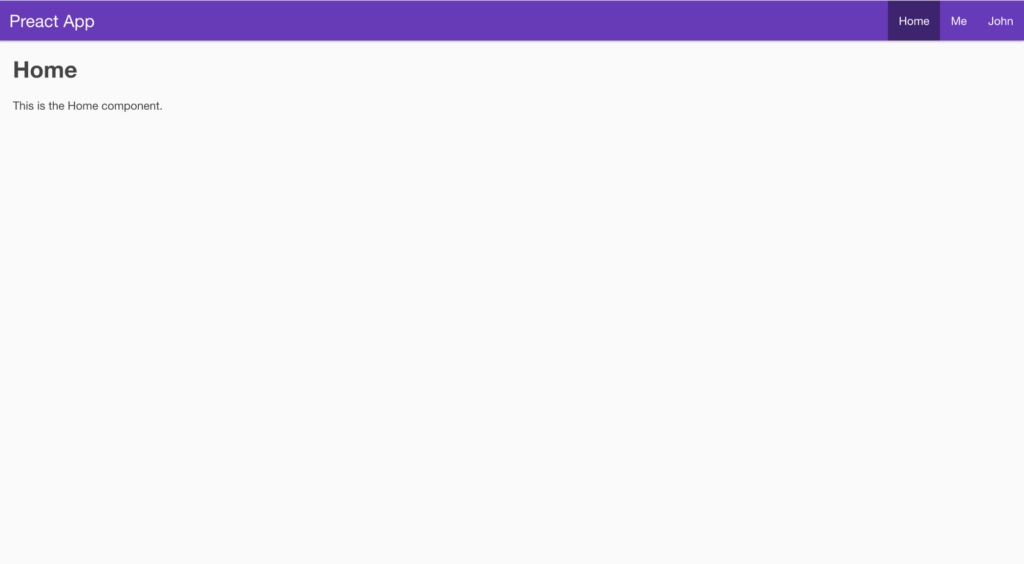
You should see a quick build run and the screen will clear and show you that the application is running at http://localhost:8080. When you open up that URL in your browser, you should see a page like this:
Some Things To Note About PreactCLI
Even though the PreactCLI-generated app looks a lot like a React app generated by create-react-app, and you can even use some of the React plugins (like React-Router) in your Preact application, there are some significant differences.
For instance, unlike the ReactCLI, there is no way to eject the Webpack configuration. Instead Preact encourages developers to customize Webpack by creating a file called preact.config.js, using Preact’s Webpack Config Helpers and exporting functions to change the way Webpack behaves.
Even though the PreactCLI says the application is running at http://0.0.0.0:8080, use http://localhost:8080. It’s the same thing and when you set up your application in the Okta dashboard, you’ll set http://localhost:8080 as your base URL and callback URL, so this just makes sure that you can call the Okta APIs.
Create Your Okta Application
Now that you have the basic shell of an application, it’s time to add user authentication. If you don’t already have one, create a free (forever) account at Okta.
Once you’ve created an account, go to the admin dashboard and click on “Applications” in the page menu. Then click the green “Add Application” button, then the green “Create New App” button, so that you see a modal window like:
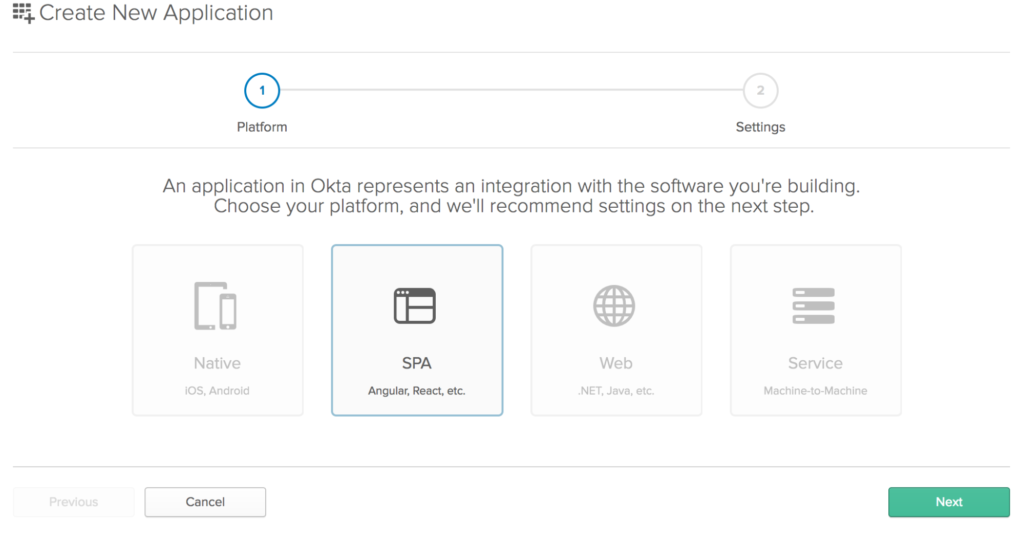
Choose “SPA” from the Platform buttons. Click the “Next” button to create your application.
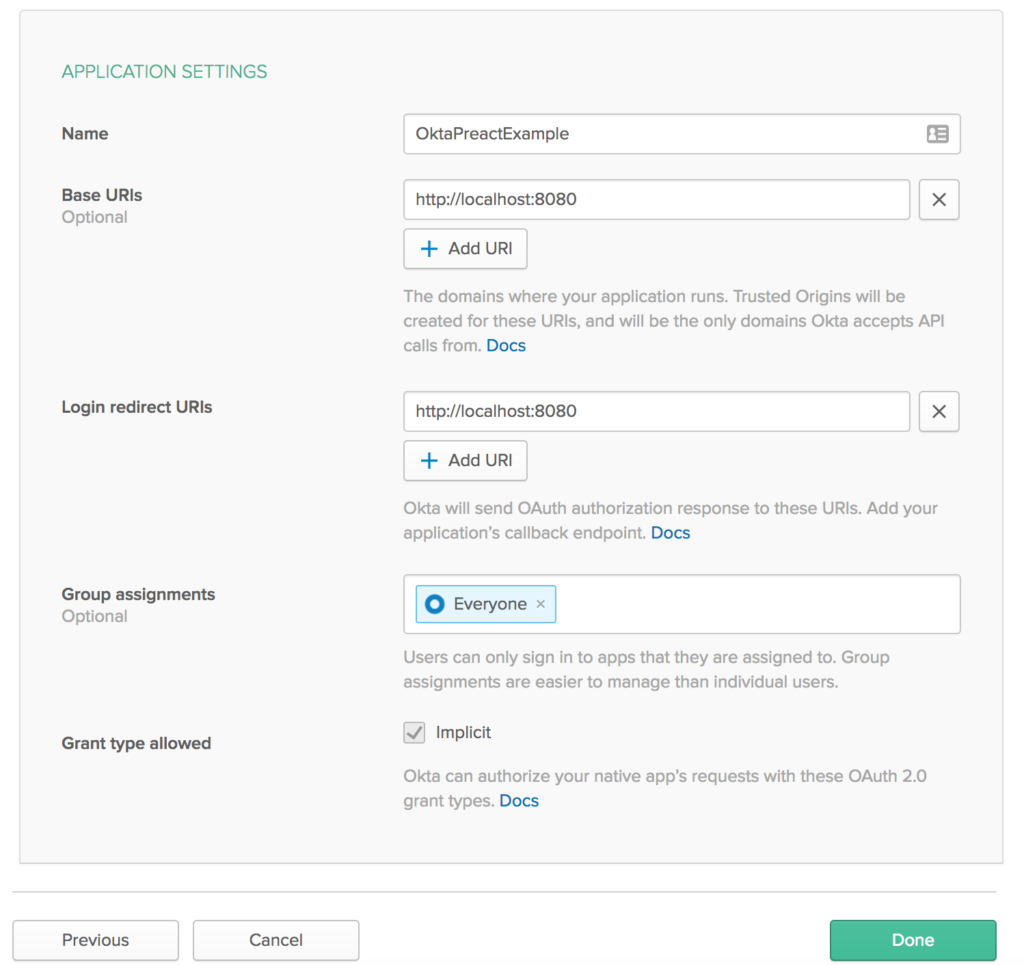
This will take you to a screen to “Application Settings” page of the Create Application wizard. Enter “OktaPreactExample” in the Application name field and add http://localhost:8080 as your base URI and as a login redirect URI. When you’re done, your form should look like this:
You’ll need to create a user (if you don’t already have one) and assign your new application to them as well. Or you can log in with the credentials you use to log in to your Okta account (the admin user).
Install the Okta Sign In Widget
The easiest way to get Okta’s authentication into your new Preact application will be to use Okta’s Sign-In Widget. You’ll install it with npm using:
npm install @okta/okta-signin-widget --save
You’ll also need to install preact-router with:
npm install preact-router --save
Add an Auth Higher-Order Component
With that done, you now need to add some Higher-Order Components to help with authentication.
Add a file called auth.js in the /src/lib folder and add the following code:
import {h} from 'preact';
import { route } from 'preact-router';
import OktaSignIn from '@okta/okta-signin-widget/dist/js/okta-sign-in.min.js';
import '@okta/okta-signin-widget/dist/css/okta-sign-in.min.css';
import '@okta/okta-signin-widget/dist/css/okta-theme.css';

class Auth {
  constructor() {
    this.login = this.login.bind(this);
    this.logout = this.logout.bind(this);
    this.isAuthenticated = this.isAuthenticated.bind(this);
    this.handleAuthentication = this.handleAuthentication.bind(this);

    this.widget = new OktaSignIn({
      baseUrl: 'https://{yourOktaDomain}.com/',
      clientId: '{clientId}',
      redirectUri: 'http://localhost:8080',
      authParams: {
        responseType: ['id_token', 'token'],
        scopes: ['openid', 'email', 'profile']
      }
    });
  }

  isAuthenticated() {
    // Checks if there is a current accessToken in the TokenManger.
    return !!this.widget.tokenManager.get('accessToken');
  }

  getCurrentUser(){
    return this.widget.tokenManager.get('idToken');
  }

  login() {
    // Redirect to the login page
    route('/login/');
  }

  async logout() {
    this.widget.tokenManager.clear();
    await this.widget.signOut();
    location = '/';
  }

  handleAuthentication(tokens) {
    for (let token of tokens) {
      if (token.idToken) {
        this.widget.tokenManager.add('idToken', token);
      } else if (token.accessToken) {
        this.widget.tokenManager.add('accessToken', token);
      }
    }
  }
}

// create a singleton
const auth = new Auth();
export const withAuth = WrappedComponent => props =>
  <WrappedComponent auth={auth} {...props} />;
In the first line of code, you can tell something’s different. The h module in Preact is what turns JSX into DOM elements. Normally, React would use the React library to generate React.createElement statements to make DOM elements from JSX. Preact uses the h library to make something like h('div', {class:'something'}, 'Content') statements to do that.
Next, you imported route from preact-router right below the h import. This is what is used by Preact to do the redirects in the login function. Notice that the Auth class is just a regular function and does not extend Component. In the constructor, the internal functions were bound with the this context from the Auth class.
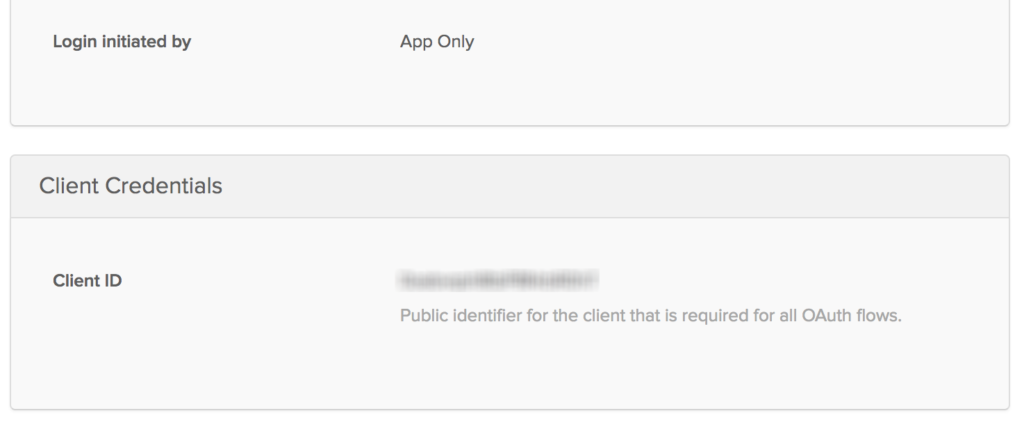
Then enter your Okta organization URL and client ID to the Okta Sign-In Widget configuration. Your Organization URL will be the URL you use when you log into your Okta account (e.g. http://dev-12345.oktapreview.com) and you can get your client ID from the application’s property page in the administrative dashboard on the “General” tab for your application (obviously, yours won’t be blurred out):
You’ll also want to change the redirectUri property to http://localhost:8080 because the Preact uses port 8080 instead of 3000 for normal React apps.
The login function simply routes the user to the login page, while the logout function clears the tokens saved in the widget’s token manager, calls signOut on the widget, and redirects the user to the root of the application.
Finally, a singleton of the Auth class is created to be shared by all the components, and is passed in as a prop called auth to any component that you wrap in withAuth.
Create a Widget Wrapper
Create a file in your /src/lib folder called OktaSignInWidget.js. Enter the code for this component:
import { h, Component } from 'preact';

export default class OktaSignInWidget extends Component {
  componentDidMount() {
    this.widget = this.props.widget;
    this.widget.renderEl({ el: this.widgetContainer }, this.props.onSuccess, this.props.onError);
  }

  componentWillUnmount() {
    this.widget.remove();
  }

  render() {
    return <div ref={(div) => { this.widgetContainer = div; }} />
  }
};
Here, the componentDidMount method renders the Okta Sign-In Widget to the div in your render method and the componentWillUnmount function removes the widget.
In the render method, there’s some strange-looking code. This allows you to set a reference to the current element into a variable called widgetContainer and then use it in the componentDidMount as this.widgetContainer. Neat, huh? Thanks to Matt Raible for showing me that trick!
Create a Redirect Component
The React-Router has a Redirect component in it, but the Preact router doesn’t, so you’ll need one. Luckily, it’s easy to create your own. In your /src/lib folder create a file called Redirect.js and add the following code:
import { Component } from 'preact';

export default class Redirect extends Component {
  componentWillMount() {
    location = this.props.to.pathname;
  }

  render() {
    return null;
  }
}
This is just a component that will redirect based on a URL passed to it. In this case, the use will be redirected using the window.location mechanism, mostly because you’ll want to refresh the page. You could also just use route(this.props.to.pathname) and let Preact’s router redirect the user.
Create a Login Component
Next, create a Login folder in src/routes. In that folder create an index.js file and a style.css file. This just follows along with the way the Preact CLI creates components.
In the index.js file, create a Login component, wrapped in the withAuth component. First, by importing the modules needed:
import { h, Component } from 'preact';
import Redirect from '../../lib/Redirect';
import OktaSignInWidget from '../../lib/OktaSignInWidget';
import { withAuth } from '../../lib/auth';
Start the component by wrapping in the withAuth higher-order component you created earlier, and set the beginning state. Here, you’ll have the redirectToReferrer set to false by default.
export default withAuth(class Login extends Component {
  state = {
    redirectToReferrer: false
  };
}
In the componentWillMount lifecycle function, wire up the onSuccess and onError functions and create them in your component.
componentWillMount() {
  this.onSuccess = this.onSuccess.bind(this);
  this.onError = this.onError.bind(this);
}

onSuccess(tokens) {
  this.props.auth.handleAuthentication(tokens);
  this.setState({
    redirectToReferrer: true
  });
}

onError(err) {
  console.log('error logging in', err);
}
You’ll notice your component passes handling of the authentication back to the higher-order component. This is a prime example of the benefits of higher-order components and composition in JavaScript.
Finally, create the render function that will make the decision about showing the login widget or, if the user is already logged in, redirecting them to the home page. You could also redirect the user to the page they were going to when they were redirected to the login page, but let’s skip that for now.
render({location, auth}, {redirectToReferrer}) {
  let from;
  if (location && location.state) {
    from = location.state;
  } else {
    from = { pathname: '/' };
  }

  if (auth.isAuthenticated() || redirectToReferrer) {
    return <Redirect to={from} />;
  }

  return (
    <OktaSignInWidget
      widget={auth.widget}
      onSuccess={this.onSuccess}
      onError={this.onError} />
  );
}
You’ll notice here that Preact is a little different in that it gives you handles to props and state as parameters to the render function. This code simply uses destructuring of those parameters to make using location, auth and redirectToReferrer simple without having a ton of this.props.{whatever}.
So your final /src/routes/login/index.js file will look like:
import { h, Component } from 'preact';
import Redirect from '../../lib/Redirect';
import OktaSignInWidget from '../../lib/OktaSignInWidget';
import { withAuth } from '../../lib/auth';

export default withAuth(class Login extends Component {
  state = {
    redirectToReferrer: false
  };

  componentWillMount() {
    this.onSuccess = this.onSuccess.bind(this);
    this.onError = this.onError.bind(this);
  }

  onSuccess(tokens) {
    this.props.auth.handleAuthentication(tokens);
    this.setState({
      redirectToReferrer: true
    });
  }

  onError(err) {
    console.log('error logging in', err);
  }

 render({location, auth}, {redirectToReferrer}) {
    let from;
    if (location && location.state) {
      from = location.state;
    } else {
      from = { pathname: '/' };
    }

    if (auth.isAuthenticated() || redirectToReferrer) {
      return <Redirect to={from} />;
    }

    return (
      <OktaSignInWidget
        widget={auth.widget}
        onSuccess={this.onSuccess}
        onError={this.onError} />
    );
  }
})
Update the Profile Page
Now that you have the Login component and it is using the Okta Sign-In Widget, use the auth component you created and update the profile page (in /src/routes/profile/index.js) to give you some more information about the user. This is what your final /src/routes/profile/index.js file should look like:
import { h, Component } from 'preact';
import { route } from 'preact-router';
import { withAuth } from '../../lib/auth';
import style from './style';

export default withAuth(class Profile extends Component {
  constructor(props){
    super(props);
  }

  componentWillMount(){
    if(this.props.auth.isAuthenticated()){
      this.state = {
        user: this.props.auth.getCurrentUser()
      };
    }else{
      return route('/login/');
    }
  }

  render(props, { user }) {
    return (
      user ?
      <div class={style.profile}>
        <h3 class={style.heading}>Profile</h3>
        <ul>
          <li>
            <span class={style.key}>Name:</span>
            <span class={style.value}>{user.claims.name}</span>
          </li>
          <li>
            <span class={style.key}>Email:</span>
            <span class={style.value}>{user.claims.email}</span>
          </li>
        </ul>
      </div> :
      null
    );
  }
})
You’ve added the authentication protection at the Component level in the componentWillMount function of the component. If the user is authenticated, it calls the getCurrentUser function on the higher-order component and adds the user to the component’s state. In the render function, you simply output the user’s name and email.
Update the Header Component
Now you just need to get the routes into your application and get the menu to link to them. Start by changing the /src/components/header/index.js file to:
import { h, Component } from 'preact';
import { Link } from 'preact-router/match';
import { withAuth } from '../../lib/auth';
import style from './style';

export default withAuth(class Header extends Component {
  componentWillMount(){
    if(this.props.auth.isAuthenticated()){
      this.setState({
          user: this.props.auth.getCurrentUser()
      });
    }
  }

  render(props, {user}) {
    return (
      <header class={style.header}>
        <h1>Preact App</h1>
        <nav>
          <Link activeClassName={style.active} href="/">Home</Link>
          {user ? <Link activeClassName={style.active} href="/profile">Profile</Link> : null }
          {user
            ? <Link activeClassName={style.active} onClick={props.auth.logout.bind(null, props.history)} href="javascript:;">Logout</Link>
            : <Link activeClassName={style.active} onClick={props.auth.login.bind(null, props.history)} href="javascript:;">Login</Link>}
        </nav>
      </header>
    );
  }
})
This will show the “Login” button if the user is not logged in and the “Logout” button if they are. It will also only show the “Profile” menu item to those users who are logged in.
Change Your Routing
Finally, change the routes in your /src/components/app.js file so that your application knows about your new routes and how to handle them. So your new app.js file will look like:
import { h, Component } from 'preact';
import { Router } from 'preact-router';

import Header from './header';
import Home from '../routes/home';
import Profile from '../routes/profile';
import Login from '../routes/Login';
// import Home from 'async!./home';
// import Profile from 'async!./profile';

export default class App extends Component {
  /** Gets fired when the route changes.
   *  @param {Object} event   "change" event from [preact-router](http://git.io/preact-router)
   *  @param {string} event.url The newly routed URL
   */
  handleRoute = e => {
    this.currentUrl = e.url;
  };

  render() {
    return (
      <div id="app">
        <Header />
        <Router onChange={this.handleRoute}>
          <Home path="/" />
          <Profile path="/profile/" />
          <Login path="/login/" />
        </Router>
      </div>
    );
  }
}
All that really changed is that you imported the newly created Login component and remove the user property being passed into the Profile component and added a new route for the Login component.
Run Your New Preact Application!
You should now be able to save your work and run npm start in the root folder and see a fully-functioning Preact application with user authentication via Okta!
There are a lot of similarities between Preact and React, but there are some key differences. Preact is meant for applications where keeping the size of the download small is critical. There are some nice conveniences in the Preact router, but there are some things missing (like withRouter). There are also some neat conveniences, like having props and state passed to the render function. All in all, I think Preact is neat, but I could see really needing a full-fledged React for complex apps.
Learn More
You can find out more about Preact from their website and Preact-Router from the Github repository.
You can also get the complete code for this article from the Okta Developer Github repository.
As always, if you have any questions, comments or concerns about the article, the code, Preact or Okta, feel free to reach out to me via email, or hit me up in the comments or via Twitter @leebrandt.
Frequently Asked Questions about Building a Preact App with Authentication
What is Preact and how does it differ from React?
Preact is a fast, lightweight JavaScript library that is similar to React. It is designed to be small and efficient, with a compressed size of just 3KB. Preact provides the same modern UI library and features of React, such as Virtual DOM diffing and Components, but with a smaller footprint. It’s perfect for mobile devices where bandwidth and performance can be issues. Preact also aims to be as close to React as possible in API, making it easy for React developers to start using Preact with minimal adjustments.
How do I set up a Preact project?
Setting up a Preact project is straightforward. You can use preact-cli, a command-line tool that helps you create and manage Preact projects. To install it, you need to have Node.js and npm installed on your computer. Once installed, you can create a new project by running the command preact create default my-project, where ‘my-project’ is the name of your project. This will create a new directory with the project files and dependencies.
How do I add authentication to my Preact app?
Adding authentication to your Preact app involves several steps. First, you need to install and import the necessary libraries, such as preact-router for routing and preact-cookies for handling cookies. Then, you need to create a login form and an authentication service that will handle the login requests and manage the user’s session. Finally, you need to protect your routes by checking if the user is authenticated before rendering the protected components.
How do I handle routing in Preact?
Preact uses preact-router for routing. It’s a simple and small router that uses the browser’s history API. To use it, you need to install it via npm and import it into your project. Then, you can define your routes using the <Router> component and <Route> components. Each <Route> component represents a page and has a ‘path’ prop that matches the URL.
How do I manage state in Preact?
Preact uses a concept called “props” and “state” to manage data. Props are passed to components from their parent, while state is managed within components. Preact’s state management is similar to React’s. You can use the this.setState() method to update the state and re-render the component. For complex state management, you can use libraries like Redux or MobX.
How do I use hooks in Preact?
Preact supports hooks, a feature that allows you to use state and other React features without writing a class. To use hooks in Preact, you need to import them from ‘preact/hooks’. The hooks API in Preact is the same as in React, so you can use hooks like useState, useEffect, and useContext in the same way.
How do I test my Preact app?
You can test your Preact app using testing libraries and frameworks like Jest and Enzyme. Jest is a JavaScript testing framework that works well with Preact, while Enzyme is a testing utility for React that can also be used with Preact. You can also use preact-test-utils, a library that provides helper functions for testing Preact components.
How do I deploy my Preact app?
You can deploy your Preact app to various hosting platforms like Netlify, Vercel, and GitHub Pages. To deploy, you need to build your app for production by running the npm run build command. This will create a ‘build’ directory with your compiled app. Then, you can deploy this directory to your chosen hosting platform.
How do I optimize my Preact app for performance?
Preact is already optimized for performance out of the box, but there are several things you can do to make your app even faster. This includes code-splitting, lazy-loading components, and optimizing images and other assets. You can also use Preact’s shouldComponentUpdate() lifecycle method to prevent unnecessary re-renders.
Can I use React libraries and components in my Preact app?
Yes, you can use most React libraries and components in your Preact app thanks to ‘preact-compat’, a thin layer over Preact that attempts to achieve 100% compatibility with React. This means you can switch to Preact from React with minimal changes to your code. However, due to the small size of Preact, some features of React are not supported out of the box.

