Key Takeaways
- The WordPress Visual Editor, powered by the TinyMCE editor control, can be customized to add unique functionality, such as creating and registering a custom TinyMCE Plugin which wraps selected text in a CSS class.
- To add custom functionality, you need to create a TinyMCE plugin in your WordPress website, register TinyMCE actions and filters, and use the TinyMCE filters (mce_external_plugins and mce_buttons) to load external TinyMCE plugins and add/remove buttons to the TinyMCE toolbar.
- Custom functionality can also be added by creating a JavaScript plugin which tells TinyMCE how to output the button and what to do when it’s clicked. This involves using the TinyMCE Plugin Manager class to add the plugin to TinyMCE, registering the button using the addButton function, and registering a command using the addCommand function.
- It’s possible to customize the WordPress Visual Editor without coding by using plugins. Some popular plugins for this purpose include TinyMCE Advanced, WP Edit, and Ultimate TinyMCE.
The content editor is a key part of WordPress. It allows users to create and manage their content, galleries and videos, in a Visual WYSIWYG (what you see is what you get) view.
It also comes with a Text view, which allows users to insert or amend HTML within their content.
The WordPress Visual Editor is powered by the TinyMCE editor control, which provides the WYSIWYG view, as well as the formatting buttons you see:

Thanks to the TinyMCE API and WordPress’ filter hooks, we can add our own functionality to the WordPress Visual Editor. Specifically, we’ll look at how to create and register a custom TinyMCE Plugin which wraps selected text in a CSS class.
Creating the TinyMCE Plugin
In your WordPress website, create the wp-content/plugins/tinymce-custom-class folder.
We’ll store our plugin’s files here, so next create a file called tinymce-custom-class.php, using the following code:
/**
 * Plugin Name: TinyMCE Custom Class
 * Plugin URI: https://www.sitepoint.com
 * Version: 1.0
 * Author: Tim Carr
 * Author URI: http://www.n7studios.co.uk
 * Description: TinyMCE Plugin to wrap selected text in a custom CSS class, within the Visual Editor
 * License: GPL2
 */
class TinyMCE_Custom_Class {
    /**
    * Constructor. Called when the plugin is initialised.
    */
    function __construct() {
    }
}
$tinymce_custom_class = new TinyMCE_Custom_Class;
This gives WordPress some information about our Plugin, and sets up our construct, where we’ll register our TinyMCE actions and filters.
WordPress TinyMCE Filters
TinyMCE provides two key filters for registering an element on the Visual Editor toolbar:
mce_external_plugins: Used to load external TinyMCE plugins (https://codex.wordpress.org/Plugin_API/Filter_Reference/mce_external_plugins)mce_buttons: Used to add/remove buttons to the TinyMCE toolbar (https://codex.wordpress.org/Plugin_API/Filter_Reference/mce_buttons,mce_buttons_2,mce_buttons_3,_mce_buttons_4)
Before we call these filters, we want check we’re in the WordPress Administration screens. Add the following code to the __construct:
if ( is_admin() ) {
	add_action( 'init', array( &$this, 'setup_tinymce_plugin' ) );
}
Next, add the setup_tinymce_plugin function to perform some further checks:
/**
* Check if the current user can edit Posts or Pages, and is using the Visual Editor
* If so, add some filters so we can register our plugin
*/
function setup_tinymce_plugin() {
    // Check if the logged in WordPress User can edit Posts or Pages
    // If not, don't register our TinyMCE plugin
    if ( ! current_user_can( 'edit_posts' ) && ! current_user_can( 'edit_pages' ) ) {
        return;
    }
    // Check if the logged in WordPress User has the Visual Editor enabled
    // If not, don't register our TinyMCE plugin
    if ( get_user_option( 'rich_editing' ) !== 'true' ) {
        return;
    }
    // Setup some filters
    add_filter( 'mce_external_plugins', array( &$this, 'add_tinymce_plugin' ) );
    add_filter( 'mce_buttons', array( &$this, 'add_tinymce_toolbar_button' ) );
}
This checks if the current logged in WordPress user can edit Posts or Pages. If they can’t, there’s no point in registering our TinyMCE Plugin for that User, as they’ll never see the Visual Editor.
We then check if the user is using the Visual Editor, as some WordPress users turn this off via Users > Your Profile. Again, if the user is not using the Visual Editor, we return (exit) the function, as we don’t need to do anything else.
If the above checks pass, the two TinyMCE WordPress Filters are registered – mce_external_plugins and mce_buttons.
The first filter – mce_external_plugins – allows us to register the TinyMCE JavaScript Plugin file that will interact with the Visual Editor. Let’s add a function call for this filter, inside our class:
/**
 * Adds a TinyMCE plugin compatible JS file to the TinyMCE / Visual Editor instance
 *
 * @param array $plugin_array Array of registered TinyMCE Plugins
 * @return array Modified array of registered TinyMCE Plugins
 */
function add_tinymce_plugin( $plugin_array ) {
    $plugin_array['custom_class'] = plugin_dir_url( __FILE__ ) . 'tinymce-custom-class.js';
    return $plugin_array;
}
Here, we register a JavaScript file within the $plugin_array, which contains all TinyMCE JavaScript plugins.
The second filter – mce_buttons – tells TinyMCE that we’d like to register a button in the Visual Editor. Again, let’s add a function call for this filter, inside our class:
/**
 * Adds a button to the TinyMCE / Visual Editor which the user can click
 * to insert a custom CSS class.
 *
 * @param array $buttons Array of registered TinyMCE Buttons
 * @return array Modified array of registered TinyMCE Buttons
 */
function add_tinymce_toolbar_button( $buttons ) {
    array_push( $buttons, 'custom_class' );
    return $buttons;
}
This registers the programmatic name for our TinyMCE button (custom_class).
Creating the JavaScript Plugin
When we called mce_external_plugins, we referenced a JavaScript file. We now need to create that file, and add some JavaScript code to it. This will tell TinyMCE how to output the button, and what to do when it’s clicked.
Create a new file in the plugin folder called tinymce-custom-class.js, inserting the following code:
(function() {
    tinymce.PluginManager.add( 'custom_class', function( editor, url ) {
        // Add Button to Visual Editor Toolbar
        editor.addButton('custom_class', {
            title: 'Insert CSS Class',
            cmd: 'custom_class',
            image: url + '/icon.png',
        });
        // Add Command when Button Clicked
        editor.addCommand('custom_class', function() {
            alert('Button clicked!');
        });
    });
})();
This JavaScript function performs a few actions:
- It calls the TinyMCE Plugin Manager class, which we can use to perform a number of TinyMCE plugin related actions. Specifically, we’re adding our plugin to TinyMCE using the
addfunction. - Within the
addroutine, we have access to the Visual Editor through theeditorinstance. We register our button using theaddButtonfunction, which comprises of a title, command and icon image. - Finally, we register a command using the
addCommandfunction, which shows an alert telling us when our button was clicked.
We’ll need to also include the icon.png image within our Plugin folder – this is the icon image that will be used for the button:
![]()
Save your code, and activate your Plugin in WordPress Administration > Plugins.
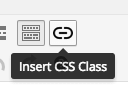
Next, create or edit a Page or Post, and you’ll hopefully see your button with the icon:
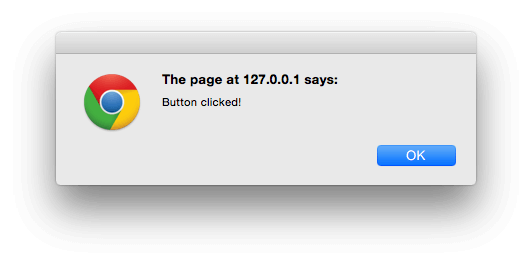
Click the button, and you’ll see the Button clicked! alert:
Defining a Command to Run
Let’s replace the alert with a prompt, asking the user for the CSS class name they want to wrap around the selected text in the Visual Editor:
(function() {
tinymce.PluginManager.add( 'custom_class', function( editor, url ) {
// Add Button to Visual Editor Toolbar
editor.addButton('custom_class', {
title: 'Insert CSS Class',
cmd: 'custom_class',
image: url + '/icon.png',
});
// Add Command when Button Clicked
editor.addCommand('custom_class', function() {
// Check we have selected some text selected
var text = editor.selection.getContent({
'format': 'html'
});
if ( text.length === 0 ) {
alert( 'Please select some text.' );
return;
}
// Ask the user to enter a CSS class
var result = prompt('Enter the CSS class');
if ( !result ) {
// User cancelled - exit
return;
}
if (result.length === 0) {
// User didn't enter anything - exit
return;
}
// Insert selected text back into editor, wrapping it in an anchor tag
editor.execCommand('mceReplaceContent', false, '' + text + '');
});
});
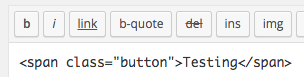
})();This command performs a few sanity checks, to make sure the user selected some text, entered a CSS class name and didn’t cancel the process.
If those checks pass, we then run the editor’s execCommand function, to replace the selected text, with the selected text wrapped in a span tag which includes the inputted CSS class.
If everything worked, switch to the ‘Text’ view, and you’ll see your selected text is now wrapped in a span tag:
Conclusion
We’ve created a WordPress Plugin to add a button to the TinyMCE Visual Editor. In this process, we’ve explored the filters WordPress uses for integration with TinyMCE, as well as the JavaScript code needed to add a button and perform an action when clicked.
To download the complete source code, visit the GitHub repository or the direct ZIP file download link.
In the next article, we’ll cover some more advanced steps that we can take to customize our TinyMCE plugin further.
Frequently Asked Questions (FAQs) about Adding Custom Functionality to the WordPress Visual Editor
How can I add custom buttons to the WordPress Visual Editor?
Adding custom buttons to the WordPress Visual Editor can be achieved by using the TinyMCE API. This API allows you to add new buttons to the toolbar and define their functionality. You can create a new plugin file in your WordPress installation’s plugins directory, and use the ‘mce_buttons’ filter to add your button. Then, you can use the ‘mce_external_plugins’ filter to load your plugin’s JavaScript file, which will define the button’s functionality.
Can I customize the WordPress Visual Editor without coding?
Yes, you can customize the WordPress Visual Editor without coding by using plugins. There are several plugins available that allow you to add, remove, or rearrange buttons on the toolbar, change the editor’s appearance, and add custom styles and formats. Some popular plugins for this purpose include TinyMCE Advanced, WP Edit, and Ultimate TinyMCE.
How can I add custom styles to the WordPress Visual Editor?
You can add custom styles to the WordPress Visual Editor by using the ‘tiny_mce_before_init’ filter. This filter allows you to modify the TinyMCE settings array, which includes a ‘style_formats’ option. You can add your custom styles to this option as an array of arrays, each defining a style. Each style should include a ‘title’, ‘block’, ‘classes’, and ‘wrapper’ property.
What is TinyMCE and how does it relate to the WordPress Visual Editor?
TinyMCE is a platform-independent web-based JavaScript HTML WYSIWYG editor control. It’s the underlying software that powers the WordPress Visual Editor. By understanding and using the TinyMCE API, you can add custom functionality to the WordPress Visual Editor.
How can I add a custom font to the WordPress Visual Editor?
You can add a custom font to the WordPress Visual Editor by using the ‘mce_css’ filter. This filter allows you to add additional CSS files to the editor. You can create a CSS file that imports your custom font and defines a class that uses it, and then add this file to the editor using the ‘mce_css’ filter.
Can I use the WordPress Visual Editor on mobile devices?
Yes, the WordPress Visual Editor is fully responsive and can be used on mobile devices. However, due to the smaller screen size, some toolbar buttons may be hidden in the ‘Kitchen Sink’ dropdown.
How can I add custom formats to the WordPress Visual Editor?
You can add custom formats to the WordPress Visual Editor by using the ‘tiny_mce_before_init’ filter and the ‘style_formats’ option. You can define your custom formats as an array of arrays, each defining a format. Each format should include a ‘title’, ‘inline’, ‘classes’, and ‘wrapper’ property.
How can I disable the WordPress Visual Editor?
You can disable the WordPress Visual Editor by going to Users > Your Profile in the WordPress admin area and checking the ‘Disable the visual editor when writing’ option.
Can I use shortcodes in the WordPress Visual Editor?
Yes, you can use shortcodes in the WordPress Visual Editor. Simply enter the shortcode in the editor and it will be processed when the post is displayed.
How can I add a table to the WordPress Visual Editor?
You can add a table to the WordPress Visual Editor by using the ‘Table’ button on the toolbar. If this button is not visible, you may need to install a plugin like TinyMCE Advanced to add it.
Tim is a WordPress Developer who builds WordPress web sites, themes and plugins. He runs n7 Studios, providing WordPress development, consultancy & training, and WP Zinc, providing free and premium WordPress Plugins.