Visual Ad Creation Workflow with Tumult Hype

This article was sponsored by Tumult. Thank you for supporting the partners who make SitePoint possible.
The goal of this article is to show how to create a rich media advertisement with Tumult Hype. It covers the basics of using the app in the context of building an ad and discusses ad-specific tips and tricks. By the end of reading you’ll be able to make HTML5 ads quickly and beautifully!
Key Takeaways
- Tumult Hype is a leading HTML5 animation and interactivity application for macOS, making it a powerful tool for creating rich media ads with animation and interactivity features.
- The application offers a user-friendly interface similar to Keynote and doesn’t require coding for most common interactivity. However, it supports JavaScript actions for more advanced functionality.
- Tumult Hype’s ad creation workflow includes choosing an ad size, importing assets, animating elements, adding interactivity and actions, previewing, and exporting for final delivery. An Export Script plug-in system can integrate ad platform features and automate export tasks.
- Tumult Hype offers a 14-day fully functional trial and costs $99.99 USD for the full Professional version, but a 25% discount is available for SitePoint users.
The Rise of HTML5 Ads
It is well known that adding animation and interactivity in digital advertising makes ads more effective. Beyond catching visitors’ eyes, rich media ads can better convey the product or branding as well as add engagements leading to more clicks.
As rich media ads are visual in nature, it makes sense to build them using visual tools. Changes are seen immediately. Adobe’s Flash reigned as king of the visual ad creation tools for years, but has been toppled by HTML5’s compatibility on mobile devices. As a technology, HTML5 ads have the additional advantage of often being more accessible while having lower power requirements. But HTML5 itself is just a markup language and has no inherently included visual tools, as Flash did with the Flash Professional app. Building ads via hand coding would be a laboriously slow process. Luckily, there are now sophisticated visual tools that can output HTML5.
Tumult Hype is Your Visual Design Tool
Tumult Hype is the leading HTML5 animation and interactivity app for macOS. Hype’s raison d’etre is to be easy to use and quick to learn. Layout is similar to Keynote, and per-property animation keyframes can be automatically created with its quick “Record” functionality. Hype provides a powerful set of animation features, such as animation along curved motion paths, customizable easings/timing functions, simultaneously running timelines, and encapsulated reusable symbols. Coding is not required for most common interactivity, although JavaScript actions can extend its capabilities by integrating with other libraries and services.
While Tumult Hype can be used for a wide range of HTML5 content, it is especially capable for rich media ad creation. A plug-in system, called “Export Scripts”, can integrate ad platform features and help package its export output for delivery. Advanced Export functionality can further help automate export tasks. Hype’s runtime library is very small with a compressed size of 25KB, giving plenty of room for your assets. This runtime drives the animations and manages browser compatibility issues (though the app still gives warnings if a feature won’t work on specific browsers).
The Ad Creation Workflow with Tumult Hype
Grab Tumult Hype and an Export Script
Step zero is to download Tumult Hype. The trial is fully functional for 14 days. Tumult Hype has two flavor modes: Standard and Professional. For ad creation (and following along with this article!), you’ll want to use Hype Professional.
You can then optionally grab an Export Script, which will augment Hype with extra ad-related features. Currently there are scripts for Sizmek, DoubleClick Studio, and DoubleClick Campaign Manager. If you are using a different ad platform, the steps are usually straightforward to adapt the standard output.
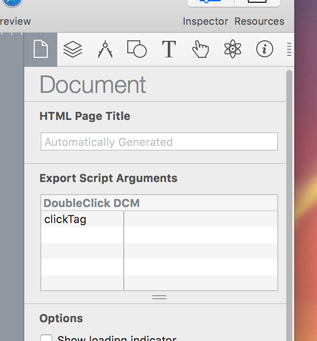
You can verify an Export Script has been installed by looking within Hype’s Preferences. Export Scripts may also have options that are show in the Document Inspector.
Choosing an Ad Size
After launching Hype, you’ll want to set the scene size to match the ad you are creating. This can be done in the Scene Inspector by setting the width and height, or choosing one of the Preset Sizes. Hype contains presets for common ads banners and rectangles.
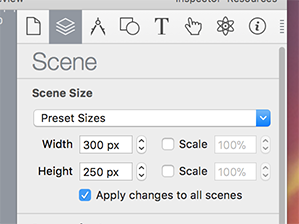
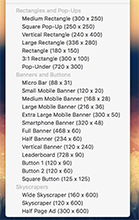
If your ad will have different size representations, you could make use of the Responsive Layout and Flexible Layout systems. Responsive Layout allows different content that is shown on width-based breakpoints. They can later be individually exported. The Flexible Layout system will adjust element positions and sizes based on container dimensions.
Importing Assets
Tumult Hype has basic shape and text primitives, but it is most likely you’ll be importing image assets from another program like Photoshop, Illustrator, or Sketch. These can simply be dragged to the scene editor or added via the Insert… menu item. Hype keeps a copy of the assets but will ask to update if it notices changes on the original to help when iterating.
You can later find assets in the Resource Library. One of the options here is to Automatically optimize when exporting. This feature is enabled by default and automates a few tasks:
- Generates retina (@2x) and non-retina (@1x) variants of the images (the Hype runtime chooses which to load)
- Reduces image sizes to the maximum dimensions used in the document
- Attempts to compress images when feasible and if there is a file size improvement
- Converts non web-safe image formats
While this is generally useful, it may work against file size goals for your ad. For example, overall ad file size is usually measured from the zip and not actual contents downloaded — as such having both retina and non-retina variants will add weight. Also you may be able to do better at visual compression quality or size than Hype can do in an automated fashion (using a tool like ImageOptim). You may need to uncheck this box.
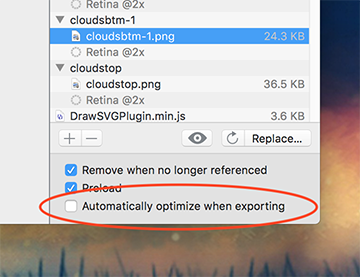
Regardless, bitmap-based assets can add up fast. You may want to consider using SVGs, which are widely supported by browsers. Hype treats these as images, yet won’t attempt to optimize them.
As a side note, IAB recommends no more than 15 initially loaded assets to help keep pages lean.
Animating 101
Once elements have been created by dragging in assets or inserting text/shapes, they can be animated easily with these steps:
- Hit the Record button
- Drag the playhead to a later time
- Change the position of the element or modify any other properties (like Opacity)
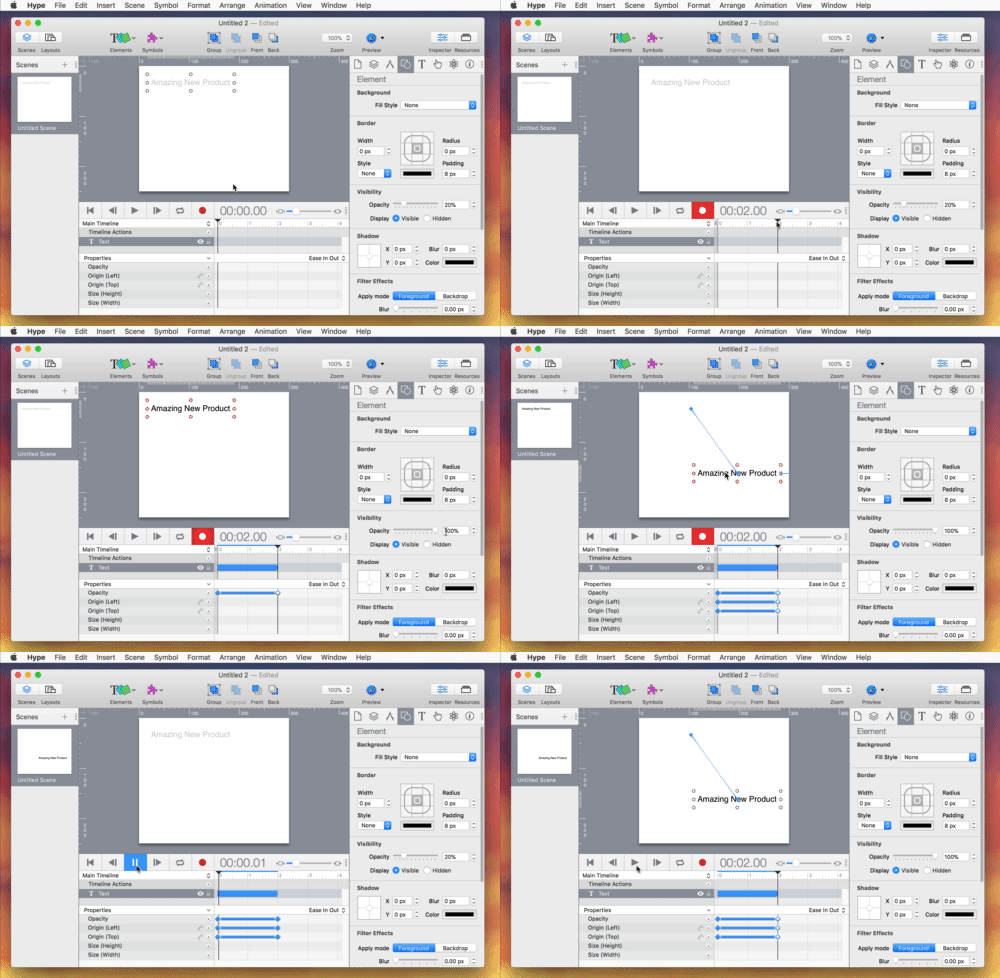
Recording is a UI shortcut for adding per-property keyframes. You can always manually create or edit them. This includes changing their timing functions to different easings or effects like elasticity and bounce-back. Position animations can be further refined by dragging a motion path to be shaped into curves.
A timeline in Hype can be thought of as a stream of animations. A scene in Hype always has at least one timeline — the Main Timeline. Multiple timelines can be created and run in parallel. This is often useful to animate specific elements in response to actions, or to maintain looping.
Symbols can play a similar role – they represent reusable “scenes within a scene” and contain their own elements and independently running timeline animations. Like other apps with Symbols, a change in one instance will be reflected in all other instances.
Adding Interactivity and Actions
The beauty of choosing HTML5 over a video/animated GIF is that it allows for interactivity and engagement with users. Interactivity is a response to an event. These events could be mouse clicks, drags, swipes, scene loads, waypoint hits, or even key presses. The action response depends on the goals of the creative. You may want to kickoff animations, bind animations to a drag, change scenes, or even trigger custom code. Within the realm of ads, typical tasks would be having a button click go to an external URL (also called an “Exit”) or triggering counters that can be reported back to the ad server.
Interactivity can be created without the need for code in most cases. These are the basic steps for running an animation in response to a mouse click:
- Select an element
- Go to the Actions Inspector and press the + next to On Mouse Click
- Choose Start Timeline… for the action and select New Timeline… in the Timeline popup button
- Name the timeline and then create animations
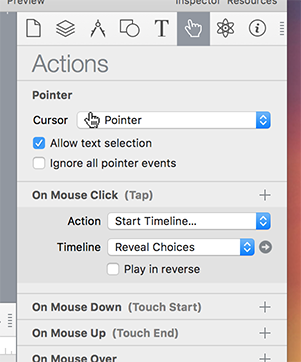
Export Scripts also can provide ad-specific actions that can be chosen in response to events. These will appear in the same Action popup list.
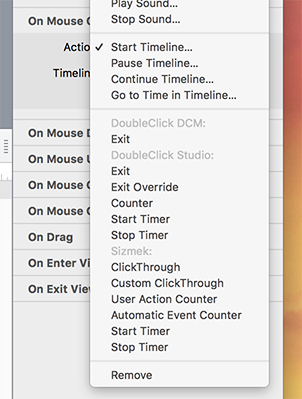
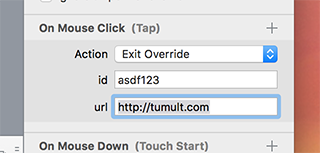
Additionally, the Run JavaScript… action can be used for any custom code, including invoking ad-related functions or calling the Hype API.
Previewing
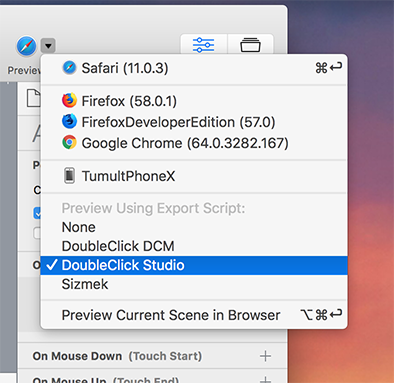
It is important to preview an ad frequently while building to ensure that final animations and interactivity behave as you intend. The Preview menu allows for quickly changing between different browsers on your computer. If you hold down the option key, you can preview the specific scene/layout that is currently selected in Hype. Hype can also preview to an iOS device using the free Hype Reflect app.
If you are using an Export Script, its output can be included in the Preview as well. To do this, open the Preview menu and check a script underneath Preview Using Export Script.
Exporting and Delivery
Once your ad is complete, you’ll want to export for final delivery. The File > Export as HTML5 menu contains the Folder… option, which produced the default .html page and corresponding folder of resources. This menu also provides any Export Script-provided options. These will automate packaging, generally stripping unnecessary resources and compressing to a single .zip file.
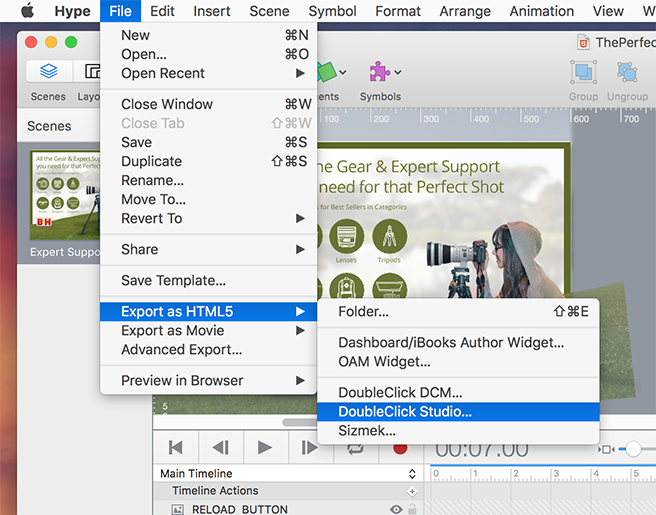
For further automation, you may want to use the File > Advanced Export… tool. This can split an ad into specific scenes or layouts, and also make use Export Scripts. File > Export as Movie provides some static image/video options if need be, too.
Conclusion
Those are the primary steps for creating a rich media HTML5 ad with Tumult Hype! As a visual tool, Hype can significantly speed up the creation and iteration process without limiting in features or functionality. The ad-specific workflow features in Export Scripts automate many common tasks for digital ad production. These Export Scripts can be built or modified by anyone, so if there’s an ad system or automation that doesn’t exist you are free to build it!
If you’re interested in learning more, there’s documentation and tutorials on the Tumult site. Hype is available for a 14-day fully functional trial and costs $99.99 USD for the full Professional version.
But right now, as a SitePoint user you can get the Professional version for just $74.99 here. That’s a 25% discount!
Frequently Asked Questions (FAQs) about Visual Ad Creation Workflow with Tumult Hype
How does Tumult Hype compare to other ad creation tools like Canva or Adobe Express?
Tumult Hype is a powerful tool that allows you to create interactive and animated content. Unlike Canva or Adobe Express, which are primarily design tools, Tumult Hype focuses on animation and interactivity. It offers a timeline-based interface, which makes it easy to create complex animations without any coding. However, it also supports JavaScript for more advanced functionality. This makes it a versatile tool that can be used for a wide range of projects, from simple animations to complex interactive content.
Can I use Tumult Hype for creating advertisements for Facebook?
Yes, you can use Tumult Hype to create advertisements for Facebook. The tool allows you to create HTML5 content, which is supported by Facebook. You can create interactive and animated ads that can help to engage your audience and increase the effectiveness of your advertising campaigns. However, it’s important to note that Facebook has specific requirements for ads, so you should ensure that your content meets these requirements.
What is the learning curve for Tumult Hype compared to other ad creation tools?
Tumult Hype has a steeper learning curve compared to tools like Canva or Adobe Express. This is because it offers more advanced features, such as animation and interactivity. However, it has a user-friendly interface and provides a range of tutorials and resources to help you get started. Once you get the hang of it, you’ll find that it offers a lot of flexibility and control over your designs.
Can I use Tumult Hype for free?
Tumult Hype is a paid tool, unlike some other ad creation tools that offer free versions. However, it offers a free trial, so you can try it out before deciding whether to purchase it. The cost of the tool is a one-time fee, which includes all future updates. This makes it a cost-effective option if you plan to use it regularly.
How does Tumult Hype support the ad creation workflow?
Tumult Hype supports the ad creation workflow by providing a range of features that make it easy to create, edit, and publish your ads. It offers a timeline-based interface for creating animations, supports interactivity, and allows you to preview your ads in real-time. It also supports a range of export options, making it easy to publish your ads to different platforms.
Is Tumult Hype suitable for beginners?
While Tumult Hype offers advanced features, it is also suitable for beginners. It has a user-friendly interface and provides a range of tutorials and resources to help you get started. The timeline-based interface makes it easy to create animations, even if you have no previous experience.
Can I use Tumult Hype on different operating systems?
Currently, Tumult Hype is only available for Mac. However, the content created with Tumult Hype can be viewed on any device that supports HTML5, including Windows and Linux computers, as well as smartphones and tablets.
What kind of ads can I create with Tumult Hype?
With Tumult Hype, you can create a wide range of ads, from simple animations to complex interactive content. This includes banner ads, interstitial ads, video ads, and more. The tool supports a range of formats, including HTML5, GIF, and video, making it a versatile choice for ad creation.
How does Tumult Hype compare to other tools in terms of features?
Tumult Hype offers a range of features that set it apart from other ad creation tools. This includes a timeline-based interface for creating animations, support for interactivity, real-time previews, and a range of export options. It also supports JavaScript for more advanced functionality.
Can I collaborate with others when using Tumult Hype?
Currently, Tumult Hype does not support collaboration within the tool. However, you can share your projects with others by exporting them as Hype documents. This allows others to edit and modify your projects using Tumult Hype.
Jonathan is the founder of Tumult and lead developer of Hype. He’s a multi-talented Objective-C hacker, web developer and designer. Jonathan previously was an engineering manager at Apple responsible for teams working on Mail.app, macOS updates and automation tools. He started writing macOS shareware from his dorm room at Purdue.

