Here’s a fairly straightforward way to create the effect of text with a triple stroke. Unlike Adobe Illustrator, where you really can apply multiple strokes, Photoshop only allows you to add one stroke on any particular layer. In this case, we’ll use a gradient trick to apply this effect. The good thing here is that the text remains fully editable after the effect has been applied.
1. Create a new Photoshop document with a white background.
2. Select the Type tool from the tool bar and add some text. The font used here is called Blair.
 3. Double-click on the text layer to open up the Layer Style dialog box. Click on the word “Stroke” on the bottom left. Set the size to 10 px and set the Fill Type to Gradient. Don’t click OK yet.
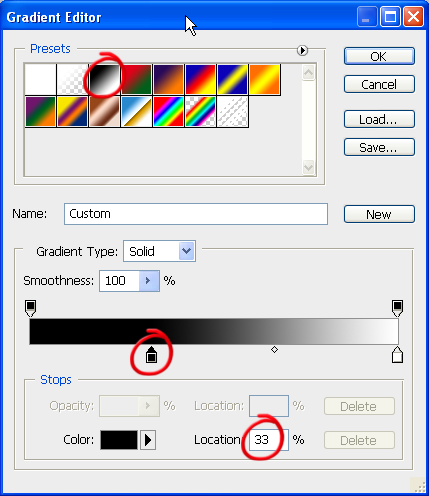
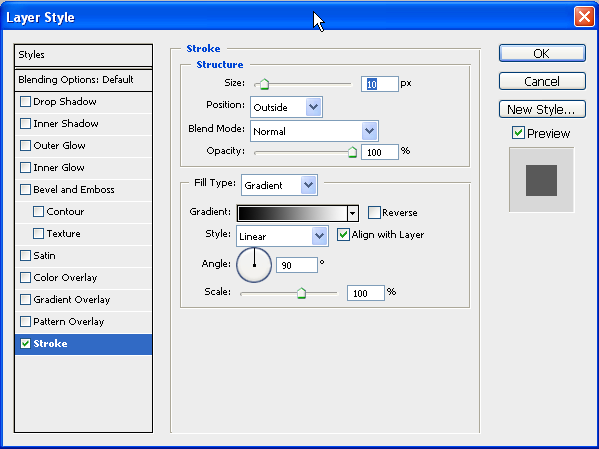 4. Click on the Gradient dropdown box and choose the Black, White gradient.
5. Still in the Gradient Editor click on the Black Color Stop, then in the Location field type in 33%.
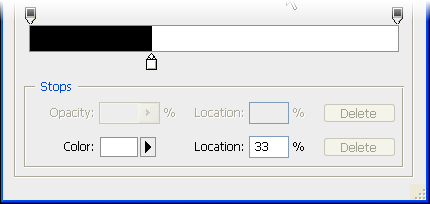
 6. Click on the White Color Stop and in the Location field type 33%.
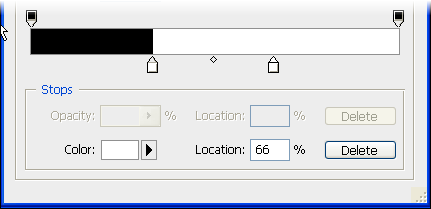
 7. Click to the right of the white color stop to add a new one. The new color stop should be white by default. If it is not white, just double click on it to open the color picker to choose white.
Type 66% in the Location box.
 8. Click once more to the right of the second white color stop. Double click on the new color stop and set the color to dark red #990000. Set the Location to 66%.
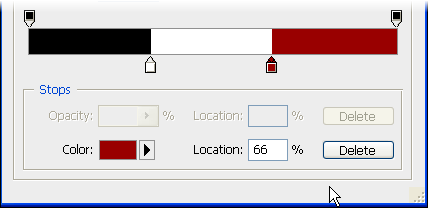 OK so that’s the special gradient created. You’ve removed the smooth transition from one color to the other producing three solid blocks of color which will make up the strokes.
Click OK.
9. Now back on the Layer Style dialog box, set the Style to Shape Burst. You will be able to see all of these changes on your initial text.
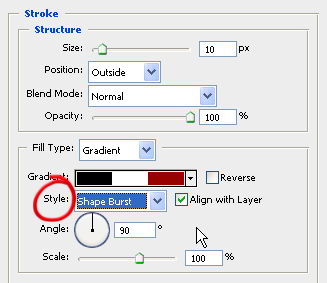
 When you’re happy with how your text looks, click OK.
As I mentioned earlier, the text is fully editable so you can add more type and it will keep the layer style. Also by changing the color of your original text you can get some nice effects. For example, my original text was black, if I go back and change it to white, it looks like this.
 You can also get cool effects by going back to the Stroke style and changing the thickness of the stroke.
Here the stroke is 18 pixels.
![]() Here the stroke is 35 pixels.
Here the stroke is 35 pixels.
![]() And finally, you can always go back to the Gradient Editor and change or add color stops as in the steps 5 – 8. Below you can see the text with four uneven strokes.
And finally, you can always go back to the Gradient Editor and change or add color stops as in the steps 5 – 8. Below you can see the text with four uneven strokes.

Frequently Asked Questions (FAQs) about Triple Stroked Text in Photoshop
How can I add more than one stroke to my text in Photoshop?
To add multiple strokes to your text in Photoshop, you can use the ‘Layer Styles’ feature. First, create a text layer and then go to ‘Layer’ > ‘Layer Style’ > ‘Stroke’. Adjust the size, position, blend mode, opacity, and color as per your preference. To add another stroke, right-click on the ‘Effects’ option under the text layer and select ‘Create Layer’. This will separate the stroke from the text. Repeat the process to add more strokes.
Can I change the color of each stroke in Photoshop?
Yes, you can change the color of each stroke in Photoshop. When you add a stroke using the ‘Layer Style’ > ‘Stroke’ option, you can choose the color of the stroke. For each additional stroke, you can select a different color.
How can I adjust the thickness of the strokes in Photoshop?
The thickness of the strokes can be adjusted in the ‘Layer Style’ dialog box. When you select ‘Stroke’, you can adjust the size slider to increase or decrease the thickness of the stroke.
Is it possible to add strokes to a specific part of the text in Photoshop?
Yes, it is possible to add strokes to a specific part of the text. You can do this by selecting the part of the text you want to add a stroke to with the ‘Text’ tool, and then following the same process to add a stroke.
Can I save my stroke settings for future use in Photoshop?
Yes, you can save your stroke settings as a style for future use. Once you have adjusted your stroke settings, click on the ‘New Style’ button in the ‘Layer Style’ dialog box, give your style a name, and click ‘OK’. You can then apply this style to other text layers by going to ‘Layer’ > ‘Layer Style’ > ‘Styles’ and selecting your saved style.
How can I remove a stroke from my text in Photoshop?
To remove a stroke from your text, go to the ‘Layers’ panel, right-click on the ‘Effects’ option under the text layer, and select ‘Clear Layer Style’. This will remove all layer styles, including the stroke.
Can I add a gradient stroke to my text in Photoshop?
Yes, you can add a gradient stroke to your text. In the ‘Layer Style’ dialog box, select ‘Stroke’ and then choose ‘Gradient’ from the ‘Fill Type’ dropdown menu. You can then adjust the gradient settings as per your preference.
How can I add a stroke to a shape in Photoshop?
The process of adding a stroke to a shape is similar to adding a stroke to text. First, create a shape using the ‘Shape’ tool. Then, go to ‘Layer’ > ‘Layer Style’ > ‘Stroke’ and adjust the stroke settings as per your preference.
Can I add a stroke to an image in Photoshop?
Yes, you can add a stroke to an image. First, open the image and create a new layer. Then, select the ‘Rectangular Marquee’ tool and draw a selection around the image. Go to ‘Edit’ > ‘Stroke’ and adjust the stroke settings. Click ‘OK’ to apply the stroke.
How can I make my strokes look more realistic in Photoshop?
To make your strokes look more realistic, you can adjust the blend mode and opacity in the ‘Layer Style’ dialog box. You can also add a ‘Bevel and Emboss’ effect to give your strokes a 3D look. Experiment with different settings to achieve the desired effect.
Jennifer Farley is a designer, illustrator and design instructor based in Ireland. She writes about design and illustration on her blog at Laughing Lion Design.

