

Key Takeaways
- Rockmongo is an open-source MongoDB administration tool written in PHP5, which can be used to create databases, collections, and documents, query collections, and import and export data. It requires a web server running PHP, PHP 5.1.6 or higher with session support, and the php_mongo extension for MongoDB to operate.
- Rockmongo provides a user-friendly interface for managing databases, collections, documents, indexes, and more. It allows developers to execute MongoDB commands and JavaScript codes, import and export data in various formats, and use plugins to extend its functionality.
- The tool offers a range of features including the ability to update, delete, and duplicate documents, run queries against collections, analyze queries and their index usages, and backup the database through the import/export functionality. It also supports plugins to extend its functionality.
By default, MongoDB provides the interactive JavaScript-based mongo shell which can be used for performing database operations. Although this shell may be the best approach to start with MongoDB queries, a GUI tool to administer the service is always useful.
There are many such GUI tools available, like Rockmongo, PHPMoAdmin, Fang of Mango, UMongo, MongoExplorer, and MongoVUE, to name just a few. When it comes to using MongoDB with PHP-based projects, Rockmongo and PHPMoAdmin are good options. In this article, we’ll take a look at Rockmongo.
Rockmongo is an open source MongoDB administration tool written in PHP5. You’ll become familiar with using Rockmongo to create databases, collections and documents, query collections, and import and export data. Ready?
Getting Started
The requirements for running Rockmongo are:
- a web server running PHP
- PHP 5.1.6 or higher with session support
- the php_mongo extension for MongoDB
Once you have the proper environment, go ahead and download the latest version of Rockmongo from its download page at rockmongo.com/downloads.
Installation instructions can be found on the Rockmongo Wiki, but in general you’ll need to unzip the downloaded package in a web-accessible directory on your server root of your site and rename it to rockmongo. Open your web browser and access the index.php page from the location where you have installed Rockmongo.
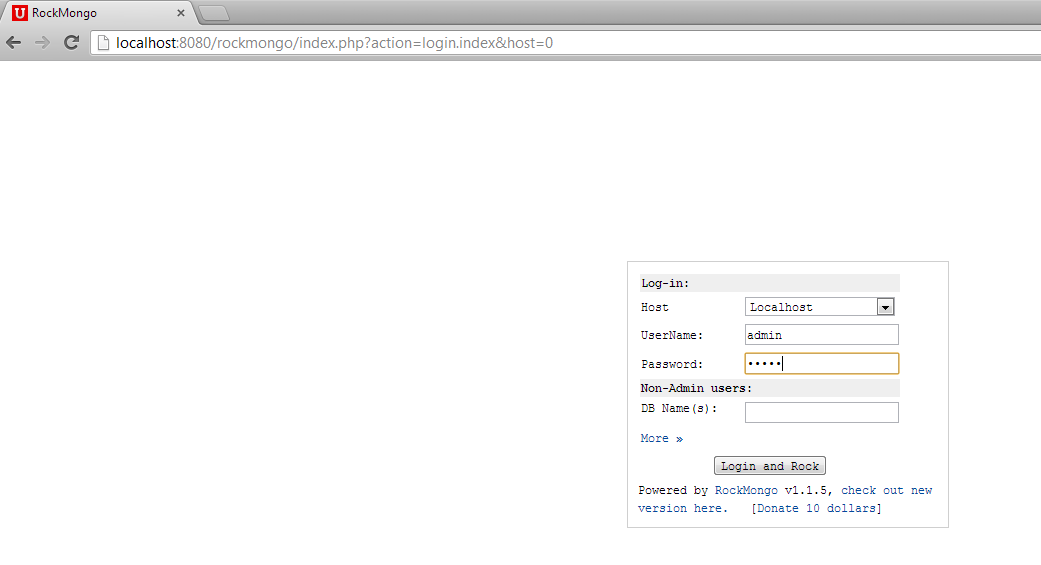
The default username and password is “admin” and “admin”. If you changed the password during installation, then enter the appropriate credentials. Click on “Login and Rock” and you’ll be redirected to the home page of the Rockmongo application.
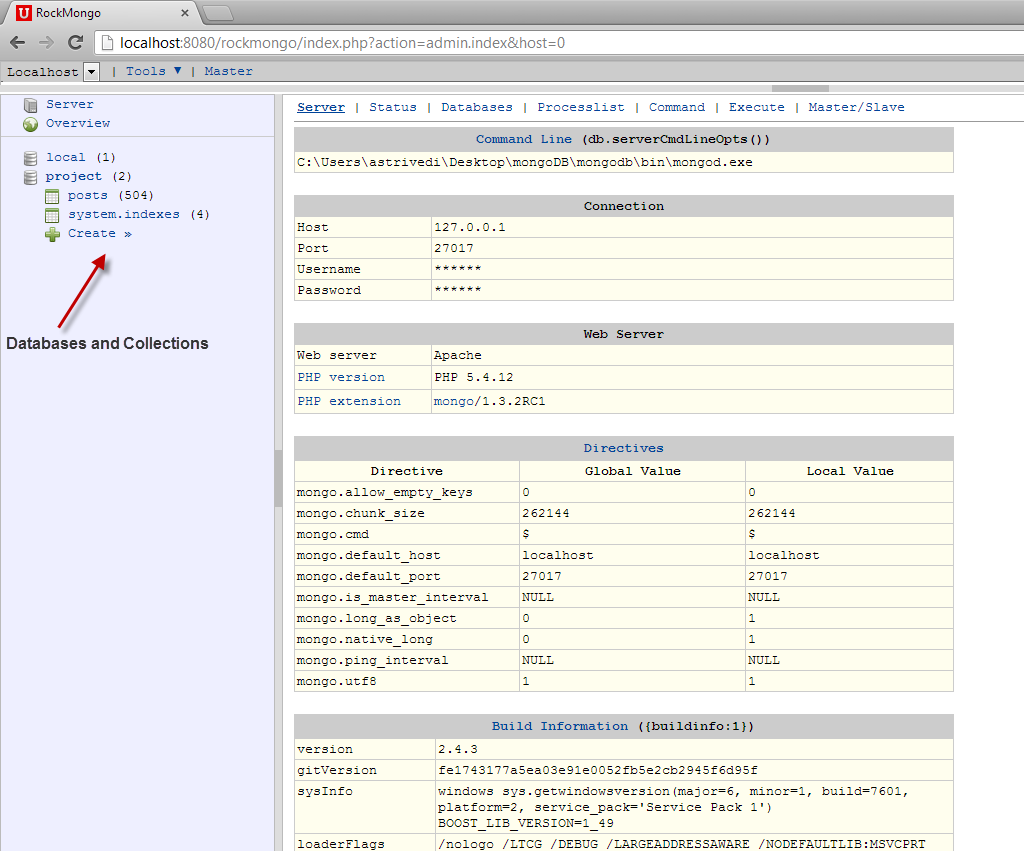
As you can see, the home page lists basic information about MongoDB Server location and connection, PHP Web Server and MongoDB settings. The left panel shows the list of databases and collections.
Creating Databases and Collections
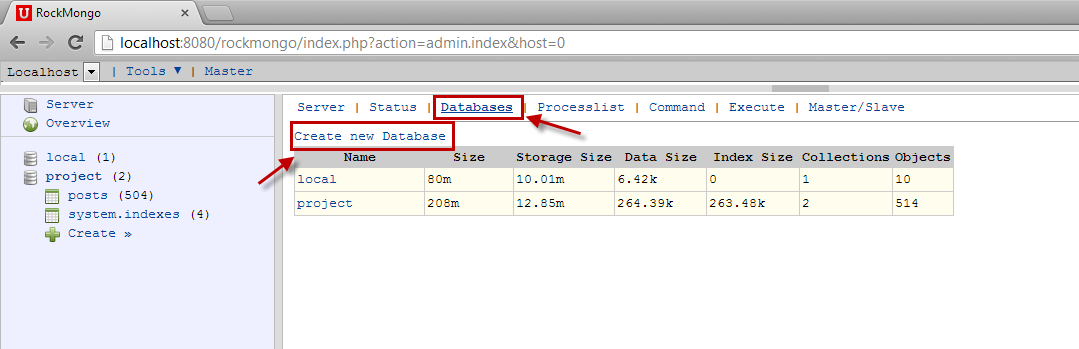
The Databases tab lists all of the database available on the MongoDB server. To create a new database, click Create New Database on the Databases tab.
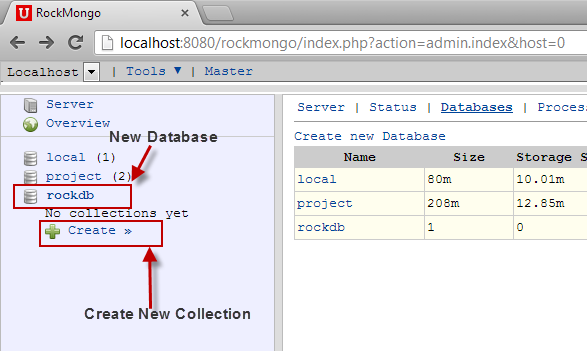
Then enter the name of the database and click Create (I’ll name mine “rockdb”). The newly created database will appear in the left panel.
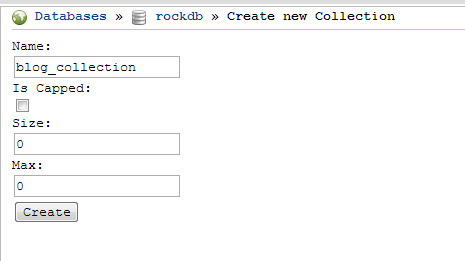
To create a new collection, click on Create under the new database in the left pane and provide the desired name for the collection (I’ll use “blog_collection”).
When you provide the collection information, don’t worry about the Is Capped field. It’s safe to leave it unchecked.
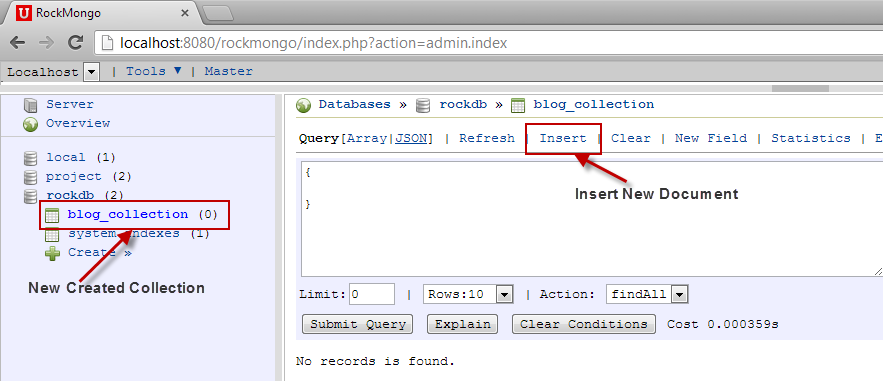
The new collection will appear in the left panel under the database. You can click on the collection to list all of the documents in it. (Note that Mongo DB creates a default system.indexes collection when you create first collection in a database.)
Inserting Documents
To insert documents, click on the Insert tab and then the name of the collection.
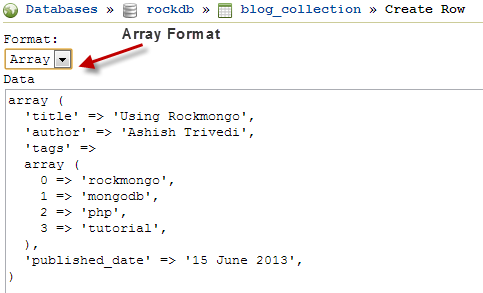
We can specify the new document structure either as JSON or a PHP array. Choosing either format doesn’t make any difference to the document formed, it’s just a matter of comfort for developers.
After specifying the document, click on Save. Similarly, go ahead and insert other documents.
To view the documents inside a collection, click on the collection in the left panel and you will see a list of all of the documents in the content area. The records most recently inserted will appear first.
Updating, Deleting, and Duplicating Documents
You can update, delete or duplicate any document by clicking on the corresponding options provided on each document. Clicking on any of the links will take the document to edit mode where you can make changes in either JSON or PHP as you did earlier.

Querying Documents
Querying the database is one of the important functions of any database administration tool. Whenever you click on a collection, you will find a text area on the top of the page for running queries against it.
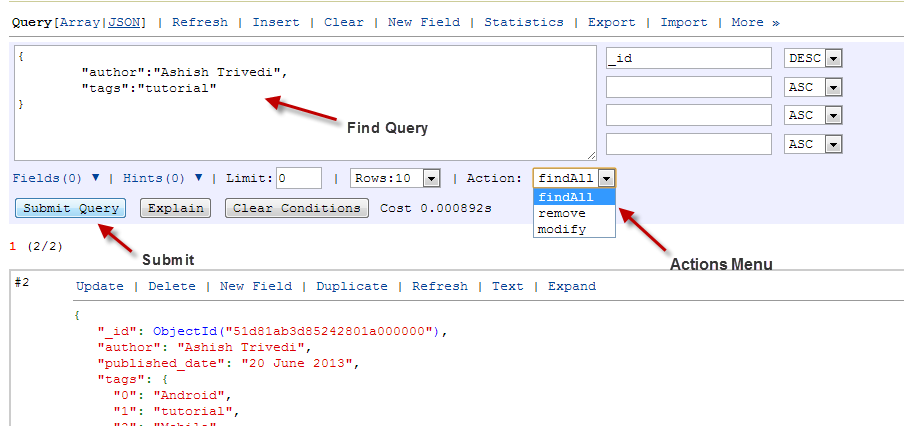
Like the documents, query expressions can also be specified either as JSON or a PHP array. There are three action options available in the drop down: findAll, remove, and modify.
- findAll: This is the default option. Specify the find condition and click on Submit Query. The matching documents will appear in the search results.
- remove: This is similar to modify in that you just have to specify the condition for selecting documents, but the action removes the matching documents from the collection.
- modify: When you click on modify, you will see two text sections. The first section is to specify the condition for matching documents and the other is to specify the update script. This feature can be used to do bulk-updates.
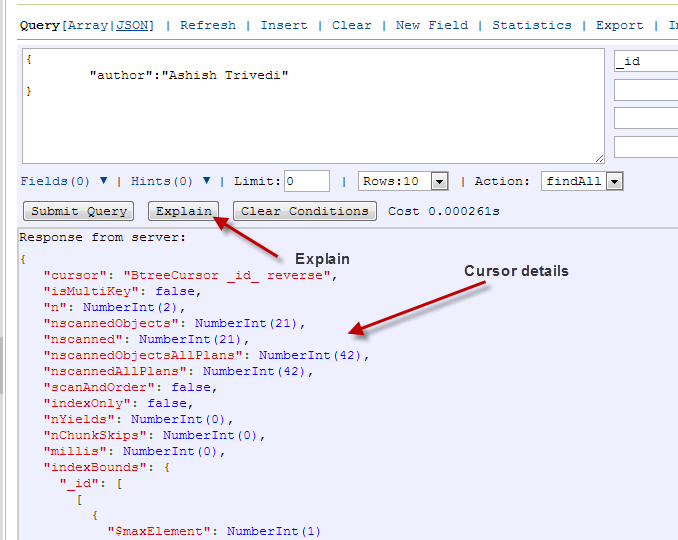
Using Explain
This is one of the most useful features and probably the one I like the most in Rockmongo. The explain query is frequently used to analyze queries and their index usages. As shown below, you can specify your find query and then click on the Explain button. This will give all the cursor details for the query.
Importing and Exporting Databases
Import and export features are useful for when you want to backup the database. The import/export functionality in Rockmongo does the same task as the mongoimport and mongoexport functions.
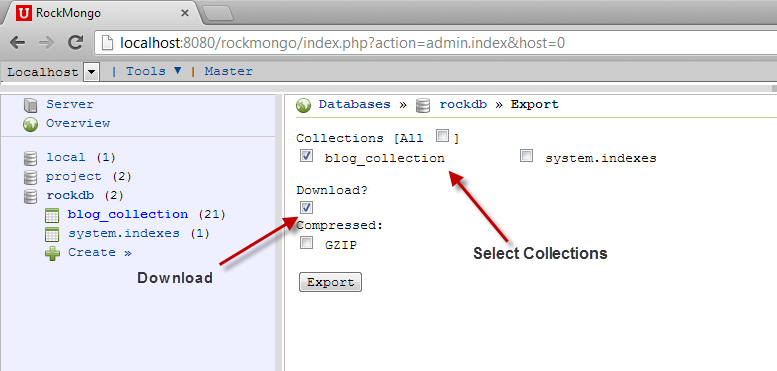
To export a database or collection, click the Export tab. Check all the checkboxes for the collections you want to export. Check the Download option as well, and then click on Export. It will give you a downloadable JavaScript file containing the entire exported database.
To import the data in another database, go to that database and click on the Import tab. Choose the JS file you just downloaded, and the entire dataset will be imported to the database.
Conclusion
There are a lot of other features in Rockmongo that I’m sure you’ll want to explore once you start working with it. In this article I’ve covered only the most frequently used features to help you get a head start with it. If you have any questions related to the article, feel free to post your comments!
Image via Fotolia
Frequently Asked Questions about RockMongo for PHP-Powered MongoDB Administration
How do I install RockMongo on my server?
To install RockMongo, you need to have PHP 5.1.6 or newer and MongoDB 1.2.2 or newer. Download the latest version of RockMongo from the official website, unzip the file, and upload it to your server. Then, open the config.php file and set your MongoDB server, port, admins, and plugins. Save the changes and open RockMongo in your web browser. You should see the login screen where you can enter your admin credentials.
What are the main features of RockMongo?
RockMongo is a powerful MongoDB administration tool powered by PHP. It provides a user-friendly interface for managing databases, collections, documents, indexes, and more. You can execute MongoDB commands and JavaScript codes, import and export data in various formats, and use plugins to extend its functionality.
How do I create a new database in RockMongo?
To create a new database, click on the “Databases” tab in the RockMongo interface, then click on “Create New Database”. Enter the name of your database and click “Create”. The new database will appear in the list of databases.
How do I use RockMongo to manage MongoDB collections?
RockMongo provides a simple interface for managing MongoDB collections. You can create, drop, rename, and duplicate collections, as well as view and modify documents. To manage a collection, click on the database name, then click on the collection name.
Can I use RockMongo to execute MongoDB commands?
Yes, RockMongo allows you to execute MongoDB commands and JavaScript codes. Click on the “Tools” tab, then select “Command”. Enter your command in the text box and click “Run”. The results will be displayed below.
How do I import and export data with RockMongo?
RockMongo supports data import and export in various formats, including JSON, CSV, and SQL. To import or export data, click on the “Tools” tab, then select “Import” or “Export”. Choose the format and the collection, then follow the instructions.
How do I manage indexes in RockMongo?
RockMongo provides a simple interface for managing indexes. To create an index, click on the collection name, then click on “Indexes”. Enter the index fields and options, then click “Create”. To drop an index, click on the “Drop” link next to the index name.
Can I use plugins with RockMongo?
Yes, RockMongo supports plugins to extend its functionality. You can download plugins from the official website, upload them to your server, and enable them in the config.php file.
How do I troubleshoot problems with RockMongo?
If you encounter problems with RockMongo, check the error messages and the server logs for clues. Make sure your MongoDB server is running and accessible, and your PHP version is compatible with RockMongo. If you can’t solve the problem, you can ask for help in the RockMongo forum or GitHub page.
Is RockMongo secure?
RockMongo uses HTTP Basic Authentication to protect your MongoDB server. However, it’s recommended to use it in a secure network and keep your MongoDB server behind a firewall. Always use strong passwords and keep your RockMongo and MongoDB versions up-to-date to prevent security vulnerabilities.

