

To make the most out of this tutorial, you should have a basic understanding of topics such as actions, filters, shortcodes, widgets and object orientated design.
If you’re interested in brushing up on the basics, you can read my previous article An Introduction to WordPress Plugin Development. It will help you to build a solid understanding of the concepts and ideas we’ll be using throughout this tutorial.

Key Takeaways
- Plugins enhance site functionality, and creating custom types, like a location list, is a practical example.
- Structure your plugin with a main PHP file and additional includes for organization and maintainability.
- Use actions and filters within your plugin to hook into WordPress core functionalities, ensuring dynamic and flexible behavior.
- Implement security measures such as checking for direct file access and verifying nonces to safeguard your plugin.
- For user-friendly interfaces, utilize widgets and shortcodes that allow admins to easily display custom content types like locations.
- Ensure your plugin handles data securely by sanitizing and validating user inputs, especially when dealing with metadata.
- Regularly update your plugin and test it across different WordPress themes to maintain compatibility and secure functionality.
Real World Example – Business Locations List
Let’s jump straight into a real world example of how plugins can be used to address issues and add functionality to your website.
Often businesses will want to showcase the various locations or offices that they have. While these locations could be created as pages, it would be better to create them as a content type that matches their unique information and provides the user with an easy interface to display these locations.
While we could build this functionality into our child theme, it is generic enough that we could build it as a plugin to make implementing it into other sites simple and easy.
Our example will cover the development of a plugin that processes and outputs locations. These locations will be a custom content type with additional meta information for storing location specific data. The plugin will also demonstrate the various ways in which you can output your information (such as the individual location page, a location listing widget and a location listing shortcode)
Setting Everything Up
Lets set everything up, jump to to your plugin directory and create the following folder / file structure
- wp_simple_location_plugin
- css
- wp_location_public_styles.css
- wp_location_admin_styles.css
- inc
- wp_location_widget.php
- wp_location_shortcode.php
- wp_simple_location_plugin.php
- css
The top level file wp_simple_location_plugin.php is going to be our main file. It is here we’ll load our styles from our CSS directory and also the additional PHP files from the includes directory.
Main Location Class
Inside the wp_simple_location_plugin.php file we’ll define our core functionality for the plugin. We’ll also include our additional files that are needed for the widget and shortcode functionality.
No Direct Access
A recommendation is to block direct access to your PHP files by checking if the ABSPATH variable is defined (if so we terminate execution). Add the following code directly after your opening PHP tag:
defined( 'ABSPATH' ) or die( 'Nope, not accessing this' );
Plugin Declaration
To get our plugin working it needs to have a plugin declaration defined. A plugin declaration is a set of comments that WordPress will look for and contains information about your plugin. This must be included as without it your plugin won’t appear in the WP plugin manager.
<?php
/*
Plugin Name: WordPress Simple Location Plugin
Plugin URI:  https://github.com/simonrcodrington/Introduction-to-WordPress-Plugins---Location-Plugin
Description: Creates an interfaces to manage store / business locations on your website. Useful for showing location based information quickly. Includes both a widget and shortcode for ease of use.
Version:     1.0.0
Author:      Simon Codrington
Author URI:  http://www.simoncodrington.com.au
License:     GPL2
License URI: https://www.gnu.org/licenses/gpl-2.0.html
*/
You define your plugins name, description, version and other information here. The majority of this will be shown on the plugins administration page when users activate the plugin.
The wp_simple_location Class
We now create the shell of the wp_simple_location class. This class will contain a majority of the functionality for this plugin and will be used to hold our properties and methods.
class wp_simple_location{

}
Include the shortcode and widget files
Since we’ll be using both a widget and a shortcode, the functionality for each has been split into its own file.
Go to the end of the wp_simple_location class and add the following:
//include shortcodes
include(plugin_dir_path(__FILE__) . 'inc/wp_location_shortcode.php');
//include widgets
include(plugin_dir_path(__FILE__) . 'inc/wp_location_widget.php');
This will load both of our files which we’ll look at later.
Class Properties
Class properties are variables that can be accessed from functions within the class.
Declaring properties makes it easier to access commonly used elements.
We only have one property in this function; an array of days that will be used for the trading hours of the location. Let’s define the value as an empty array as later on we’ll populate it with our values.
//properties
private $wp_location_trading_hour_days = array();
The _construct Function
The _construct function is an important part of the plugin as it acts as the master function, letting us handle and execute other functions.
This function is a magic function; Magic functions are special functions added to PHP5 that are triggered on certain conditions automatically. This function is triggered the instant that our class is instantiated (the class is created and assigned to a variable).
In a plugin you will use this function to add all of your actions, filters and function calls. You could add these hooks outside the class but it’s fine to leave them here.
Copy the following code. We’ll go through each of the elements one at a time so you can see what is happening.
//magic function (triggered on initialization)
public function __construct(){

    add_action('init', array($this,'set_location_trading_hour_days')); //sets the default trading hour days (used by the content type)
    add_action('init', array($this,'register_location_content_type')); //register location content type
    add_action('add_meta_boxes', array($this,'add_location_meta_boxes')); //add meta boxes
    add_action('save_post_wp_locations', array($this,'save_location')); //save location
    add_action('admin_enqueue_scripts', array($this,'enqueue_admin_scripts_and_styles')); //admin scripts and styles
    add_action('wp_enqueue_scripts', array($this,'enqueue_public_scripts_and_styles')); //public scripts and styles
    add_filter('the_content', array($this,'prepend_location_meta_to_content')); //gets our meta data and dispayed it before the content

    register_activation_hook(__FILE__, array($this,'plugin_activate')); //activate hook
    register_deactivation_hook(__FILE__, array($this,'plugin_deactivate')); //deactivate hook

}
The register_activation_hook and register_deactivation_hook functions are used to hook into functions when the plugin is activated or deactivated. We use these hooks to ensure our content type (our locations) have been added correctly and to flush our permalinks (so we can use pretty permalinks)
Setting the Location Trading Hour Days
Our plugin allows the admin to define the opening and closing times for different days on single location basis.
The backend admin where you enter these details looks at our property $wp_location_trading_hour_days which contains an array of our days. We need to call the set_location_trading_hour_days function to set the days we want to display location trading hours for.
//set the default trading hour days (used in our admin backend)
public function set_location_trading_hour_days(){

    //set the default days to use for the trading hours
    $this->wp_location_trading_hour_days = apply_filters('wp_location_trading_hours_days',
        array('monday' => 'Monday',
              'tuesday' => 'Tuesday',
              'wednesday' => 'Wednesday',
              'thursday' => 'Thursday',
              'friday' => 'Friday',
              'saturday' => 'Saturday',
              'sunday' => 'Sunday',
        )
    );
}
When assigning the values of the array we also called the wp_location_trading_hours_days filter. This means that a theme or another plugin could redefine the days that locations are open for business (they might filter the array and add ‘holidays’ to the array so they can enter a trading hour value for that day).
Setting the Location Trading Hour Days
Here we define our new custom location content type that will be used in our plugin.
We define the labels and arguments for the content type and pass our arguments to the register_post_type function.
The codex page on custom content types explains all of the options you can specify. For our content type we want basic support for the Title, Editor and Featured Image.
//register the location content type
public function register_location_content_type(){
     //Labels for post type
     $labels = array(
           'name'               => 'Location',
           'singular_name'      => 'Location',
           'menu_name'          => 'Locations',
           'name_admin_bar'     => 'Location',
           'add_new'            => 'Add New',
           'add_new_item'       => 'Add New Location',
           'new_item'           => 'New Location',
           'edit_item'          => 'Edit Location',
           'view_item'          => 'View Location',
           'all_items'          => 'All Locations',
           'search_items'       => 'Search Locations',
           'parent_item_colon'  => 'Parent Location:',
           'not_found'          => 'No Locations found.',
           'not_found_in_trash' => 'No Locations found in Trash.',
       );
       //arguments for post type
       $args = array(
           'labels'            => $labels,
           'public'            => true,
           'publicly_queryable'=> true,
           'show_ui'           => true,
           'show_in_nav'       => true,
           'query_var'         => true,
           'hierarchical'      => false,
           'supports'          => array('title','thumbnail','editor'),
           'has_archive'       => true,
           'menu_position'     => 20,
           'show_in_admin_bar' => true,
           'menu_icon'         => 'dashicons-location-alt',
           'rewrite'            => array('slug' => 'locations', 'with_front' => 'true')
       );
       //register post type
       register_post_type('wp_locations', $args);
}
When you have this you should see a new menu for your post type
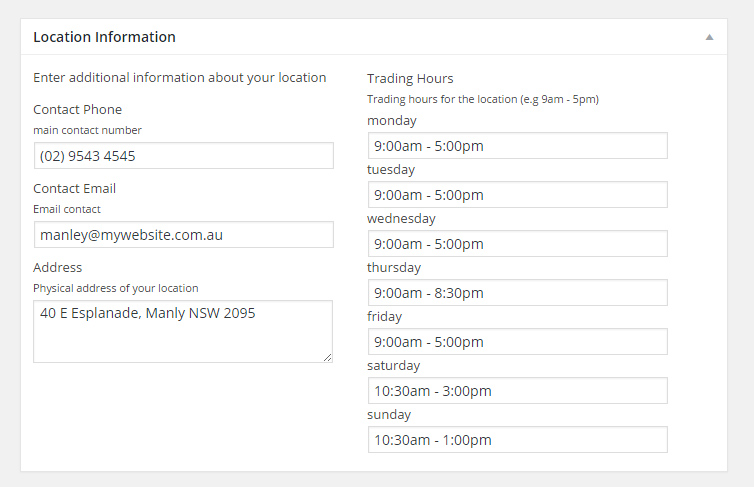
Adding a Meta Box to the Location Content Type’
We define a custom meta box that will be displayed on our location page. This box will contain all of our additional fields we want to save as meta data (such as a phone number, email, address).
Inside our function we call the add_meta_box() function and supply our arguments.
//adding meta boxes for the location content type*/
public function add_location_meta_boxes(){

    add_meta_box(
        'wp_location_meta_box', //id
        'Location Information', //name
        array($this,'location_meta_box_display'), //display function
        'wp_locations', //post type
        'normal', //location
        'default' //priority
    );
}
Our third value to add_meta_box is the function that will display the output for the box. We’are calling the location_meta_box_display function which is the next function we’ll add to our class
Location meta box display
This is the function that will be called from our location meta box and It displays additional fields that the admin can use to save information about their location.
//display function used for our custom location meta box*/
public function location_meta_box_display($post){

    //set nonce field
    wp_nonce_field('wp_location_nonce', 'wp_location_nonce_field');

    //collect variables
    $wp_location_phone = get_post_meta($post->ID,'wp_location_phone',true);
    $wp_location_email = get_post_meta($post->ID,'wp_location_email',true);
    $wp_location_address = get_post_meta($post->ID,'wp_location_address',true);

    ?>
    <p>Enter additional information about your location </p>
    <div class="field-container">
        <?php
        //before main form elementst hook
        do_action('wp_location_admin_form_start');
        ?>
        <div class="field">
            <label for="wp_location_phone">Contact Phone</label>
            <small>main contact number</small>
            <input type="tel" name="wp_location_phone" id="wp_location_phone" value="<?php echo $wp_location_phone;?>"/>
        </div>
        <div class="field">
            <label for="wp_location_email">Contact Email</label>
            <small>Email contact</small>
            <input type="email" name="wp_location_email" id="wp_location_email" value="<?php echo $wp_location_email;?>"/>
        </div>
        <div class="field">
            <label for="wp_location_address">Address</label>
            <small>Physical address of your location</small>
            <textarea name="wp_location_address" id="wp_location_address"><?php echo $wp_location_address;?></textarea>
        </div>
        <?php
        //trading hours
        if(!empty($this->wp_location_trading_hour_days)){
            echo '<div class="field">';
                echo '<label>Trading Hours </label>';
                echo '<small> Trading hours for the location (e.g 9am - 5pm) </small>';
                //go through all of our registered trading hour days
                foreach($this->wp_location_trading_hour_days as $day_key => $day_value){
                    //collect trading hour meta data
                    $wp_location_trading_hour_value =  get_post_meta($post->ID,'wp_location_trading_hours_' . $day_key, true);
                    //dsiplay label and input
                    echo '<label for="wp_location_trading_hours_' . $day_key . '">' . $day_key . '</label>';
                    echo '<input type="text" name="wp_location_trading_hours_' . $day_key . '" id="wp_location_trading_hours_' . $day_key . '" value="' . $wp_location_trading_hour_value . '"/>';
                }
            echo '</div>';
        }
        ?>
    <?php
    //after main form elementst hook
    do_action('wp_location_admin_form_end');
    ?>
    </div>
    <?php

}
Let’s run through what this function does
- First it creates a secure nonce field for the meta box (nonces are used to verify that a submit action came from the correctly place).
- It collects our phone, email and address meta information (if we have any).
- Just before the form starts we add the
wp_location_admin_form_startaction hook. This will let other plugins or themes hook into this location, allowing additional fields or information to be displayed. - Displays the phone, email and address fields (and pre-populates them if we have any previous values).
- Displays the list of trading hour days for the location. Here the admin can define the trading hours on a day by day basis. These days can be dynamic as they are attached to the
wp_location_trading_hours_daysfilter. - Just before the form finishes we add the
wp_location_admin_form_endaction hook. This will let other plugins or the themes hook into this location, allowing additional fields or information to be displayed.
You should see your meta box displayed on your location. It should look something like this
Registering Content Type and Flushing Re-write Rules on Activate
When a plugin first activates you can call a function to perform once off actions. That is what we do with the plugin_activate function.
Even though we register our content type via the init hook, we still need to call the register_location_content_type from within it (to ensure that our content type has been added correctly)
We also flush the rewrite rules so that we can use pretty permalinks for our locations (we can have links such as example.com/location/mylocation instead of example.com/?p=144)
//triggered on activation of the plugin (called only once)
public function plugin_activate(){
    //call our custom content type function
    $this->register_location_content_type();
    //flush permalinks
    flush_rewrite_rules();
}
Flushing Re-write Rules on Deactivation
Plugin deactivate is triggered when we deactivate our plugin. Since we’re removing the plugin and the plugin defined a custom content type, we want to use this chance to flush our re-write rules for consistency.
//trigered on deactivation of the plugin (called only once)
public function plugin_deactivate(){
    //flush permalinks
    flush_rewrite_rules();
}
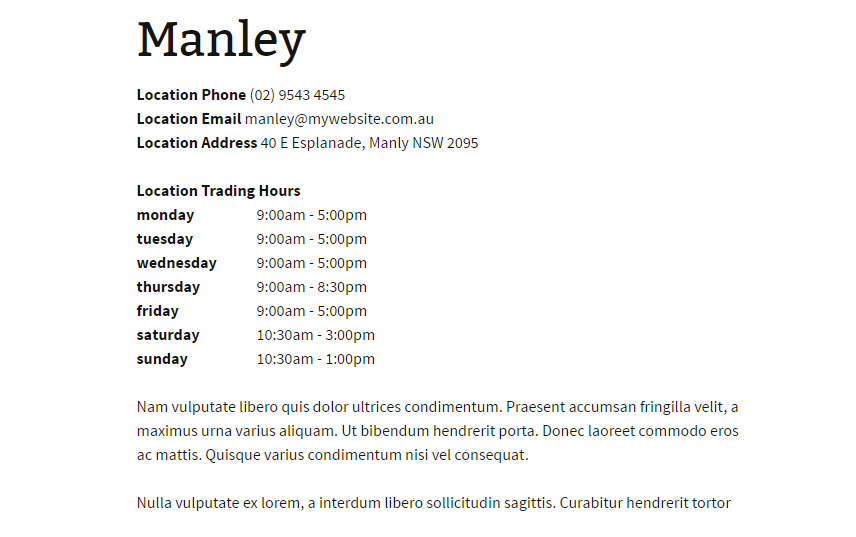
Displaying Our Location Meta Information on a Single Location
Since we’re defining additional meta information for each location, we create a function that handles the display of this extra information when viewing the single location page.
The prepend_location_meta_to_content function is hooked onto the the_content filter which means we can add our additional information before the pages main content.
public function prepend_location_meta_to_content($content){

    global $post, $post_type;

    //display meta only on our locations (and if its a single location)
    if($post_type == 'wp_locations' && is_singular('wp_locations')){

        //collect variables
        $wp_location_id = $post->ID;
        $wp_location_phone = get_post_meta($post->ID,'wp_location_phone',true);
        $wp_location_email = get_post_meta($post->ID,'wp_location_email',true);
        $wp_location_address = get_post_meta($post->ID,'wp_location_address',true);

        //display
        $html = '';

        $html .= '<section class="meta-data">';

        //hook for outputting additional meta data (at the start of the form)
        do_action('wp_location_meta_data_output_start',$wp_location_id);

        $html .= '<p>';
        //phone
        if(!empty($wp_location_phone)){
            $html .= '<b>Location Phone</b> ' . $wp_location_phone . '</br>';
        }
        //email
        if(!empty($wp_location_email)){
            $html .= '<b>Location Email</b> ' . $wp_location_email . '</br>';
        }
        //address
        if(!empty($wp_location_address)){
            $html .= '<b>Location Address</b> ' . $wp_location_address . '</br>';
        }
        $html .= '</p>';

        //location
        if(!empty($this->wp_location_trading_hour_days)){
            $html .= '<p>';
            $html .= '<b>Location Trading Hours </b></br>';
            foreach($this->wp_location_trading_hour_days as $day_key => $day_value){
                $trading_hours = get_post_meta($post->ID, 'wp_location_trading_hours_' . $day_key , true);
                $html .= '<span class="day">' . $day_key . '</span><span class="hours">' . $trading_hours . '</span></br>';
            }
            $html .= '</p>';
        }

        //hook for outputting additional meta data (at the end of the form)
        do_action('wp_location_meta_data_output_end',$wp_location_id);

        $html .= '</section>';
        $html .= $content;

        return $html;


    }else{
        return $content;
    }

}
Let’s run through what this function does:
- Since the function is added to the
the_contenthook, it will run every time a page is loaded. As such we use the global$postand$post_typevariables to ensure we’re on a single location page only - We collect our basic location information such as the email, phone and address.
- Just as we’re about to display our meta information we call the
wp_location_meta_data_output_startaction hook. This action will let other plugins or themes hook into the starting output of the meta information (if someone added a new field to the location this hook can be used to display the saved info). - We output the email, phone and address information.
- We go through our
wp_location_trading_hour_daysvariable and see if we have days defined. If we do we loop through all of them and collect its trading hours and display them. - Just before we finish all of our output we call the
wp_location_meta_data_output_endaction. This action will let someone output additional information before the closing of the location meta.
Getting the Location Listing Out
We create a function who’s purpose is to build the HTML for a listing of our locations.
The get_locations_output function is by both the location shortcode and the location widget to generate its mark up.
Since it’s used for multiple purposes, this function has several important actions. I’ll will break them all down step by step.
//main function for displaying locations (used for our shortcodes and widgets)
public function get_locations_output($arguments = ""){

    //default args
    $default_args = array(
        'location_id'   => '',
        'number_of_locations'   => -1
    );

    //update default args if we passed in new args
    if(!empty($arguments) && is_array($arguments)){
        //go through each supplied argument
        foreach($arguments as $arg_key => $arg_val){
            //if this argument exists in our default argument, update its value
            if(array_key_exists($arg_key, $default_args)){
                $default_args[$arg_key] = $arg_val;
            }
        }
    }

    //find locations
    $location_args = array(
        'post_type'     => 'wp_locations',
        'posts_per_page'=> $default_args['number_of_locations'],
        'post_status'   => 'publish'
    );
    //if we passed in a single location to display
    if(!empty($default_args['location_id'])){
        $location_args['include'] = $default_args['location_id'];
    }

    //output
    $html = '';
    $locations = get_posts($location_args);
    //if we have locations
    if($locations){
        $html .= '<article class="location_list cf">';
        //foreach location
        foreach($locations as $location){
            $html .= '<section class="location">';
                //collect location data
                $wp_location_id = $location->ID;
                $wp_location_title = get_the_title($wp_location_id);
                $wp_location_thumbnail = get_the_post_thumbnail($wp_location_id,'thumbnail');
                $wp_location_content = apply_filters('the_content', $location->post_content);
                if(!empty($wp_location_content)){
                    $wp_location_content = strip_shortcodes(wp_trim_words($wp_location_content, 40, '...'));
                }
                $wp_location_permalink = get_permalink($wp_location_id);
                $wp_location_phone = get_post_meta($wp_location_id,'wp_location_phone',true);
                $wp_location_email = get_post_meta($wp_location_id,'wp_location_email',true);

                //apply the filter before our main content starts
                //(lets third parties hook into the HTML output to output data)
                $html = apply_filters('wp_location_before_main_content', $html);

                //title
                $html .= '<h2 class="title">';
                    $html .= '<a href="' . $wp_location_permalink . '" title="view location">';
                        $html .= $wp_location_title;
                    $html .= '</a>';
                $html .= '</h2>';


                //image & content
                if(!empty($wp_location_thumbnail) || !empty($wp_location_content)){

                    $html .= '<p class="image_content">';
                    if(!empty($wp_location_thumbnail)){
                        $html .= $wp_location_thumbnail;
                    }
                    if(!empty($wp_location_content)){
                        $html .=  $wp_location_content;
                    }

                    $html .= '</p>';
                }

                //phone & email output
                if(!empty($wp_location_phone) || !empty($wp_location_email)){
                    $html .= '<p class="phone_email">';
                    if(!empty($wp_location_phone)){
                        $html .= '<b>Phone: </b>' . $wp_location_phone . '</br>';
                    }
                    if(!empty($wp_location_email)){
                        $html .= '<b>Email: </b>' . $wp_location_email;
                    }
                    $html .= '</p>';
                }

                //apply the filter after the main content, before it ends
                //(lets third parties hook into the HTML output to output data)
                $html = apply_filters('wp_location_after_main_content', $html);

                //readmore
                $html .= '<a class="link" href="' . $wp_location_permalink . '" title="view location">View Location</a>';
            $html .= '</section>';
        }
        $html .= '</article>';
        $html .= '<div class="cf"></div>';
    }

    return $html;
}
- Firstly, the function has an optional argument called
arguments. This is used because both the shortcode and the widget will pass options to the display (to customise exactly what will be returned). - The function defines a set of default arguments into the
$default_argsarray. This will basically set the number of locations to -1 (all locations) and also set the location ID to nothing (meaning we want to display a list of locations, not just one by default). - We check to see if the passed
$argumentsvariable is not empty and is also an array (meaning we have passed an array of arguments). We go through all of the elements inside the$argumentsarray and check to see if any of the array keys matches anything in our$default_argsarray. If something matches we update the$default_argsarray. - We use the
$default_argsarray to build a search forget_posts()which will find all of our locations (if we specified a single location we’ll just search for that) - Now we start building our HTML output. We define our
$htmlvariable and start building our output. - We collect all of our information about the location (title, content, image, link etc) and get it ready for output.
- Before we continue collecting our output we all the
wp_location_before_main_contentfilter on our$htmlvariable. This will let third parties add extra content before the title of the location. This is useful as if we defined any extra fields in our admin we can use this to output them. - The title, image, content, phone and email are added to our output (conditionally checking if they exist).
- Before we’re about to output the read more button we call our second filter, the
wp_location_after_main_contentfilter. This will let third parties add content right before the button. - We add our read more button to the output and then return our
$htmlvariable.
Saving Additional Meta Information for Locations
When we save a single location we want to run a function to collect and update our additional meta information (such as email, phone, address etc).
We use the save_location function for this purpose.
//triggered when adding or editing a location
public function save_location($post_id){

    //check for nonce
    if(!isset($_POST['wp_location_nonce_field'])){
        return $post_id;
    }
    //verify nonce
    if(!wp_verify_nonce($_POST['wp_location_nonce_field'], 'wp_location_nonce')){
        return $post_id;
    }
    //check for autosave
    if(defined('DOING_AUTOSAVE') && DOING_AUTOSAVE){
        return $post_id;
    }

    //get our phone, email and address fields
    $wp_location_phone = isset($_POST['wp_location_phone']) ? sanitize_text_field($_POST['wp_location_phone']) : '';
    $wp_location_email = isset($_POST['wp_location_email']) ? sanitize_text_field($_POST['wp_location_email']) : '';
    $wp_location_address = isset($_POST['wp_location_address']) ? sanitize_text_field($_POST['wp_location_address']) : '';

    //update phone, memil and address fields
    update_post_meta($post_id, 'wp_location_phone', $wp_location_phone);
    update_post_meta($post_id, 'wp_location_email', $wp_location_email);
    update_post_meta($post_id, 'wp_location_address', $wp_location_address);

    //search for our trading hour data and update
    foreach($_POST as $key => $value){
        //if we found our trading hour data, update it
        if(preg_match('/^wp_location_trading_hours_/', $key)){
            update_post_meta($post_id, $key, $value);
        }
    }

    //location save hook
    //used so you can hook here and save additional post fields added via 'wp_location_meta_data_output_end' or 'wp_location_meta_data_output_end'
    do_action('wp_location_admin_save',$post_id, $_POST);

}
Let’s analyse what we’re doing:
- We’re firstly checking our nonce and verifying that it exists (passed from the meta box). We also check to make sure we’re not auto-saving. Once we’re sure everything is ok we move on.
- We collect the phone, email and address information and sanitize them with the
sanitize_text_field()function. They are assigned to variables and then used in ourupdate_post_meta()function to save them to the location. - Because our trading hours are dynamic and we have to collect and save them a little differently. Since we don’t know how many will exist we can’t extract them from the
$_POSTarray by name. So we go through all of the$_POSTvariables and check to see if any of them start withwp_location_trading_hours_. If they do we update their value and save them as meta information. - Finally, just before we finish we call the
wp_location_admin_saveaction. This action will take current id of the location as$post_idand let a third party function collect additional information from the global$_POSTand save them to the location.
Loading Our Admin and Public Scripts and Styles
We need to load additional CSS files for both the front end and back end of our website. We create two functions that will load any scripts or styles we need.
Inside these CSS files are basic styling for the admin fields inside the meta box and also slight front end styling.
The plugin will work just fine without any CSS so these can be safely omitted if you’re not interested. (If you don’t want to add these, also remember to remove their action call from the construct function).
//enqueus scripts and stles on the back end
public function enqueue_admin_scripts_and_styles(){
    wp_enqueue_style('wp_location_admin_styles', plugin_dir_url(__FILE__) . '/css/wp_location_admin_styles.css');
}

//enqueues scripts and styled on the front end
public function enqueue_public_scripts_and_styles(){
    wp_enqueue_style('wp_location_public_styles', plugin_dir_url(__FILE__). '/css/wp_location_public_styles.css');

}
Location Shortcode
Now we can look at the shortcode class that will be used in combination with our main class.
Adding shortcodes gives the admin an easy to use interface to showcase the various locations they might have. These shortcodes will also be customisable, allowing the admin to specify an exact location by its ID or all of them. When you use this shortcode on a page it should look similar to the following
We’ll be working inside the wp_location_shortcode.phpfile
Deny Direct Access
Just like in our main PHP file we want to deny any direct access. Do add the following to the top of our file
defined( 'ABSPATH' ) or die( 'Nope, not accessing this' );
The wp_location_shortcode class
Let’s start by creating the class outline for the shortcode. This class isn’t as large as our main class but it will contain a few functions we’ll look at shortly.
//defines the functionality for the location shortcode
class wp_location_shortcode{

}
The _construct function
We define our construct function and use it to add our actions and filters. This class only needs one function.
//on initialize
public function __construct(){
    add_action('init', array($this,'register_location_shortcodes')); //shortcodes
}
Register the Location Shortcode
We use this function to add our shortcode.
We call the add_shortcode function to create a new shortcode called wp_locations. We then will use the location_shortcode_output function to output the shortcode.
//location shortcode
public function register_location_shortcodes(){
    add_shortcode('wp_locations', array($this,'location_shortcode_output'));
}
Building the Output for the Shortcode
This function is called from the add_shortcode function and is used to build the output for the shortcode.
//shortcode display
public function location_shortcode_output($atts, $content = '', $tag){

    //get the global wp_simple_locations class
    global $wp_simple_locations;

    //build default arguments
    $arguments = shortcode_atts(array(
        'location_id' => '',
        'number_of_locations' => -1)
    ,$atts,$tag);

    //uses the main output function of the location class
    $html = $wp_simple_locations->get_locations_output($arguments);

    return $html;
}
Let’s look at what this function does:
- The function takes in the arguments of the shortcode
$atts, the content between the shortcode$contentand the name of shortcode$tag. We use these elements to help build the output - We reference the global
$wp_simple_locationsvariable so that we’ll have access to the main location class (and all of its functions). - We create a default array of arguments for the shortcode using the
shortcode_atts()function. - We use the
get_locations_outputfunction from the$wp_simple_locationsobject to build the shortcode output. We pass in our arguments so that the shortcode can provide dynamic content. For example a location ID can be passed so only a single location is returned. - We return the shortcode and it is displayed in whatever page or post you added it to.
Creating a New wp_location_shortcode Object
At the end of your class you will create a new wp_location_shortcodeobject. All of the functionality inside of the class will be activated and you will be able to use your new shortcode.
$wp_location_shortcode = new wp_location_shortcode;
Location Widget
Let’s wrap this up by looking at the class that handles the functionality for the location widget.
We add widget support because almost all themes support widgets and they give the admin user a quick and simple way to showcase their locations (or perhaps a single location).
We open the wp_location_widget.php file and begin.
Deny Direct Access
Again we deny direct access to the PHP file by including the following at the very beginning:
defined( 'ABSPATH' ) or die( 'Nope, not accessing this' );
The wp_location_widget Class
Let’s create our basic structure for the wp_location_widget class.
The class is similar to our other classes we have created; however this time we’re extending the already defined WP_widget class.
//main widget used for displaying locations
class wp_location_widget extends WP_widget{

}
The _construct Function
Inside our _construct function we define the basic properties of our widget by overloading the parent _construct function and supplying our own values. We set the ID, name and description of the widget.
In addition, we also hook our register_wp_location_widgets function onto the widgets_init hook so that we can register our widget.
//initialise widget values
public function __construct(){
    //set base values for the widget (override parent)
    parent::__construct(
        'wp_location_widget',
        'WP Location Widget',
        array('description' => 'A widget that displays your locations')
    );
    add_action('widgets_init',array($this,'register_wp_location_widgets'));
}
Building the Admin Interface for the Widget
The admin interface is what the admin user will interact with when setting up the widget.
Because we want to offer some options, you can choose how many locations will be shown via the widget and also if you want to select a single location to display.
The function form() is inherited from the parent WP_widget so it will be automatically called when we’re on the widget admin screen.
    //handles the back-end admin of the widget
    //$instance - saved values for the form
    public function form($instance){
        //collect variables
        $location_id = (isset($instance['location_id']) ? $instance['location_id'] : 'default');
        $number_of_locations = (isset($instance['number_of_locations']) ? $instance['number_of_locations'] : 5);

        ?>
        <p>Select your options below</p>
        <p>
            <label for="<?php echo $this->get_field_name('location_id'); ?>">Location to display</label>
            <select class="widefat" name="<?php echo $this->get_field_name('location_id'); ?>" id="<?php echo $this->get_field_id('location_id'); ?>" value="<?php echo $location_id; ?>">
                <option value="default">All Locations</option>
                <?php
                $args = array(
                    'posts_per_page'    => -1,
                    'post_type'         => 'wp_locations'
                );
                $locations = get_posts($args);
                if($locations){
                    foreach($locations as $location){
                        if($location->ID == $location_id){
                            echo '<option selected value="' . $location->ID . '">' . get_the_title($location->ID) . '</option>';
                        }else{
                            echo '<option value="' . $location->ID . '">' . get_the_title($location->ID) . '</option>';
                        }
                    }
                }
                ?>
            </select>
        </p>
        <p>
            <small>If you want to display multiple locations select how many below</small><br/>
            <label for="<?php echo $this->get_field_id('number_of_locations'); ?>">Number of Locations</label>
            <select class="widefat" name="<?php echo $this->get_field_name('number_of_locations'); ?>" id="<?php echo $this->get_field_id('number_of_locations'); ?>" value="<?php echo $number_of_locations; ?>">
                <option value="default" <?php if($number_of_locations == 'default'){ echo 'selected';}?>>All Locations</option>
                <option value="1" <?php if($number_of_locations == '1'){ echo 'selected';}?>>1</option>
                <option value="2" <?php if($number_of_locations == '2'){ echo 'selected';}?>>2</option>
                <option value="3" <?php if($number_of_locations == '3'){ echo 'selected';}?>>3</option>
                <option value="4" <?php if($number_of_locations == '4'){ echo 'selected';}?>>4</option>
                <option value="5" <?php if($number_of_locations == '5'){ echo 'selected';}?>>5</option>
                <option value="10" <?php if($number_of_locations == '10'){ echo 'selected';}?>>10</option>
            </select>
        </p>
        <?php
    }
Let’s go through what’s happening here:
- First we’re defining values for our location ID and the number of locations. We check to see if the
$instancevariable holds any of these values (if they already exist). If the values do exist we extract them, if they do not we simple supply default values (setting number of locations to 5 and the location ID to default). - We create a label and form field that will be used to display the locations to the admin. We fetch all of the locations with
get_posts()and display them. We check against each location to see if it matches the value saved in the location id (if it has been set). - We create the select list for the number of locations to display. Again we check each option to see if it matches a value passed into the number of locations variable.
Updating the Widget and Saving Options
The widget needs to call an update function to save its form values and that is what this function does.
The update() function is again inherited from the parent WP_widget class so we just specify how we’re going to save our values
//handles updating the widget
//$new_instance - new values, $old_instance - old saved values
public function update($new_instance, $old_instance){

    $instance = array();

    $instance['location_id'] = $new_instance['location_id'];
    $instance['number_of_locations'] = $new_instance['number_of_locations'];

    return $instance;
}
We’re given two variables, the $new_instance and the $old_instance.
The new instance contains our current values in the form and the old instance contains our previous values.
What we do is create a new array to hold our extracted values and then return them.
Displaying the Widget on the Front End
The widget() function is another function inherited from the parent WP_widget class and is responsible for the output of the widget for the front end. It leverages the display function from the wp_simple_locations class to build its output.
//handles public display of the widget
//$args - arguments set by the widget area, $instance - saved values
public function widget( $args, $instance ) {

    //get wp_simple_location class (as it builds out output)
    global $wp_simple_locations;

    //pass any arguments if we have any from the widget
    $arguments = array();
    //if we specify a location

    //if we specify a single location
    if($instance['location_id'] != 'default'){
        $arguments['location_id'] = $instance['location_id'];
    }
    //if we specify a number of locations
    if($instance['number_of_locations'] != 'default'){
        $arguments['number_of_locations'] = $instance['number_of_locations'];
    }

    //get the output
    $html = '';

    $html .= $args['before_widget'];
    $html .= $args['before_title'];
    $html .= 'Locations';
    $html .= $args['after_title'];
    //uses the main output function of the location class
    $html .= $wp_simple_locations->get_locations_output($arguments);
    $html .= $args['after_widget'];

    echo $html;
}
Let’s go through what we have done:
- We collect our global
$wp_simple_locationsobject as we want to use its display function. - We create a blank array of arguments and then check to see if our widget specified any arguments (such as the number of locations to display or a single specific location).
- We start our build process for the output and define our
$htmlvariable. We call theget_locations_output()function defined in the$wp_simple_locationsobject and pass in our arguments (it will return all of the HTML we need). - We echo the result of our
$htmlvariable and the widget is displayed.
Registering the Widget for Use
We use this function to register our widget with WordPress. We do this by calling the register_widget() function and supplying the name of our class as the value into the function.
//registers our widget for use
public function register_wp_location_widgets(){
    register_widget('wp_location_widget');
}
I hope you’ve enjoyed this real world example of building a WordPress plugin from scratch, stay tuned for more.
Frequently Asked Questions about WordPress Plugin Development
What are the prerequisites for developing a WordPress plugin?
Before you start developing a WordPress plugin, you should have a good understanding of PHP, which is the programming language WordPress is built on. You should also be familiar with HTML, CSS, and JavaScript, as these are often used in plugin development. Additionally, understanding the basics of WordPress, such as how themes and plugins work, is essential. Lastly, you should have a local development environment set up on your computer where you can test your plugin.
How do I start developing a WordPress plugin?
The first step in developing a WordPress plugin is to create a new folder in your WordPress installation’s plugins directory. This folder will contain all the files related to your plugin. Next, create a main PHP file for your plugin and add a header comment at the top of the file. This comment tells WordPress that a plugin exists here. After that, you can start writing the functionality of your plugin in PHP.
How can I ensure my WordPress plugin is secure?
Security should be a top priority when developing a WordPress plugin. Always sanitize and validate user input to prevent SQL injection attacks. Use nonces to verify the source of requests. Avoid revealing sensitive information in error messages. Regularly update and test your plugin to ensure it remains secure against new threats.
How do I debug my WordPress plugin?
WordPress comes with built-in debugging systems designed to simplify the process. You can enable debugging by setting the WP_DEBUG constant to true in your wp-config.php file. This will start logging any errors or warnings that occur. Additionally, using a PHP IDE with a step-by-step debugger can help you find and fix issues in your code.
How can I make my WordPress plugin compatible with all themes?
Ensuring your plugin is compatible with all themes can be challenging due to the vast number of themes available. However, following WordPress coding standards, using hooks and filters instead of modifying core files, and testing your plugin with different themes can help ensure compatibility.
How do I add a settings page for my WordPress plugin?
WordPress provides the Settings API for creating settings pages. You can use this API to create a new page, add sections and fields to the page, and handle form submissions. The settings you create will be stored in the WordPress database and can be accessed using the get_option function.
How can I make my WordPress plugin multilingual?
To make your plugin multilingual, you need to internationalize it. This involves wrapping all text strings in your plugin in a function that allows them to be translated. You can then create translation files for each language you want to support.
How do I distribute my WordPress plugin?
You can distribute your WordPress plugin by submitting it to the WordPress Plugin Directory. Before you submit, make sure your plugin meets all the guidelines set by WordPress. You can also distribute your plugin on your own website or through a third-party marketplace.
How do I update my WordPress plugin?
To update your plugin, you need to increment the version number in the plugin header comment and update the plugin files on the WordPress Plugin Directory or wherever you distribute your plugin. It’s important to thoroughly test your plugin before releasing an update to ensure it doesn’t break any existing functionality.
How can I add custom CSS or JavaScript to my WordPress plugin?
You can add custom CSS or JavaScript to your plugin by enqueuing the scripts or styles. WordPress provides the wp_enqueue_script and wp_enqueue_style functions for this purpose. These functions ensure that your scripts or styles are loaded in the correct order and prevent conflicts with other plugins or themes.