

One of the most effective and fun ways to boost your web development skills is by cloning an existing web page or website. In this tutorial, we’ll be cloning the Hacker News home page, making use of React and HarperDB.
By the time we’re done, our cloned version of the Hacker News home page should look like this:
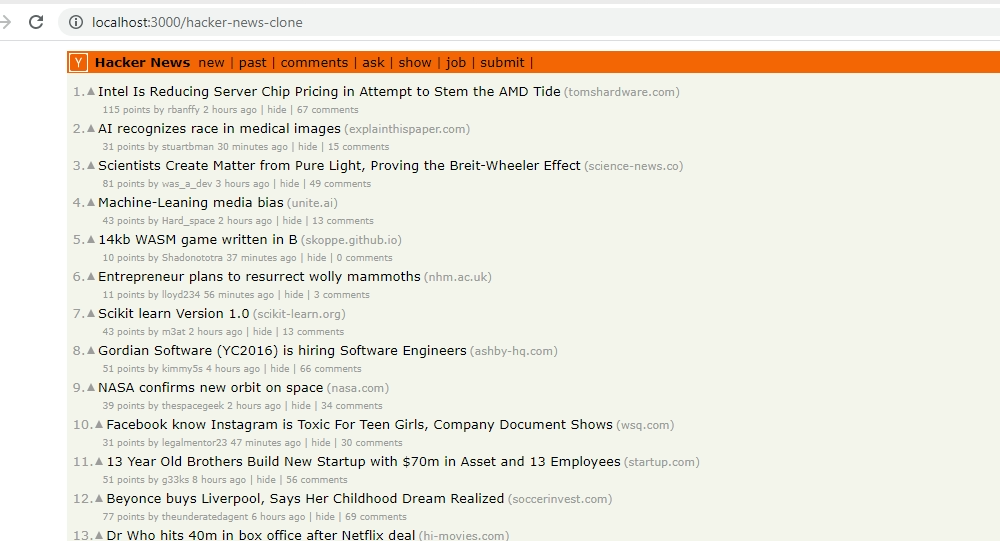
The code for this project can be found in its GitHub repository.
Key Takeaways
- Utilize React and HarperDB for Rapid Development: The combination of React for front-end and HarperDB for backend operations offers a streamlined approach to building applications, allowing for both SQL and NoSQL queries, and serverless architecture that simplifies setup and scalability.
- Simplified Project Setup with create-react-app: By using create-react-app, developers can quickly set up a new React project with standard configurations, saving time and focusing more on the unique aspects of their project.
- Real-time Data Interaction: Implementing the useHarperDB React hook connects the frontend directly to the HarperDB cloud instance, enabling real-time data fetching and manipulation within the React components.
- Comprehensive Frontend Design Practice: Cloning the Hacker News home page provides a practical exercise in frontend development, focusing on replicating design, handling state, and user interactions, which enhances UI/UX design skills.
- Deployment Made Easy: The tutorial walks through deploying the completed Hacker News clone to GitHub Pages, showcasing how to make projects publicly accessible and sharable.
- Expandable for Additional Features: The basic setup serves as a foundation, which can be expanded with additional features like user authentication, dynamic content updates, and more interactive elements to increase user engagement.
The Benefits of Cloning
Building a clone of a web page has the following benefits:
-
It helps you to give attention to design intricacies and nuances. This makes you a more comprehensive designer.
-
It helps you get familiar with color and typography. These are very important concepts that every front-end developer/designer should be proficient with.
-
It allows you learn about new technologies. You get to use new tech stacks and broaden the scope of your knowledge and skills.
About the React/useHarperDB Tech Stack
The stack we’ll be using for this project is primarily is the React/useHarperDB stack.
HarperDB is a data management software. It’s great for cases where you need NoSQL and SQL capabilities, rapid application development, integration, edge computing, distributed computing, and real-time operational analytics.
HarperDB is also flexible. It allows you do the following:
- make queries to a single endpoint
- use both SQL and NoSQL to query your database
- upload data in JSON and with SQL queries
- upload bulk data in a single CSV file
It’s very fast, simple to use and allows you to set up in a serverless way. The serverless architecture entails the abstraction of the back-end tasks to another service.
In simpler terms, as the developer you don’t have to implement a back end and a database for the web application on your local machine. Instead, a platform like HarperDB takes care of the back-end operations and provides you with a way to access and manage data from its infrastructure, through the cloud. That way, you can focus on front-end development.
Throughout the development process, we’ll be using the following tools.
React
We’ll be using the React library for our home page clone. React is a front-end JavaScript library for building reusable user interface components. For example, say you want to use a similar button in two or more places on your website. With HTML, you’d define the markup for that button in every section you want to use it. This isn’t consistent with the DRY (don’t repeat yourself) principle. With React, all you need to do is define a single button component and then register that component in every section you intend to use it within the app. This simplifies the entire building process and cleans up your code.
Instead of manually installing React and setting up the tedious configurations, we’ll use the create-react-app tool to instantly build out a working framework for us. This will help save time.
Node and npm
The React, React DOM and thousands of other packages all live inside of the npm registry. To be able to install these dependencies on our local machine, we’ll need to have Node and npm installed. You can install Node from here.
If you’re not sure if Node is already installed on your computer, or you’re unsure of which version is currently installed, simply open a command terminal on your machine and type in node -v. If you have Node installed, it should display the version of Node you have installed. Note that you should have a node version of at least 12.xx to run this project.
A HarperDB Cloud account
To set up a database, we’ll need to create an instance for our app. To create an instance, we’ll first need to sign up to Harper. After setting up our database cloud instance, we’ll need to use the username, password and database URL later in our React app. In the database, we’ll create a table that holds the list of Hacker News posts that will be displayed later on the web page.
useHarperDB
This is a React hook provided by Harper. This hook essentially acts as a bridge between our React App and the database. By calling this function inside our React component and passing in some important parameters — including an SQL query — we’ll be able to access the posts from our cloud database. This package will be installed using the Node package manager and details on it can be found here.
SQL
In this project, we’ll only be using a single basic SQL query, so having broad knowledge isn’t required.
CSS
Finally, we’ll be styling our clone using pure CSS with no libraries. Every style we apply will be geared towards mimicking the Harper News home page.
Hacker News logo
Since we’re going to be creating an exact replica of the real Hacker News home page, we’ll need the logo image. You can download the logo in SVG format here.
Creating a HarperDB Cloud Instance
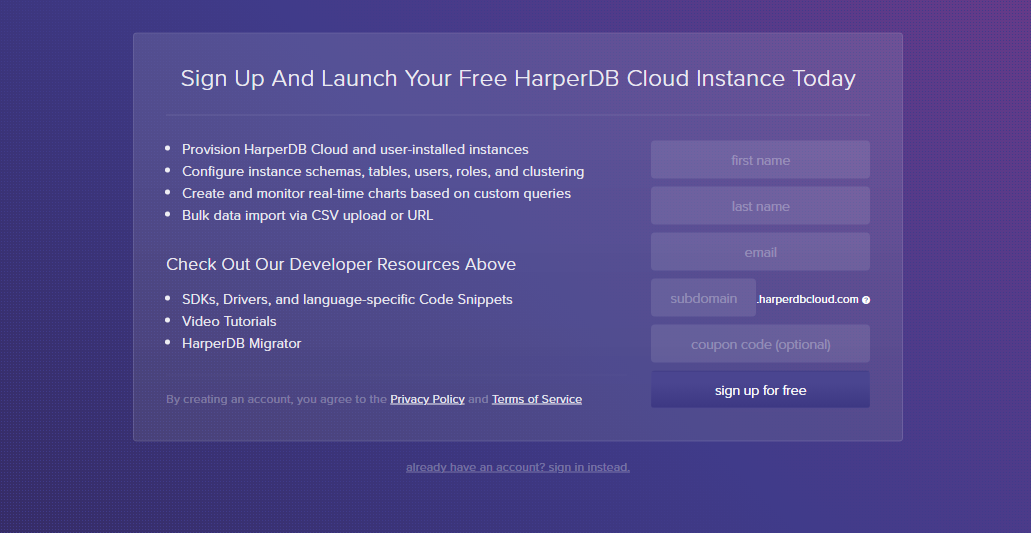
First, we need to set up our cloud instance. We go over to the HarperDB home page and sign up for a free account.
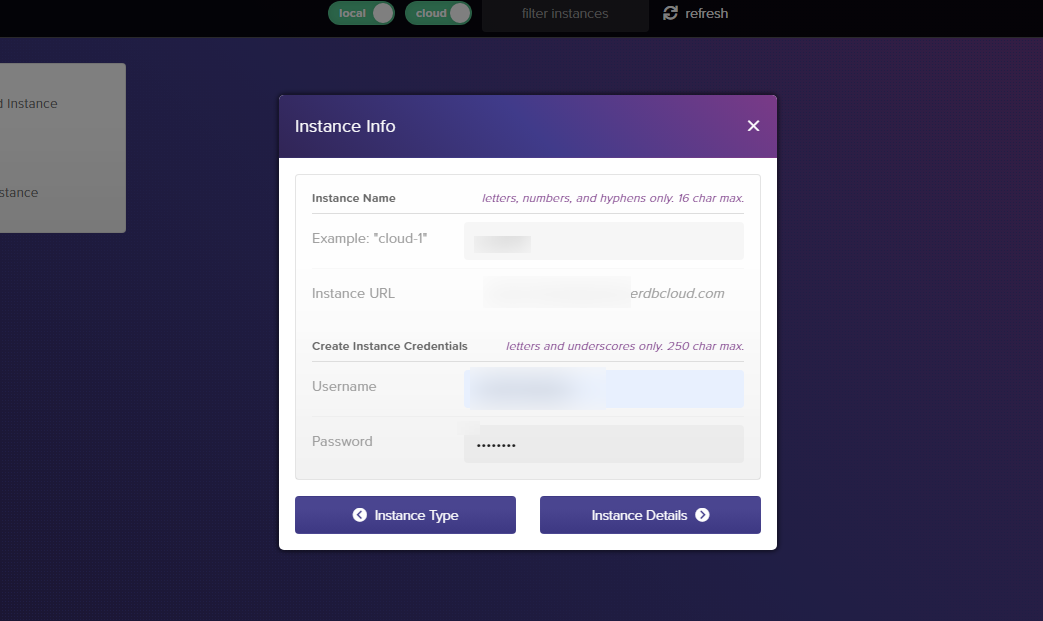
After signing up, we’ll create a HarperDB Cloud instance for our app. Follow the instructions, fill in your username, a password for your instance and your instance name. After doing so, a URL will be generated for you.
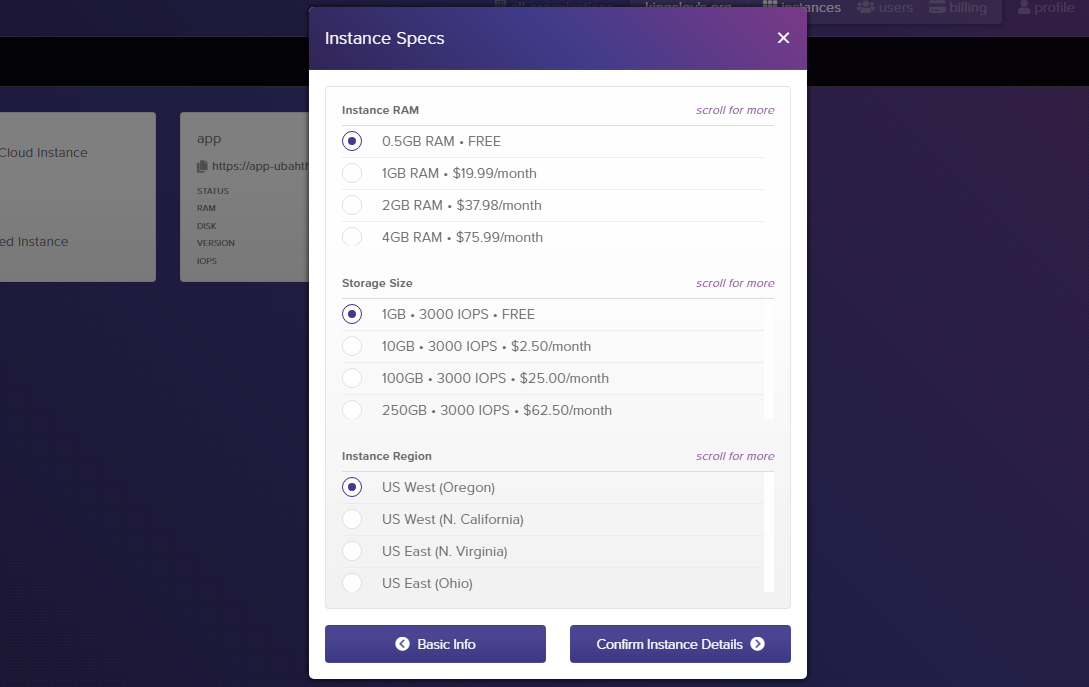
In the following page, we’ll be told to select our specs. Since this is a tutorial, we’ll go for the free plans.
Click on “Confirm Instance Details” and you’ll be moved to a page which contains all your instance’s information. Now, copy your instance URL, your username, and your password and save it somewhere, as you’ll need them later.
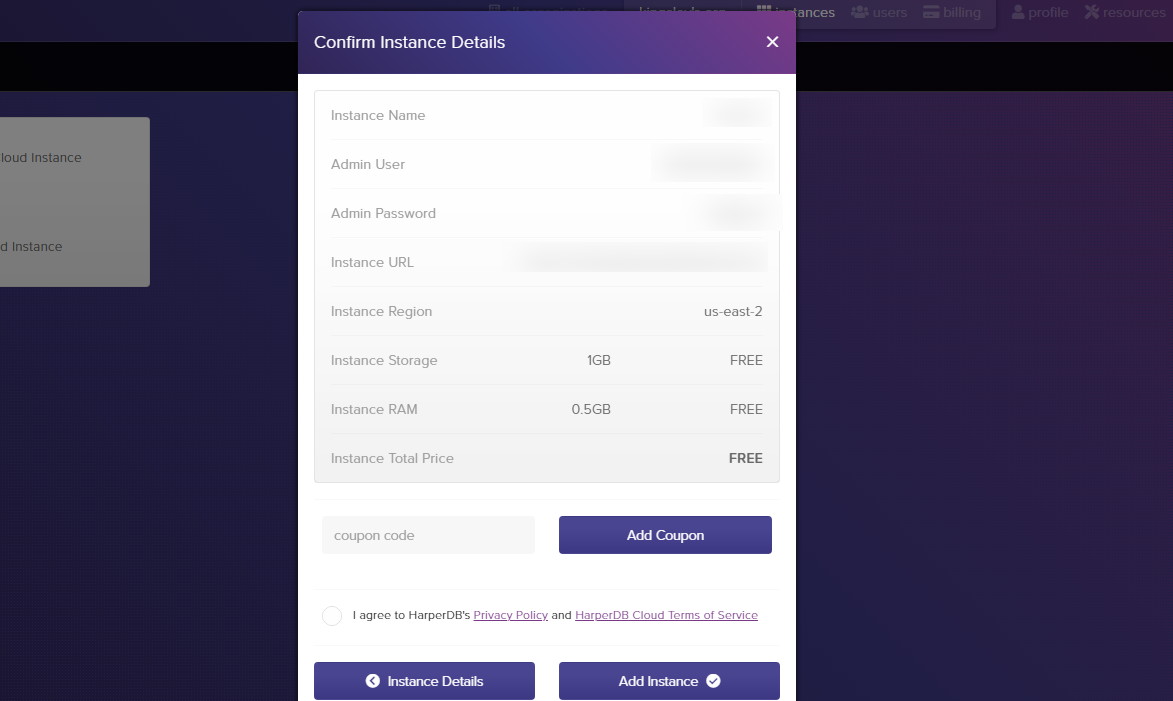
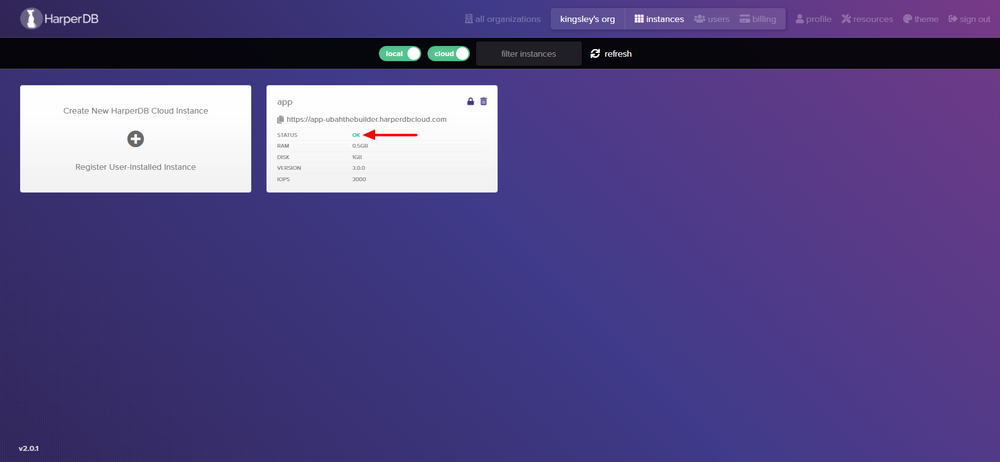
Finally, we confirm the instance. You’ll immediately see the “creating instance” label on the card. This indicates that HarperDB is working on our instance and that it will be all set in a few minutes.

It’s important that we store our instance credentials in an accessible place, since we’ll be requiring it later in the tutorial. The credentials are your username, password and instance URL.
Setting Up Our Project Directory
Our database is now spinning up on the side. Now it’s time to create the directory for our app and install dependencies.
First, we go over to the terminal and run the following command:
npx create-react-app hacker-news-clone
This will create a folder named hacker-news-clone and install the React library into the project. Since create-react-app is a code generator, all configurations will be done for us automatically. That way, we can focus more on building our app.
Creating the Database and Supplying it with Data
Going back to HarperDB, we’ll need to provide it with the data for our page. This data will be a list of Hacker news posts which we’ll display on our front end.
Creating a schema and a table within the database
We’ll need to define a schema for our database. A schema is the structural form of a database. It defines how data is going to be organized inside the database. In HarperDB, you can simply think of the schema as a collection of tables. We can define multiple tables inside a schema and access those tables from different places within our app.
From your HarperDB dashboard, click on the card. You’ll be directed to a new page.
To create a schema, simple click on the + icon beside it.
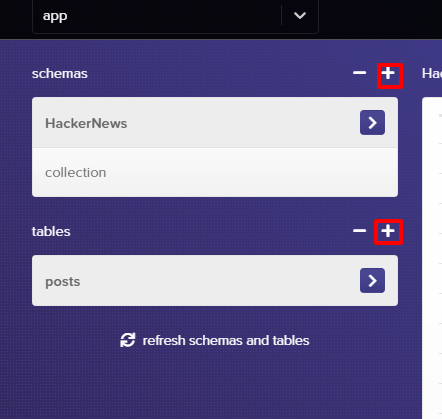
For our tutorial, we’ll be naming our schema “HackerNews”.
Inside the schema, we’ll define our first table, named posts. This table will hold all of the posts data that will be showing on our page. In addition to the table’s name, we’ll also have to pass in a hash attribute for our table. A hash attribute is a unique value that distinguishes one row (post) from another row of data inside the table.
For our posts table, we’ll set the hash attribute to id. This means the id column will hold unique data for every row in the table.
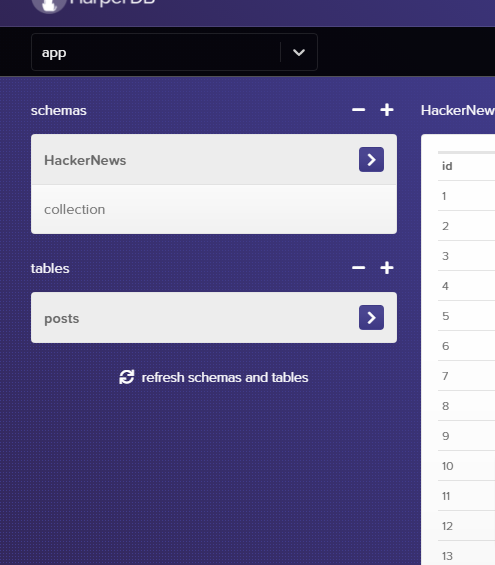
Populating our table with data
At this point, the table is empty. We’ll have to populate the table with data. HarperDB provides us with various ways of doing this:
- by making SQL or NoSQL queries to create data on our database
- by defining a single JSON object (for only one record) and an array of JSON data (for multiple records)
- by importing and loading data with a CSV file
In this tutorial, we’ll be supplying data via JSON. Since we’re inserting multiple records of posts, we’ll be using an array of JSON object, with each object holding information of a single post.
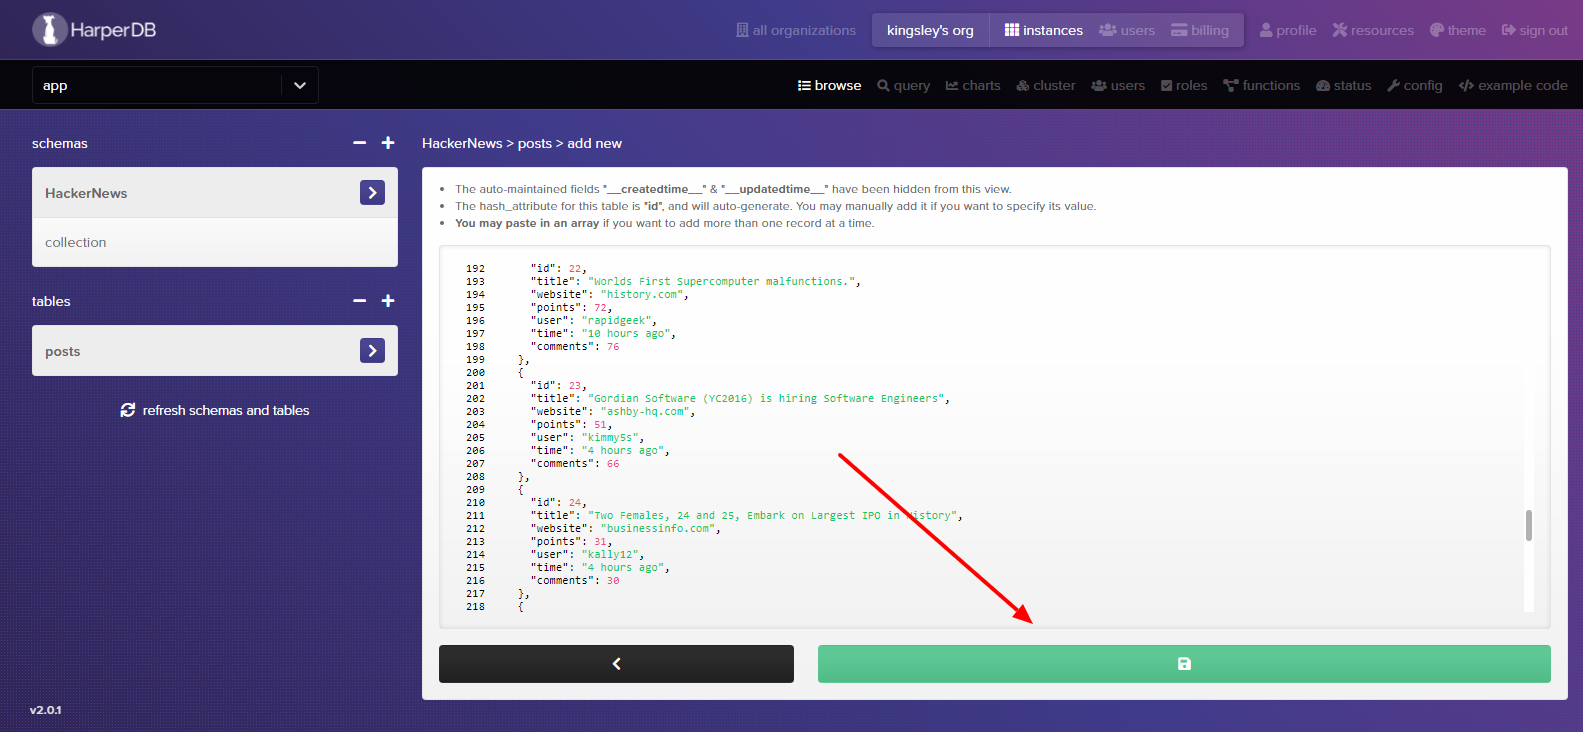
Click the little + icon on the top right corner and paste in the following JSON data:
[
  {
    "id": 1,
    "title": "Intel Is Reducing Server Chip Pricing in Attempt to Stem the AMD Tide",
    "website": "(tomshardware.com)",
    "url": "https://www.tomshardware.com",
    "points": 115,
    "user": "rbanffy",
    "time": "2 hours ago",
    "comments": 67
  },

  {
    "id": 2,
    "title": "AI recognizes race in medical images",
    "website": "(explainthispaper.com)",
    "url": "https://www.explainthispaper.com",
    "points": 31,
    "user": "stuartbman",
    "time": "30 minutes ago",
    "comments": 15
  }
]
Note: this data is just for two Hacker News posts. You can get data for 30 posts from the GitHub repository.
Go and click on the green button to insert them into the table. This should dynamically populate our table with the two posts.
With that, we’ve finished our work on the HarperDB cloud. It’s now time to focus on the front-end part of our website.
Integrating HarperDB and Our App with HarperDBProvider
Right now, our front end is isolated from our back end. We have to connect our HarperDB cloud instance to our React app. Thankfully, HarperDB provides us with a hook for that: use-harperdb.
We need to install useharperdb into our project. To do so, we run the following command:
npm install use-harperdb
For security reasons, we’ll need to store our instance credentials inside an environmental variable. We’ll create a file named .env inside the root app (hacker-news-clone) and pass in the following variables:
REACT_APP_DB_URL=**
REACT_APP_USER=**
REACT_APP_PASSWORD=**
Please make sure to follow the same format and replace the double asterisks with your own instance information. Pass in your database’s URL, your username and your password.
After that, we’ll go inside the index.js file by navigating to hacker-news-clone/src/index.js. Then we import HarperDBProvider and wrap our entire app inside it:
import React from 'react';
import ReactDOM from 'react-dom';
import './index.css';
import App from './App';
import { HarperDBProvider } from 'use-harperdb';

ReactDOM.render(
  <React.StrictMode>
    <HarperDBProvider
    url={process.env.REACT_APP_DB_URL}
    user={process.env.REACT_APP_USER}
    password={process.env.REACT_APP_PASSWORD}
    >
      <App />
    </HarperDBProvider>
  </React.StrictMode>,
  document.getElementById('root')
);
Inside the <HarperDBProvider> we pass in our environmental variables. This is a very important step to take, because it essentially makes sure our entire app has the context of our cloud instance and can, therefore, pull data from it.
Building the Home Page with React
Remember that the task is to clone the Hacker News home page. This also means we’ll be paying a lot of attention to styling. With that in mind, it’s time to start building.
Building the root component
The root component is app.js. Navigate into hacker-news-clone/src/App.js and type in the following code:
import React from 'react';
import './App.css';
import Posts from './components/Posts';
import logo from './hacker-news.svg'

function App() {
  return (
    <div className="App">
    <div className="container">
      <div className="header flex">
          <div className="part-1 flex">
              <div className="image">
                <img src={logo} alt="" />
              </div>

              <h1 className="logo">Hacker News</h1>
              <h3><a href="https://news.ycombinator.com/newest">new</a></h3> <span className="stroke">|</span>
              <h3><a href="https://news.ycombinator.com/front">past</a></h3> <span className="stroke">|</span>
              <h3><a href="https://news.ycombinator.com/newcomments">comments</a></h3> <span className="stroke">|</span>
              <h3><a href="https://news.ycombinator.com/ask">ask</a></h3> <span className="stroke">|</span>
              <h3><a href="https://news.ycombinator.com/show">show</a></h3> <span className="stroke">|</span>
              <h3><a href="https://news.ycombinator.com/job">job</a></h3> <span className="stroke">|</span>
              <h3><a href="https://news.ycombinator.com/submit">submit</a></h3> <span className="stroke">|</span>
          </div>

          <div className="part-2">
              <h3><a href="https://news.ycombinator.com/login">login</a></h3>
          </div>
        </div>

          <Posts />
    </div>
  </div>
  );
}

export default App;
Being the root component, app.js will hold the entirety of our React app. On top we can see the markup for the header section of our page and below we can see the posts component also registered within it.
The header <div> holds all of the markup for the header section of the Hacker News page. This includes the little logo, the logo text and the list of navigation links. You can also see the flex class registered on some elements. All of the alignments will be done from our stylesheet App.css, using Flexbox.
The final component is the post component. This component will hold the lower part of our page, which includes the list of posts from HarperDB.
Building the posts component
This is perhaps the most interesting React component in this project. This component will display the list of posts that will get pulled from the database using the use-harperdb function.
Navigate to hacker-news-clone/src/components/Post.js and create the Post component:
import { useHarperDB } from 'use-harperdb';

function Posts() {
let [data, loading, error, refresh] = useHarperDB({
    query: {
      operation: 'sql',
      sql: `select * from HackerNews.posts`
    }
    /* interval: 40000 */
  })

// CODE WILL CONTINUE
After importing the dependencies, we’ll define our posts “function” component. Inside it, we execute the useHarperDB function and pass in a query object as parameter. Inside this object we define two properties:
operation: this defines the kind of query operation we want to carry out on the database. In our case, it’s an SQL operation.sql: here we define our SQL query.
You can also see the interval property. Using this property, we can specify how long we want to wait before automatically making a fresh request to HarperDB for data. Think of it as an automatic refresh.
However, since we won’t be needing it here, I decided to comment it out. I’m just mentioning it for learning purposes.
Calling the useharperdb function will return the following variables, which we accept into an array:
loading: this indicates that data is still loadingerror: if an error is encountered, the error message is returned into this variablerefresh: this function can be used to repeatedly pull data from the databasedata: this contains the actual data that we had queried for in the query object
Now we’ll code the remainder of the component:
// CONTINUATION

if(loading) {
    return <div> Loading... </div>
  }

if(data) {
      return (
        <div className="body">
          <div className="posts">

          {data.map((post, index) => {
            return (
            <div key={post.id}>
              <p><span className="number">{post.id}.</span> <span className="triangle"></span>{post.title}<a href={post.url} className="website">{post.website}</a> </p>
              <p className="secondary">{post.points} points by <a href="" className="outline">{post.user}</a> <a href="" className="outline">{post.time}</a>  | <a href="" className="outline">hide</a> |  <a class="outline" href="">{post.comments} comments</a> </p>
            </div>
          )
          })}
          </div>

          <div className="footer">
            <p><a href="https://news.ycombinator.com/newest" onClick={refresh}>More</a></p>
            <hr />
            <div className="links">
              <p><a href="">Guidelines</a><span className="stroke">|</span> <a href="">FAQs</a><span className="stroke">|</span> <a href="">Lists</a><span className="stroke">|</span>
                  <a href="">API</a><span className="stroke">|</span> <a href="">Security</a><span className="stroke">|</span> <a href="">Legal</a><span className="stroke">|</span>
                  <a href="">Apply to YC</a><span className="stroke">|</span> <a href="">Contact</a>
              </p>
            </div>
            <div className="form">
              <label for="Search">Search:</label>
              <input type="text" name="" id="" />
            </div>
        </div>
      </div>
)
} else {
    return (
      <div>Sorry, no data
        {error}
      </div>
  )
}

}

export default Posts
The data returned from calling use-harperdb will be an array of 30 objects. That is 30 Hacker News posts.
Each post object is going to have an ID, title, website, URL, points, user, time and comments. All of these data will be used to populate our template.
The first if statement displays a Loading... message if data isn’t yet ready.
The second statement checks to ensure that there is data and that the data array has more than one post. In that case, we’ll display all of the posts on the page using the map() method. The data from each post will be dynamically passed into the template.
We need to supply a unique value to the key property on each iteration to help React distinguish each new set of posts. The id field is great for this role, because each post has a unique id value.
If the second statement is false, and no data is returned, we display Sorry, no data, along with the error message. As I previously mentioned, any error message will be returned inside error.
In the footer section, we’ll assign the refresh function to the onClick property of the link. Hence, for every time More is clicked, the page will refresh.
Finally, we make sure to export the component. That way it will be available to app.js.
To view the app, we simply need to run the following command:
cd /path/to/hacker-news-clone
npm start
This command will run the local development server and boot your app on localhost:3000.
Styling the page to mimic Hacker News
Finally, we define the styles for our app inside app.css.
For comprehension, some of the styles have been documented. Navigate to hacker-news-clone/src/App.css and use the following:
/* BASE STYLES */

/* Reset user agent default styles */
* {
  box-sizing: border-box;
  margin: 0;
  padding: 0;
}

/* Set the font-family to the same typeface as Hacker News */

body{
  font-family: "verdana", "geneva", sans-serif;
}

a {
  text-decoration: none;
  color: black;
}

/* NAVIGATION STYLES */

/* Center the navbar, ensure it doesn't exceed the specified width */

.container {
  margin: 10px auto;
  max-width: 1350px;
}

/* Set the height of Hacker News Logo */
.image {
  height: 19px;
  width: 19px;
  border: 1px solid white;
  margin: 0 3px 0 0;
}

.part-1 img {
  height: 100%;
  width: 100%;
  background-color: white;
}

/* Display the navbar in a horizontally-aligned manner, using FlexBox */
.flex {
  display: flex;
  justify-content: space-between;
  align-items: center;
}

/* Set background color to same orange shade as Hacker News */

.header {
  padding: 1px 2px;
  margin: 0;
  height: 22px;
  background-color: #f46404;
}

.header h1 {
  font-size: 13px;
  margin: 0 4px;
}

.header h3 {
  font-size: 13px;
  font-weight: 100;
  margin: 0 4px;
}

/* Style the strokes which divides the nav links */
.stroke {
  font-size: 13px;
}

/* BODY SECTION */

/* Set body color to lighter purple */
.body {
  background-color: #f3f4ec;
  padding-bottom: 10px;
  margin: 0;

}

/* Draw a triangle */

.triangle {
     width: 0;
     height: 0;
     border-left: 4px solid transparent;
     border-right: 4px solid transparent;
     border-bottom: 8px solid #9c9c9c;
     position: relative;
     bottom: 12px;
     right: 3px;
   }

.posts {
  padding: 10px 6px;
  font-size: 13px;
}

.posts p{
  color: black;
}

/* Sets the font size of each paragrapgh */

.posts .secondary,
.posts .outline {
  font-size: 9px;
  margin: 5px 0;
}

.posts .secondary {
  color: #9c9c9c;
  font-size: 9px;
  margin-left: 30px;
}

.website {
  margin-left: 3px;
}

.posts .number {
  color: #9c9c9c;
}

/* Set a border on the bottom of the links when hovered over */

.outline:hover {
  border-bottom: 1px solid #9c9c9c;
}

.posts a {
  color: #9c9c9c;
  font-size: 11px;
}

/* Footer */
.footer p {
  font-size: 13px;
}

.footer hr {
  border: 1px solid #f46404;
  margin: 7px 0;
}

.footer p {
  font-size: 11px;
  font-weight: 100;
  margin: 0 4px;
}

.links {
  text-align: center;
}

.links a {
  margin-right: 6px;
}

.form {
  color:#9c9c9c;
  margin: 20px auto;
  width: 200px;
}

.form input {
  width: 130px;
}
That’s it for the styling.
Viewing our app
On the command line, type in the following command:
npm start
This will start up the local development server and display our page on localhost:3000.
Deploying to GitHub Pages
You can go a step further and deploy your page to GitHub pages.
Before proceeding, make sure you have an active GitHub account. Please also ensure you have Git installed on your local machine.
Navigate back to your command terminal and run the following command:
npm install gh-pages --save-dev
This will save GitHub Pages to your project as a dev dependency.
When the installation is complete, go over to your project folder and open the package.json file, which is in the root folder. You should find gh-pages under the dev dependency:
"devDependencies": {
    "gh-pages": "^3.2.3"
  }
Navigate to your project directory (hacker-news-clone) and select the package.json file. Inside the file, insert the following lines of strings (replace the template with yours):
"homepage":  https://{Your GitHub username here}.github.io/{Your Project Name}.git

// Inside scripts object
"predeploy": "npm run build",
"deploy": "gh-pages -d build"
Now run the following command
npm run deploy
This will deploy your application to GitHub pages. You can obtain the link to the page from your repository.
Final Words
One of the biggest pros of HarperDB is that it provides a free plan for users. As a developer, this makes it possible to build a variety of projects without having to worry about charges.
Using the React/HarperDB stack, you can boost your coding skills by building some other simple CRUD applications.
Thanks for following along.
Frequently Asked Questions (FAQs) about Building a Hacker News Clone
How can I add more features to my Hacker News clone?
Adding more features to your Hacker News clone can make it more interactive and user-friendly. You can consider adding features like user authentication, comments, upvotes, and downvotes. For user authentication, you can use libraries like Passport.js. For comments, upvotes, and downvotes, you can use the HarperDB database to store and retrieve these data. Remember to update your React components to reflect these changes.
How can I improve the performance of my Hacker News clone?
Performance is a crucial aspect of any web application. To improve the performance of your Hacker News clone, consider implementing techniques like lazy loading, code splitting, and optimizing your database queries. Lazy loading and code splitting can help reduce the initial load time of your application. Optimizing your database queries can help reduce the time taken to fetch data from the database.
How can I deploy my Hacker News clone?
Once you’ve built your Hacker News clone, you might want to deploy it so that others can use it. You can use platforms like Heroku, Netlify, or Vercel for deployment. These platforms provide a simple and straightforward way to deploy your React applications. You’ll need to follow the specific instructions provided by these platforms to deploy your application.
How can I add a search functionality to my Hacker News clone?
Adding a search functionality can enhance the user experience of your Hacker News clone. You can use libraries like Fuse.js to add fuzzy search functionality. You’ll need to create a search component in React and use the Fuse.js library to search through your posts.
How can I make my Hacker News clone responsive?
Making your Hacker News clone responsive ensures that it looks good on all devices. You can use CSS frameworks like Bootstrap or libraries like React-Bootstrap to make your application responsive. These libraries provide a grid system and pre-designed components that can help you design a responsive application.
How can I add a dark mode to my Hacker News clone?
Dark mode is a popular feature in many web applications. You can add a dark mode to your Hacker News clone by using CSS variables and React’s state. You’ll need to define your colors as CSS variables and create a state in React to toggle between light and dark mode.
How can I handle errors in my Hacker News clone?
Handling errors properly can improve the user experience of your Hacker News clone. You can use try-catch blocks in your JavaScript code to catch errors and display appropriate error messages to the user. In React, you can use error boundaries to catch errors in your components.
How can I test my Hacker News clone?
Testing is an important part of software development. You can use libraries like Jest and React Testing Library to test your Hacker News clone. These libraries provide functions to test your React components and their functionality.
How can I add pagination to my Hacker News clone?
Pagination can improve the user experience of your Hacker News clone by limiting the number of posts displayed at once. You can use libraries like react-paginate to add pagination to your application. You’ll need to update your database queries to fetch a specific number of posts at a time.
How can I secure my Hacker News clone?
Security is a crucial aspect of any web application. You can secure your Hacker News clone by implementing features like user authentication and authorization, and by sanitizing user input to prevent SQL injection attacks. You can use libraries like Passport.js for user authentication and authorization, and libraries like validator.js to sanitize user input.