

Key Takeaways
- CakePHP is a robust PHP development framework that embraces the MVC (Model-View-Controller) pattern and is suitable for users of all skill levels. It provides a solid foundation for rapid development of web applications, with added support for console applications.
- CakePHP offers automatic code generation using the console tool Bake and dynamic scaffolding, which allows for quick creation of a basic application that can create, retrieve, update, and delete objects. This can significantly speed up the development process.
- The framework follows the principle of “convention over configuration”, reducing the need for extensive configuration files. It also provides a Dispatcher component for routing requests to the appropriate controller, enhancing the MVC pattern.
- CakePHP is highly scalable and suitable for large-scale projects. It supports multiple database systems and includes built-in tools for input validation, CSRF protection, Form tampering protection, SQL injection prevention, and XSS prevention, making it a secure choice for application development.
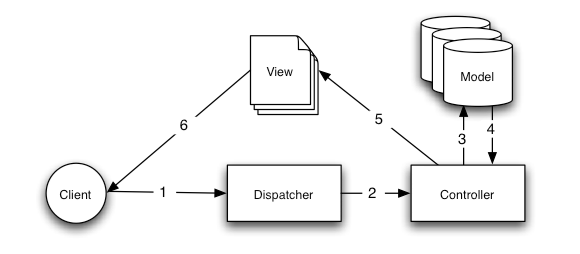
CakePHP is a framework that provides a solid base for PHP development. It allows users at any skill level to rapidly develop robust web applications. The framework follows the principles of the MVC pattern (Model-View-Controller) which separates your code in three parts:
- Model – code that deals with data (i.e. database, filesystem, and other data providers)
- View – code that displays data and deals with the interface (web pages, RSS feeds, etc.)
- Controller – code that provides the application’s main functionality by collecting input coordinating the model and view code
CakePHP augments the pattern by adding a Dispatcher component as well to help with routing requests to an appropriate controller. The flow within a CakePHP application therefor looks like this:
You can find more information about the MVC pattern on the CakePHP Book site.
Personally, the reason why I prefer CakePHP over other PHP frameworks is its better support for console applications. CakePHP has a powerful console tool that can be customized to build applications for both the web and the console world.
In this article I’ll introduce you to two of CakePHP’s most useful features:
- automatic code generation using the console tool Bake
- dynamic scaffolding
I’ll do so by recreating the example that Stephen Thorpe presented in his article Untangling MVC with CodeIgniter using these two features of CakePHP. Thorpe’s example application presents a form to collect an email address, validates the address, stores it to a database.
Installation and Configuration
Before you start to write any code, you’ll need to download and install the latest version of CakePHP from the CakePHP website. Make sure that your web server supports URL rewriting (Apache does so through mod_rewrite for example) as it is heavily used by CakePHP. There are other fallback methods, but they are outside the scope of this article.
After obtaining the CakePHP code:
- Uncompress the archive file in the document root of your web server and rename the directory to
Subscribers. - Make the directory
Subscribers/app/tmpwritable to the user account under which the web server runs. - Open your browser and navigate to the
Subscribersdirectory (for examplehttp://localhost/Subscribers/).
You should see a page similar to the following:

The philosophy of CakePHP is “convention over configuration.” If you follow CakePHP’s basic naming conventions for classes, variables, file names, and paths, you can minimize your configuration files to essential information.
The directory app/Config is one of CakePHP’s conventions. In this directory you’ll find the default configuration files and can add your specific files as necessary. CakePHP provides some basic settings inside the core.php file, and you can override these setting by editing the bootstrap.php file which is intended to be specific for your application. CakePHP also provides a sample file for database configuration called database.php.default.
Security Changes
In the initial browser output you should see two red notices asking you to edit the parameters Security.salt and Security.cipherSeed. These two settings are used by the framework for all of its encryption routines, so it’s obviously better to have values different from the shipped defaults.
Open the app/Config/bootstrap.php file and insert these two lines:
<?php

Configure::write('Security.salt', 'SomeSuperSecretLongStringHere');

Configure::write('Security.cipherSeed', 'SomeSuperSecretLongNumberHere');
CakePHP uses its
Configure class to manage such settings. With these lines, you use Configure‘s write() static method to set the new values. The values will be stored in memory within the configuration object. Another method you’ll use often is Configure::read() to retrieve the application’s settings. The convention of using Section.variableName to name settings is called dot notation and it’s converted internally by CakePHP into an associative array.
Now if you reload the page the two red notices disappear.
Database Configuration
The yellow notice suggests how to proceed to configure database connectivity: rename (or copy) app/Config/database.php.default to app/Config/database.php and open it in your editor.
The DATABASE_CONFIG class stores details for all database connections inside its public properties. The starter file provides you with the $default and $test properties (the first is used by default by the application, and the latter is used optionally for PHPUnit tests).
Each variable is an associative array of settings that should be familiar to you: hostname, login, password, database, and prefix. The datasource key sets which database driver to use and the default is MySQL (Database/Mysql). CakePHP uses PDO and so it also supports Postgres, SQLite, and MS SQL Server. Additionally, you can add custom datasources or override existing ones. I’ll continue demonstrating with the default MySQL driver.
Create a new database on you server (i.e. cake_subscribers) and insert the connection details in your $default connection. Reload the page and you should see a green notice saying “Cake is able to connect to the database.”
You’ll also need a database table to save the subscriber information, so use the following to create the table subscribers:
CREATE TABLE subscribers (

    id INT(11) NOT NULL AUTO_INCREMENT PRIMARY KEY,

    name VARCHAR(128) NOT NULL,

    last_name VARCHAR(128) NOT NULL,

    email VARCHAR(128) NOT NULL UNIQUE,

    created DATETIME,

    modified DATETIME

)
Other Useful Settings
Looking inside the core.php file you can see other interesting settings that can be overridden with the bootstrap.php file: sessions and logging features, error and exception handling, and more. One useful setting is the debug level. The default value is 2, which means that errors and warnings are displayed, cache is always refreshed, and the full SQL output is shown at the bottom of each page. A value of 1 will suppress the SQL output. A value of 0 is suitable for production; only errors are logged and CakePHP-specific exceptions are displayed gracefully as 404 or 501 errors.
Code Generation with Bake
Once you have the basic environment set up, you can start coding or… let CakePHP write some code for you! The Bake console tool is very powerful. It can generate any of the basic components (models, views, and controllers) and other useful things like unit tests.
Open a terminal window and navigate to your project’s directory (for example, /Users/Shared/WebServer/Documents/Subscribers) and run the Bake command as shown here to generate code for the model:
Vitos-Laptop:Subscribers vito$ lib/Cake/Console/cake/bake model
Welcome to CakePHP v2.0.5 Console
---------------------------------------------------------------
App : app
Path: /Users/Shared/WebServer/Documents/Subscribers/app/
---------------------------------------------------------------
---------------------------------------------------------------
Bake Model
Path: /Users/Shared/WebServer/Documents/Subscribers/app/Model/
---------------------------------------------------------------
Use Database Config: (default/test)
[default] >
Press enter to confirm your default database connection and you’ll see:
Possible Models based on your current database:
1. Subscriber
Enter a number from the list above,
type in the name of another model, or 'q' to exit
[q] >
Enter 1, and then Bake will ask if you want to specify validation criteria for this model. Enter Y.
For each field, Bake asks you to select one or more validation rules and suggests you the most suitable. Chose notempty for the name and last_name fields and email for the email field.
The last question is about model associations, and it is safe to Enter N for now. You should see a recap:
---------------------------------------------------------------
The following Model will be created:
---------------------------------------------------------------
Name:       Subscriber
DB Table:   `subscribers`
Validation: Array
(
    [name] => Array
        (
            [notempty] => notempty
        )

    [last_name] => Array
        (
            [notempty] => notempty
        )

    [email] => Array
        (
            [email] => email
        )

)
---------------------------------------------------------------
Look okay? (y/n)
If it’s all right, Enter Y and let it work. In less than one minute we have a model class, complete with validation and testing features. Give it a look in your editor. Awesome!
Now let’s do the same thing for the controller:
Vitos-Laptop:Subscribers vito$ lib/Cake/Console/cake/bake controller
Press enter to accept the default database configuration, then select the Subscribers controller, then enter Y to build the controller interactively and then Y to enable dynamic scaffolding. The final output should look like this:
---------------------------------------------------------------
The following controller will be created:
---------------------------------------------------------------
Controller Name:
    Subscribers
public $scaffold;
---------------------------------------------------------------
Look okay? (y/n)
[y] >
Automatic User Interfaces with Scaffolding
If you open the controller file app/Controller/SubscribersController.php you’ll see that it’s almost empty; there is a class definition and a public property named $scaffold. Bake can generate the full code for controllers and can also generate views (and I encourage you to try), but we chose earlier to use the dynamic scaffolding feature.
Scaffolding is a technique that allows you to define and create a basic application that can create, retrieve, update and delete objects. All you need to use scaffolding is a model and a controller. Skeptical? Point your browser to http://localhost/Subscribers/subscribers and you should see this:

The interface is fully functional! Try to insert and edit some entries; you’ll see error handling in action and full pagination.
But if you try to insert a duplicated email address you should see a very bad (but elegant) error message. This happens because I applied the UNIQUE index to the email field in the database and CakePHP doesn’t know this. Open the model file app/Model/Subscriber.php and edit its email validation rule like this:
<?php

...

'email' => array(

    'email' => array(

        'rule' => array('email'),

        //'message' => 'Your custom message here',

        //'allowEmpty' => false,

        //'required' => false,

        //'last' => false, // Stop validation after this rule

        //'on' => 'create', // Limit validation to 'create' or 'update' operations

    ),

    'unique' => array(

        'rule' => array('isUnique'),

        'message' => 'This email address is already registered',

        //'allowEmpty' => false,

        //'required' => false,

        //'last' => false, // Stop validation after this rule

        //'on' => 'create', // Limit validation to 'create' or 'update' operations

    ),

),
Now try adding a duplicate address again and this time you should see a more friendly error message.
Scaffolding can also be redirected to a specific path, for example /admin. You can build and customize the public pages of an application and use the scaffolding feature for the private administration panel, preferably using one of CakePHP’s authentication, authorization, and security features. I’ll show you the first step and then let you explore the others.
Add this line to your bootstrap.php file:
<?php

Configure::write('Routing.prefixes', array('admin'));
This tells CakePHP to parse
admin as an URL prefix (you can use as many prefixes you want). Then in the SubscribersController.php file edit the scaffold property like this:<?php
...
public $scaffold = 'admin';If you reopen the subscribers index URL you should see an error, but if you point to
http://localhost/Subscribers/admin/subscribers you see your administration panel.
Summary
In this introductory article, you have seen only the tip of the iceberg of CakePHP’s capabilities. CakePHP has a lot of features and nearly each of them is extensible and customizable to suit your needs. In addition, you can count on a very useful documentation, a complete API reference and an active community called The Bakery. I suggest you to start with the tutorials and… Happy Baking!
Image via sutsaiy / Shutterstock
Frequently Asked Questions about Rapid Application Development with CakePHP
What is the main advantage of using CakePHP for Rapid Application Development?
CakePHP is a robust and flexible PHP framework that offers a streamlined approach to rapid application development (RAD). Its main advantage lies in its convention-over-configuration philosophy, which eliminates the need for unnecessary configuration and allows developers to focus on the logic of the application. CakePHP also comes with built-in tools for input validation, CSRF protection, Form tampering protection, SQL injection prevention, and XSS prevention, making it a secure choice for application development.
How does CakePHP compare to other PHP frameworks for RAD?
CakePHP stands out among other PHP frameworks due to its comprehensive suite of features and tools designed specifically for RAD. It offers a highly organized, reusable, and maintainable code, which can significantly reduce development time and costs. Unlike other frameworks, CakePHP also provides extensive documentation and a supportive community, making it an accessible choice for developers of all skill levels.
Is CakePHP suitable for large-scale projects?
Yes, CakePHP is highly scalable and can be used for large-scale projects. It supports various database systems, including MySQL, PostgreSQL, SQLite, and MSSQL, and allows developers to manage multiple databases within a single application. CakePHP also offers tools for caching, internationalization, and localization, making it a versatile choice for global projects.
How secure is CakePHP?
CakePHP is built with security in mind. It includes built-in tools for input validation, CSRF protection, form tampering protection, SQL injection prevention, and XSS prevention. Additionally, CakePHP follows the MVC architecture, which separates the application’s logic from its presentation, further enhancing its security.
What is the learning curve for CakePHP?
While CakePHP is a powerful tool, it does have a learning curve, especially for beginners. However, its extensive documentation and supportive community can help ease this process. Developers familiar with PHP and MVC architecture will find it easier to get started with CakePHP.
Can I integrate third-party libraries with CakePHP?
Yes, CakePHP allows the integration of third-party libraries. It follows the PSR-4 autoloading standard and can be installed via Composer, making it easy to manage and integrate third-party libraries.
How does CakePHP handle database migrations?
CakePHP includes a powerful console and shell library for handling database migrations. It allows developers to modify the database structure and keep track of these changes over time, making it easier to manage and deploy applications.
Does CakePHP support RESTful API development?
Yes, CakePHP provides built-in support for creating RESTful APIs. It includes tools for routing, input parsing, and output formatting, making it a suitable choice for API development.
How does CakePHP handle testing?
CakePHP comes with built-in testing support, allowing developers to write and run tests for different parts of the application. It supports both unit testing and integration testing, ensuring the reliability and stability of the application.
What is the future of CakePHP?
CakePHP continues to be a popular choice for RAD due to its robust features and active community. The framework is regularly updated to include new features and improvements, ensuring its relevance in the ever-evolving world of web development.

