When I first started programming the only type of code I wrote was procedural. You know the type, one thing leads to another with a thrown in function here and there and you have a working application. As I grew as a programmer, I began to find out that way of programming is fine for small projects but when I started to develop bigger applications my code became very disorganized and hard to read. To combat this I started writing my own classes to help me write better, reusable code that I could use in all my applications. Then I realized that although I was learning a lot by doing this, I was reinventing the wheel. Most of what I was writing had already been accomplished many times over in various PHP frameworks. I began looking into the almost endless selection of PHP frameworks and saw most of them were also based on something called MVC. Learning to program using MVC was a complete paradigm shift for me, but it was well worth the struggle. If you want to develop applications with sell-structured, readable code that you can quickly diagnose problems in, then MVC is for you. In this article I’ll untangle the mysteries of MVC for you using CodeIgniter, a PHP framework based on the MVC pattern. I’ll first present a high level overview of MVC, what it is and how it can help you to become a better programmer, and then guide you through writing a simple web form the CodeIgniter way so you can see how the pattern looks in action.
What is MVC?
MVC is another acronym you’ll want to add to your endless book of acronyms; it stands for Model-View-Controller and is an software architectural design pattern. Adhering to the MVC pattern of will separate your application’s logic from its data and presentation. If you have ever seen code like this:<?php if($somthing == $thisthing) echo "<p>Hello there</p>"; ?>- Model – encapsulates your data management routines. Usually this is the part of your code that retrieves, inserts, updates, and deletes data in you database (or whatever else you’re using for a data store).
- View – encapsulates the information that is presented to a user. This is the actual web page, RSS feed, or even a part of a page like a header of footer.
- Controller – coordinates the Model and View parts of your application to respond to the request. A controller accepts input from the user and instructs the model and a view to perform actions based on that input; it controls the flow of information in the application.
- The user interacts with the View which presents a web form.
- The user submits the form, and the Controller receives the POST request. It passes this data to the Model.
- The Model updates and queries the database and sends the result back to the Controller.
- The Controller passes the Model’s response to the View.
- The View updates itself with the new data and is displayed to the user.
Installing CodeIgniter
With so many MVC frameworks out there, how do you decide which one to choose – don’t they all provide similar functionality just differing slightly in their implementation and syntax? I had never used a framework before so I had to read through a lot of documentation and experiment with them to find out which one was right for me. I found that CodeIgniter had a much smaller learning curve then the others, which is probably why it has a reputation for being great for beginners. It’s documentation is very clear and provides many code examples to help you along the way. Although in this article I’ll be using CodeIgniter, the concept of MVC will be applicable to almost any framework you choose. CodeIgniter is a cinch to install and configure for you system. Follow these steps and you’ll be up and running in less then five minutes.- Download the latest version of CodeIgniter. As of this writing, the latest version is 2.0.3.
- Uncompress the archive and place the uncompressed directory in your web root.
- Rename the directory from
CodeIgniter_2.0.3toCI - Open
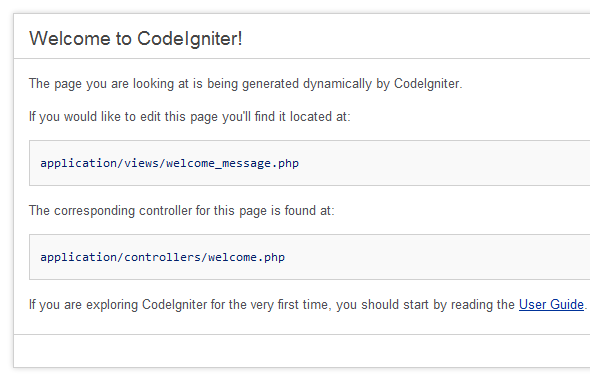
CI/application/config/config.phpand change the base URL to your server. In my case, it is:$config['base_url'] = "http://localhost/CI"; - Go to the
CIdirectory on the server using your web browser. Again, in my case it’shttp://localhost/CI.
 Now that you have everything installed you’ll have probably noticed all the directories that CodeIgniter has. Don’t be intimidated; you won’t have to deal with most of them since the majority of your work will take place in the
 system/application directory.
Looking in the system/application directory there are subdirectories named controllers, models, and views. This is where you will place your files for your application. Your controller files will be in the controllers directory, model files in the models directory, and view files in the views directory.
Less Talk, More Code
Now that you have a basic understanding of what the MVC architecture is and have CodeIgniter installed, let’s get down to some coding. In this example you’ll create a very simple form to collect email addresses using CodeIgniter’s form helper classes and form validation library. Let’s get started.Create the Controller
Create a new file in yourapplication/controllers directory named sitepointform.php that contains the following code:
<?php
class Sitepointform extends CI_Controller
{
    public function index() {
        // Load the Form helper which provides methods to assist
        // working with forms.
        $this->load->helper("form");
        // Load the form validation classes
        $this->load->library("form_validation");

        // As you have loaded the validation classes, you can now
        // apply rules to the fields you want validated. The
        // functions below take three arguments:
        //     1. The name of form field
        //     2. The human name of the field to be displayed in
        //        the event of an error
        //     3. The names of the validation rules to apply
        $this->form_validation->set_rules("first", "First Name",
            "required");
        $this->form_validation->set_rules("last", "Last Name",
            "required");
        $this->form_validation->set_rules("email", "Email Address",
            "required|valid_email");

        // Check whether the form validates. If not, present the
        // form view otherwise present the success view.
        if ($this->form_validation->run() == false) {
            $this->load->view("sitepointform_view");
        }
        else {
            $this->load->view("formsuccess");
        }
    }
}
Create the Views
Next, create a file in yourapplication/views directory called sitepointform_view.php with this code:
<?php
// Display any form validation error messages
echo validation_errors();

// Using the form helper to help create the start of the form code
echo form_open("sitepointform");
?>
   <label for="first">First Name</label>
   <input type="text" name="first"><br>

   <label for="last">Last Name</label>
   <input type="text" name="last"><br>

   <label for="email">Email Address</label>
   <input type="text" name="email"><br>

   <input type="submit" name="submit" value="Submit">
 </form>
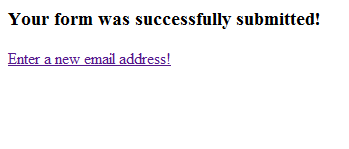
</html>application/views/formsuccess_view.php with this code which will be showed later when a form is successfully submitted:
<html>
 <head>
  <title>Form Success</title>
  </head>
 <body>
  <h3>Your form was successfully submitted!</h3>
  <p><a href="http://localhost/CI/index.php/sitepointform">Enter a new
email address!</a></p>
 </body>
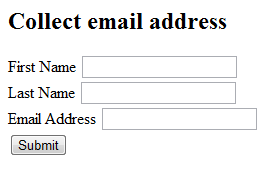
</html>http://localhost/CI/index.php/sitepointform/index and you’ll see your newly created form:
 The URL follows this pattern in your application:
http://yourwebroot/[controller-class]/[controller-method]/[agruments]Here
sitepointform is the controller class, and index is the desired method. If you were renamed the method to myForm(), the URL would change like this:
http://localhost/CI/index.php/sitepointform/myFormIn the absence of a method in the URL, CodeIgniter will assume
index.
Hit submit without any input in the text fields to try out the validation. You’ll see CodeIgniter enforcing the rules you set up earlier in the controller and displays the error messages.
Create the Model
Now that you have your form built, you need somewhere to store all the names and email addresses. Create a tableaddresses with the following statement in your database:
CREATE TABLE addresses (
    id INTEGER UNSIGNED NOT NULL AUTO_INCREMENT,
    last_name VARCHAR(128) NOT NULL,
    first_name VARCHAR(128) NOT NULL,
    email VARCHAR(128) NOT NULL,
    PRIMARY KEY (id)
);application/config/database.php and enter your database credentials. Specify appropriate values for the hostname, username, password, database, and dbdriver keys.
Then, create application/models/sitepointform_model.php with this code:
<?php
class Sitepointform_model extends CI_Model
{
    public function insert_address($data) {
        $this->load->database();
        $this->db->insert("addresses", $data);
    }
}insert_address() that is accepts the array of values passed in from the controller. CodeIgniter has a database class built in so you don’t have to write any SQL at all; $this->db->insert() will automatically generate and execute the SQL for you.
Try it Out
To use the model from the controller, open upapplication/controllers/sitepointform.php and update the index() method as follows:
<?php
public function index() {
    $this->load->helper("form");
    $this->load->library("form_validation");

    $this->form_validation->set_rules("first", "First Name",
        "required");
    $this->form_validation->set_rules("last", "Last Name",
        "required");
    $this->form_validation->set_rules("email", "Email Address",
        "required|valid_email");

    if ($this->form_validation->run() == false) {
        $this->load->view("sitepointform_view");
    }
    else {
        $first = $_POST["first"];
        $last = $_POST["last"];
        $email = $_POST["email"];
        $data = array("first_name" => $first,
                      "last_name" => $last,
                      "email" => $email);

        $this->load->model("sitepointform_model");
        $this->sitepointform_model->insert_address($data);
        $this->load->view("formsuccess");
    }
}insert_address() method. Note the keys in the array have the same names as the columns in the addresses table. This is important for the final step in creating the model. Then the model is loaded with $this->load->model(), the data is passed to the insert_address() method, and the success view is displayed.
Go back to http://localhost/CI/index.php/sitepointform and enter some data. If you fill in all the text fields correctly you’ll see the success page and the data is now in your database.

Summary
Hopefully you now understand what MVC is all about, a way of separating pieces of your code based on their function to keep everything more organized. Though CodeIgniter happens to be my framework of choice, knowledge of the pattern is applicable to almost any other framework you choose, and of course you can implement it in your own code without a framework as well. Image via Alexey Rozhanovsky / ShutterstockFrequently Asked Questions about MVC with CodeIgniter
What is the Model-View-Controller (MVC) in CodeIgniter?
The Model-View-Controller (MVC) is a software design pattern that separates the application logic into three interconnected components. In CodeIgniter, the Model corresponds to the data-related logic, the View is responsible for the user interface and presentation parts, and the Controller handles the user requests and ties the model and view together. This separation allows for efficient code organization, easier debugging, and improved scalability.
How does the MVC pattern work in CodeIgniter?
In CodeIgniter, the MVC pattern works by dividing the application tasks into models, views, and controllers. The Controller receives a user request, processes it, and interacts with the Model if necessary. The Model performs the required operations on the database and returns the results to the Controller. The Controller then loads the View, passing the data to be displayed. The View renders the final output to be presented to the user.
How do I create a Controller in CodeIgniter?
To create a Controller in CodeIgniter, you need to create a new file in the ‘application/controllers’ directory. The file name should start with a capital letter and it should extend the CI_Controller class. Inside this class, you can define methods that correspond to different pages of your application.
How do I create a Model in CodeIgniter?
To create a Model in CodeIgniter, you need to create a new file in the ‘application/models’ directory. The file name should start with a capital letter and it should extend the CI_Model class. Inside this class, you can define methods that interact with your database.
How do I create a View in CodeIgniter?
To create a View in CodeIgniter, you need to create a new file in the ‘application/views’ directory. This file can contain HTML, PHP, and other types of code. The View is responsible for displaying the data provided by the Controller.
How do I load a View in CodeIgniter?
To load a View in CodeIgniter, you use the $this->load->view() function in your Controller. The first parameter is the name of the View file and the second optional parameter is an array of data that you want to pass to the View.
How do I load a Model in CodeIgniter?
To load a Model in CodeIgniter, you use the $this->load->model() function in your Controller. The parameter is the name of the Model file. Once loaded, you can access its methods using the $this->model_name syntax.
How does CodeIgniter handle database operations in the MVC pattern?
In CodeIgniter’s MVC pattern, database operations are handled by the Model. The Model contains methods for retrieving, inserting, updating, and deleting data in the database. These methods are called by the Controller as needed.
Can I use multiple Models, Views, and Controllers in CodeIgniter?
Yes, you can use multiple Models, Views, and Controllers in CodeIgniter. This allows you to organize your code in a modular way, making it easier to maintain and extend.
How does CodeIgniter’s MVC pattern improve code organization and scalability?
CodeIgniter’s MVC pattern improves code organization by separating the application logic into distinct components, each with a specific responsibility. This makes the code easier to understand and maintain. It also improves scalability, as each component can be developed and tested independently, and new features can be added without affecting the existing code.
Stephen Thorpe is originally from London but now living in Tennessee. He works at an Internet and Telephone company as an applications developer primarily using PHP and MySQL.


