
This article was originally published on Alibaba Cloud. Thank you for supporting the partners who make SitePoint possible.
Think you got a better tip for making the best use of Alibaba Cloud services? Tell us about it and go in for your chance to win a Macbook Pro (plus other cool stuff). Find out more here.
This document shows how to deploy a WordPress site and phpMyAdmin application using the ROS template with a single click.
Introduction
Many users do not have in-house technical capabilities to build and manage a website. They have teams who can manage the content but not the infrastructure that comes along with it. Currently available solutions are suitable for a limited period when the requirements are basic, but as soon as they require customization, high availability, and scalability, additional solutions supporting scaling are needed.
The ROS stack template (WordPressCluster-phpMyAdmin.ros) discussed in this document helps address the high availability and scalability requirements of such users. With a single click, it creates the entire VPC stack, Server Load Balancer, Auto Scaling, ECS, RDS, and other instances, deploys WordPress and phpMyAdmin, and configures Auto Scaling to guarantee that any new instances can be added and configured without manual intervention.
Prerequisites
- Availability of an OSS bucket.
- RAM user with read and write access to the OSS bucket.
- Understanding of ROS and ability to create ROS stack templates and stacks from the console.
Architecture overview
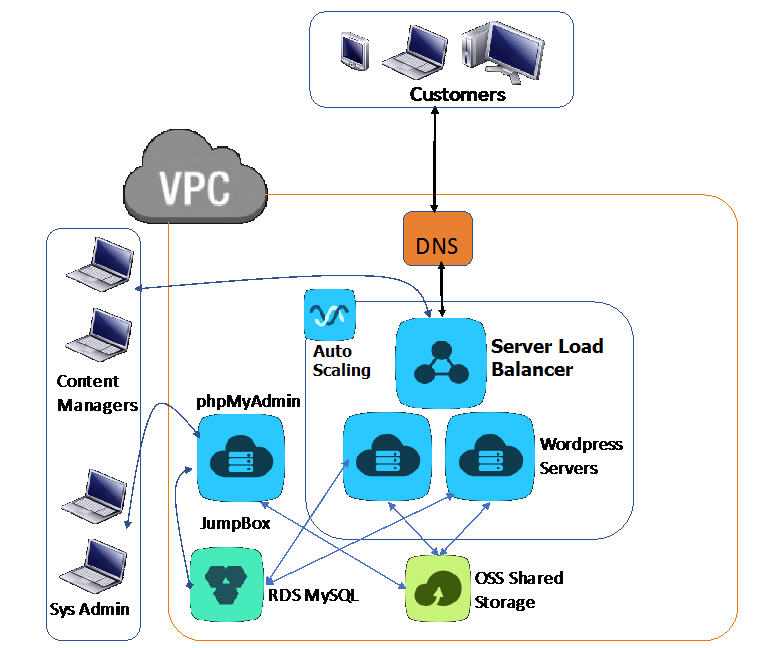
This diagram provides an overview of the deployment architecture that is generated based on the template WordPressCluster-phpMyAdmin.ros.
Three types of users access the infrastructure:
End users, who access the website hosted on WordPress through a URL that is resolved to a Public Server Load Balancer instance.
WordPress is hosted on Apache web servers. The servers have their document root set to /wwwroot which is on an OSS bucket shared across the web servers using OSSFS (a FUSE-based file system officially provided by Alibaba Cloud).
RAM users who have the access permission of the OSS bucket can mount the OSS bucket on the ECS instance.
The RDS for MySQL database holds the WordPress content and is accessed from the web server over its intranet connect string.
System administrator, who can access to the VPC environment through an SSH logon to the JumpBox (bastion host).
The JumpBox has an elastic IP and is accessed over the Internet.
The access through JumpBox is to manage the instances inside the VPC.
phpMyAdmin is installed on the JumpBox and is accessible over the Internet.
In this way, the administrators can administer the RDS database.
Content managers, who can access the WordPress Management console through the Internet.
Access to all these services can be controlled by security groups and can be configured as per the environment.
The Template Overview
Click WordPressCluster-phpMyAdmin.ros to download the ROS stack template for use.
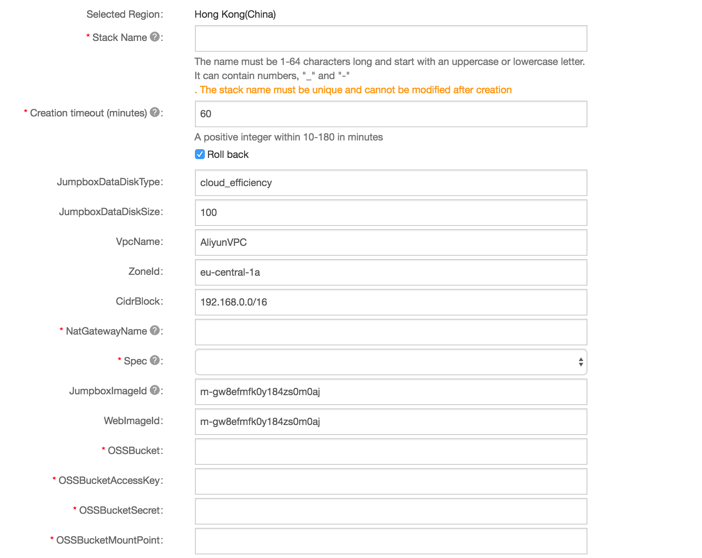
Note: In the template, the ZoneId is set as eu-central-1a, and the ImageId is m-gw8efmfk0y184zs0m0aj. You can modify the ZoneId and the ImageId according to the zones and images supported in the ROS console. Log on to the ROS console, click ECS Instance Information, select a region, and click ECS Zone or ECS Image to view all the zones or images supported in this region.
Based on the WordPressCluster-phpMyAdmin.ros stack template, the system creates the VPC, Server Load Balancer, VSwitch, NAT Gateway, Security Groups, and ECS instances for JumpBox, Elastic IP for JumpBox, Auto Scaling for ECS instances, and RDS instance.
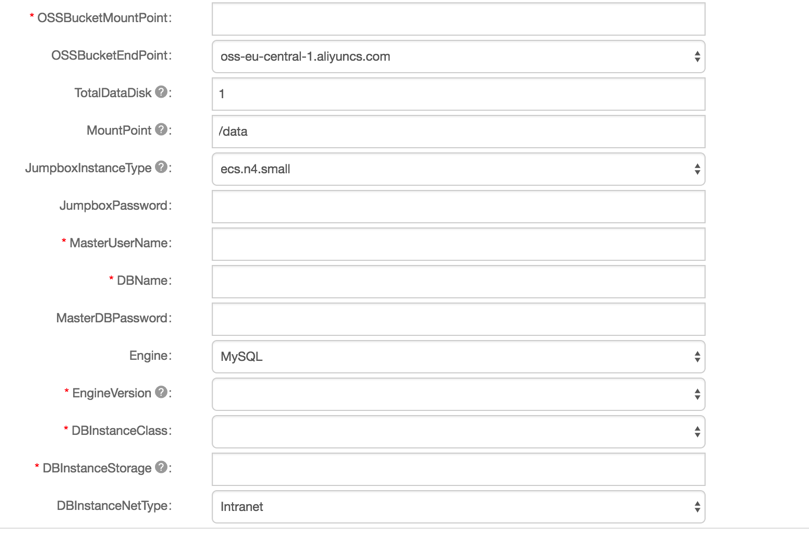
It takes the following input parameters to make the resource stack generic enough to be deployable for any user in any region.
According to the template, the system installs httpd, mysql-client, PHP, OSSFS, phpMyAdmin, and WordPress on the JumpBox and also configures them in the UserData section of the ALIYUN::ECS::Instance resource.
The following is a snippet of the UserData section of the JumpBox.
 "ossbucketendpoint=",
   {
   "Ref": "OSSBucketEndPoint"
   },
   "\n",
   "DatabaseUser=",
   {
   "Ref": "MasterUserName"
   },
   "\n",
   "DatabasePwd=",
   {
   "Ref": "MasterDBPassword"
   },
   "\n",
   "DatabaseName=",
   {
   "Ref": "DBName"
   },
   "\n",
   "DatabaseHost=",
   {
   "Fn::GetAtt": ["Database", "InnerConnectionString"]
   },
   "\n",
   "yum install -y curl httpd mysql-server php php-common php-mysql\n",
   "yum install -y php-gd php-imap php-ldap php-odbc php-pear php-xml php-xmlrpc\n",
   "yum install -y phpmyadmin\n",
   "sed -i \"s%localhost%$DatabaseHost%\" /etc/phpMyAdmin/config.inc.php\n",
   "sed -i \"s%Deny,Allow%Allow,Deny%\" /etc/httpd/conf.d/phpMyAdmin.conf\n",
   "sed -i \"s%Deny from All%Allow from All%\" /etc/httpd/conf.d/phpMyAdmin.conf\n",
   "sed -i \"/<RequireAny>/a Require all Granted\" /etc/httpd/conf.d/phpMyAdmin.conf\n",
   "chkconfig httpd on\n",
   "service httpd stop\n",
   "wget
   https://github.com/aliyun/ossfs/releases/download/v1.80.3/ossfs_1.80.3_centos6.5_x86_64.rpm\n",
   "yum install -y ossfs_1.80.3_centos6.5_x86_64.rpm\n",
   "echo $ossbucket:$ossbucketaccesskey:$ossbucketsecret >> /etc/passwd-ossfs\n",
   "chmod 600 /etc/passwd-ossfs\n",
   "mkdir $ossbucketmountpoint\n",
   "chmod -R 755 $ossbucketmountpoint\n",
   "echo #This script will automount the ossbucket\n",
   "echo umount $ossbucketmountpoint >> /usr/local/bin/ossfs-automount.sh\n",
   "echo #Mounting OSS Bucket\n",
              "echo ossfs $ossbucket $ossbucketmountpoint -ourl=http://$ossbucketendpoint -o allow_other -o mp_umask=0022 -ouid=48 -ogid=48 >> /usr/local/bin/ossfs-automount.sh\n",
"chmod 755 /usr/local/bin/ossfs-automount.sh\n",
"echo /usr/local/bin/ossfs-automount.sh >> /etc/rc.d/rc.local\n",
"chmod +x /etc/rc.d/rc.local\n",
"/usr/local/bin/./ossfs-automount.sh\n",
"wget http://WordPress.org/latest.tar.gz\n",
"tar -xzvf latest.tar.gz\n",
"sed -i \"s%database_name_here%$DatabaseName%\" WordPress/wp-config-sample.php\n",
"sed -i \"s%username_here%$DatabaseUser%\" WordPress/wp-config-sample.php\n",
"sed -i \"s%password_here%${DatabasePwd:-$DatabasePwdDef}%\" WordPress/wp-config-sample.php\n",
"sed -i \"s%localhost%$DatabaseHost%\" WordPress/wp-config-sample.php\n",
"mv WordPress/wp-config-sample.php WordPress/wp-config.php\n",
"cp -a WordPress/* $ossbucketmountpoint\n",
"chmod -R 755 /wwwroot/*\n",
"rm -rf WordPress*\n",
"service httpd start\n",
"done\n"
The UserData section deploys WordPress on the OSS bucket which can be mounted to the web servers created using Auto Scaling. This guarantees that the web servers have the updated content from the document root.
The web servers are started through Auto Scaling. The installation and configuration of httpd, PHP, and ossutil, mounting of DocumentRoo, and starting of services are done in the UserData section of the Auto Scaling configuration.
The following is a snippet of the UserData section of the web server Auto Scaling configuration.
 "DatabaseHost=",
              {
                "Fn::GetAtt": ["Database", "InnerConnectionString"]
              },
              "\n",
              "yum install -y curl httpd mysql-server php php-common php-mysql\n",
              "yum install -y php-gd php-imap php-ldap php-odbc php-pear php-xml php-xmlrpc\n",
              "chkconfig httpd on\n",
              "service httpd stop\n",
              "DocumentRoot='/var/www/html'\n",
              "sed -i \"s%$DocumentRoot%$ossbucketmountpoint%\" /etc/httpd/conf/httpd.conf\n",
              "Directory='/var/www'\n",
              "sed -i \"s%$Directory%$ossbucketmountpoint%\" /etc/httpd/conf/httpd.conf\n",
"wget https://github.com/aliyun/ossfs/releases/download/v1.80.3/ossfs_1.80.3_centos6.5_x86_64.rpm\n",
              "yum install -y ossfs_1.80.3_centos6.5_x86_64.rpm\n",
              "echo $ossbucket:$ossbucketaccesskey:$ossbucketsecret >> /etc/passwd-ossfs\n",
              "chmod 600 /etc/passwd-ossfs\n",
              "mkdir $ossbucketmountpoint\n",
              "chmod -R 755 $ossbucketmountpoint\n",
              "echo #This script will automount the ossbucket\n",
              "echo umount $ossbucketmountpoint >> /usr/local/bin/ossfs-automount.sh\n",
              "echo #Mounting OSS Bucket\n",
              "echo ossfs $ossbucket $ossbucketmountpoint -ourl=http://$ossbucketendpoint -o allow_other -o mp_umask=0022 -ouid=48 -ogid=48 >> /usr/local/bin/ossfs-automount.sh\n",
              "chmod 755 /usr/local/bin/ossfs-automount.sh\n",
              "echo /usr/local/bin/ossfs-automount.sh >> /etc/rc.d/rc.local\n",
              "chmod +x /etc/rc.d/rc.local\n",
              "/usr/local/bin/./ossfs-automount.sh\n",
              "chmod -R 755 /wwwroot/*\n",
              "service httpd start\n",
              "done\n"
            ]
This is a good solution for users who are looking for an end-to-end environment, and for solution architects to support their customers in POC.