


Key Takeaways
- This tutorial demonstrates how to integrate Vue.js with a WordPress plugin to provide a modern UI experience. Vue.js is a popular progressive JavaScript library for building user interfaces similar to Angular and React. The tutorial walks through building a simple WordPress plugin with a Vue interface that interacts with the WordPress REST API through the JavaScript Fetch API.
- The process involves creating a WordPress plugin that registers a shortcode, integrating Vue.js with the WordPress plugin, and creating a Vue app inside a separate JavaScript file. The Vue app fetches the latest published posts via the /wp-json/wp/v2/posts?filter[orderby]=date WP-API endpoint and displays them in the widget. The tutorial assumes some familiarity with Vue.js and includes creating a Vue instance and using life-cycle hooks like mounted().
- The tutorial also shows how to add more features to the widget, such as real-time data fetching, so the user doesn’t need to reload the page to retrieve the latest published posts. This is achieved by continuously polling the WP-API endpoint using the JavaScript setInterval() method. The tutorial concludes with the creation of a WordPress plugin that uses the Vue.js library to display a Vue component in posts and pages that fetches and displays the latest posts every five seconds.
In this tutorial, we’ll learn how to integrate Vue.js with a WordPress plugin to provide a modern UI experience to our WordPress users.
Vue.js is a very popular progressive JavaScript library for building modern and rich user interfaces similar to Angular and React in terms of popularity, performance and component-based architecture. We’ll dive into the entire process of building a very simple WordPress plugin with a Vue interface that interacts with the WordPress REST API through the JavaScript Fetch API.
We’ll create a shortcode that will allow us to add a latest published posts widget in our WordPress website. The UI of the widget is a Vue app which fetches the latest published posts via the /wp-json/wp/v2/posts?filter[orderby]=date WP-API endpoint.
This tutorial assumes some familiarity with Vue.js. We’ll see how to create a Vue instance, use life-cycle hooks like mounted(), and also the JavaScript Fetch API to interact with the WordPress REST API.
Creating a WordPress Plugin
In this section, we’ll see how to create a WordPress plugin that registers a shortcode in a few steps.
Create a Folder in wp-content/plugins
Let’s start by creating the back-end part of our plugin. Plugins live inside the wp-content/plugins folder. Navigate to this folder inside your WordPress installation folder and create a sub-folder for your plugin. Let’s call it vueplugin:
cd /var/www/html/wp-content/plugins
mkdir vueplugin
Inside your plugin folder, create a vueplugin.php file and add the initial content:
<?php
/*
Plugin Name: Latest Posts
Description: Latest posts shortcode
Version: 1.0
*/
These comments are used as meta information for the plugin. In our case, we simply provide a plugin name, description and version.
If you visit the plugins page in the admin interface you should be able to see your plugin listed:

Creating a Shortcode
Shortcodes are used via WordPress plugins to enable users to add content to posts and pages. To register a shortcode you need to add the following minimal code in your plugin file:
function handle_shortcode() {
    return 'My Latest Posts Widget';
}
add_shortcode('latestPosts', 'handle_shortcode');
We’re registering a shortcode named latestPosts.
WordPress provides the built-in add_shortcode() function to create the shortcode in your WordPress plugin. The function takes a name as the first parameter and the handler function that processes your shortcode logic and returns an output as a second parameter.
At this point, we’re only returning a static string from our shortcode, but shortcodes are more useful when used to insert dynamic content.
Now, let’s activate the plugin from the admin interface by clicking on the Activate link below the plugin name:

You can use a shortcode by enclosing it in square brackets — that is, [SHORTCODE_NAME]. The text inside the brackets is the name we passed as the first parameter to the add_shortcode() function. It gets replaced by the output returned by the PHP function passed as the second parameter.
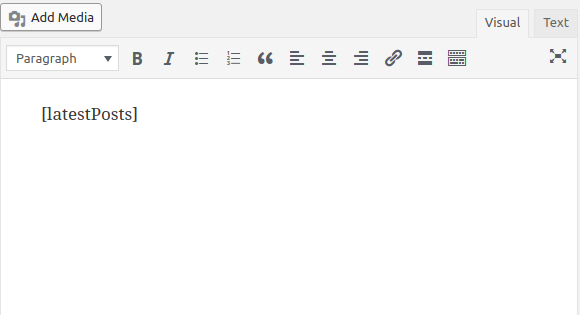
To test if our shortcode is successfully registered, we can create a new post and add [latestPosts] in the post content:
You should see My Latest Posts Widget sentence rendered:

Now, instead of displaying the static My Latest Posts Widget string, let’s display the latest posts using Vue.js.
Integrating Vue.js with a WordPress Plugin
The Vue docs lists different methods of using Vue.js. The easiest one is using a <script> tag to include the library script, which is also the most straightforward way to integrate Vue.js with WordPress.
You can integrate a Vue app with WordPress in a few easy steps:
- First, you need to add a DOM element in WordPress (e.g. via a shortcode) where you can mount the Vue app.
- Next, you need to enqueue the Vue library script.
- Finally, you need to create a Vue app inside a separate JavaScript file and enqueue it.
Unlike the traditional approach of using WordPress, using Vue.js will allow you to add better interactivity and user experience. Instead of needing to constantly reload the current page, users can interact with the page and have the interface dynamically updated. Apps created with Vue.js are called SPAs, or single page applications. But in our case, instead of creating a complete SPA, we’ll only use Vue.js to create a simple widget that can be used to render information in a small part of your page (such as in the sidebar). Think of a widget created with Vue.js as a sort of a small SPA.
Let’s start by enqueueing the Vue library in WordPress. We need to add another function to our plugin which handles the enqueueing of the Vue library:
function enqueue_scripts(){
   global $post;
   if(has_shortcode($post->post_content, "latestPosts")){
                wp_enqueue_script('vue', 'https://cdn.jsdelivr.net/npm/vue@2.5.17/dist/vue.js', [], '2.5.17');
   }
}
We first check if we’re displaying a post that includes our latestPosts shortcode, then we enqueue the Vue script using the wp_enqueue_script() function.
You can check if the script is included by visiting your post source code:
![]()
Next, go back to the handle_shortcode() function and change it to include a <div> where we can render a Vue app:
<div id="mount"></div>
Next, create a latestposts.js file inside your plugin folder and add the following code to create a Vue instance:
( function() {
  var vm = new Vue({
    el: document.querySelector('#mount'),
    mounted: function(){
      console.log("Hello Vue!");
    }
  });
})();
We create a new Vue instance with the Vue() function, which is the first step to start the Vue application.
When creating the Vue instance, you also need to provide an options object, which allows you to provide different options for building your Vue app.
In our example, we use the el property to provide the Vue instance an existing DOM element to mount on. This can be either a CSS selector or an actual HTMLElement. In our case, we use document.querySelector('#mount') to get the HTML element of the <div> with the #mount ID.
We also use the mounted property to provide a function that will be called after the instance has been mounted. At this point, we only log a Hello Vue! string on the console.
You can also browse the full list of the available options in the API reference.
Next, just like the Vue library, you need to enqueue this file. Inside the enqueue_scripts() function add the following code:
wp_enqueue_script('latest-posts', plugin_dir_url( __FILE__ ) . 'latest-posts.js', [], '1.0', true);
The plugin_dir_url() built-in function is used to get the absolute URL of a file. __FILE__ is a constant that gives you the file-system path to the current PHP file. This will allow us to get the absolute path of the latest-posts.js file without using any hardcoded URLs that could be changed on a different system.
At this point you should see the Hello Vue! string on the browser’s console:
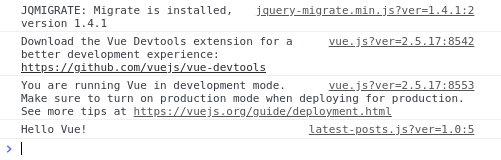
And you should also see the latest-posts.js script included in the source code of a post that contains the shortcode.

Next let’s change the plugin to render the previous My Latest Posts Widget string, but this time from Vue. In your Vue instance, include the template property with whatever HTML code you want to render:
 var vm = new Vue({
   el: document.querySelector('#mount'),
   template: "<h1>My Latest Posts Widget</h1>",
   mounted: function(){
   console.log("Hello Vue!");
 }
});
Now, let’s fetch and render the latest posts using the fetch API.
In the Vue instance, add a data property with a posts array which will hold the fetched posts:
 var vm = new Vue({
   el: document.querySelector('#mount'),
   data: {
    posts: []
   },
Next, let’s include the code to fetch the latest posts in the mounted life-cycle event that gets fired when the component is mounted on the DOM:
 var url = '/wp-json/wp/v2/posts?filter[orderby]=date';
 fetch(url).then((response)=>{
    return response.json()
  }).then((data)=>{
    this.posts = data;
  })
We call the JavaScript fetch() method which returns a Promise. After successfully resolving the Promise, we assign the data to the posts array.
Finally, add the template property:
template: `<div><h1>My Latest Posts</h1>
  <div>
    <p v-for="post in posts">
      <a v-bind:href="post.link">{{post.title.rendered}}</span></a>
    </p>
  </div>
</div>`,
We use the Vue v-for directive to loop through the posts and display the title.rendered and the link properties of each post.
This is a screenshot of the result for me.
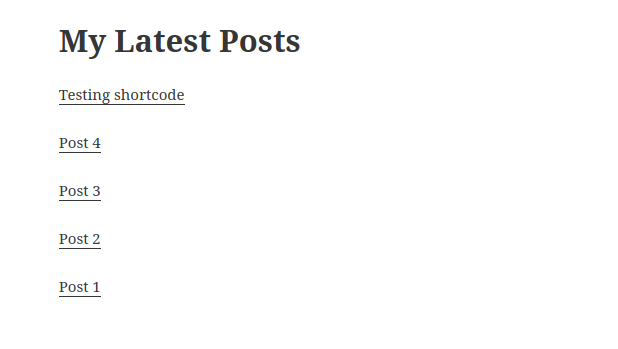
In your case, it may look different depending on your active theme and the posts you have in your WordPress website.
If you click on the post title you should be taken to the post page.
We can add more features to our widget, such as real-time data fetching, so the user doesn’t need to reload the page to retrieve the latest published posts. We can achieve this by continuously polling the WP-API endpoint using the JavaScript setInterval() method.
First, move the code that fetches the posts in its own method:
 var vm = new Vue({
  /*...*/

 methods:{

  fetchPosts: function(){
    var url = '/wp-json/wp/v2/posts?filter[orderby]=date';
    fetch(url).then((response)=>{
      return response.json()
      }).then((data)=>{
        this.posts = data;
        console.log(this.posts);
      });
  }
 },
We use the methods property of the Vue instance to add custom methods in our Vue instance. You can then access these methods directly on the instance via this.
Next, in the mounted() function, add the following code to fetch posts every five seconds:
 var vm = new Vue({
  /*...*/
 mounted: function() {
   console.log("Component is mounted");

   this.fetchPosts();
   setInterval(function () {
    this.fetchPosts();
   }.bind(this), 5000);
 }
You can test this by opening the WordPress admin interface in another browser’s tab and adding a new post. You should see your Vue widget updated with a new post without manually refreshing the page.
Conclusion
In this tutorial, we’ve seen how to create a WordPress plugin that makes use of the Vue.js library. We’ve created a shortcode that can be used to display a Vue component in your posts and pages that fetches and displays the latest posts every five seconds. This was achieved via polling the WordPress REST API using the setInterval() method.
If you’re up for experimenting, you can also use WordPress boilerplates to quickly create plugins.
Frequently Asked Questions (FAQs) on Building a WordPress Plugin with Vue
What are the prerequisites for building a WordPress plugin with Vue?
Before you start building a WordPress plugin with Vue, you need to have a basic understanding of WordPress and Vue.js. WordPress is a content management system (CMS) that allows you to create and manage websites, while Vue.js is a JavaScript framework used for building user interfaces. You should also have a local development environment set up with WordPress installed. Additionally, knowledge of PHP, HTML, CSS, and JavaScript is essential as these languages are used in the development process.
How do I integrate Vue.js into my WordPress plugin?
Integrating Vue.js into your WordPress plugin involves a few steps. First, you need to enqueue Vue.js in your plugin file. This can be done using the wp_enqueue_script function in WordPress. Next, you need to create a new Vue instance and attach it to an element in your plugin’s HTML. You can then use Vue’s syntax in this element and its children.
How can I use Vue components in my WordPress plugin?
Vue components can be used in your WordPress plugin by first registering them in your Vue instance. Once registered, you can use them in your plugin’s HTML just like regular HTML elements. Remember to enqueue the script file containing your component using the wp_enqueue_script function.
How do I handle data in my Vue-powered WordPress plugin?
Data in a Vue-powered WordPress plugin can be handled using Vue’s data option. This option allows you to declare reactive data properties that Vue will track for changes. You can then use these properties in your plugin’s HTML using Vue’s mustache syntax or the v-bind directive.
How do I make AJAX requests in my Vue-powered WordPress plugin?
AJAX requests in a Vue-powered WordPress plugin can be made using the axios library. This library allows you to make HTTP requests from your plugin to the server. You can install axios via npm and enqueue it in your plugin file. Then, you can use axios in your Vue instance or components to make the requests.
How do I handle events in my Vue-powered WordPress plugin?
Events in a Vue-powered WordPress plugin can be handled using Vue’s v-on directive. This directive allows you to listen for DOM events and run some JavaScript when they are triggered. You can use it in your plugin’s HTML to attach event listeners to elements.
How do I use Vue directives in my WordPress plugin?
Vue directives can be used in your WordPress plugin to apply special reactive behavior to the DOM. Some common directives include v-if for conditional rendering, v-for for rendering lists, and v-model for two-way data binding. These directives can be used in your plugin’s HTML.
How do I debug my Vue-powered WordPress plugin?
Debugging your Vue-powered WordPress plugin can be done using Vue Devtools. This is a browser extension that allows you to inspect your Vue components and their data. You can also use console.log statements in your JavaScript code to log values to the browser console.
How do I build and deploy my Vue-powered WordPress plugin?
Building and deploying your Vue-powered WordPress plugin involves a few steps. First, you need to build your Vue app using a tool like webpack or Vue CLI. This will compile your Vue code into a single JavaScript file that can be included in your plugin. Then, you can upload your plugin to the WordPress plugin directory or distribute it as a zip file.
How do I keep my Vue-powered WordPress plugin secure?
Keeping your Vue-powered WordPress plugin secure involves following best practices for WordPress and Vue.js development. This includes sanitizing and validating user input, using nonces to protect against CSRF attacks, and keeping your dependencies up to date. You should also follow WordPress’s plugin security guidelines.