
The old adage is true: time is money. Using inefficient design techniques makes for slow work, which in turn results in fewer clients, a lower hourly rate, and a portfolio with fewer impressive projects. Knowing time-saving tricks can have a subtle but enormously positive effect on your work and your career.
There are always multiple ways to accomplish the same goal in Photoshop; many of them can be achieved by using blend mode tricks. There are very few projects that couldn’t benefit from a few minutes of blend mode brilliance; what you achieve in ten ordinary Photoshop actions can often be done in just two or three steps using filters and blend modes. Here are some popular tricks for using blend mode tricks to save you time and garner great results.
Sharpen Your Image
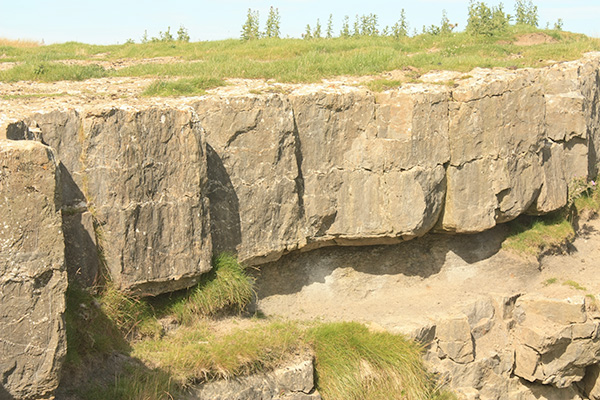
You aren’t stuck with the sharpening filter as your only sharpening tool. You can use the following quick trick to have a little more control over sharpening your images. You can download the sample image below here.
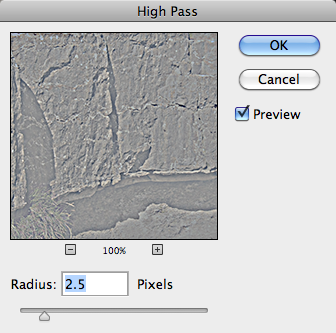
Hit Command/Ctrl + “J” to duplicate the layer. Then, go to “Filter” > “Other” > “High Pass.” This filter is good for detecting edges, which will help us sharpen our image, giving crisper contrast across the whole canvas. The amount of sharpening applied depends on several factors: the resolution of your image, and how defined the image is to begin with. I set the radius to around 2.5 pixels.
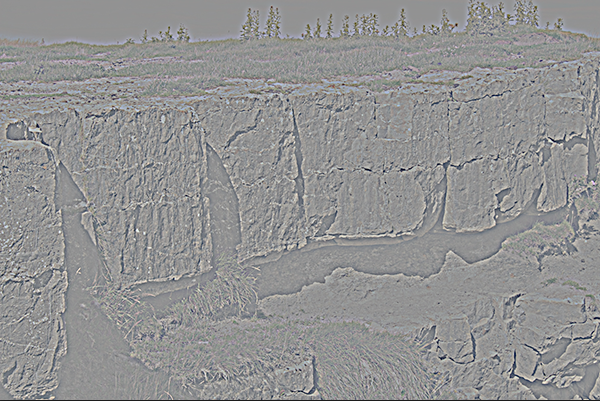
Set the blend mode to “Overlay.” As you can see from the image below, there was a lot of sharpening applied to the image with just a small amount applied to the high pass filter. If this is too much sharpening for you, all is not lost, because you can simply lower the opacity of the duplicate image via the layer’s panel. This gives you a lot more control over exactly how much sharpening is applied to your image.

Change Colors in an Image
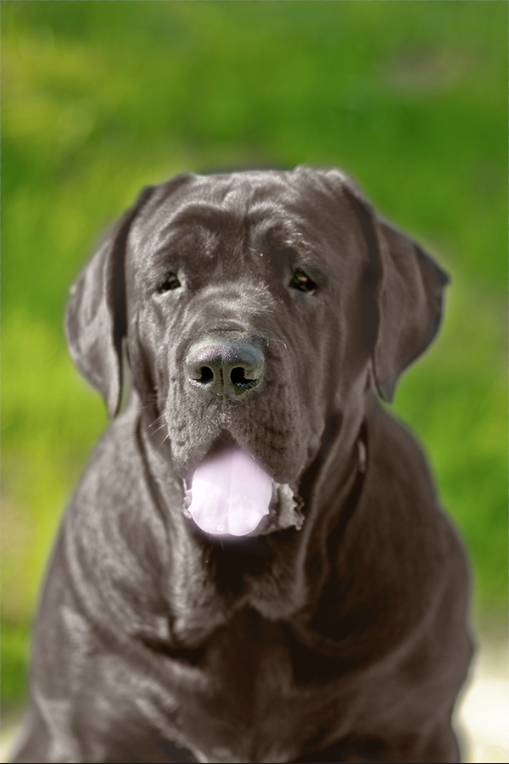
Trying to convincingly change colors in an image can be quite difficult. You try to use Hue/Saturation, Color Balance, and other color manipulation features, but it takes a lot of effort to change one color without affecting the others. There is another way to quickly change colors within your image. Suppose you were looking for images of a chocolate Labrador dog, but you can only find images of a black one. It’s in just the right position, but it just isn’t the right color. Instead of spending 30 minutes looking for another image, use the following trick. You can download the sample image here.

You can apply this next trick non-destructively. Click the “New Adjustment Layer” icon in the Layers Panel and choose a Hue/Saturation adjustment layer. Click and drag the saturation slider all the way to the left to desaturate the image. Click the layer mask icon and use black to mask out the background so that the foliage and greenery behind the dog is visible once again.
Next, create a new blank layer above the Hue/Saturation adjustment layer. Select a medium-sized soft edge brush, roughly 50 pixels. Click the color picker icon to choose the foreground color within the Tools Panel. Select a medium brown (#52453c). Brush over the black areas of the dog on this new blank layer. Make sure not to paint over any areas that shouldn’t be brown, such as the dog’s eyes, the tongue, or the background.
Change the blend mode to “Color.” This will colorize the dog without permanently altering the image. Since the dog’s fur is quite dark, it is tough to see a change. However, if you want to lighten the tone of the dog, simply duplicate the painted layer and this time change the blend mode to “Screen.” You can see the results are much lighter in the final image below.

Final Image:
Create a Coloring Effect Using the “Difference” Blend Mode
There are several blend modes that disregard or ignore 50% grey completely, so using these particular blend modes can yield some unique results. The sample image below is a photo of a city, which you can download here.

Create a new layer and fill it with 50% grey. You can do this by holding Shift and hitting Delete, prompting the fill dialog box to come up. Click on the 50% grey option, and click OK. Next, go to “Filter” > “Noise” > “Add Noise.” Set the slider to 12.5% and choose Gaussian.

Next, go to “Filter” > “Blur” > “Motion Blur,” set the angle to 65°, and set the distance to around 10 pixels.

All you have to do now it set the blend mode to “Difference.” The effect that you get resembles a pen and ink sketch-color effect. it looks like someone inked in the details, and loosely hatched in the coloring with colored pencils. It’s a very fast way to make elements for graphic novels or similar art.

Use Blend Modes Within Layer Styles
You can create some amazing effects by using blend mode tricks within layer styles. The right combinations can produce unequaled results. To make a quick neon text effect, create a new layer and fill it with black. Select the typeface of your choice. I find that a rounded typeface really works well with the neon effect. I like a newer font that has become pretty popular recently, called Lovelo; I am using Lovelo Line Bold. Center the text and make it white.

Next, double-click the text layer to bring up the Layer Styles Panel. Choose “Inner Glow” and select a softer pink (#ff00f0). Set the source to “edge” and the size to around 4-5px. You don’t want to set it too high, because you want the white to show through as the light source. Set the blend mode to “Hard Light.”


Next, select Outer Glow. Choose an intense red (#ff0000), set the size to around 10px, and set the blend mode to “screen.” Now, you have created a neon glow text effect in just a few minutes. Combining the right font with the right colors, layer styles, and blend modes created a nice effect that hardly took any time at all.


Conclusion
Being able to edit your images quickly and create beautiful effects will make your design work much easier and make you a more successful designer. Knowing the power of blend modes and how they react to different colors, black and white, and shades of grey will enable you to leverage their behavior to save you a great deal of time and frustration.
Do you have any blend mode tricks to share? Are you a blend mode expert or do you need to visit Blend Modes 101?
Frequently Asked Questions on Photoshop Blend Mode Tricks
What are the different blend modes in Photoshop and how do they work?
Blend modes in Photoshop are algorithms that determine how two layers interact with each other. They are grouped into five categories: Normal, Darken, Lighten, Contrast, and Inversion. Each blend mode has a unique effect. For example, the Multiply blend mode in the Darken category will darken your image based on the color values of the lower layer, while the Screen blend mode in the Lighten category will lighten your image.
How can I use blend modes to improve my design?
Blend modes can be used to create a variety of effects in your design. For instance, you can use them to add texture, create shadows, enhance colors, or even to blend images together. By understanding how each blend mode works, you can experiment with different combinations to achieve the desired effect.
Can I use blend modes to remove a white or black background from an image?
Yes, you can use blend modes to remove a white or black background from an image. The Multiply blend mode can be used to remove white backgrounds, while the Screen blend mode can be used to remove black backgrounds.
How can I use blend modes to create a vintage effect?
To create a vintage effect, you can use the Overlay or Soft Light blend modes. These modes will blend your image with a texture layer, giving it a worn-out or aged look. You can adjust the opacity of the texture layer to control the intensity of the effect.
What is the difference between the Overlay and Soft Light blend modes?
Both Overlay and Soft Light blend modes are part of the Contrast group, which means they both darken and lighten an image. However, Overlay has a stronger effect compared to Soft Light. Overlay tends to increase contrast, while Soft Light produces a more subtle effect.
How can I use blend modes to create a double exposure effect?
To create a double exposure effect, you can use the Screen blend mode. This mode will blend two images together, creating a ghostly or dreamy effect. You can adjust the opacity of the top layer to control the intensity of the effect.
Can I use blend modes to change the color of an image?
Yes, you can use blend modes to change the color of an image. The Color blend mode will change the color of your image based on the color of the blend layer, while preserving the brightness of the original image.
How can I use blend modes to add texture to an image?
To add texture to an image, you can use the Overlay or Soft Light blend modes. These modes will blend your image with a texture layer, giving it a textured look. You can adjust the opacity of the texture layer to control the intensity of the effect.
Can I use blend modes to create a silhouette effect?
Yes, you can use blend modes to create a silhouette effect. The Multiply blend mode can be used to create a dark silhouette, while the Screen blend mode can be used to create a light silhouette.
How can I use blend modes to create a gradient effect?
To create a gradient effect, you can use the Gradient Map adjustment layer with a blend mode. The Soft Light blend mode will blend the gradient colors with your image, creating a smooth transition between colors. You can adjust the opacity of the gradient layer to control the intensity of the effect.