
You’re building an application, and you need to share the database’s structure with your team. After all, you want everyone to be up and running as soon as possible. What do you do? SQL dumps of table structures? You could… but that’s so very primitive – and can be time consuming to import, too! More often than not, database migrations are the answer.
In this tutorial, we’ll go through a framework-agnostic package for building and executing database migrations called Phinx.
Key Takeaways
- Phinx is a framework-agnostic migration tool ideal for managing and sharing database structures in development environments, making it a necessity for efficient team collaboration.
- Installation and setup are straightforward, requiring only Composer for installation and a simple command to initialize the configuration file (`phinx.yml`).
- Supports multiple configurations for different environments (development, testing, production) within a single `phinx.yml` file, enhancing flexibility across various deployment scenarios.
- Migration creation is simplified with Phinx’s commands, allowing for structured table creation and modifications, which are easily reversible, enhancing database version control.
- Phinx’s adaptability with different databases and its ability to handle complex migrations make it a robust choice for developers looking to maintain and scale their database architectures efficiently.
Bootstrapping
First, let’s install Phinx into the project with Composer:
composer require robmorgan/phinx --dev
The Phinx binary will be installed into the vendor/bin folder, as per Composer’s default values. It can then be executed by running:
php vendor/bin/phinx
Phinx needs a phinx.yml file from which to read the database configuration before it can do anything meaningful. To generate it, we run:
php vendor/bin/phinx init
Configurations
The generated file will look something like this:
paths:
    migrations: %%PHINX_CONFIG_DIR%%/db/migrations
    seeds: %%PHINX_CONFIG_DIR%%/db/seeds

environments:
    default_migration_table: phinxlog
    default_database: development
    production:
        adapter: mysql
        host: localhost
        name: production_db
        user: root
        pass: ''
        port: 3306
        charset: utf8

    development:
        adapter: mysql
        host: localhost
        name: development_db
        user: root
        pass: ''
        port: 3306
        charset: utf8

    testing:
        adapter: mysql
        host: localhost
        name: testing_db
        user: root
        pass: ''
        port: 3306
        charset: utf8
Phinx supports an arbitrary number of “databases”, though these should be considered versions of one database rather than several different ones. Sometimes, the need may arise to use a completely different database, however.
Such is the case, for example, with nofw, which in a previous version still uses Gatekeeper – a secure but clumsily developed user authorization package. Gatekeeper demands its own phinx.yml file (with a custom migration path) and does not provide an option to change which one is used, while at the same time requiring its own user database. That throws a wrench into the whole “let’s use Phinx in a project already using Gatekeeper” idea.
For cases like these, Phinx offers the -c option which tells the launcher which phinx.yml file to use. Note that Phinx supports json and php file formats, too, but we’ll focus on the default yml one here and create a separate file for our example database.
mv phinx.yml my-phinx.yml
This merely renames the default file and makes room for “special” packages like Gatekeeper. It would be great if Phinx supported multiple migration paths, but we’ll take what we can get.
Before we create the first migration, we need to fill out the credentials in my-phinx.yml. On Homestead Improved, the following would be quite enough:
paths:
    migrations: db/migrations

environments:
    default_migration_table: phinxlog
    default_database: development
    production:
        adapter: mysql
        host: localhost
        name: production_db
        user: username
        pass: 'password'
        port: 3306
        charset: utf8

    development:
        adapter: mysql
        host: localhost
        name: homestead
        user: homestead
        pass: 'secret'
        port: 3306
        charset: utf8
The First Migration
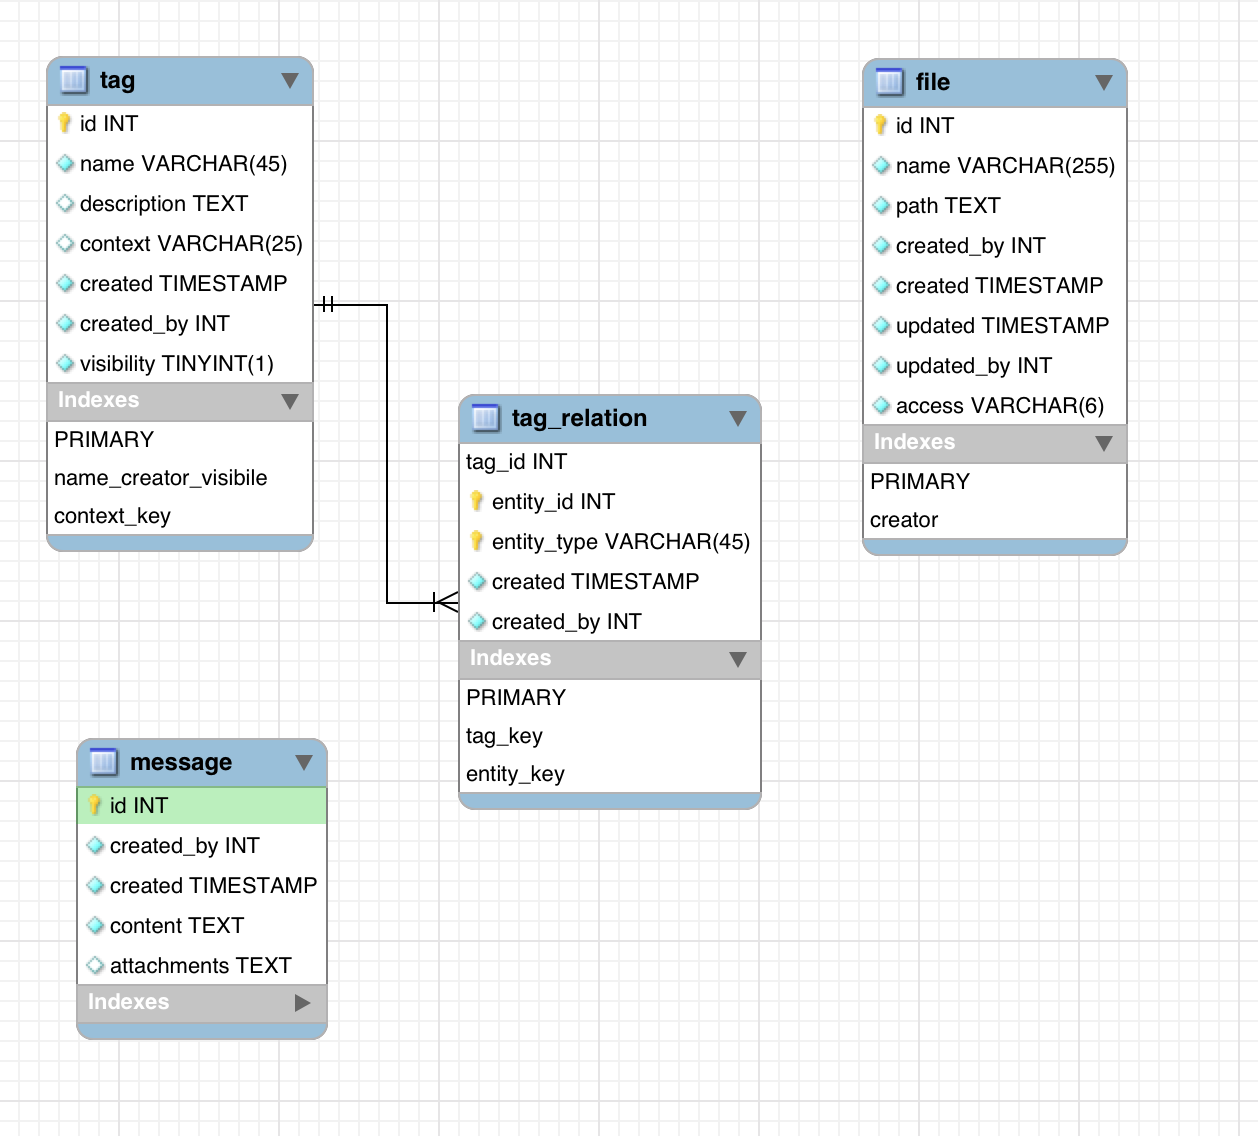
Let’s imagine we have an application which needs the following functionality built in:
- a way to send messages, app-wide, so that all users can see them
- a way to upload files into the system, and a way to attach those onto the aforementioned messages
- a way to define tags and tag the uploaded files (among other entities that should be easy to add later on), so the files can be sorted and searched.
The model for this might look something like:
Converted to SQL with MySQL Workbench, this would be straightforward to import into the database:
-- MySQL Workbench Forward Engineering
SET @OLD_UNIQUE_CHECKS=@@UNIQUE_CHECKS, UNIQUE_CHECKS=0;
SET @OLD_FOREIGN_KEY_CHECKS=@@FOREIGN_KEY_CHECKS, FOREIGN_KEY_CHECKS=0;
SET @OLD_SQL_MODE=@@SQL_MODE, SQL_MODE='TRADITIONAL,ALLOW_INVALID_DATES';
-- -----------------------------------------------------
-- Schema mydb
-- -----------------------------------------------------
-- -----------------------------------------------------
-- Schema mydb
-- -----------------------------------------------------
CREATE SCHEMA IF NOT EXISTS `mydb` DEFAULT CHARACTER SET utf8 ;
USE `mydb` ;
-- -----------------------------------------------------
-- Table `mydb`.`tag`
-- -----------------------------------------------------
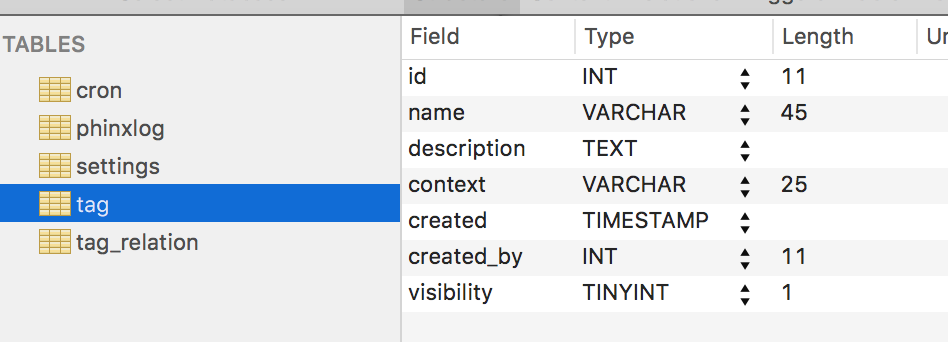
CREATE TABLE IF NOT EXISTS `mydb`.`tag` (
`id` INT UNSIGNED NOT NULL AUTO_INCREMENT,
`name` VARCHAR(45) NOT NULL,
`description` TEXT NULL,
`context` VARCHAR(25) NULL,
`created` TIMESTAMP NOT NULL DEFAULT CURRENT_TIMESTAMP,
`created_by` INT UNSIGNED NOT NULL,
`visibility` TINYINT(1) UNSIGNED NOT NULL DEFAULT 1,
PRIMARY KEY (`id`),
UNIQUE INDEX `name_creator_visibile` (`created_by` ASC, `name` ASC, `visibility` ASC),
INDEX `context_key` (`context` ASC))
ENGINE = InnoDB;
-- -----------------------------------------------------
-- Table `mydb`.`tag_relation`
-- -----------------------------------------------------
CREATE TABLE IF NOT EXISTS `mydb`.`tag_relation` (
`tag_id` INT UNSIGNED NOT NULL,
`entity_id` INT UNSIGNED NOT NULL,
`entity_type` VARCHAR(45) NOT NULL,
`created` TIMESTAMP NOT NULL DEFAULT CURRENT_TIMESTAMP,
`created_by` INT UNSIGNED NOT NULL,
PRIMARY KEY (`tag_id`, `entity_id`, `entity_type`),
INDEX `tag_key` (`tag_id` ASC),
INDEX `entity_key` (`entity_id` ASC, `entity_type` ASC),
CONSTRAINT `tag_id_fk`
FOREIGN KEY (`tag_id`)
REFERENCES `mydb`.`tag` (`id`)
ON DELETE CASCADE
ON UPDATE NO ACTION)
ENGINE = InnoDB;
-- -----------------------------------------------------
-- Table `mydb`.`file`
-- -----------------------------------------------------
CREATE TABLE IF NOT EXISTS `mydb`.`file` (
`id` INT UNSIGNED NOT NULL AUTO_INCREMENT,
`name` VARCHAR(255) NOT NULL,
`path` TEXT NOT NULL,
`created_by` INT UNSIGNED NOT NULL,
`created` TIMESTAMP NOT NULL DEFAULT CURRENT_TIMESTAMP,
`updated` TIMESTAMP NOT NULL DEFAULT CURRENT_TIMESTAMP,
`updated_by` INT UNSIGNED NOT NULL,
`access` VARCHAR(6) NOT NULL DEFAULT 'public',
PRIMARY KEY (`id`),
INDEX `creator` (`created_by` ASC))
ENGINE = InnoDB;
-- -----------------------------------------------------
-- Table `mydb`.`message`
-- -----------------------------------------------------
CREATE TABLE IF NOT EXISTS `mydb`.`message` (
`id` INT UNSIGNED NOT NULL AUTO_INCREMENT,
`created_by` INT UNSIGNED NOT NULL,
`created` TIMESTAMP NOT NULL DEFAULT CURRENT_TIMESTAMP,
`content` TEXT NOT NULL,
`attachments` TEXT NULL,
PRIMARY KEY (`id`))
ENGINE = InnoDB;
SET SQL_MODE=@OLD_SQL_MODE;
SET FOREIGN_KEY_CHECKS=@OLD_FOREIGN_KEY_CHECKS;
SET UNIQUE_CHECKS=@OLD_UNIQUE_CHECKS;
While this makes the first step extremely simple, it makes subsequent changes near impossible. We’ll talk about why a bit further down. When looking at things in the long term, the healthier approach would be using migrations.
Best Practice
Before proceeding, let’s talk about best practices.
The general consensus is that a migration file should only contain one change per file. When creating the tables, one migration per table. When adding columns subsequently, one set of column changes per file. When adding foreign keys even – one constraint per table.
Likewise, while Phinx does support pure SQL statements in the migration files, so technically the Workbench output can be copied into migrations directly, it’s better to use Phinx’s own syntax to make the underlying database engine replaceable later on.
With that in mind, let’s begin.
Creating Migrations
First, we’ll create the tables.
php vendor/bin/phinx create Tag
php vendor/bin/phinx create File
php vendor/bin/phinx create Message
Note that we only have one tag-related migration, even though the tags feature uses two tables, as evident from the model above. This is because in this initial stage, it is fine to create the tables that cannot function without one another at the same time. Notice also the order of features – to send messages, we need to be able to attach files. To attach files, we need to be able to tag them. Hence, it makes sense to install tags first, files second, and messages third.
After this command executes, Phinx will have created three files in db/migrations, each beginning with the date and time of creation, and ending with the migration name, e.g. 20160508205010_tag.php. The files will extend the AbstractMigration class and contain template code not unlike the following:
< ?php

use Phinx\Migration\AbstractMigration;

class Tag extends AbstractMigration
{
    /**
     * Change Method.
     *
     * Write your reversible migrations using this method.
     *
     * More information on writing migrations is available here:
     * http://docs.phinx.org/en/latest/migrations.html#the-abstractmigration-class
     *
     * The following commands can be used in this method and Phinx will
     * automatically reverse them when rolling back:
     *
     *    createTable
     *    renameTable
     *    addColumn
     *    renameColumn
     *    addIndex
     *    addForeignKey
     *
     * Remember to call "create()" or "update()" and NOT "save()" when working
     * with the Table class.
     */
    public function change()
    {

    }
}
Notice that, while Phinx does support the standard up and down methods you’re used to seeing in other migration tools, it defaults to change which can auto-reverse the migrations, removing the need to write separate down procedures.
Let’s create our Tag migration now by modifying the change() method to look like this:
    public function change()
    {
        $tag = $this->table('tag');
        $tag
            ->addColumn('name', 'string', ['limit' => 45, 'null' => false])
            ->addColumn('description', 'text')
            ->addColumn('context', 'string', ['limit' => 25])
            ->addColumn('created', 'timestamp', ['null' => false, 'default' => 'CURRENT_TIMESTAMP'])
            ->addColumn('created_by', 'integer', ['signed' => false, 'null' => false])
            ->addColumn('visibility', 'boolean', ['null' => false, 'signed' => false, 'default' => 1])
            ;

        $tag->addIndex(['name', 'created_by', 'visibility'], ['unique' => true, 'name' => 'name_creator_visible']);
        $tag->addIndex(['context']);

        $tag->create();

        $tagRelation = $this->table('tag_relation', array('id' => false, 'primary_key' => array('tag_id', 'entity_id', 'entity_type')));
        $tagRelation
            ->addColumn('tag_id', 'integer', ['null' => false])
            ->addColumn('entity_id', 'integer', ['null' => false, 'signed' => false])
            ->addColumn('entity_type', 'string', ['limit' => 45, 'null' => false])
            ->addColumn('created', 'timestamp', ['null' => false, 'default' => 'CURRENT_TIMESTAMP'])
            ->addColumn('created_by', 'integer', ['signed' => false, 'null' => false])
        ;

        $tagRelation->addIndex(['tag_id']);
        $tagRelation->addIndex(['entity_id', 'entity_type'], ['name' => 'entity']);

        $tagRelation->addForeignKey('tag_id', 'tag', 'id', array('delete'=> 'CASCADE', 'update'=> 'NO_ACTION'));

        $tagRelation->create();
    }
Breaking it down, we first define the tag table, then add all the columns as per the documentation, and finally drop some indexes in there for good measure. Notice that there is no id column in the tag table. That’s because Phinx automatically creates an auto-incrementing primary key called id unless told to do otherwise.
The first index of the tag table is called name_creator_visible. The order of the columns in an index matters. The second index is one placed onto the context column, allowing us to search all tags by context – something we expect to use often when selecting tags applicable to a certain entity.
Next, we make the tag_relation table. As mentioned before, Phinx creates an auto-incrementing primary key called id, which is why we need to disable it in the table’s initial definition. In the very same line, we define an alternative primary key consisting of tag_id, entity_id and entity_type. This makes sure that a given entity can only have one copy of a single tag attached to it. Adding columns proceeds as usual, and then it’s time to create indexes again. The tag_id one lets us quickly find all entities with a given tag, and the combination of entity_id and entity_type lets us quickly list all the tags on a given entity.
Finally, we create a simple foreign key, binding the tag_id field to the id field of the tag table, so that the tag_relation rows corresponding to said tag_id get deleted if the tag itself is deleted from the system.
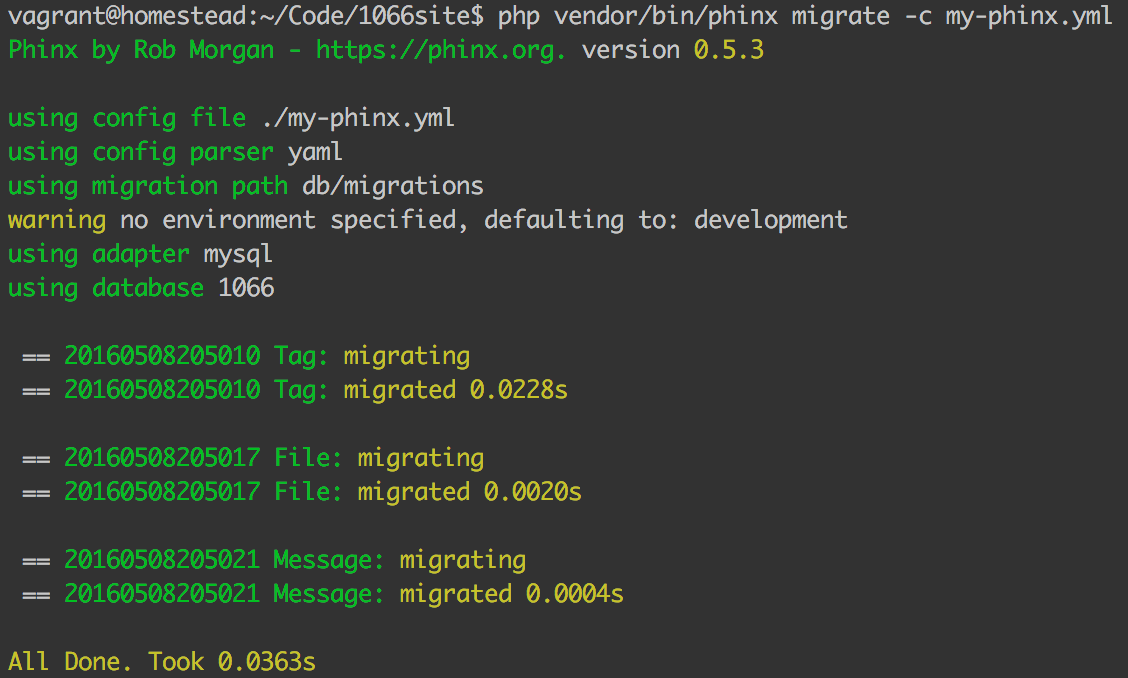
Our initial tag migration is now ready. Let’s test it out. We initiate the migration with:
php vendor/bin/phinx migrate -c my-phinx.yml
Optionally, we can provide a -e X flag where X is the environment we’re targeting. In this case, it isn’t necessary because our my-phinx.yml file notes development as the default database (and thus default environment).
Sure enough, after execution, our tables are there:
Let’s quickly write up the file and message migrations, too.
// File
    public function change()
    {

        $file = $this->table('file');

        $file
            ->addColumn('name', 'string', ['limit' => 255, 'null' => false])
            ->addColumn('path', 'text', ['null' => false])
            ->addColumn('access', 'string', ['limit' => 6, 'null' => false, 'default' => 'public'])
            ->addColumn('created', 'timestamp', ['null' => false, 'default' => 'CURRENT_TIMESTAMP'])
            ->addColumn('created_by', 'integer', ['signed' => false, 'null' => false])
            ->addColumn('updated', 'timestamp', ['null' => false, 'default' => 'CURRENT_TIMESTAMP'])
            ->addColumn('updated_by', 'integer', ['signed' => false, 'null' => false])
        ;

        $file->addIndex(['created_by'], ['name' => 'creator']);
        $file->addIndex(['access'], ['name' => 'accessibility']);

        $file->create();

    }
// Message
    public function change()
    {

        $message = $this->table('message');

        $message
            ->addColumn('content', 'text', ['null' => false])
            ->addColumn('attachments', 'text')
            ->addColumn('created', 'timestamp', ['null' => false, 'default' => 'CURRENT_TIMESTAMP'])
            ->addColumn('created_by', 'integer', ['signed' => false, 'null' => false])

        ;

        $message->addIndex(['created_by'], ['name' => 'creator']);

        $message->create();

    }
Troubleshooting
If we run the migrate command now, however, we’ll notice nothing happens. No new databases appear. What gives?
When Phinx executed the tag migration, it made an entry in the phinxlog table in the database, noting which migration was last executed. Since the migration files for Message and File already existed at that point (but were empty), they were marked as migrated, and are thus ignored in this run, because this run is “officially” already done. First, we have to rollback. A rollback undoes the last migration.
php vendor/bin/phinx rollback -c my-phinx.yml
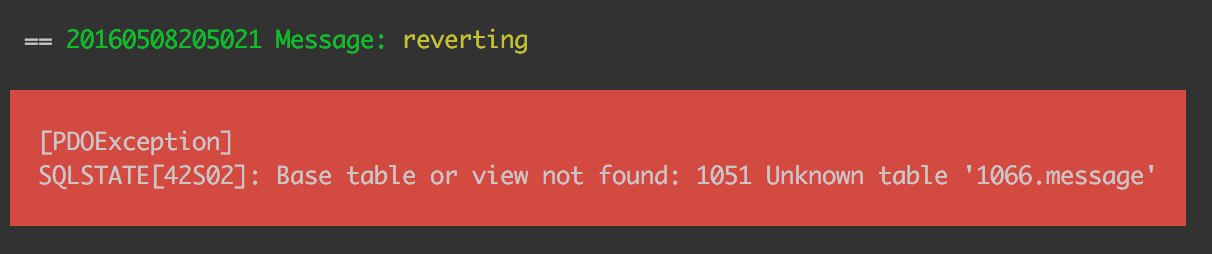
Uh oh! What now?
Well, the File and Message migration files were empty when the migration first ran. Phinx reads the change method of a migration to figure out the undo process (e.g. it turns create table into drop table), and since it now finds mention of the tables in the files where previously there was none, it is confused – there is no such table!
There are several ways around this problem:
- Be careful when writing migrations. Either write them all at once and then migrate, or create and write one by one and migrate after each one has been completed.
- Comment the content of the two new
changemethods, save, run rollback, then uncomment. - Manually remove the
phinxlog,tag, andtag_relationtables since it’s the first time we’re setting things up and we can’t do any damage. - Use
upanddownmethods instead ofchange– this would then use thedownmethod on rollback which could either be empty, or contain a singledrop tablecommand.
We’ll go with option 2.
First, comment the contents of both change methods. Then, run:
php vendor/bin/phinx rollback -c my-phinx.yml -t XXXXXXXX
… where XXXXXXXX is the number in front of the migration you want to roll back to, if you want to skip several of them. Omitting the number just rolls it back once, to the last known migration, so running it several times without -t also does the trick.
Finally, we can run migrate and have it all imported. First, we uncomment the change methods. Then:
php vendor/bin/phinx migrate -c my-phinx.yml
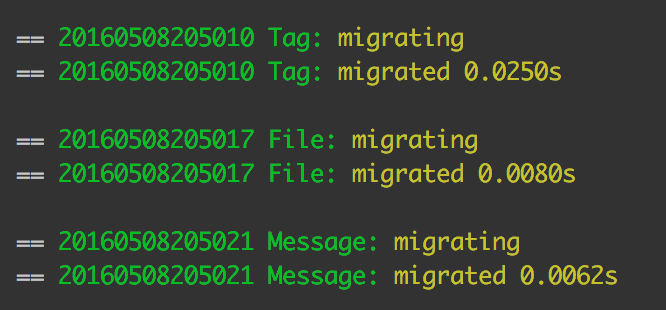
Success! All three tables have been created!
Subsequent Migrations and Versioning
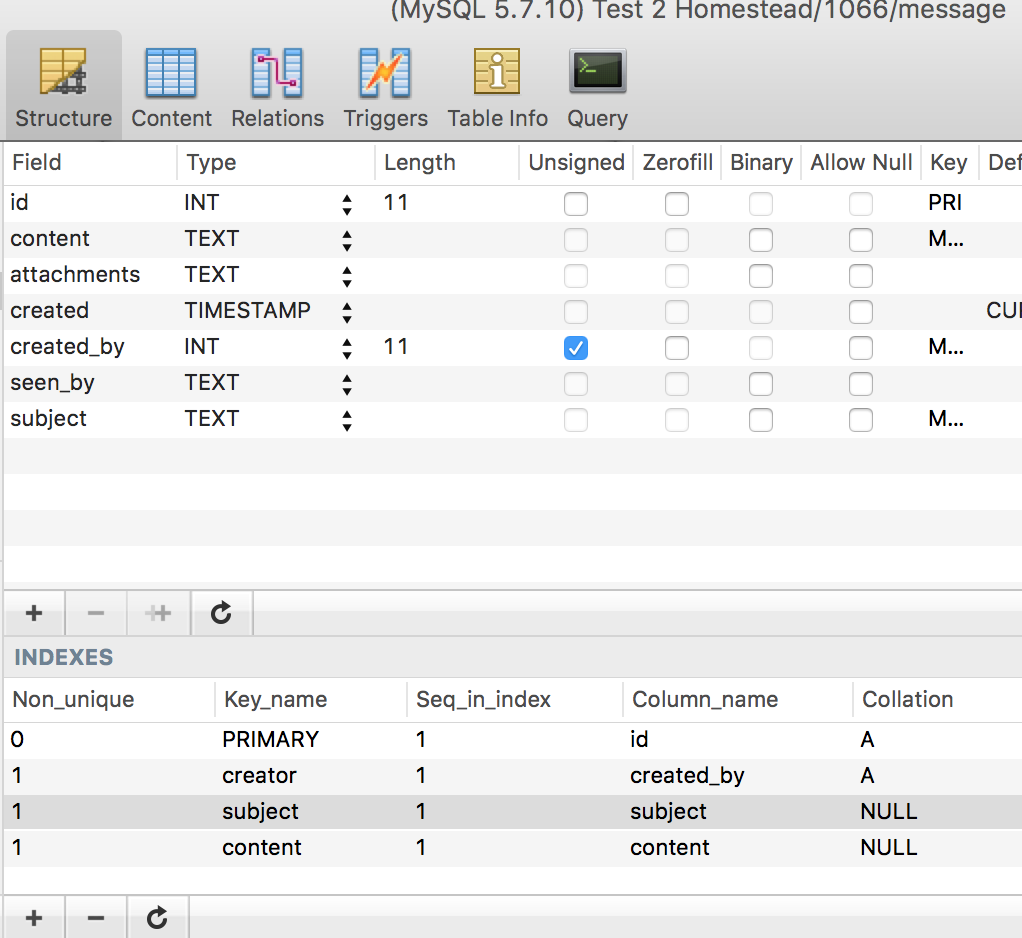
So how do we do changes and subsequent migrations now? Let’s say we want the message table to:
- contain a field that can register all the
user_idvalues of the user accounts who have seen the message. - contain a subject, too, not just a body.
- be fast-searchable on both subject and body (a FULLTEXT index – only with MySQL)
Writing the SQL and committing it in such a raw form still makes things simple for people setting up the app we’re working on from scratch, but when one already has the database, applying changes to table structure is where the real power of migrations begins to shine.
We create a new migration:
php vendor/bin/phinx create MessageSeen -c my-phinx.yml
In the newly created message_seen class, we change the change method to:
    public function change()
    {

        $message = $this->table('message');

        $message->addColumn('seen_by', 'text');
        $message->addColumn('subject', 'text');

        if ($this->getAdapter()->getAdapterType() === 'mysql') {
            $message->addIndex('subject', ['type' => 'fulltext']);
            $message->addIndex('content', ['type' => 'fulltext']);
        }

        $message->update();
    }
Notice how we first added the columns as before, when creating the table, so nothing new there. But then we used a trick to find out if our adapter is of the mysql type, meaning we have support for FullText indexes. After everything has been defined, we execute the update command on the table. If we now run the default migrate command, the changes should be applied.
php vendor/bin/phinx migrate -c my-phinx.yml
Sure enough, the changes are there:
Conclusion
Phinx is a very down-to-earth and easy to use package with functionality similar to that in certain frameworks, but completely independent. It provides us with the power to create, destroy, and modify database tables without writing raw SQL which not only makes it easier to write and version the changes, but also lets us switch out the underlying database adapter later on from, say, MySQL to Postgre!
What’s the most complex migration you’ve ever written? Do you anticipate any hiccups with this approach? Let us know in the comments!
Frequently Asked Questions (FAQs) about Phinx Migration Library
What is the Phinx Migration Library and why is it important?
The Phinx Migration Library is a powerful and flexible tool for managing and manipulating databases. It is particularly useful in the context of web development, where changes to the database structure are common and can be difficult to manage. Phinx allows developers to create, update, and delete database tables in a controlled and versioned manner. This means that changes can be tracked, rolled back if necessary, and easily shared with other members of the development team. This makes the process of database management much more efficient and less prone to errors.
How do I install and configure Phinx?
Phinx can be installed using Composer, a tool for dependency management in PHP. Once installed, you can configure Phinx by creating a phinx.yml file in your project root. This file will contain information about your database, including the adapter to use (such as MySQL, PostgreSQL, or SQLite), the host, name, user, and password of your database, and any other configuration options you wish to set.
How do I create a new migration with Phinx?
To create a new migration with Phinx, you can use the create command followed by the name of the migration. This will create a new file in the migrations directory with a timestamp and the given name. You can then edit this file to define the changes you want to make to the database.
How do I run migrations with Phinx?
Once you have created a migration, you can run it using the migrate command. This will apply all pending migrations in the order they were created. If you want to roll back a migration, you can use the rollback command.
Can I use Phinx with my existing database?
Yes, Phinx can be used with existing databases. You can create a migration that represents the current state of your database, and then create further migrations to modify it. This allows you to start using Phinx without having to recreate your entire database.
What are the benefits of using Phinx over other migration tools?
Phinx offers several advantages over other migration tools. It is database agnostic, meaning it can be used with any type of database. It also provides a simple and intuitive interface, making it easy to create and manage migrations. Additionally, Phinx supports both up and down migrations, allowing you to easily undo changes if necessary.
How do I use Phinx in a team environment?
Phinx is designed to be used in a team environment. Migrations can be shared between team members, ensuring that everyone is working with the same database structure. This can greatly simplify the development process and reduce the risk of errors.
Can I use Phinx with other PHP frameworks?
Yes, Phinx can be used with any PHP framework. It is not tied to any specific framework, making it a flexible choice for any PHP project.
How do I troubleshoot issues with Phinx?
If you encounter issues with Phinx, you can use the status command to check the status of your migrations. This will show you which migrations have been run and which are pending. If you need further assistance, you can refer to the Phinx documentation or seek help from the Phinx community.
How do I keep my Phinx migrations organized?
Keeping your migrations organized is key to maintaining a healthy database. Phinx automatically names migrations with a timestamp, ensuring they are run in the order they were created. You can also group related migrations into a single file, making them easier to manage.