- Prerequisites
- Your First Project
- Running the App on the Pebble Device
- The appinfo.json File
- The “Find Me Starbucks” C Code
- The JavaScript Code
- Run the App
- Debugging Pebble Apps
- Conclusion (sort of)
- Bonus Section: More on the C Code
- Frequently Asked Questions (FAQs) about Pebble Watch Development with JavaScript
The Pebble watch has seen a growing number of techies like myself wearing it excitedly around their wrists in recent months. They’ve just released version two of their API which not only brings a Pebble app store into fruition but also brings a JavaScript framework into the picture. The PebbleKit JavaScript Framework allows you to use JavaScript to dynamically read in data and events from the web onto a Pebble watch app, and vise versa. This brings an exciting new realm of potential to Pebble apps – we can now easily integrate the Pebble watch with any number of cool web APIs. This article will teach you how to add JavaScript to a Pebble app using the PebbleKit JavaScript Framework. We’ll be creating a watchface that displays the address of the nearest Starbucks at all times. To get this data, we’ll be using the Foursquare API to find nearby locations using their venue search. It’ll be simple to change the functionality to search for a different type of location if you’re not a big Starbucks drinker! This article is written from the perspective of a JavaScript developer looking to get started from the very beginning. There will be a bit of C programming involved as the Pebble watch app itself runs on C. If you aren’t comfortable with C, you can use the sample C code and adjust JavaScript to add new functionality and experiment away!
Prerequisites
If you’re looking to follow along with this tutorial, you’ll need the following:- An Android phone or an iPhone with the Pebble app installed and running.
- A Pebble watch.
- API credentials for the Foursquare API.
- A Wi-Fi network to transfer your app to your mobile device and Pebble watch.
- The bravery to combine JavaScript with some C code.
Installing the Pebble SDK
We need to install the Pebble SDK locally. Download and installation instructions vary depending on OS, but Pebble’s documentation covers it quite clearly. Therefore, I won’t go into too much detail here.Your First Project
First, create a folder for all your Pebble apps, and navigate to it in a terminal window:mkdir /Users/patcat/pebble-dev/projects
cd /Users/patcat/pebble-dev/projectspebble new-project --javascript find_me_starbucksfind_me_starbucks). We’re going to be working in that directory, so cd into it. Inside the project directory you’ll notice that Pebble has been kind enough to set a bunch of stuff up for us:
- appinfo.json – This is really similar to a
package.jsonfile for Node developers. - resources – Keep images and such in here if your app needs them.
- src – All your code lives here. This is where we’ll start.
- wscript – This file tells the Pebble SDK how to build your app. This file is best left alone unless you know what you’re doing.
Running the App on the Pebble Device
Next, we’ll verify that we can successfully get our sample app onto the Pebble watch. Ensure that you’re still in your project folder and run the following build command.pebble build- On Android, open the Pebble app > Settings > Developer Options and tick Enable Developer Connection.
- On iOS, go to the iOS settings application > Pebble > Enable Developer Mode.
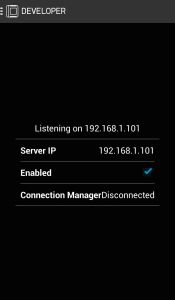 Enter the following command in the terminal, substituting
 IP_ADDRESS_OF_YOUR_PHONE with your phone’s IP.
pebble install --phone IP_ADDRESS_OF_YOUR_PHONE- Make sure your phone and your computer are both on the same network.
- Make sure your Pebble watch has an available slot for an app. If not, you’ll need to remove one first!
- Try restarting your phone and executing
pebble installcommand again. Note that your IP address might change in the process.
The appinfo.json File
This file is an incredibly vital piece in our Pebble app puzzle. The command we ran earlier set up the very basic pieces, but we’ll want to know exactly what’s what and where we need to make some adjustments. The appinfo.json file for “Find Me Starbucks” will look like this:
{
  "uuid": "f614da96-1c67-4ab6-be80-903d63728080",
  "shortName": "Find Me Starbucks",
  "longName": "Find Me Starbucks",
  "companyName": "Patrick Catanzariti",
  "versionCode": 1,
  "versionLabel": "1.0.0",
  "watchapp": {
    "watchface": true
  },
  "appKeys": {
    "location": 0
  },
  "capabilities": ["location"],
  "resources": {
    "media": []
  }
}- uuid – This is a unique ID that Pebble has generated for our project. There is no need to change this from what is generated for us. Do not use the one shown in the listing above.
- shortName – The name appears on the Pebble watch launcher.
- longName – The name appears on the Pebble watch mobile app. The long name “Find Me Starbucks” is short enough to fit on the Pebble watch, so both names are the same in this case.
- companyName – The company or developer name.
- versionCode – Version number that you’ll increase with each release.
- versionLabel – The version label. Pebble recommends the format
Major.Minor.Bugfix. - watchapp – Two options can be added here.
watchface– Whether the app is a watchface (the user cannot interact with it and they’ll expect it to tell them the time) or a more fully featured app that the user can interact with. We’re making a watchface with the “Find Me Starbucks” app.only_shown_on_communication– Whether the app should be visible only when receiving data from the mobile app. This is optional, and for our app, we don’t need it.
- appKeys – The key names we’ll be storing data in to pass from our JavaScript to the Pebble watch. I’ll explain this in more detail soon, but it’s important to get this right.
- capabilities – This field allows you to define permissions for the app, such as whether it will need to access the user’s location and whether the app will have a configuration window on the mobile app (e.g.
["location", "configurable"]). On version 2 of the API, specifying the location capability may not be necessary, but I like to include it just to be on the safe side. - resources – Only contains the
mediaobject, which lists all the media to be bundled with the app. The formats accepted areraw,png,png-trans, andfont. For this tutorial, we won’t be using any images, but if you decide to include an icon for your app (or images in the app itself), you’ll need to add the images here.
The “Find Me Starbucks” C Code
Thepebble new-project command created a C file in your src folder. Open that file (if you’ve been following my naming so far, it’ll be src/find_me_starbucks.c). The C code for “Find Me Starbucks” is a bit more complex than the initial template. It uses the concepts in the initial template file and a few new ones. The main focus of this article is the JavaScript side of it all, so we won’t go over this in detail. An explanation of the C code is provided as a bonus at the end of this article. It will give you a bit more background so you can make some small adjustments to compliment your JS.
For now, we’ll copy and paste the following C code into the src/find_me_starbucks.c file. It should replace everything that was there before:
#include <pebble.h>

static Window *window;
static TextLayer *text_layer;
static TextLayer *label_layer;
static TextLayer *time_layer;

static AppSync sync;
static uint8_t sync_buffer[64];

enum {
  OUR_LOCATION = 0x0
};

void sync_tuple_changed_callback(const uint32_t key,
        const Tuple* new_tuple, const Tuple* old_tuple, void* context) {

  switch (key) {
    case OUR_LOCATION:
      text_layer_set_text(text_layer, new_tuple->value->cstring);
      break;
  }
}

// http://stackoverflow.com/questions/21150193/logging-enums-on-the-pebble-watch/21172222#21172222
char *translate_error(AppMessageResult result) {
  switch (result) {
    case APP_MSG_OK: return "APP_MSG_OK";
    case APP_MSG_SEND_TIMEOUT: return "APP_MSG_SEND_TIMEOUT";
    case APP_MSG_SEND_REJECTED: return "APP_MSG_SEND_REJECTED";
    case APP_MSG_NOT_CONNECTED: return "APP_MSG_NOT_CONNECTED";
    case APP_MSG_APP_NOT_RUNNING: return "APP_MSG_APP_NOT_RUNNING";
    case APP_MSG_INVALID_ARGS: return "APP_MSG_INVALID_ARGS";
    case APP_MSG_BUSY: return "APP_MSG_BUSY";
    case APP_MSG_BUFFER_OVERFLOW: return "APP_MSG_BUFFER_OVERFLOW";
    case APP_MSG_ALREADY_RELEASED: return "APP_MSG_ALREADY_RELEASED";
    case APP_MSG_CALLBACK_ALREADY_REGISTERED: return "APP_MSG_CALLBACK_ALREADY_REGISTERED";
    case APP_MSG_CALLBACK_NOT_REGISTERED: return "APP_MSG_CALLBACK_NOT_REGISTERED";
    case APP_MSG_OUT_OF_MEMORY: return "APP_MSG_OUT_OF_MEMORY";
    case APP_MSG_CLOSED: return "APP_MSG_CLOSED";
    case APP_MSG_INTERNAL_ERROR: return "APP_MSG_INTERNAL_ERROR";
    default: return "UNKNOWN ERROR";
  }
}

void sync_error_callback(DictionaryResult dict_error, AppMessageResult app_message_error, void *context) {
  APP_LOG(APP_LOG_LEVEL_DEBUG, "... Sync Error: %s", translate_error(app_message_error));
}

static void handle_second_tick(struct tm* tick_time, TimeUnits units_changed) {
  static char time_text[] = "00:00";

  strftime(time_text, sizeof(time_text), "%I:%M", tick_time);
  text_layer_set_text(time_layer, time_text);
}

static void init_clock(Window *window) {
  Layer *window_layer = window_get_root_layer(window);
  GRect bounds = layer_get_bounds(window_layer);

  time_layer = text_layer_create(GRect(0, 20, bounds.size.w, bounds.size.h-100));
  text_layer_set_text_alignment(time_layer, GTextAlignmentCenter);
  text_layer_set_text_color(time_layer, GColorWhite);
  text_layer_set_background_color(time_layer, GColorClear);
  text_layer_set_font(time_layer, fonts_get_system_font(FONT_KEY_BITHAM_42_LIGHT));

  time_t now = time(NULL);
  struct tm *current_time = localtime(&now);
  handle_second_tick(current_time, SECOND_UNIT);
  tick_timer_service_subscribe(SECOND_UNIT, &handle_second_tick);

  layer_add_child(window_get_root_layer(window), text_layer_get_layer(time_layer));
}

static void init_location_search(Window *window) {
  Layer *window_layer = window_get_root_layer(window);
  GRect bounds = layer_get_bounds(window_layer);

  label_layer = text_layer_create((GRect) { .origin = { 0, 90 }, .size = { bounds.size.w, 100 } });
  text_layer_set_text(label_layer, "Nearest Starbucks:");
  text_layer_set_text_color(label_layer, GColorWhite);
  text_layer_set_text_alignment(label_layer, GTextAlignmentCenter);
  text_layer_set_background_color(label_layer, GColorClear);
  text_layer_set_font(label_layer, fonts_get_system_font(FONT_KEY_GOTHIC_14_BOLD));
  layer_add_child(window_layer, text_layer_get_layer(label_layer));

  text_layer = text_layer_create((GRect) { .origin = { 0, 115 }, .size = { bounds.size.w, bounds.size.h } });
  text_layer_set_text(text_layer, "Loading...");
  text_layer_set_text_color(text_layer, GColorWhite);
  text_layer_set_text_alignment(text_layer, GTextAlignmentCenter);
  text_layer_set_background_color(text_layer, GColorClear);
  text_layer_set_overflow_mode(text_layer, GTextOverflowModeFill);
  text_layer_set_font(text_layer, fonts_get_system_font(FONT_KEY_GOTHIC_14));
  layer_add_child(window_layer, text_layer_get_layer(text_layer));

  Tuplet initial_values[] = {
     TupletCString(OUR_LOCATION, "Loading...")
  };

  app_sync_init(&sync, sync_buffer, sizeof(sync_buffer), initial_values, ARRAY_LENGTH(initial_values),
      sync_tuple_changed_callback, sync_error_callback, NULL);
}

static void window_load(Window *window) {
  init_location_search(window);
  init_clock(window);
}

static void window_unload(Window *window) {
  text_layer_destroy(text_layer);
  text_layer_destroy(label_layer);
  text_layer_destroy(time_layer);
}

static void init(void) {
  window = window_create();
  window_set_window_handlers(window, (WindowHandlers) {
    .load = window_load,
    .unload = window_unload,
  });

  app_message_open(64, 64);

  const bool animated = true;
  window_stack_push(window, animated);
  window_set_background_color(window, GColorBlack);
}

static void deinit(void) {
  window_destroy(window);
}

int main(void) {
  init();

  APP_LOG(APP_LOG_LEVEL_DEBUG, "Done initializing, pushed window: %p", window);

  app_event_loop();
  deinit();
}
The JavaScript Code
The majority of the actual data and usefulness of our app will come from our JavaScript. This is where we’ll get the app to speak to all that untapped potential of the web. All our JavaScript must be in one file, which should already exist for you in your project undersrc/js. The filename must be pebble-js-app.js for it to be picked up by your Pebble app. The initial contents of pebble-js-app.js, which simply display a “Hello world” message, are shown below.
Pebble.addEventListener("ready",
  function(e) {
    console.log("Hello world! - Sent from your javascript application.");
  }
);ready event, which runs when the Pebble app is ready to accept commands. It is similar to the idea of using $(document).ready(function() {}); in jQuery. Since we want to locate Starbucks, not say hello, we’re going to overwrite the contents of this file with the code shown below. I’ll break down the code in more detail later.
var locationOptions = {timeout: 15000, maximumAge: 60000};

function fetch_location_data(pos) {
  var req = new XMLHttpRequest(),
      version = Date.now(),
      clientId = 'BSFRMG541RT1SJBWRZ4NPV1F5QQKJ2B1OSMQ0EDTU3NR0ZAX',
      clientSecret = '4VFLSBVYEQAN0M0XNGERON0LYMSMG1AJRSXXAQURK5GJQBNB',
      latitude = pos.coords.latitude,
      longitude = pos.coords.longitude;

  req.open('GET', 'https://api.foursquare.com/v2/venues/search?client_id=' + clientId + '&client_secret=' + clientSecret + '&v=' + version + '&ll=' + latitude + ',' + longitude + '&query=starbucks', true);

  req.onload = function(e) {
    if (req.readyState == 4 && req.status == 200) {
      if (req.status == 200) {
        var response = JSON.parse(req.responseText);

        if (response && response.meta.code == '200' && response.response) {
          var venue = response.response.venues[0];

          Pebble.sendAppMessage({location: venue.location.address + ', ' + venue.location.city});
        }
      } else {
        console.log('Error');
      }
    }
  }

  req.send(null);
}

function fetch_location_error(err) {
  console.log(err);
  Pebble.sendAppMessage({location: 'Unable to retrieve location'});
}

Pebble.addEventListener('ready', function(e) {
  locationWatcher = window.navigator.geolocation.watchPosition(fetch_location_data, fetch_location_error, locationOptions);
});
The AppMessage Object
We send and receive messages as JSON objects with very specific keys. By default, we can send messages to and from the Pebble using an index starting from 0 for each key like so:{"0": "Your first value", "1": "Your second value", "2": "Your third value"}appinfo.json file. We have this bit of info stored in that file:
"appKeys": {
  "location": 0
}location. Now, we can write our messages like this:
{"location": "Your first value"}Sending and Receiving Messages
To send a message, we use thePebble.sendAppMessage() function. The first parameter is the JSON message you’re sending. The second and third parameters are the success and error callbacks, respectively. An example sendAppMessage() call is shown below.
Pebble.sendAppMessage({"0": "Your first value", "1": "Your second value", "2": "Your third value"},
  function(e) {
    console.log("Successfully delivered message with transactionId=" + e.data);
  },
  function(e) {
    console.log("Unable to deliver message with transactionId=" + e.data + ". Error is: " + e.error.message);
  }
);
Geolocating
The Pebble location API uses thewindow.navigator.geolocation.watchPosition() function to keep track of our location. It accepts three parameters, a success callback function, an error callback function and a variable that expects a JSON object of options. In our “Find Me Starbucks” app, we define two options for the geolocation search, timeout and maximumAge:
var locationOptions = {timeout: 15000, maximumAge: 60000};timeout is the amount of time, in milliseconds, that the app will wait before giving up and returning an error. In our example above, we check for location data for 15 seconds before returning an error if nothing is returned. The maximumAge option, represents the age, in milliseconds, of data we’re willing to use cached in the app. Once the location data is older than this, we request new location data. In our code, we’re checking for new location data every minute (e.g. every 60000 milliseconds).
We run the watchPosition() function, setting fetch_location_data() as the success callback and fetch_location_error() as the error callback:
Pebble.addEventListener('ready', function(e) {
  locationWatcher = window.navigator.geolocation.watchPosition(fetch_location_data, fetch_location_error, locationOptions);
});fetch_location_error() function returns a message if Pebble can’t determine our location, letting the user know what happened:
function fetch_location_error() {
  Pebble.sendAppMessage({location: 'Unable to retrieve location'});
}fetch_location_data() callback is explained in the next section, and this is where the magic happens.
Making Ajax Requests
Ajax requests follow the standardXMLHttpRequest format. In our “Find Me Starbucks” app, our fetch_location_data() callback starts by defining a few important variables:
var req = new XMLHttpRequest(),
    version = Date.now(),
    clientId = 'BNBFMG541RT1SJBWRZ1NPS1F1QQKK2B19SMS0EDAU3DR7ZZA',
    clientSecret = '4AFKSBKJHQAKJHFBNGERON0LYMSMG1AKJ2KJHBWKS8KJHSDKHE',
    latitude = pos.coords.latitude,
    longitude = pos.coords.longitude;
req stores theXMLHttpRequest object. version is a timestamp that is generated to provide a unique “version” number for our API request, as requested by the Foursquare API. clientId and clientSecret are given to you when you register with the Foursquare API. They’ll be unique to your app, and the ones shown in the code sample aren’t real. Visit Foursquare for Developers, register your app, and get yourself a set of keys to use. Finally, latitude and longitude are physical geolocation coordinates returned by the Pebble API.
The Foursquare documentation provides an example venue search. Our app adapts this example by requesting the following URL.
https://api.foursquare.com/v2/venues/search?client_id=CLIENT_ID&client_secret=CLIENT_SECRET&v=1396158354368&ll=40.7,-74&query=starbucks{
"meta": {
"code": 200
},
"response": {
"venues": [
{
"id": "4a7ae3f0f964a52095e91fe3",
"name": "Starbucks",
"contact": {
"phone": "2124826530",
"formattedPhone": "(212) 482-6530",
"twitter": "starbucks"
}
...req.onload function to read in the values that are returned. If req.status is 200 (indicating success), then we interpret the response as JSON and verify that Foursquare has returned a meta.code of 200 (part of Foursquare’s API) and has a value of response. The code that does this is shown below.
req.onload = function(e) {
  if (req.readyState == 4 && req.status == 200) {
    if (req.status == 200) {
      var response = JSON.parse(req.responseText);
if (response && response.meta.code == '200' && response.response) {var venue = response.response.venues[0];sendAppMessage() function, we send a message to our Pebble watch. The location label matches what we set up in the appinfo.json file earlier (it needs to match for the communication to work):
Pebble.sendAppMessage({location: venue.location.address + ', ' + venue.location.city});Run the App
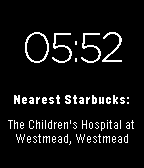
Once all the JavaScript and C code is ready, runpebble build, followed by pebble install --phone IP_ADDRESS_OF_YOUR_PHONE. If all goes well, you should have a watchface installed that tells you both the time and your nearest Starbucks. An example is shown in the following figure.
Debugging Pebble Apps
Usingconsole.log() as a debugging technique is a common practice. To view the logs from your Pebble watch, issue the following command:
pebble logs --phone IP_ADDRESS_OF_YOUR_PHONEpebble-js-app.js as the filename, and a line number. An example JavaScript log is shown below.
[INFO ] find_me_starbucks__1/pebble-js-app.js:3 If this is coffee, please bring me some tea; but if this is tea, please bring me some coffee. Abraham Lincoln.APP_LOG(). This is similar to console.log() in JavaScript. The message will show up in the logs, but will look something like this:
find_me_starbucks.c:37 You can never get a cup of tea large enough or a book long enough to suit me. C.S. Lewis.Conclusion (sort of)
Congratulations! You now got an app that’s retrieving the nearest Starbucks location from Foursquare and displaying it on your Pebble watch to ever so subtly encourage a caffeine addiction. There is more you could potentially do with this app. I plan on expanding the app out in future to allow for custom user configuration – e.g. what if the Pebble watch owner wants to be notified of the nearest “Toys R Us” instead? Using the PebbleKit JavaScript framework, you can set up a configuration window on the user’s phone which allows them to put in their preferences for the app. This just might be in a future article! I hope we’ve managed to inspire you to try out the Pebble SDK and make your own little experiment sometime soon. With the JavaScript framework, it’s now totally open to whatever API you can dream up! If you’re in need of more inspiration, take a look at the Pebble Mars Watchface – you can get streaming images from the Curiosity Mars Rover on your Pebble watchface. An unbelievably brilliant use of the Pebble SDK. All of the “Find Me Starbucks” code is available on GitHub. Check it out there and please do let me know if you use this code as a starting point for an even more inspiring Pebble app. I’d love to see what you come up with!Bonus Section: More on the C Code
If you’re keen to understand a bit more about what is going on in thefind_me_starbucks.c code, I’ve written up a quick guide. We’ll still be focused on a relatively high level overview (I won’t explain specific C syntax or anything like that), but this may help JavaScript developers out there who just want to know a bit about the code they’re tinkering with.
I’ll start with a slimmed down version of the C code that gets placed in your Pebble app folder when you first create an app, just to make this a bit easier to piece together:
#include <pebble.h>

static Window *window;
static TextLayer *text_layer;

static void window_load(Window *window) {
  Layer *window_layer = window_get_root_layer(window);
  GRect bounds = layer_get_bounds(window_layer);

  text_layer = text_layer_create((GRect) { .origin = { 0, 72 }, .size = { bounds.size.w, 20 } });
  text_layer_set_text(text_layer, "Hello world");
  text_layer_set_text_alignment(text_layer, GTextAlignmentCenter);
  layer_add_child(window_layer, text_layer_get_layer(text_layer));
}

static void window_unload(Window *window) {
  text_layer_destroy(text_layer);
}

static void init(void) {
  window = window_create();
  window_set_window_handlers(window, (WindowHandlers) {
    .load = window_load,
    .unload = window_unload,
  });
  const bool animated = true;
  window_stack_push(window, animated);
}

static void deinit(void) {
  window_destroy(window);
}

int main(void) {
  init();

  APP_LOG(APP_LOG_LEVEL_DEBUG, "Done initializing, pushed window: %p", window);

  app_event_loop();
  deinit();
}main() function is invoked. Inside of main(), calling init() is considered best practice for Pebble app development. We set up much of the foundations of our app in init(). We then use app_event_loop() to stop the app from executing any more code in main() from this point until the app exits. Therefore, deinit() is only called once the app is closing.
Windows
Windows are the containers we put elements into in a Pebble app. We’ll always need at least one of these for the app to function. We can have multiple windows in an app, however only one will be visible at any given time. Windows are created like this:window = window_create();window_load() function to run when the window is shown and the window_unload() function to run when it is out of view:
window_set_window_handlers(window, (WindowHandlers) {
  .load = window_load,
  .unload = window_unload,
});window.load() function get the size of the Pebble app window. We use this to determine the size and position of other elements in the app.
We use window_stack_push(window, animated) to attach the window to the app. The second variable sets up whether the window switching is animated or not.
The text_layer_create() and other related functions create a text element, set its size, origin, text content and alignment, then add it to the window.
The text_layer_destroy(text_layer) does what you’d expect, it removes the layer we created earlier from memory. Keeping things nice and tidy when we don’t need it any longer.
Memory Management
Thedeinit() function is used to clean up after our application is done executing. In C, you need to destroy elements that you create. If you don’t, they persist in memory on the Pebble watch. JavaScript is lovely and handles this for us, but when coding in C, you need to take care of this yourself. For example, when you no longer need a window, you should destroy it:
window_destroy(window);text_layer_destroy(text_layer);“Find Me Starbucks” Code
Now it’s time to revisit the C code from much earlier in this article. We’re adding functionality to receive messages from the JavaScript, along with adding the clock functionality. The first thing to notice is that we’ve added a few more text layers:static TextLayer *text_layer;
static TextLayer *label_layer;
static TextLayer *time_layer;AppSync module of the Pebble SDK to sync data back and forth between the phone app and the Pebble watch. This implementation starts with two new variables in our C code. We define the AppSync module in the variable sync and set up a buffer that is 64 bytes long to store messages:
static AppSync sync;
static uint8_t sync_buffer[64];0x0) as OUR_LOCATION. That’s basically a way of naming the first key/value pair as OUR_LOCATION rather than needing to say 0x0. It is more for the sake of readability than functionality:
enum {
  OUR_LOCATION = 0x0
};init() function. In order to use AppSync, we need to run app_message_open which takes two parameters, the maximum inbox size (how much it can receive from our JS) and outbox size (how much it can send out):
app_message_open(64, 64);init_location_search() function. Everything to do with finding our location and printing out the results can be found here. A large part of this function is setting up the text layers and formatting them to look nice. We also set up an array of initial_values that defines the initial key/value pair of OUR_LOCATION as "Loading...":
Tuplet initial_values[] = {
  TupletCString(OUR_LOCATION, "Loading...")
};app_sync_init() passes our initial values into the buffer, then runs the callback function of sync_tuple_changed_callback() if successful or sync_error_callback() if it fails. In the most basic terms, our sync_tuple_changed_callback() function passes in a key/value pair received from app_sync_init(). The variables we care about are key and new_tuple. key is the position of the pair returned (e.g. 0x0, 0x1, etc.) and new_tuple contains its contents (e.g. "L1, IMAX Cinema Complex, Darling Harbour"). We gave our first and only position of 0x0 a name of OUR_LOCATION, so we look out for that and set the text on our app to display that value:
void sync_tuple_changed_callback(const uint32_t key,
    const Tuple* new_tuple, const Tuple* old_tuple, void* context) {

  switch (key) {
    case OUR_LOCATION:
      text_layer_set_text(text_layer, new_tuple->value->cstring);
      break;
  }
}
Displaying the Time
Our app is still a clock at heart, so it must tell time. I personally do all this within theinit_clock() function (it isn’t a convention as far as I’m aware). Much of it once again is just defining text layers to display the info, but there are some other pieces worth nothing.
We get the current time in seconds as Unix time:
time_t now = time(NULL);struct tm *current_time = localtime(&now);handle_second_tick() function once, then again every second:
handle_second_tick(current_time, SECOND_UNIT);
tick_timer_service_subscribe(SECOND_UNIT, &handle_second_tick);strftime() function and displays it in the time_layer text on the watch:
static void handle_second_tick(struct tm* tick_time, TimeUnits units_changed) {
  static char time_text[] = "00:00";

  strftime(time_text, sizeof(time_text), "%I:%M", tick_time);
  text_layer_set_text(time_layer, time_text);
}
Conclusion (seriously)
With that, you’ve hopefully got a little bit more knowledge of how the C code is playing its part in the grand scheme of things. Pebble provides a large amount of detailed documentation on all of this. A few great spots to start are:- Advanced Pebble Watch Configuration – A followup to this article containing more advanced information.
- Anatomy of a Pebble application – Explains the
appinfo.jsonfile and some of the basic structural bits of the C code. - Working with the PebbleKit JavaScript Framework – A lot of info on the JavaScript side of things.
- The core of the Pebble SDK – Docs on the more technical C side of Pebble apps if you’re looking for more comprehensive info on what’s going on there.
Frequently Asked Questions (FAQs) about Pebble Watch Development with JavaScript
How can I start developing apps for Pebble Watch using JavaScript?
To start developing apps for Pebble Watch using JavaScript, you need to set up your development environment first. This involves installing Node.js and npm (Node Package Manager) on your computer. Once you have these installed, you can install Pebble’s command-line tool, Pebble Tool, which allows you to create, build, and install apps on your Pebble Watch. You can then start writing your app using JavaScript and Pebble’s JavaScript API, Pebble.js.
What are the key features of Pebble.js?
Pebble.js is a JavaScript framework for developing Pebble apps. It provides a simple and intuitive API for creating watchfaces, menus, cards, and windows. It also supports event-driven programming, allowing you to respond to button presses, accelerometer events, and more. Additionally, Pebble.js supports communication with the web, enabling your app to fetch data from the internet and display it on the watch.
How can I use PebbleKit JS for communication between the watch and a companion app?
PebbleKit JS is a JavaScript library that allows you to establish a communication link between your Pebble app and a companion app running on a smartphone. You can use it to send messages, data, and commands back and forth between the two apps. To use PebbleKit JS, you need to include it in your project and use its API to send and receive data.
Can I develop Pebble apps using other programming languages?
Yes, in addition to JavaScript, you can also develop Pebble apps using C. Pebble provides a C API, Pebble SDK, which offers more control over the watch’s hardware and allows you to create more complex apps. However, C is a lower-level language and may be more difficult to learn and use than JavaScript.
How can I test my Pebble app?
You can test your Pebble app using the Pebble emulator, which is included in the Pebble Tool. The emulator allows you to run your app on your computer and see how it would look and behave on a real Pebble Watch. You can also install your app on your own Pebble Watch for testing.
How can I publish my Pebble app?
To publish your Pebble app, you need to submit it to the Pebble app store. Before you can do this, you need to package your app into a .pbw file using the Pebble Tool. You can then upload this file to the app store, along with a description, screenshots, and other information about your app.
What are some common challenges in Pebble app development?
Some common challenges in Pebble app development include dealing with the watch’s limited screen size and resolution, optimizing battery life, and ensuring compatibility with different models of the Pebble Watch. Additionally, because the watch has limited processing power and memory, you need to write efficient code and manage resources carefully.
Can I monetize my Pebble app?
Yes, you can monetize your Pebble app by selling it on the Pebble app store. However, keep in mind that the market for Pebble apps is relatively small, so you may not make a lot of money from app sales. Alternatively, you can offer your app for free and monetize it through in-app purchases or advertising.
Are there any resources or communities for Pebble app developers?
Yes, there are several resources and communities for Pebble app developers. The Pebble developer website provides documentation, tutorials, and sample code. There are also several online forums and communities where you can ask questions, share your work, and learn from other developers.
What is the future of Pebble app development?
The future of Pebble app development is uncertain, as Pebble was acquired by Fitbit in 2016 and stopped producing new watches. However, the Pebble community remains active, and developers continue to create and update apps for the platform. Additionally, Rebble, a community-led project, has taken over many of Pebble’s services and continues to support Pebble app development.
 Patrick Catanzariti
PatCat is the founder of Dev Diner, a site that explores developing for emerging tech such as virtual and augmented reality, the Internet of Things, artificial intelligence and wearables. He is a SitePoint contributing editor for emerging tech, an instructor at SitePoint Premium and O'Reilly, a Meta Pioneer and freelance developer who loves every opportunity to tinker with something new in a tech demo.