

In the previous article we covered how to install OptionTree and how to integrate it with your theme. We also explored many of the most basic, but incredibly useful option types that OptionTree provides out of the box. These options can be implemented in a matter of minutes using OptionTree’s easy UI theme options builder, which is second to none.
Key Takeaways
- OptionTree simplifies the integration of advanced theme options like date pickers and measurement units, enhancing customization without extensive coding.
- Advanced options such as the ‘Date Picker’, ‘Date Time Picker’, and ‘Measurement’ types allow for detailed user inputs and can be easily managed through the UI theme options builder.
- The ‘Numeric Slider’ and ‘On/Off’ switch are user-friendly interfaces for setting numerical values and toggling settings within themes, streamlining the user experience.
- OptionTree supports diverse data types including arrays for measurements and strings for date and time, ensuring flexibility in handling theme options.
- Customization extends to modifying existing option types like changing date formats or measurement units, providing developers with the capability to tailor functionalities to specific needs.
Exploring Some of the More Advanced Options
We are now going to continue exploring some of the most advanced options you can include in your theme with just a few clicks. Don’t be alarmed by the term ‘Advanced Options’, OptionTree makes them all easy to integrate, however, it’s considered ‘Advanced’ because of the need to code these by hand from scratch. Here we go!
Date Picker
The ‘Date Picker’ option type is tied to a standard form input field which displays a calendar pop-up that allow the user to pick any date when focus is given to the input field. The returned value is a date formatted string (YYYY-MM-DD).
array(

    'id'          => 'spyr_demo_date_picker',

    'label'       => __( 'Date Picker', 'text-domain' ),

    'desc'        => __( 'Your description', 'text-domain' ),

    'type'        => 'date-picker',

    'section'     => 'your_section',

)
// Get the value saved on Theme Options Page

$spyr_demo_date_picker = ot_get_option( 'spyr_demo_date_picker' );
// Get the value saved for a Page, Post or CPT ( Within the loop )

$spyr_demo_date_picker = get_post_meta( $post->ID, 'spyr_demo_date_picker', true );
// Checking if the date has passed

$date = new DateTime( ot_get_option( 'spyr_demo_date_picker' ) );

$now  = new DateTime( "now" );
// Compare the 2 dates

// Not that this example assumes you have not changed the date format

// through the ot_type_date_picker_date_format filter like shown below

if( $now > $date ) {

    echo 'Date is in the past';

} else {

    echo 'Date has not passed yet';

}
// Change displayed format and returnd value

// Defaults to yy-mm-dd

// Not recommended but it's possible

add_filter( 'ot_type_date_picker_date_format', 'spyr_modify_date_picker_date_format', 10, 2 );

function spyr_modify_date_picker_date_format( $format, $field_id ) {

    if( 'spyr_demo_date_picker' == $field_id ) {

        return 'mm-dd-yy';

    }

}
Date Time Picker
The ‘Date Time Picker’ option type is tied to a standard form input field which displays a calendar pop-up that allows the user to pick any date and time when focus is given to the input field. The returned value is a date and time formatted string (YYYY-MM-DD HH:MM).
// OptionTree Date Time Picker Option Type
// Example code when being used as a Metabox or

// Exported OptionTree file to be used in Theme Mode
array(

'id'          => 'spyr_demo_date_time_picker',

'label'       => __( 'Date Time Picker', 'text-domain' ),

'desc'        => __( 'Your description', 'text-domain' ),

'std'         => '',

'type'        => 'date-time-picker',

'section'     => 'your_section',

)
// Get the value saved on Theme Options Page

$spyr_demo_date_time_picker = ot_get_option( 'spyr_demo_date_time_picker' );
// Get the value saved for a Page, Post or CPT ( Within the loop )

$spyr_demo_date_time_picker = get_post_meta( $post->ID, 'spyr_demo_date_time_picker', true );
// Checking if the date has passed

$date = new DateTime( ot_get_option( 'spyr_demo_date_time_picker' ) );

$now  = new DateTime( "now" );
// Compare the 2 dates

// Not that this example assumes you have not changed the date format

// through the ot_type_date_time_picker_date_format filter like shown below

if( $now > $date ) {

    echo 'Date is in the past';

} else {

    echo 'Date has not passed yet';

}
// Change displayed format and returnd value

// Defaults to yy-mm-dd

// Not recommended but it's possible

add_filter( 'ot_type_date_time_picker_date_format', 'spyr_modify_date_time_picker_date_format', 10, 2 );

function spyr_modify_date_time_picker_date_format( $format, $field_id ) {

    if( 'spyr_demo_date_time_picker' == $field_id ) {

        return 'mm-dd-yy';

    }

}
Measurement
The ‘Measurement’ option type is a mix of input and select fields. The text input accepts a value and the select field lets you choose the unit of measurement to add to that value. Currently the default units are px, %, em, and pt. However, you can change these with the ot_measurement_unit_types filter.
// OptionTree Measurement Option Type
// Example code when being used as a Metabox or

// Exported OptionTree file to be used in Theme Mode
array(

    'id'          => 'spyr_demo_measurement',

    'label'       => __( 'Measurement', 'text-domain' ),

    'desc'        => __( 'Your description', 'text-domain' ),

    'type'        => 'measurement',

    'section'     => 'your_section',

)
// Get the value saved on Theme Options Page

// Returns an array

$spyr_demo_measurement = ot_get_option( 'spyr_demo_measurement' );
// Get the value saved for a Page, Post or CPT ( Within the loop )

// Returns an array

$spyr_demo_measurement = get_post_meta( $post->ID, 'spyr_demo_measurement', true );
// Displaying the result side by side

echo $spyr_demo_measurement[0] . $spyr_demo_measurement[1];
// Adding a new measurement option to the list

add_filter( 'ot_measurement_unit_types', 'spyr_ot_measurement_unit_types', 10, 2 );

function spyr_ot_measurement_unit_types( $measurements, $field_id ) {

    if( 'demo_measurement' == $field_id ) {

        return array_merge( $measurements, array( 'rem' => 'rem' ) );

    }

}
// Override list of measurements

add_filter( 'ot_measurement_unit_types', 'spyr_ot_measurement_override_unit_types', 10, 2 );

function spyr_ot_measurement_override_unit_types( $measurements, $field_id ) {

    if( 'demo_measurement' == $field_id ) {

        return array( 'rem' => 'rem' );

    }

}
Numeric Slider
The ‘Numeric Slider’ option type displays a jQuery UI slider. It will return a single numerical value for use in a custom function or loop.
// OptionTree Numeric Slider Option Type
// Example code when being used as a Metabox or

// Exported OptionTree file to be used in Theme Mode
array(

    'id'          => 'spyr_demo_numeric_slider',

    'label'       => __( 'Numeric Slider', 'text-domain' ),

    'desc'        => __( 'Your description', 'text-domain' ),

    'type'        => 'numeric-slider',

    'section'     => 'your_section',

    'min_max_step'=> '-500,5000,100',

)
// Get the value saved on Theme Options Page

$spyr_demo_numeric_slider = ot_get_option( 'spyr_demo_numeric_slider' );
// Get the value saved for a Page, Post or CPT ( Within the loop )

$spyr_demo_numeric_slider = get_post_meta( $post->ID, 'spyr_demo_numeric_slider', true );
On/Off
The ‘On/Off’ option type displays a simple switch that can be used to turn things ‘on’ or ‘off’. The saved return value is either ‘on’ or ‘off’.
// OptionTree On/Off Option Type
// Example code when being used as a Metabox or

// Exported OptionTree file to be used in Theme Mode
array(

    'id'          => 'spyr_demo_on_off',

    'label'       => __( 'On/Off', 'text-domain' ),

    'desc'        => __( 'Your description', 'text-domain' ),

    'type'        => 'on-off',

    'section'     => 'your_section',

)
// Get the value saved on Theme Options Page

$spyr_demo_on_off = ot_get_option( 'spyr_demo_on_off' );
// Get the value saved for a Page, Post or CPT ( Within the loop )

$spyr_demo_on_off = get_post_meta( $post->ID, 'spyr_demo_on_off', true );
// Checking whether it's On or Off

if( 'off' != $onoff ) {

    echo 'It\'s On';

} else {

    echo 'It\'s Off';

}
Gallery
The ‘Gallery’ option type saves a comma separated list of image attachment IDs. You will need to create a front-end function to display the images in your theme. You will be able to get any image size that your theme may have added through add_image_size().
// OptionTree Gallery Option Type
// Example code when being used as a Metabox or

// Exported OptionTree file to be used in Theme Mode
array(

    'id'          => 'spyr_demo_gallery',

    'label'       => __( 'Gallery', 'text-domain' ),

    'desc'        => __( 'Your description', 'text-domain' ),

    'type'        => 'gallery',

    'section'     => 'your_section',

)
// Get the value saved on Theme Options Page

// Return a comma separated list of image attachment IDs

$spyr_demo_gallery = ot_get_option( 'spyr_demo_gallery' );
// Get the value saved for a Page, Post or CPT ( Within the loop )

// Return a comma separated list of image attachment IDs

$spyr_demo_gallery = get_post_meta( $post->ID, 'spyr_demo_gallery', true );
// Get the list of IDs formatted into an array

// and ready to use for looping through them

$gallery_img_ids = wp_parse_id_list( $spyr_demo_gallery );
Slider
The ‘Slider’ option type allows you to create a slider in a matter of minutes. You can then use these repeatable fields to hold information which you’ll later use to populate your slider. This option is being deprecated soon in favor of the more flexible ‘List Item’ option.
// OptionTree Slider Option Type
// Example code when being used as a Metabox or

// Exported OptionTree file to be used in Theme Mode
array(

    'id'          => 'spyr_demo_slider',

    'label'       => __( 'Slider', 'text-domain' ),

    'desc'        => __( 'Your description', 'text-domain' ),

    'type'        => 'slider',

    'section'     => 'your_section',

)
// Get the value saved on Theme Options Page

// Returns an array

$spyr_demo_slider = ot_get_option( 'spyr_demo_slider' );
// Get the value saved for a Page, Post or CPT ( Within the loop )

// Returns an array

$spyr_demo_slider = get_post_meta( $post->ID, 'spyr_demo_slider', true );
// Loop through the array to build your Slider.

// Note that every slider is different

// We have access to the following array keys

// title, description, image and link

echo '<ul class="slides">';

foreach( $spyr_demo_slider as $slide ) {

    echo '<li><a href="'. $slide['link'] .'"><img src="'. $slide['image'] .'" width="960" height="300"

          alt="'. $slide['description'] .'" title="'. $slide['title'] .'" /></a></li>';

}

echo '</ul>';
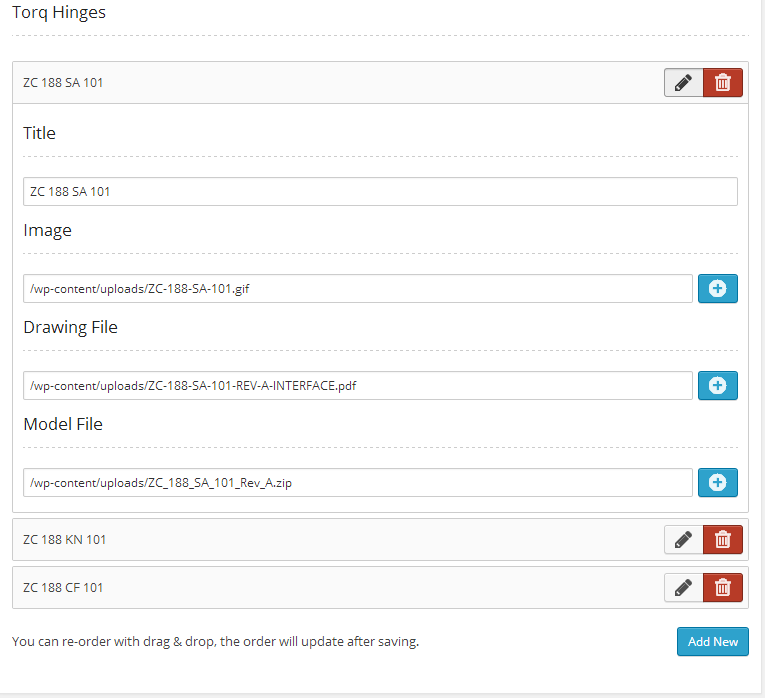
List Item
The ‘List Item’ option type allows for a great deal of customization. You can add settings to the ‘List Item’ and those settings will be displayed to the user when they add a new ‘List Item’. Typically, this is used for creating sliding content or blocks of code for custom layouts. The slider is a ‘List Item’ option type with four predefined fields so you can build an image slider in minutes. The ‘List Item’ option type allows you to define your own fields, their ID’s and these fields can even have their own option type. The possibilities are endless.
Here’s an example of a ‘List Item’ set-up.
Upload
The ‘Upload’ option type is used to upload any WordPress supported media. After uploading, users are required to press the ‘Send to OptionTree’ button in order to populate the input with the URI of that media. There is one caveat of this feature. If you import the theme options and have uploaded media on one site, the old URI will not reflect the URI of your new site. You will have to re-upload or FTP any media to your new server and change the URIs if necessary.
The ‘Upload’ option type can also be saved as an attachment ID by adding ot-upload-attachment-id to the class attribute. This will allow you to get any image size registered through add_image_size(). The returned value will be either an attachment ID or the source link to an image, depending on whether or not ot-upload-attachment-id has been added to the CSS Class field.
// OptionTree Upload Option Type
// Example code when being used as a Metabox or

// Exported OptionTree file to be used in Theme Mode
array(

    'id'          => 'spyr_demo_upload',

    'label'       => __( 'Upload', 'text-domain' ),

    'desc'        => __( 'Your description', 'text-domain' ),

    'type'        => 'upload',

    'section'     => 'your_section',

    'class'       => 'ot-upload-attachment-id', // Optional CSS Class

)
// Get the value saved on Theme Options Page

$spyr_demo_upload = ot_get_option( 'spyr_demo_upload' );
// Get the value saved for a Page, Post or CPT ( Within the loop )

$spyr_demo_upload = get_post_meta( $post->ID, 'spyr_demo_upload', true );
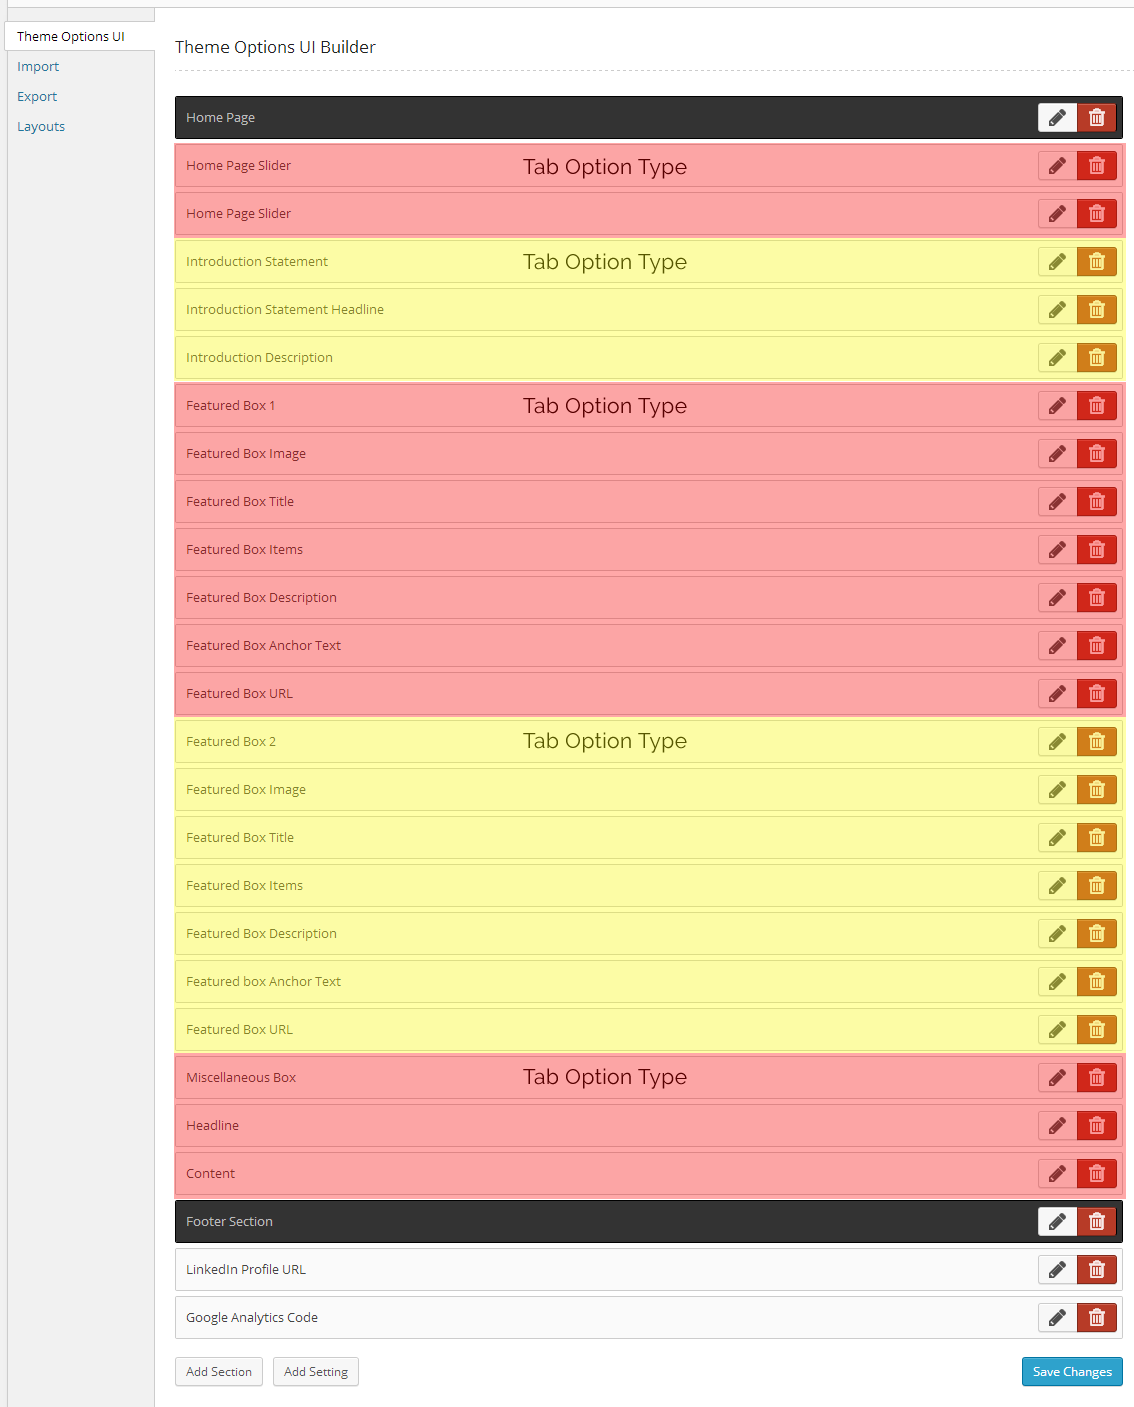
Tab
The ‘Tab’ option type allows you to group together a set of fields which would normally expand down the page. You’ll find yourself using this option over and over again. There are no return values for this field. As usual, implementing this option takes only a few clicks and the UI looks amazing for you and your customer.
To create tabs via the Theme Options UI Builder, all you have to do is make sure the ‘Tab’ option type sits above the group of fields that you want to group. You can add more ‘Tabs’ by doing the same to the other options you want to group. A ‘Tab’ ends when it encounters another ‘Tab’ or the beginning of a new section.
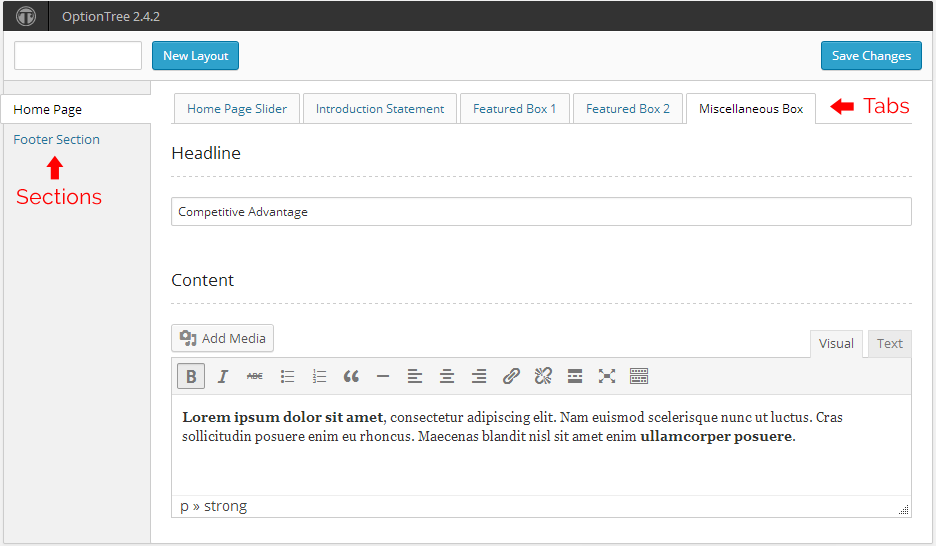
To help you visualize this, let’s take a look at the UI Builder with a real world example:
When you visit the Theme Options page under ‘Appearance’, this is what you’ll get from those options.
Color Picker
The ‘Color Picker’ option type saves a hexadecimal color code for use in CSS. Use it to modify the color of something in your theme.
// OptionTree Color Picker Option Type
// Example code when being used as a Metabox or

// Exported OptionTree file to be used in Theme Mode
array(

'id'          => 'spyr_demo_colorpicker',

'label'       => __( 'Colorpicker', 'text-domain' ),

'desc'        => __( 'Your description', 'text-domain' ),

'type'        => 'colorpicker',

'section'     => 'your_section',

)
// Get the value saved on Theme Options Page

$spyr_demo_colorpicker = ot_get_option( 'spyr_demo_colorpicker' );
// Get the value saved for a Page, Post or CPT ( Within the loop )

$spyr_demo_colorpicker = get_post_meta( $post->ID, 'spyr_demo_colorpicker', true );
Conclusion
Even though these are some of the most advanced features of OptionTree, the best is yet to come.
OptionTree makes it really simple to enhance your typography, allowing you and your customers to style your HTML elements with ease.
In a future article, we’ll take a look at working with CSS and creating the ‘Background’ and ‘Typography’ option types which will take your WordPress themes to a whole new level.
Frequently Asked Questions about OptionTree Advanced Options
How do I install OptionTree on my WordPress site?
Installing OptionTree on your WordPress site is a straightforward process. First, navigate to the ‘Plugins’ section on your WordPress dashboard. Click on ‘Add New’ and search for ‘OptionTree’ in the search bar. Once you find the plugin, click on ‘Install Now’ and then ‘Activate’. The plugin should now be ready for use on your site.
How do I use the OptionTree UI Builder?
The OptionTree UI Builder is a powerful tool that allows you to create custom theme options. To use it, navigate to the ‘OptionTree’ section on your WordPress dashboard. Click on ‘Settings’ and then ‘UI Builder’. From here, you can add sections, settings, and options to your theme. Remember to save your changes when you’re done.
How do I update data in OptionTree?
Updating data in OptionTree is simple. Navigate to the ‘OptionTree’ section on your WordPress dashboard. Click on ‘Settings’ and then the option you want to update. Make your changes and then click ‘Update’ to save them.
Where can I find the real values of variables in OptionTree?
The real values of variables in OptionTree can be found in the ‘OptionTree’ section on your WordPress dashboard. Click on ‘Settings’ and then the option you’re interested in. The value of the variable will be displayed on the right side of the screen.
How do I add custom CSS to my OptionTree theme?
To add custom CSS to your OptionTree theme, navigate to the ‘OptionTree’ section on your WordPress dashboard. Click on ‘Settings’ and then ‘Custom CSS’. Here, you can add your custom CSS code. Remember to save your changes when you’re done.
How do I use OptionTree with a child theme?
To use OptionTree with a child theme, you need to first install and activate the child theme on your WordPress site. Then, navigate to the ‘OptionTree’ section on your WordPress dashboard. Click on ‘Settings’ and then ‘Child Theme’. From here, you can configure the settings for your child theme.
How do I troubleshoot issues with OptionTree?
If you’re experiencing issues with OptionTree, the first step is to check if the plugin is up to date. If it’s not, update it. If the issue persists, try deactivating and reactivating the plugin. If you’re still experiencing issues, you may need to contact the plugin’s support team for further assistance.
How do I uninstall OptionTree?
To uninstall OptionTree, navigate to the ‘Plugins’ section on your WordPress dashboard. Find ‘OptionTree’ in the list of installed plugins and click ‘Deactivate’. Once the plugin is deactivated, you can click ‘Delete’ to remove it from your site.
Can I use OptionTree on a non-WordPress site?
OptionTree is a WordPress-specific plugin, so it cannot be used on non-WordPress sites. However, there are similar tools available for other content management systems that offer similar functionality.
Is OptionTree compatible with all WordPress themes?
OptionTree is designed to be compatible with most WordPress themes. However, some themes may not support all of OptionTree’s features. If you’re experiencing compatibility issues, you may need to contact the theme’s developer for assistance.