

Key Takeaways
- Photoshop’s Content Aware Tools, introduced in CS6, have simplified the process of removing or moving objects in images, saving users hours of intricate cloning work.
- The Content Aware Fill tool allows users to quickly remove an object from an image by selecting the object and choosing the “Content Aware” option in the fill dialog box. Care should be taken to avoid repeating patterns in the resulting image.
- The Content Aware Move tool, found under the spot healing brush tool and the patch tool in the Tools Panel, enables users to reposition objects within an image. The tool blends the surrounding areas and fills the area where the object used to be.
- The Content Aware Scale tool allows users to alter an image to fit specific needs, such as changing a landscape image into a portrait image, without distorting key content. The Patch Tool and the Healing Brush also have Content Aware modes that can help in refining the image further.
Removing objects from images in Photoshop used to be an absolute nightmare to deal with. Just a few versions prior to Photoshop CS6, if you had an object or person that you wanted to remove from the background, you would have to use the clone tool and painstakingly paint the surrounding areas over the object that you wanted to get rid of. You could spend hours on complex cloning, and only highly skilled Photoshop experts could create a convincing blend. Thankfully, we now have a range of different tools that can erase and blend objects right out of an image in seconds! These tools are called Photoshop’s “Content Aware Tools,” and if you haven’t been making the most of them, you’re truly missing out.
Content Aware Fill
Content Aware Fill is an amazing tool that will allow you to remove an object from an image almost instantly. Let’s give it a try. Download this sample image and open it in Photoshop.

This is already a great image, but let’s suppose that you wanted to remove the leftmost tree from the picture. In older versions, this could take hours to clone the surrounding areas over the tree and align all of the edges. You would have to sample an area, then paint a little, sample another area, then paint in a little more. You can imagine how painful and tedious this could be, especially when working with something complex, such as foliage.
To use Content Aware Fill, make a selection with any of the selection tools, such as the marquee tool, the lasso tool, the magic wand, etc., and draw a selection around the object that you want to remove. Hold Shift and press “Delete” to bring up the fill dialog box. You can choose from patterns, gradients, solid fills, etc., but the choice we will make is “Content Aware.” Click “OK.”

Notice that in one motion, the tree is gone. There is one thing to note — if you look closely, the gap in the treeline (observed in the background) is repeated. You need to look out for this repetition when using this method, because Photoshop analyzes the surrounding areas in order to make a seamless blend. The downside is that unique artifacts, such as the tree and the shape of the shadow are repeated. This can be easily corrected by selecting these areas individually, in a small section, and using Content Aware Fill once again, just in a tighter area. The result is shown below.

Content Aware Move
Sometimes, you don’t want to remove a part of an image, you just wish that you could move it or reposition it to another area. For this purpose, Adobe added the Content Aware Move Tool in Photoshop CS6. This is very easy to use, and it can be found under the spot healing brush tool and the patch tool within the Tools Panel. It looks like two crossed arrows. To use the Content Aware Move Tool, you must make a careful selection around the object that you want to move. This time, let’s move the tree instead of removing it altogether. Make the selection as tight as you can around the object.

After you have made the selection, while the Content Aware Move Tool is still active, click and drag the selection to the area where you want your object to be. Try to place the object in an area that makes sense. Photoshop ends up doing a pretty good job of blending the surrounding areas and filling the area where the tree used to be. See the example below:

Content Aware Move isn’t always perfect, but it usually does a good job. If the results aren’t what you were hoping for, you might need to make the selection a little tighter to get better results.
Content Aware Scale
Content Aware Scale is another great tool that can help you alter an image to suit very specific needs. Suppose that you find an image that you like, but it is landscape, and you need it to be a portrait. The composition might not make this achievable, but with Content Aware Scale, you can scale an image and bring main objects closer together without any obvious distortions.
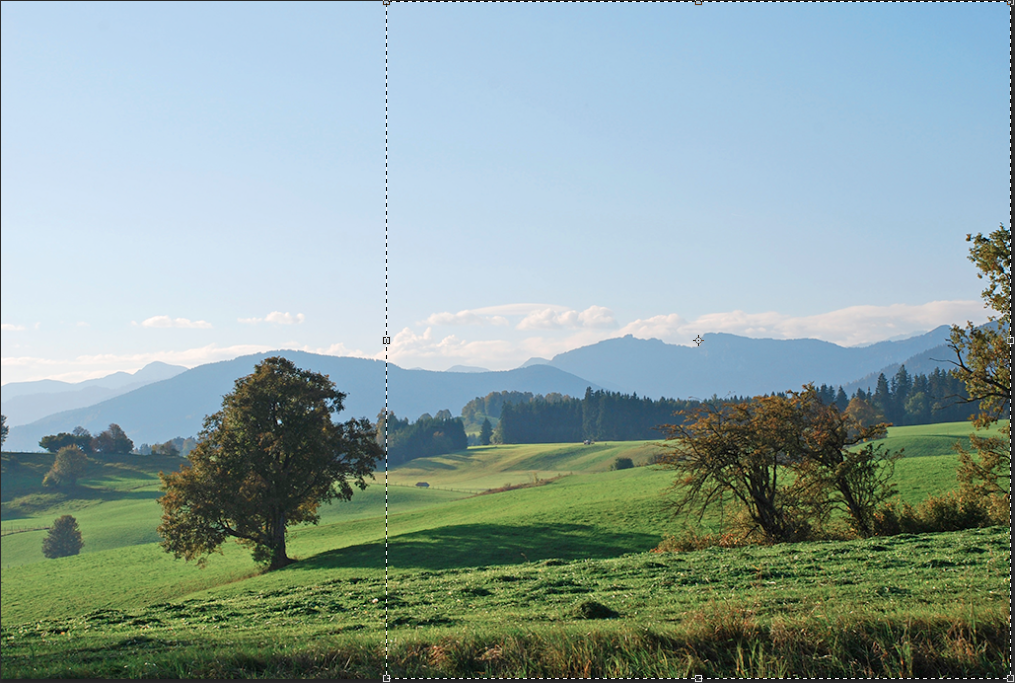
You don’t select the entire image all at once and scale it inward; that usually ends up “crunching” the main subjects that you are trying to bring closer together. The best approach is to make a selection that is the entire height of the image, but only contains one of the objects that you want to include, as well as most of the background space that you want to reduce. Notice in the example below that I have selected the full height and plenty of background, but I’ve only included one of the two trees in the foreground.
Now, let’s reach out and grab that other tree. Go to “Edit” > “Content Aware Scale.” Now, you can scale the image inward towards the other tree. Bring it in as close as possible without “crunching” the middle too much, which will make it look distorted and glitchy. Hit Enter/Return to commit to the changes. You can repeat the same process on the left side of the image if you wish.
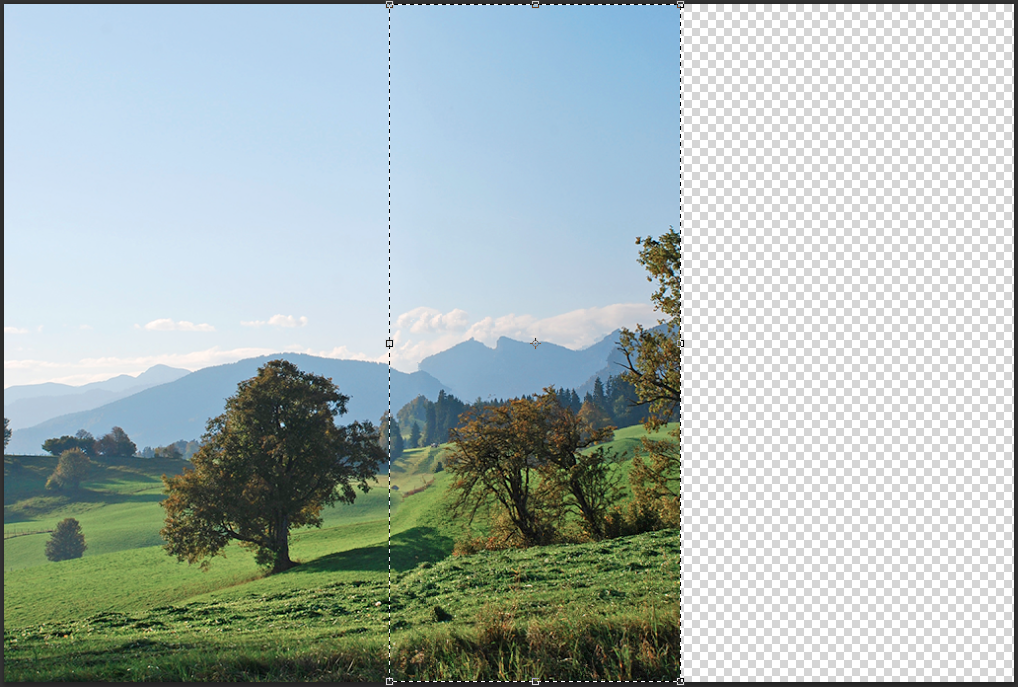


After scaling the image inward as much as possible, select the crop tool, with the set proportions to 8.5 x 11 and you can crop the image to fit the portrait constraints. The final result is shown below:

Content Aware Mode in the Patch Tool
Within the patch tool, you have normal mode, and now in CS6 you have the ability to use Content Aware patching, which is meant to help you get better results from your patching efforts. Similar to Content Aware Fill, you have the ability to set the Adaptation from “strict” to very “loose.” “Loose” gets better results, because it tends to blend the edge more gracefully that “strict.” “Strict” produces harsh edges, so beware when using this setting. Make a selection, just like you would with Content Aware Fill, but when you move the selection to another point on the canvas, you are choosing where to sample the fill content from. Notice the tree in the example below and that the fill was sampled from the area just to the right.


Content Aware Mode with the Healing Brush
The healing brush is normally used for more refined healing and the removing of artifacts. Now, you can select Content Aware as the healing brush type. In the sample image below, notice the line of brush in the center. (By “line of brush,” I mean actual plants, not Photoshop lines or Photoshop brushes.)

Simply click and drag to paint over the brush. Make sure that your Photoshop brush is large enough to cover the thickness of thereal brush (that is, the plants), and simply trace the brush across the brush. (Get it?) You can also trace over the small fence in the distance. Below, the fence is gone and so is the brush.

Conclusion
The Content Aware Tools definitely make your like easier. They save you hours of time cloning unwanted objects out of the background, and in some cases, you can change a landscape image into a portrait image by scaling an image inward without distorting the key content. Using Content Aware is a smart tool that should be in any smart designer’s arsenal.
Do you use Content Aware Tools often, or do you prefer a more manual, meticulous approach?
Frequently Asked Questions about Using Photoshop’s Content-Aware Tools
How can I use the Content-Aware Move tool to adjust the composition of my image?
The Content-Aware Move tool in Photoshop is a powerful feature that allows you to move or extend objects within an image while automatically filling in the background. To use it, first select the Content-Aware Move tool from the toolbar. Then, draw a selection around the object you want to move. Once you’ve made your selection, simply click and drag the object to its new location. Photoshop will automatically fill in the area where the object used to be, matching the surrounding pixels for a seamless result.
What is the difference between the Content-Aware Move and Patch tools?
While both tools are designed to manipulate objects within an image, they work in slightly different ways. The Content-Aware Move tool allows you to move an object to a new location, while the Patch tool is used to replace unwanted parts of an image with pixels from another area. Both tools use Photoshop’s Content-Aware technology to automatically blend the edited areas with the surrounding pixels.
Can I use the Content-Aware tools to remove objects from my image?
Yes, the Content-Aware tools can be used to remove unwanted objects from an image. The Patch tool is particularly useful for this. Simply draw a selection around the object you want to remove, then drag the selection to an area of the image that you want to use as a replacement. Photoshop will automatically replace the selected object with pixels from the area you’ve chosen, blending them for a seamless result.
How can I control the adaptation of the Content-Aware tools?
The adaptation settings for the Content-Aware tools can be adjusted in the options bar. The adaptation setting controls how closely the fill texture matches the surrounding area. A lower setting will create a looser match, while a higher setting will create a tighter match. Experiment with different settings to achieve the best result for your image.
Can I use the Content-Aware tools on any type of image?
The Content-Aware tools work best on images with a consistent background. They may struggle to produce a seamless result on images with complex backgrounds or patterns. However, with careful selection and adjustment of the adaptation settings, you can achieve good results on a wide range of images.
What should I do if the Content-Aware tools aren’t producing the results I want?
If you’re not happy with the results from the Content-Aware tools, there are a few things you can try. First, check your selection. A precise selection will produce better results than a loose one. Second, adjust your adaptation settings. A higher setting may produce a better match with the surrounding pixels. Finally, consider using a different tool. The Clone Stamp tool or the Healing Brush tool may be better suited to your needs.
Can I use the Content-Aware tools to resize my image?
Yes, you can use the Content-Aware Scale tool to resize your image without distorting important elements. This tool works by identifying and protecting areas of the image that contain important visual information. It then resizes the image, stretching or shrinking the less important areas to fit the new dimensions.
How can I improve my skills with the Content-Aware tools?
The best way to improve your skills with the Content-Aware tools is through practice. Try using the tools on a variety of images to get a feel for how they work. You can also find many tutorials and guides online that can provide you with tips and techniques to help you get the most out of these powerful tools.
Are there any limitations to the Content-Aware tools?
While the Content-Aware tools are incredibly powerful, they do have some limitations. They work best on images with consistent backgrounds and may struggle with complex patterns or textures. Additionally, they may not always produce a perfect result. However, with careful use and a bit of practice, you can achieve impressive results with these tools.
Can I use the Content-Aware tools to add objects to my image?
While the Content-Aware tools are primarily designed for moving or removing objects, you can use them to add objects to an image. You can do this by duplicating the object you want to add, then using the Content-Aware Move tool to place the duplicate in the desired location. Photoshop will automatically blend the duplicate with the surrounding pixels for a seamless result.