Keep An Object’s Shadows Intact While Changing Background In Photoshop
This Photoshop tutorial shows you how to take an object with shadows on a white background, and place it onto a different background while maintaining the transparency of the shadows. To do this we’ll use the Luminosity channel in Photoshop. For more general editing techniques, learn how to remove the background.
1. Open up the image of an object whose shadows you want to keep intact. For this example I’m using an image of a couple of limes by straymuse which is available for free download from Stock Xchng.
2. Create a selection around the limes. Make sure that only the limes are selected and none of the shadows. Use whatever selection tool you feel most comfortable with but make sure it’s a good clean selection.
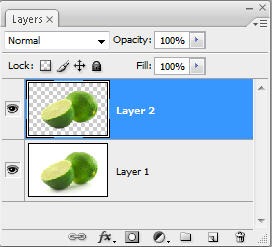
3. Press Ctrl + J (windows) or Cmd + J (Mac) to make a duplicate of the limes on a new layer.
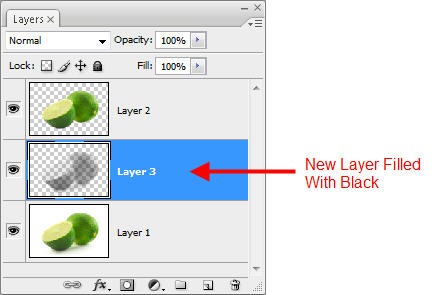
4. Select your original image layer again. We’re going to load up Luminosity now. Basically that means that highlights are selected. Press Ctrl + Alt + ~ (windows) or Cmd + Opt + ~ (mac). We’re not interested in highlights though, we’re looking for shadows so we need to inverse the selection. Press Ctrl + Shift + I (windows) or Cmd + Shift + I (mac). It might not look like all the shadows are selected but don’t worry, more that you think is selected.
5. With the selection still in place, add a new layer above the original layer and below the lime only layer.
6. Make sure your foreground colour is set to black by pressing D on the keyboard. Then fill the new layer with black by pressing Alt + Backspace (windows) and Option + Delete (mac). This only fills the shadows. It will look like a slightly ghostly layer.
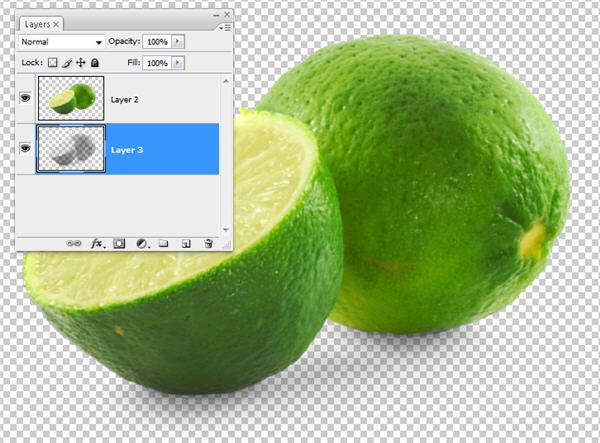
7. Click on the original background layer again, select all and hit Delete to get rid of the Background layer. At this stage you should only have the lime layer and the shadows.
8. Merge the two remaining layers by pressing Ctrl + E (windows) or Cmd + E (mac). Now you’re ready to bring your object and shadows to another background.
9. I chose a streetscape image, again from Stock Xchng. Open this image in Photoshop, then drag your merged lime image on top. Hold down Shift as you drag if you want to put the limes onto the very centre of the street scene.
If the edge of the limes look too jagged, you could take the Blur Tool (R) and gently brush around their edge.
Why would there be giant limes in the middle of the street? Well there wouldn’t be, but hey that’s the joy of Photoshop, and the point is to show you the limes with their partly transparent shadows intact in a different scene.
Frequently Asked Questions (FAQs) on Keeping Shadows Intact While Changing Background in Photoshop
What are the best tools in Photoshop to use when trying to keep shadows intact while changing the background?
The best tools to use in Photoshop for this purpose are the Quick Selection Tool, the Magic Wand Tool, and the Lasso Tool. These tools allow you to select the object and its shadow separately from the background. Once selected, you can then change the background without affecting the shadow. The Pen Tool can also be used for more precise selections.
How can I maintain the quality of the shadow when changing the background?
To maintain the quality of the shadow, it’s important to make a precise selection of the shadow. You can use the Refine Edge tool to fine-tune your selection and ensure that the edges of the shadow are not lost. Additionally, using Layer Masks can help preserve the shadow while you make changes to the background.
Can I change the color of the shadow while keeping its shape intact?
Yes, you can change the color of the shadow while keeping its shape intact. This can be done by creating a new layer and using the Paint Bucket Tool to fill the shadow with your desired color. Then, change the blending mode of this layer to Color. This will change the color of the shadow while preserving its shape and transparency.
How can I remove the background without affecting the shadow?
To remove the background without affecting the shadow, you can use the Quick Selection Tool or the Magic Wand Tool to select the background. Once selected, you can delete the background, leaving the object and its shadow intact. Remember to use the Refine Edge tool to fine-tune your selection and ensure that the edges of the shadow are not lost.
Can I add a new shadow to an object after changing the background?
Yes, you can add a new shadow to an object after changing the background. This can be done by duplicating the object layer, filling it with black using the Paint Bucket Tool, and then transforming and distorting it to create a shadow effect. You can then adjust the opacity and blending mode of this layer to make the shadow look realistic.
How can I make the shadow look realistic on a new background?
To make the shadow look realistic on a new background, you can adjust the opacity and blending mode of the shadow layer. You can also use the Gaussian Blur filter to soften the edges of the shadow and make it blend more naturally with the new background.
Can I change the direction of the shadow?
Yes, you can change the direction of the shadow by transforming and distorting the shadow layer. This can be done by selecting the shadow layer and using the Free Transform command to rotate and skew the shadow.
How can I keep the shadow intact when changing the background to a different color?
To keep the shadow intact when changing the background to a different color, you can use the Color Replacement Tool. This tool allows you to change the color of the background while preserving the shadow.
Can I use the same method to keep reflections intact when changing the background?
Yes, the same method can be used to keep reflections intact when changing the background. Just like with shadows, you can use the Quick Selection Tool, the Magic Wand Tool, or the Lasso Tool to select the object and its reflection separately from the background.
What if the shadow is not clearly defined or is too faint?
If the shadow is not clearly defined or is too faint, you can enhance it using the Burn Tool or the Levels adjustment. These tools can darken the shadow and make it more visible. You can also duplicate the shadow layer and adjust its opacity to make the shadow more pronounced.
Jennifer Farley is a designer, illustrator and design instructor based in Ireland. She writes about design and illustration on her blog at Laughing Lion Design.
Published in
·Accessibility·Design·Design & UX·Sketch·Technology·Typography·Usability·UX·February 25, 2016

Published in
·Animation·Design·Design & UX·Illustration·Photography & Imagery·Photoshop·Resources·August 22, 2017


