How To Setup A Layout Grid In Photoshop
 The Grid feature in Photoshop is a great tool to assist you with your layout designs, whether its design for the web or print. Adding a “Snap” lets you align objects very precisely along the lines of the grid. And rather than make a new grid each time you’re designing, you can set up grid preference that can be reused.
Making a grid
1. Create a new document. If you’re designing for the 1024 x 768 pixel monitor resolution, then set up your new document as 960 pixels wide and 768 high.
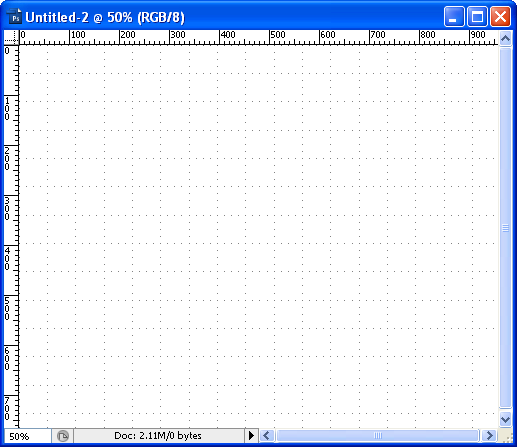
2. To add the grid, choose View > Show > Grid. You will immediately see a grid overlaid on your new document. The grid that you can see is non-printing, it’s simply there for your benefit and reference.
 You’ll notice that there are several heavy lines, and in between them there are lighter dotted lines, known as sub-divisions.
You could just leave your grid alone at this point, but by setting up some preferences you can take more control and set up how the lines in your grid will look, how far apart they are from each other and how many subdivisions appear between the main grid lines.
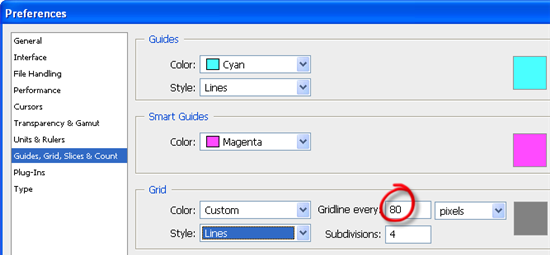
To open up the grid preferences choose Edit > Preferences> Guides, Grids & Slices & Count. This opens the Preference dialog box you can see below. (Note: I’m using CS3, earlier versions may look a little different but will have similar options for grids.)
 Still inside the Grid preferences, if you want to have a twelve column grids across a 960 pixel document, set the “Gridline every” option to be 80 pixels. I leave the number of sub-divisions at 4. Click OK, and that’s your grid in place.
Snapping
Enabling Snapping helps you to align layers, text and basically any object you want. To turn it on, choose View > Snap
. You’ll see a tick mark beside this option when it is selected. Then choose View > Snap To > Grid. Once this is selected you will find that objects will click or snap into place on your grid. If the snap becomes annoying, just switch it off by choosing View > Snap To > Grid again.
 When you’re finished designing, simply choose View > Show > Grid or Ctrl+; (pc) or Cmd+; (Mac) to hide the grid and marvel at your lovely design.
Are you currently using grids for layout? Did you make your own, or did you download one from the web?
If you enjoyed reading this post, you’ll love Learnable; the place to learn fresh skills and techniques from the masters. Members get instant access to all of SitePoint’s ebooks and interactive online courses, like Foundations of Photoshop.
Comments on this article are closed. Have a question about Photoshop? Why not ask it on our forums?
Frequently Asked Questions (FAQs) about Setting Up a Layout Grid in Photoshop
What is the purpose of using a layout grid in Photoshop?
A layout grid in Photoshop is a powerful tool that helps designers maintain consistency and alignment in their designs. It provides a structured, visual guide that ensures elements are placed accurately and proportionally. This is particularly useful when working on complex designs or when multiple elements need to be aligned or distributed evenly. Using a layout grid can significantly improve the overall aesthetics and functionality of your design.
How can I customize the grid settings in Photoshop?
Photoshop allows you to customize the grid settings according to your specific needs. You can adjust the grid size, color, and style by going to the “Preferences” menu, then selecting “Guides, Grid & Slices”. Here, you can set the gridline every certain number of pixels, inches, or centimeters, and you can also set the number of subdivisions. Remember to click “OK” to save your settings.
Can I use the layout grid in Photoshop for web design?
Absolutely! The layout grid is an essential tool for web design in Photoshop. It helps in creating a balanced and well-structured design, ensuring that all elements are aligned and distributed evenly. It’s particularly useful when designing responsive websites, as it allows you to plan and visualize how the layout will adapt to different screen sizes.
How do I turn on the grid in Photoshop?
To turn on the grid in Photoshop, go to the “View” menu, then select “Show” and click on “Grid”. You can also use the shortcut Ctrl + ‘ (Command + ‘ on Mac) to quickly toggle the grid on and off.
Can I save my custom grid settings for future use?
Yes, once you’ve customized your grid settings in Photoshop, these settings will be saved and applied to all new documents you create. However, if you want to use different grid settings for different projects, you’ll need to manually adjust the settings each time.
How can I use guides along with the grid in Photoshop?
Guides are another useful tool in Photoshop that can be used in conjunction with the grid. You can create guides by clicking on the ruler and dragging onto your canvas. Guides can be moved, removed, or locked in place, and they can be used to create precise alignments and measurements.
Can I hide the grid without losing my settings?
Yes, you can easily hide the grid in Photoshop without losing your settings. Simply go to the “View” menu, select “Show”, and uncheck “Grid”. Your grid settings will be saved and the grid will reappear when you choose to show it again.
Is there a way to snap objects to the grid in Photoshop?
Yes, Photoshop has a “Snap To” feature that allows you to automatically align objects to the nearest gridline. You can enable this feature by going to the “View” menu, selecting “Snap To”, and checking “Grid”.
Can I change the color of the grid in Photoshop?
Yes, you can change the color of the grid in Photoshop. Go to “Preferences”, then “Guides, Grid & Slices”. Here, you can choose a new color for your gridlines.
How can I use the grid to create a modular layout in Photoshop?
A modular layout is a design approach where the layout is divided into a grid with multiple modules. Each module can contain text, images, or other design elements. To create a modular layout in Photoshop, first set up your grid according to the module size you want. Then, use the gridlines as guides to place your design elements within the modules. This approach ensures a clean, organized layout with consistent spacing and alignment.
Jennifer Farley is a designer, illustrator and design instructor based in Ireland. She writes about design and illustration on her blog at Laughing Lion Design.


