How to Get Started With restdb.io and Create a Simple CMS


This article was sponsored by restdb.io. Thank you for supporting the partners who make SitePoint possible.
Databases strike fear into the heart of the most experienced developers. Installation, updates, disk space provision, back-ups, efficient indexing, optimized queries, and scaling are problems most could do without. Larger organizations will employ a knowledgeable dev ops person who dedicates their life to the database discords. Yet the system inevitably fails the moment they go on vacation.
A more practical option is to outsource your database and that’s exactly the service restdb.io provides. They manage the tricky data storage shenanigans, leaving you to concentrate on more urgent development tasks.
Key Takeaways
- restdb.io is a cloud NoSQL database management service that helps developers by handling the complex aspects of data storage, allowing them to focus on more urgent development tasks.
- restdb.io offers a free account for service assessment, with paid plans providing additional storage space, query throughput, developer accounts, and MongoDB integration.
- restdb.io allows the creation of a database-driven website using data documents in a collection, with the site hosted at www-yourdbname.restdb.io.
- restdb.io’s REST API provides endpoints controlled via HTTP for data retrieval, document creation, document updates, property updates in a document, and document deletion.
- restdb.io can be used to build a basic Content Management System (CMS), making it suitable for any project requiring data storage. It can be accessed from any language or framework, making it ideal for applications with multiple interfaces.
restdb.io: the Basics
restdb.io is a plug and play cloud NoSQL database. It will be immediately familiar to anyone with MongoDB experience. The primary differences:
- there’s no need to manage your installation, storage or backups
- you can define a data structure schema in restdb.io
- data fields can have relationships with other fields in other collections
- there’s no need to define indexes
- data can be queried and updated through a REST API authenticated by HTTP or Auth0/JWT tokens
- queries and updates are sent and received in JSON format
- there are tools to enter, view and export data in various formats
- it supports some interesting bonus features such as codehooks, email, web form generation, websites, realtime messaging, and more.
A free account allows you to assess the service with no obligation. Paid plans offer additional storage space, query throughput, developer accounts and MongoDB integration.
In the following sections I’ll describe how to:
- configure a new database and enter data
- use that data to render a set web pages hosted on restdb.io, and
- use the API to provide a search facility for content editors.
Step 1: Create a New Database
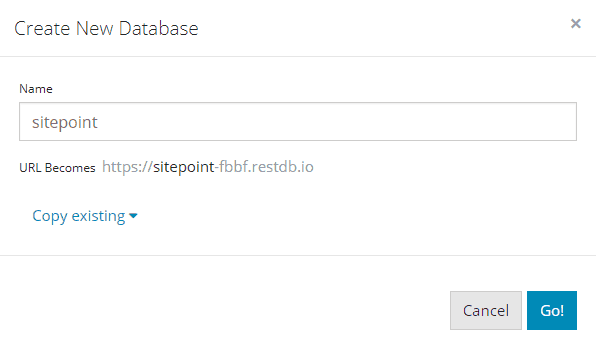
After signing up with a Google, Facebook or email account, you can create a new empty database. This generates a new API endpoint URL at yourdbname.restdb.io:
Step 2: Create a New Collection
A database contains one or more collections for storing data. These are analogous to SQL database tables. Collections contain “documents” which are analogous to SQL database records (table rows).
The restdb.io interface offers two modes:
- Standard mode shows the available collections and allows you to insert and modify data.
- Developer mode allows you to create and configure collections.
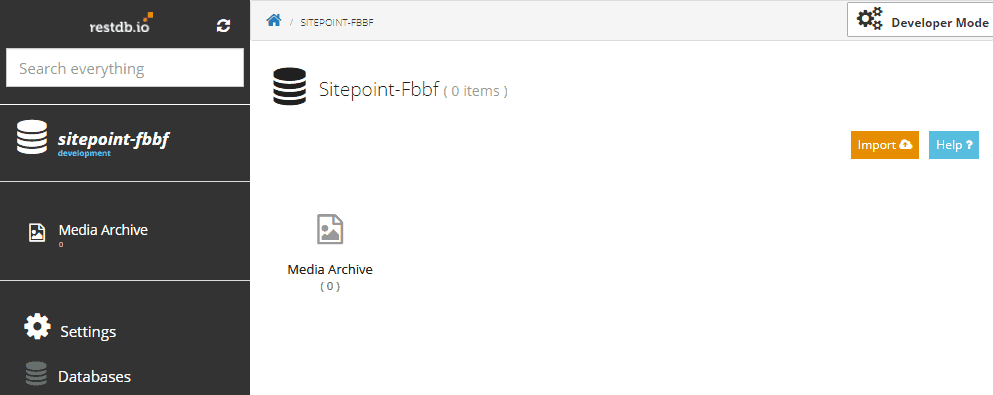
Enter Developer Mode (top-right of screen) and click the Add Collection button.
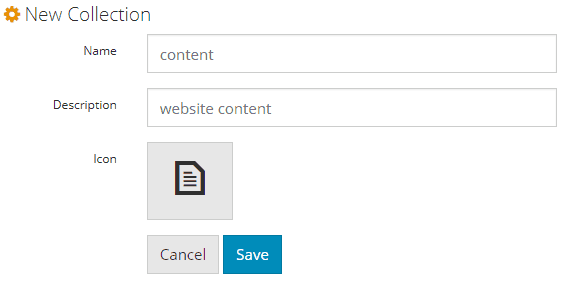
A collection requires a unique name (I’ve used “content”) and an optional description and icon. Hit Save to return to your database overview. The “content” collection will appear in the list along with several other non-editable system collections.
Alternatively, data can be imported from Excel, CSV or JSON files to create a collection by hitting Import in the standard view.
Step 3: Define Fields
Staying in Developer Mode, click the “content” collection and choose the Fields tab. Click Add Fields to add and configure new fields which classify the data in the collection.
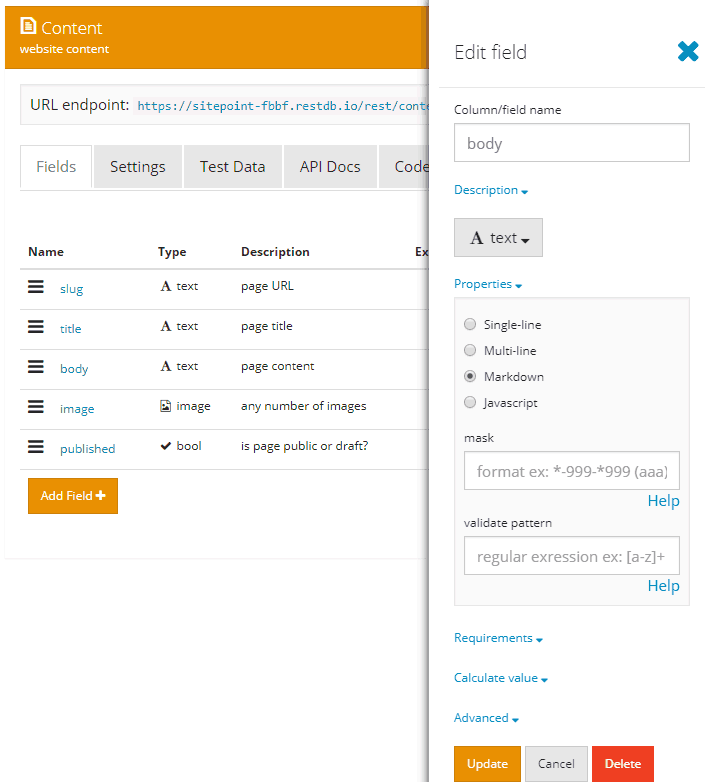
Each collection document will sore data about a single page in the database-driven website. I’ve added five fields:
- slug – a text field for the page path URL
- title – a text field for the page title
- body – a special markdown text field for the page content
- image – a special image field which permits any number of uploaded images (which are also stored on the restdb.io system)
- published – boolean value which must be true for pages to be publicly visible.
Step 4: Add Documents
Documents can be added to a collection in either standard or developer mode (or via the API). Create a few documents with typical page content:
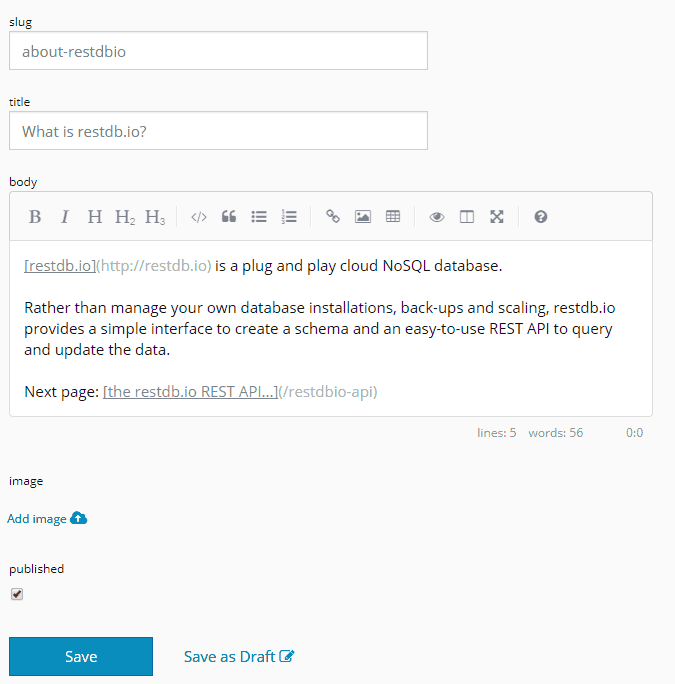
The slug should be empty for the home page.
Step 5: Create a Database-Driven Website (Optional)
restdb.io provides an interesting feature which can create and host a database-driven website using data documents in a collection.
The site is hosted at www-yourdbname.restdb.io but you can point any domain at the pages. For instructions, click Settings from the Database list or at the bottom of the left-hand panel then click the Webhosting tab.
To create the website, Pages must be configured in Developer Mode which define templates to view the content. Templates contain a code snippet which sets:
- the context – a query which locates the correct document in a collection, and
- the HTML – a structure which uses handlebars template syntax to insert content into appropriate elements.
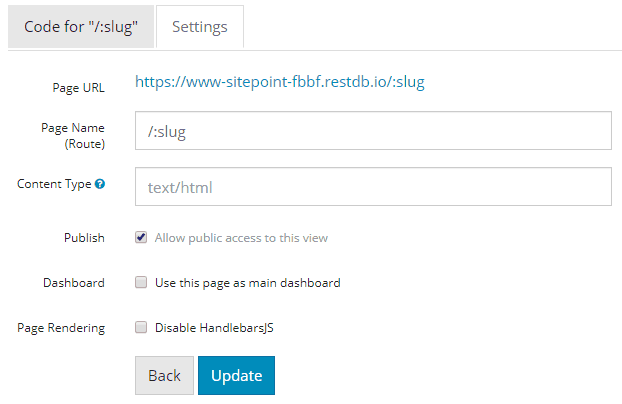
Click Add Page to create a page. Name it the special name /:slug – this means the template will apply to any URL other than the home page (which does not have a slug). Hit Save and return to the page list, then click the /:slug entry to edit.
Switch to the Settings tab and ensure text/html is entered as the Content Type and Publish is checked before hitting Update:
Now switch to the Code for “/:slug” tab. Enter the context code at the top of the editor:
{{#context}}
{
  "docs": {
    "collection": "content",
    "query": {
      "slug": "{{pathparams.slug}}",
      "published": true
    }
  }
}
{{/context}}
This defines a query so the template can access a specific document from our content collection. In this case, we’re fetching the published document which matches the slug passed on the URL.
All restdb.io queries return an array of objects. If no document is returned, the docs array will be empty so we can add code to return that the page is not available immediately below the context:
<!doctype html>
{{#unless docs.[0]}}
  <html>
  <body>
    <h1>Page not available</h1>
    <p>Sorry, this page cannot be viewed. Please return later.</p>
  </body>
  </html>
{{/unless}}
Below this, we can code the template which slots the title, body and image fields into appropriate HTML elements:
{{#with docs.[0]}}
  <html>
  <head>
    <meta charset="utf-8">
    <title>{{title}}</title>
    <meta name="viewport" content="width=device-width,initial-scale=1">
    <style>
      body {
        font-family: sans-serif;
        font-size: 100%;
        color: #333;
        background-color: #fff;
        max-width: 40em;
        padding: 0 2em;
        margin: 1em auto;
      }
    </style>
  </head>
  <body>
    <header>
      {{#each image}}
        <img src="https://sitepoint-fbbf.restdb.io/media/{{this}}" alt="image" />
      {{/each}}

      <h1>{{title}}</h1>
    </header>
    <main>
      {{markdown body}}

      <p><a href="/">Return to the home page...</a></p>
    </main>
  </body>
  </html>
{{/with}}
Note our markdown body field must be rendered with a markdown handler.
Save the code with Ctrl|Cmd + S or by returning to the Settings tab and hitting Update.
The /:slug page template will apply to all our content collection — except for the home page, because that does not have a slug! To render the home page, create a New Page with the name home with identical settings and content. You may want to tweak the template for home-page-specific content.
Once saved, you can access your site from https://www-yourdbname.restdb.io/. I’ve created a very simple three-page site at https://www-sitepoint-fbbf.restdb.io/.
For more information about restdb.io page hosting, refer to:
- Pages and Database Driven Website Hosting
- The restdb.io Dynamic Website Demo
- handlebar template syntax
Step 6: API Queries
Creating a site to display your data may be useful, but you’ll eventually want to build an application which queries and manipulates information.
restdb.io’s REST API provides endpoints controlled via HTTP:
- HTTP GET requests retrieve data from a collection
- HTTP POST requests create new documents in a collection
- HTTP PUT requests update documents in a collection
- HTTP PATCH requests update one or more properties in a document in a collection
- HTTP DELETE requests delete documents from a collection
There are a number of APIs for handling uploaded media files, database meta data and mail but the one you’ll use most often is for collections. The API URL is:
https://yourdbname.restdb.io/rest/collection-name/
The URL for my “content” collection is therefore:
https://sitepoint-fbbf.restdb.io/rest/content/
Queries are passed to this URL as a JSON-encoded querystring parameter named q, e.g. fetch all published articles in the collection:
https://sitepoint-fbbf.restdb.io/rest/content/q={"published": true}
However, this query will fail without an API key passed in the x-apikey HTTP header. A full-access API key is provided by default but it’s advisable to create keys which are limited to specific actions. From the database Settings, API tab:
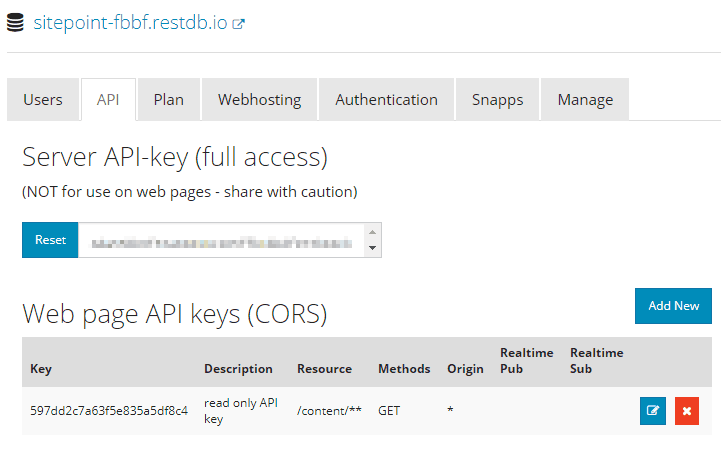
Click Add New to create a new key. The one I created here is limited to GET (query) requests on the content collection only. You should create a similarly restricted key if you will be using client-side JavaScript Ajax code since the string will be visible in the code.
It’s now possible to build a standalone JavaScript query handler (ES5 has been used to ensure cross-browser compatibility without a pre-compile step!):
// restdb.io query handler
var restDB = (function() {

  // configure for your own DB
  var
    api = 'https://sitepoint-fbbf.restdb.io/rest/',
    APIkey = '597dd2c7a63f5e835a5df8c4';

  // query the database
  function query(url, callback) {

    var timeout, xhr = new XMLHttpRequest();

    // set URL and headers
    xhr.open('GET', api + url);
    xhr.setRequestHeader('x-apikey', APIkey);
    xhr.setRequestHeader('content-type', 'application/json');
    xhr.setRequestHeader('cache-control', 'no-cache');

    // response handler
    xhr.onreadystatechange = function() {
      if (xhr.readyState !== 4) return;
      var err = (xhr.status !== 200), data = null;
      clearTimeout(timeout);
      if (!err) {
        try {
          data = JSON.parse(xhr.response);
        }
        catch(e) {
          err = true;
          data = xhr.response || null;
        }
      }
      callback(err, data);
    };

    // timeout
    timeout = setTimeout(function() {
      xhr.abort();
      callback(true, null);
    }, 10000);

    // start call
    xhr.send();
  }

  // public query method
  return {
    query: query
  };

})();
This code passes queries to the restdb.io API endpoint and sets the appropriate HTTP headers including x-apikey for the API key. It times out if the response takes longer than ten seconds. A callback function is passed an error and any returned data as a native object. For example:
// run a query
restDB.query(
  '/content?q={"published":true}',
  function(err, data) {
    // success!
    if (!err) console.log(data);
  }
);
The console will output an array of documents from the content collection, e.g.
[
  {
    _id: "1111111111111111",
    slug: "",
    title: "Home page",
    body: "page content...",
    image: [],
    published: true
  },
  {
    _id: "22222222222222222",
    slug: "page-two",
    title: "Page Two",
    body: "page content...",
    image: [],
    published: true
  },
  {
    _id: "33333333333333333",
    slug: "page-three",
    title: "Another page",
    body: "page content...",
    image: [],
    published: true
  }
]
The API can be called from any language which can make an HTTP request. restdb.io provides examples for cURL, jQuery $.ajax, JavaScript XMLHttpRequest, NodeJS, Python, PHP, Java, C#, Objective-C and Swift.
I’ve created a simple example at Codepen.io which allows you to search for strings in the title and body fields and displays the results:
See the Pen restdb.io query by SitePoint (@SitePoint) on CodePen.
It passes the following query:
{ "$or": [
  { "title": {"$regex": "searchstring"} },
  { "body":  {"$regex": "searchstring"} }
]}
where searchstring is the search text entered by the user.
An additional h querystring parameter limits the returned fields to just the slug, title and published flag:
{
  "$fields": {
    "slug": 1,
    "title": 1,
    "published": 1
  }
}
Further information:
Step 7: Build Your Own CMS
A few steps were required to create a database-driven website and a simple search facility. You could edit pages directly using restdb.io’s user interface but it would be possible to build a bespoke CMS to manipulate the content. It would require:
- A new restdb.io API key (or change the existing one) to have appropriate GET, POST, PUT, PATCH and DELETE access to the content collection.
- A user interface to browse or search for pages (the one above could be a good starting point).
- A process to start a new page or GET existing content and place it in an editable form.
- Processes to add, update or delete pages using the appropriate HTTP methods.
The editing system should run on a restricted device or behind a login to ensure only authenticated users can access. Take care not to reveal your restdb.io API key if using client-side code!
Further information:
Try restdb.io Today!
This article uses restdb.io to build a rudimentary CMS, but the service is suitable for any project which requires data storage. The REST API can be accessed from any language or framework which makes it ideal for applications with multiple interfaces, e.g. a web and native mobile view.
restdb.io provides a practical alternative to managing your own database software installation. It’s simple to use, fast, powerful, highly scalable and considerably less expensive than hiring a database expert! Your application hosting costs will also reduce since all data is securely stored and backed-up on the restdb.io servers.
Finally, restdb.io makes you more productive. You can concentrate on the main application because data storage no longer causes concerns for you and your team.
Start building your restdb.io database today and let us know how you get on!
Frequently Asked Questions (FAQs) about Getting Started with RestDB.io and Creating a Simple CMS
What is RestDB.io and why should I use it?
RestDB.io is a NoSQL database and backend service that allows developers to create, read, update, and delete data from a database using a simple API. It’s a great tool for developers because it allows them to focus on building their application without worrying about managing a database. It’s also very flexible and can be used with any programming language that can make HTTP requests.
How do I get started with RestDB.io?
To get started with RestDB.io, you first need to create an account. Once you’ve done that, you can create a new database and start adding collections (tables) and fields (columns). You can then use the API to interact with your data.
How do I create a collection in RestDB.io?
Creating a collection in RestDB.io is straightforward. After logging into your account, navigate to your database and click on the ‘New Collection’ button. You can then give your collection a name and start adding fields.
How do I add fields to a collection in RestDB.io?
To add fields to a collection in RestDB.io, navigate to the collection and click on the ‘New Field’ button. You can then specify the field name, type, and other properties.
How do I use the RestDB.io API?
The RestDB.io API allows you to interact with your data programmatically. You can use it to create, read, update, and delete data from your collections. The API is RESTful, which means you can use standard HTTP methods like GET, POST, PUT, and DELETE to interact with your data.
Can I use RestDB.io with my programming language?
Yes, you can use RestDB.io with any programming language that can make HTTP requests. This includes popular languages like JavaScript, Python, Ruby, PHP, and many others.
How do I secure my RestDB.io database?
RestDB.io provides several security features to help protect your data. You can restrict access to your database by IP address, require authentication for API requests, and encrypt your data at rest.
Can I use RestDB.io to build a CMS?
Yes, you can use RestDB.io to build a simple CMS. By creating collections for your content types and using the API to manage your content, you can build a CMS that fits your specific needs.
How do I manage users in RestDB.io?
RestDB.io provides a built-in user management system. You can create users, assign roles, and manage permissions directly from the RestDB.io dashboard.
What are the limitations of RestDB.io?
While RestDB.io is a powerful tool, it does have some limitations. For example, it may not be suitable for applications that require complex relational data models or advanced query capabilities. However, for many applications, RestDB.io provides a simple and flexible solution for managing data.
Craig is a freelance UK web consultant who built his first page for IE2.0 in 1995. Since that time he's been advocating standards, accessibility, and best-practice HTML5 techniques. He's created enterprise specifications, websites and online applications for companies and organisations including the UK Parliament, the European Parliament, the Department of Energy & Climate Change, Microsoft, and more. He's written more than 1,000 articles for SitePoint and you can find him @craigbuckler.
