

Key Takeaways
- Widgets are miniature application views embedded in other applications, usually the Home screen, and can be interacted with and updated periodically. Creating a simple widget displaying the current time involves defining components in the AndroidManifest.xml file, creating a meta-data file, and specifying the layout and components of the widget.
- Creating a widget involves introducing a new element in the manifest file that specifies it, creating a meta-data file, and creating a layout file. The layout file specifies the components of the widget and their layout. However, there are restrictions on which components can be used in widgets due to the widget running in a different application.
- The ExampleAppWidgetProvider class contains the code to update the widget view each time the timeout period expires. It uses a RemoteViews component to set strings, images, and button actions on the remote components. The widget is updated using the updateAppWidget() method.
- Android limits the update period of widgets to once every half an hour or greater to avoid battery drain. For more frequent updates that only operate while the screen is on, the AlarmManager can be used. This method does not drain the battery.
One often vaunted feature of Android are the Home screen widgets. The official definition of a widget, taken from the Android documentation is:
App Widgets are miniature application views that can be embedded in other applications (such as the Home screen) and receive periodic updates.
In practice, widgets are generally only used on the Home screen. Widgets can also be interacted with, reacting to touch events, although there are some limits on what can be done. In this article, I will show you how to write a simple widget that shows the current time, and loads up your app when you click on it. In future articles, we will add additional functionality to show graphics, update frequently, and fetch data to show from the internet.
Android’s documentation of App Widgets provides a pretty good starting point when learning widgets. We will start with an example that is very similar to their tutorial, then we will move on to demonstrate some more advanced features. We assume that the user is using Eclipse with the Android Development Extensions to produce their app, but the same results can be achieved in other IDEs. Getting Started with Android is a no nonsense guide to setting up an Android development environment.
Lets start by creating a new Android Project. Select File » New » Android Project. Fill in the wizard as you see fit with some sensible values. You can choose whatever values you like, but for my example I used the following values specifically, leaving the other values to their defaults.
- Project Name: Widget Example
- Build Target: 2.2 [API Level 8]
- Application Name: Widget Example
- Package Name: com.eightbitcloud.example.widget

Then click on Finish. This will create you a fully working and testable Android application. Run it in the emulator now if you like, by right clicking on the project and selecting Run As » Android Application. You might need to create a definition for an emulator. Once running, the app simply displays you a black screen with a ‘Hello World’ string in it. Boring, but it is a good starting point.
In Android, all components that are shown in the OS are defined in the manifest file. Load up AndroidManifest.xml from the top level of your project. Eclipse will show you the file in a structured editor, but if you are familiar with XML, it might be easier to switch to the source view by selecting the last tab in the editor. It should look something like this:
<?xml version="1.0" encoding="utf-8"?>

<manifest xmlns:android="http://schemas.android.com/apk/res/android"

  package="com.eightbitcloud.example.widget" android:versionCode="1"

  android:versionName="1.0">

  <uses-sdk android:minSdkVersion="8" />
  <application android:icon="@drawable/icon" android:label="@string/app_name">

    <activity android:name=".WidgetExampleActivity"

      android:label="@string/app_name">

      <intent-filter>

    <action android:name="android.intent.action.MAIN" />

    <category android:name="android.intent.category.LAUNCHER" />

      </intent-filter>

    </activity>
  </application>

</manifest>
The important thing that is in this file at the moment is the Activity that specifies the main view of the application. You’ll see it inside the application tag. This tells Android where the class is that specifies the main view of your application, what name it should be given (by the label attribute), and what intents it should respond to. The main view is marked as the MAIN action to indicate that Android should load it up when the app starts, and with LAUNCHER to indicate that it should appear in the application list. None of this is directly related to widgets, but is useful background on how Android handles its manifest.
To add our widget, we need to introduce a new element to the manifest that specifies it. Below the activity, add the following
<receiver android:name=".ExampleAppWidgetProvider" android:label="8-bit cloud widget 1">

  <intent-filter>

        <action android:name="android.appwidget.action.APPWIDGET_UPDATE" />

  </intent-filter>

  <meta-data android:name="android.appwidget.provider" android:resource="@xml/widget1_info" />

</receiver>
This specifies a new class ExampleAppWidgetProvider which will be responsible for receiving APPWIDGET_UPDATE intents. We need to give a name to our widget, which we do by specifying a value for the android:label attribute. Normally, you would specify this in your application’s res/values/strings.xml file, but for the sake of simplicity I have placed the value directly in the manifest file. I used “8-bit cloud widget 1”. The remainder of the configuration of the widget will be specified in the meta-data file, which will be located in the res/xml/widget1_info.xml file. Our next step is to create that meta-data file. Create it by selecting File » New » Other » Android » Android XML and fill it in as follows.
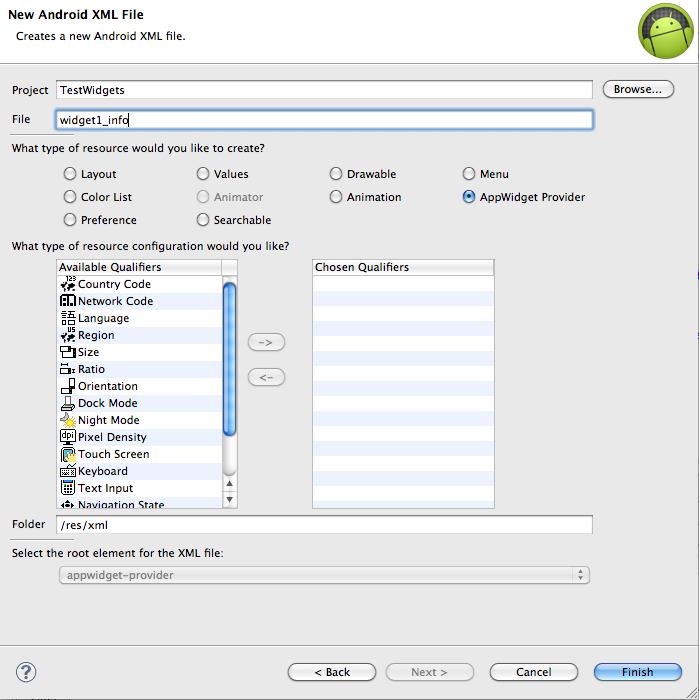
Once the file is created, switch to the source tab, and set the contents of the file to the following:
<?xml version="1.0" encoding="utf-8"?>

<appwidget-provider xmlns:android="http://schemas.android.com/apk/res/android"

    android:minWidth="294dp"

    android:minHeight="72dp"

    android:updatePeriodMillis="1000"

    android:initialLayout="@layout/widget1">

</appwidget-provider>
The minWidth and minHeight parameters specify the size of the widget. There are special rules about the sizes that Android widgets can have because Android arranges its home screens in a grid of 4 x 4. The documentation specifies that you calculate the size by using the following formula:
size = (number of cells * 74) – 2
In our example, we want our widget to be 4 * 1 cells in size, so we specify the size as (4 * 74) – 2 = 294 by 72 dps.
Android views only update on a periodic basis. We want to display a clock, so I’ve put in an updatePeriodMillis of one second (1000 ms), so that it updates every second. It turns out that values this small don’t work, but I’ll come back to that later. Finally, we specify what layout will be used for the widget. Lets create that layout file using the same android XML creation wizard we used before, except this time we select a layout type and a file name of widget1. As before, switch to the source tab of the file, and use the following contents:
<?xml version="1.0" encoding="utf-8"?>

<LinearLayout

  xmlns:android="http://schemas.android.com/apk/res/android"

  android:orientation="vertical"

  android:layout_width="match_parent"

  android:layout_height="match_parent"

  android:gravity="center"

  android:layout_margin="4dp"

  android:background="@drawable/background">

    <TextView android:id="@+id/widget1label" android:layout_height="wrap_content" android:textAppearance="?android:attr/textAppearanceLarge" android:layout_width="wrap_content"/>

    <Button android:text="Click Me!" android:id="@+id/button" android:layout_width="wrap_content" android:layout_height="wrap_content"/>
</LinearLayout>
The layout specifies what components will be in the widget, and how they are laid out. The important things to see here however are the TextView and Button components that have been added to it. They correspond to the components that will be shown on the screen.
When creating your widget, you might be tempted to create fancy layouts, using your own custom components and complex layouts. There are quite severe restrictions on which components can be used in Widgets however, because the widget runs in a different application, and doesn’t have access to your own code when rendering.
There are sneaky ways you can make your widget look like its more complex however, which I will cover in another article. For now, note that the only components that you can use in a widget are:
- FrameLayout
- LinearLayout
- RelativeLayout
- AnalogClock
- Button
- Chronometer
- ImageButton
- ImageView
- ProgressBar
- TextView
- ViewFlipper
You’ll notice in the layout that there is a background specified for the widget as well. You’ll need to create your own background drawable in res/drawable/background, or you could use the one I created for the example.
package com.eightbitcloud.example.widget;
import java.text.DateFormat;

import java.text.SimpleDateFormat;

import java.util.Arrays;

import java.util.Date;
import android.app.PendingIntent;

import android.appwidget.AppWidgetManager;

import android.appwidget.AppWidgetProvider;

import android.content.Context;

import android.content.Intent;

import android.util.Log;

import android.widget.RemoteViews;
public class ExampleAppWidgetProvider extends AppWidgetProvider {

  DateFormat df = new SimpleDateFormat("hh:mm:ss");
  public void onUpdate(Context context, AppWidgetManager appWidgetManager, int[] appWidgetIds) {

    final int N = appWidgetIds.length;
    Log.i("ExampleWidget",  "Updating widgets " + Arrays.asList(appWidgetIds));
    // Perform this loop procedure for each App Widget that belongs to this

    // provider

    for (int i = 0; i < N; i++) {

      int appWidgetId = appWidgetIds[i];
      // Create an Intent to launch ExampleActivity

      Intent intent = new Intent(context, WidgetExampleActivity.class);

      PendingIntent pendingIntent = PendingIntent.getActivity(context, 0, intent, 0);
      // Get the layout for the App Widget and attach an on-click listener

      // to the button

      RemoteViews views = new RemoteViews(context.getPackageName(), R.layout.widget1);

      views.setOnClickPendingIntent(R.id.button, pendingIntent);
      // To update a label

      views.setTextViewText(R.id.widget1label, df.format(new Date()));
      // Tell the AppWidgetManager to perform an update on the current app

      // widget

      appWidgetManager.updateAppWidget(appWidgetId, views);

    }

  }

}
This class contains the code that will be used to update our view each time that the timeout period expires. It is responsible for updating the contents of the widget. Widgets run in a different application (the Home screen) to our application, so it is not just a matter of simply updating the components. Instead, you are given access to a RemoteViews component which you can use to set strings, images and button actions on the remote components.
In our case, we are looking to do two things. First, we want to add an action listener for our button so that when we click on it, it opens up our main application. This is done with the PendingIntent and the setOnClickPendingIntent() method. Second, we want to update the TextView in our view to show the current date. This is done via the call to setTextViewText(). Once this is done, we update the widget using the updateAppWidget() method.
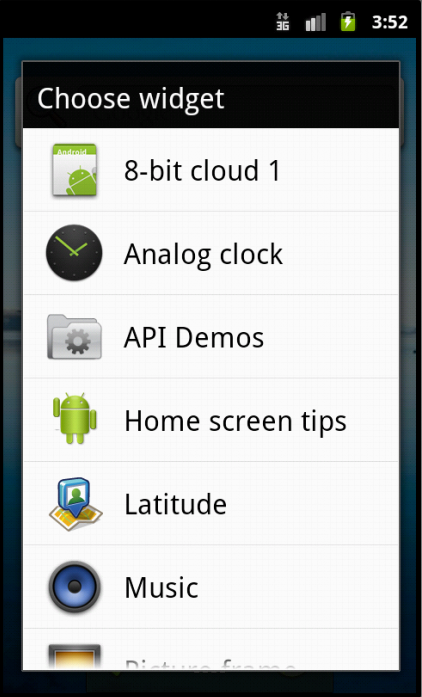
Voila! We now have a working widget application. Install it on your emulator by selecting the run profile you created before. As before, it will show you the application view. Quit out to the Home screen using the home button, then long press on the background and select Widget. You should now be presented with a list of widgets, with your widget in the list. Select your widget, and it will be added to your home screen.

Yay! Hang on, the clock isn’t updating! We set the update period to 1 second in our meta-data file, so it should update once every second, right? It turns out there is a very good reason for this. Every time a widget needs updating, Android will wake up your device, load your application, and run the WidgetProvider class to update the widget. It does this even if your screen is off and the phone is asleep. If the update period were set to only run a few times an hour or less frequently, then this doesn’t amount to much of a battery drain. If the update period is very short like our example, then the widget would drain very quickly and you would have a long list of angry customers. To avoid this, Google limits the update period to once every half an hour or greater.
Luckily there is another way to handle more frequent updates; one that only operates while the screen is on so as not to drain the battery. To do this, we use the AlarmManager. Using the AlarmManager will be the focus of my next article.
As with all my articles, I have posted the source to GitHub. You can find the code as part of my Android-Examples repository, in the WidgetExample subdirectory. This project will be updated as the tutorial series progresses, so I have marked this first example as a tag. Please feel free to ask questions or provide feedback.
And if you enjoyed reading this post, you’ll love Learnable; the place to learn fresh skills and techniques from the masters. Members get instant access to all of SitePoint’s ebooks and interactive online courses, like Beginning Android Development.
Comments on this article are closed. Have a question about Android? Why not ask it on our forums?
Frequently Asked Questions (FAQs) about Coding an Android Widget
What are the basic components required to code an Android widget?
To code an Android widget, you need four basic components. First, an AppWidgetProviderInfo XML file that describes the properties of the widget, such as its size and update frequency. Second, an AppWidgetProvider class that serves as the broadcast receiver for receiving updates. Third, a layout file that defines the user interface of the widget. Lastly, you need to modify the AndroidManifest.xml file to declare the AppWidgetProvider.
How can I update my Android widget?
Android widgets can be updated using the AppWidgetManager’s updateAppWidget() method. This method takes two parameters: the widget’s ID and a RemoteViews object that describes the new state of the widget. You can also set an update interval in the AppWidgetProviderInfo XML file, which will automatically update the widget at the specified interval.
How can I make my Android widget interactive?
To make your Android widget interactive, you can use PendingIntent. PendingIntent works like a regular Intent but can be used from outside of your application’s context. For example, you can set a PendingIntent on a button in your widget’s layout that launches an activity in your app when the button is clicked.
How can I resize my Android widget?
Android widgets can be made resizable by adding the android:resizeMode attribute to the AppWidgetProviderInfo XML file. The value of this attribute can be either “horizontal”, “vertical”, or “none”. Note that widget resizing is only available on Android 3.1 and higher.
How can I test my Android widget?
You can test your Android widget using the Android Emulator. Simply run your app in the emulator and then add the widget to the home screen. You can also test your widget on a physical device by installing the app on the device and adding the widget to the home screen.
How can I optimize the performance of my Android widget?
To optimize the performance of your Android widget, you should minimize its update frequency and avoid performing complex operations such as network requests or database queries in the AppWidgetProvider’s onUpdate() method. Instead, these operations should be performed in a background service.
How can I support different screen sizes and densities with my Android widget?
You can support different screen sizes and densities by creating multiple layout files for your widget and placing them in the appropriate resource directories. Android will automatically select the correct layout file based on the device’s screen size and density.
How can I add configuration settings to my Android widget?
You can add configuration settings to your Android widget by creating a configuration activity. This activity is launched when the user adds the widget to their home screen. The configuration activity should return a result intent containing the widget’s ID and any configuration data.
How can I handle user input in my Android widget?
User input in Android widgets is handled using PendingIntent. For example, you can set a PendingIntent on a button in your widget’s layout that launches an activity in your app when the button is clicked. The activity can then handle the user input and update the widget if necessary.
How can I debug my Android widget?
You can debug your Android widget using the Android Debug Bridge (ADB). ADB allows you to view log messages, install and uninstall apps, and perform other debugging tasks. You can also use the Android Studio debugger to set breakpoints and step through your code.