How to Administer a Remote MySQL Database using SSH Tunneling

 Most MySQL developers have a copy of their databases running on a local PC. Although the MySQL command line may be fun for a while, it is no substitute for a decent database design application such as Workbench or SQLyog.
Connecting to a local database on localhost’s port 3306 is easy. However, when it comes to configuring the remote database, many developers resort to SSH or slower web applications such as phpMyAdmin. Fortunately, SSH tunneling allows you to use your favorite desktop design application to access your remote MySQL database.
What is Tunneling?
Wikipedia has a great description of tunneling – but life is too short to understand it. In brief, a “tunnel” is created between your PC and the server and it appears as though the remote MySQL database is run locally. If your web host supports SSH, you should be able to configure tunneling.
Tunneling Software
Windows users can download Putty and Plink from the Putty website. Copy both files to a folder of your choice.
Mac or Linux users have SSH built in; use the following Windows instructions as a guide and refer to your documentation.
Digging the Tunnel
Start a command line console, CD to the Putty/Plink folder, and enter:
plink -L 3307:localhost:3306 myusername@mydomain.com
Where:
- 3307 is the local port used to connect to the remote database. You can use 3306, however, this could conflict with your PC’s MySQL installation.
- localhost and 3306 is the MySQL address from the remote server (most people will not need to change this)
- myusername is your SSH user name
- mydomain.com is the remote server’s domain or IP address.
The first time you connect, you will be asked if the SSH key can be added to the cache. You will then be asked for your SSH password before the tunnel is established.
(Tip: copy the Plink command in to a .bat file so it can be launched with a click.)
Attaching to the Remote Database
You can now connect to the remote database from SQLyog or any other database client:
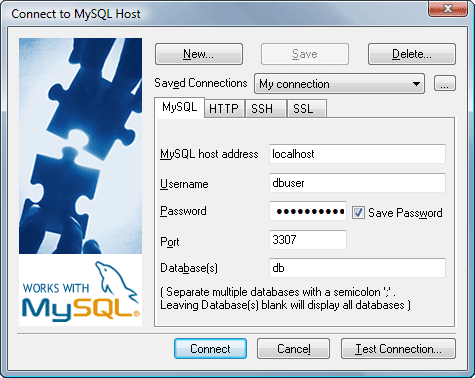
The connection details are:
- ‘localhost’ for the MySQL host address (your end of the tunnel)
- ‘3307’ for the local port to the remote database (specified in the Plink command)
- the remote database name, and
- the remote username and password, i.e. a MySQL account with permissions to access and configure the database.
All going well, you should now be able to manage your remote database as easily as a local version.
Does anyone have further tips or advice regarding remote MySQL administration?
Frequently Asked Questions on Administering a Remote MySQL Database Using SSH Tunneling
What is SSH Tunneling and how does it work with MySQL?
SSH Tunneling, also known as SSH port forwarding, is a method of transporting arbitrary networking data over an encrypted SSH connection. It can be used to secure a network connection over an unsecured network. In the context of MySQL, SSH tunneling can be used to connect to a MySQL server securely. The data transferred between the client and the server is encrypted, making it difficult for anyone to intercept and understand the data.
How can I set up an SSH Tunnel for MySQL?
Setting up an SSH tunnel for MySQL involves creating a secure SSH connection between the client and the server. This can be done using SSH client software. Once the SSH connection is established, you can then connect to the MySQL server through this secure tunnel. The exact steps can vary depending on the SSH client software and the operating system you are using.
What are the benefits of using SSH Tunneling for MySQL?
SSH Tunneling provides a secure connection between the client and the server, which is particularly important when dealing with sensitive data. It encrypts the data transferred between the client and the server, preventing anyone from intercepting and understanding the data. This is particularly useful when connecting to a MySQL server over an unsecured network, such as the internet.
Can I use SSH Tunneling with any MySQL client?
Yes, SSH Tunneling can be used with any MySQL client. The SSH tunnel acts as a secure bridge between the client and the server, so it doesn’t matter what client software you are using. As long as the client software supports connecting to a MySQL server, it can connect through the SSH tunnel.
What are the potential issues I might face when using SSH Tunneling with MySQL?
While SSH Tunneling is a powerful tool, it can sometimes be complex to set up and manage. If not set up correctly, it can lead to connection issues. Additionally, because the data is encrypted, it can add some overhead to the connection, potentially slowing down data transfer rates. However, these issues can usually be mitigated with proper setup and management.
How can I troubleshoot connection issues with SSH Tunneling?
Troubleshooting connection issues with SSH Tunneling can involve checking the SSH connection, verifying the MySQL server settings, and ensuring that the client software is correctly configured to use the SSH tunnel. Detailed error messages from the SSH client software and the MySQL client can also provide clues about what might be going wrong.
Is SSH Tunneling the only way to secure a MySQL connection?
No, SSH Tunneling is not the only way to secure a MySQL connection. Other methods include using SSL/TLS encryption, IP whitelisting, and using a VPN. The best method depends on your specific needs and circumstances.
Can I use SSH Tunneling with a remote MySQL server?
Yes, SSH Tunneling can be used with a remote MySQL server. In fact, this is one of the most common use cases for SSH Tunneling. By creating a secure SSH tunnel to the remote server, you can connect to the MySQL server as if it were on your local network.
How can I improve the performance of my SSH Tunnel?
There are several ways to improve the performance of your SSH Tunnel. These include using a faster encryption algorithm, enabling compression, and optimizing your network settings. However, the exact steps can vary depending on the SSH client software and the operating system you are using.
What is the difference between SSH Tunneling and a VPN?
Both SSH Tunneling and VPNs provide a way to secure network connections, but they do so in different ways. SSH Tunneling creates a secure tunnel for a specific application (in this case, MySQL), while a VPN secures all network traffic from a device. This means that SSH Tunneling can be more efficient if you only need to secure a single application, but a VPN can provide broader security if you need to secure all network traffic.
Craig is a freelance UK web consultant who built his first page for IE2.0 in 1995. Since that time he's been advocating standards, accessibility, and best-practice HTML5 techniques. He's created enterprise specifications, websites and online applications for companies and organisations including the UK Parliament, the European Parliament, the Department of Energy & Climate Change, Microsoft, and more. He's written more than 1,000 articles for SitePoint and you can find him @craigbuckler.