

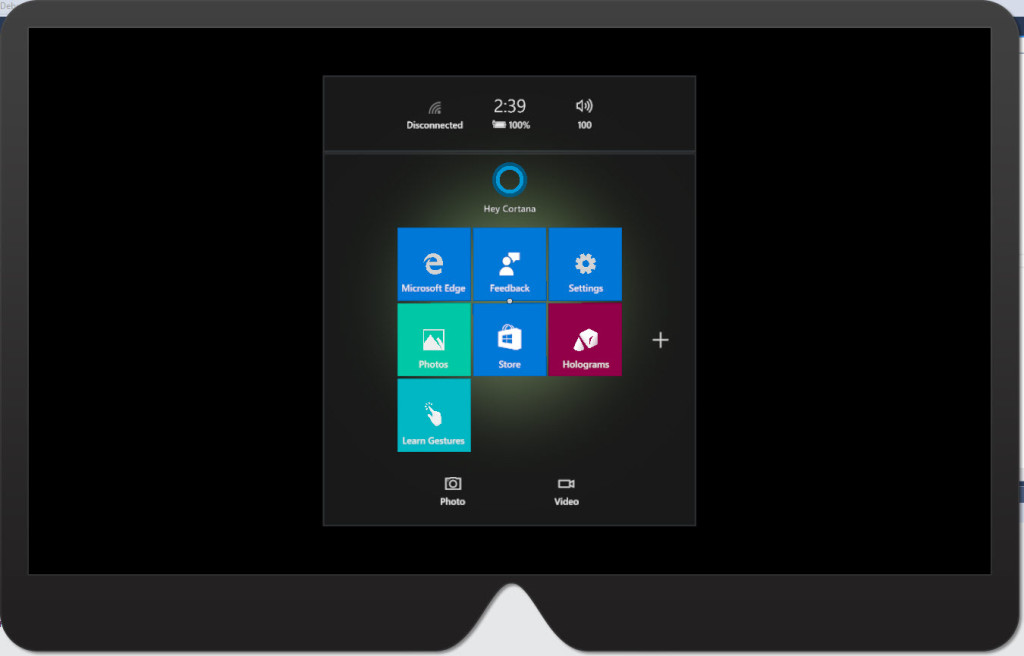
One of the most exciting and groundbreaking technology products at the moment is the Microsoft HoloLens. The ability to show real time 3D holograms mixed seamlessly with any physical environment opens up endless new possibilities for modern computing. I have just scratched the surface of the holographic rabbit hole and, considering the hardware has just started shipping as a US$3,000 developer kit, it is safe to say that the best is yet to come.
If you can’t wait for the general availability release and want to delve into HoloLens app development today, then there is good news! The tooling is already available, it is free and you don’t even need a HoloLens to get started.
Key Takeaways
- Microsoft HoloLens development requires a basic understanding of C# and Unity3D, along with the installation of the HoloLens Emulator and development tools available from Microsoft’s official website.
- Unity3D plays a crucial role in HoloLens development by facilitating the creation of 3D environments and interactions, offering a visual editor for scene creation, behavior scripting, and application building.
- To debug HoloLens applications, developers can utilize Visual Studio’s debugging tools such as breakpoints and variable inspection, and can test applications using the HoloLens Emulator without needing a physical device.
- While HoloLens applications can be developed on a Mac using Unity and Visual Studio for Mac, a Windows machine is necessary for building and deploying applications to the HoloLens or its emulator due to platform restrictions.
- HoloLens applications can be published to the Microsoft Store by creating a developer account, undergoing application certification, and then publishing, or they can be distributed directly via sideloading.
Prerequisites
As HoloLens runs Windows 10, apps are built for the Universal Windows Platform (UWP), which means that UWP apps written for mobile devices, desktops, Xbox and other platforms will also run on HoloLens. There are two main tools you need to create holographic experiences — Visual Studio 2015 and Unity 3D. You will use these alongside the SDK and emulator. In total, you will need the following:
- Windows 10
- Visual Studio 2015 Update 2 (Community Edition)
- Unity 3D for HoloLens
- Windows 10 SDK (if you didn’t already install it with Visual Studio 2015)
- HoloLens Emulator
Once you have installed these tools, you are ready to create your first holographic experience.
Although the HoloLens runs UWP apps, which are in turn written using C# and Visual Studio, the unique aspect of HoloLens apps is the 3D holograms. These are created and modeled in your favorite 3D software, but if you are like me and don’t have a clue how to create 3D models, there are services you can use where professionals will create them for you. Unity even has their own 3D model asset store. I will include a short introduction to Unity, however it is a huge topic. SitePoint has some other Unity articles to get you started.
Unity 3D allows you to import and manipulate 3D models, and manage events and scripts for each object. You can control the lighting, the surroundings (known as the “scene”) and every other aspect of the world you want to project to your users. Unity is not easy to master, but there is no way around it if you want to create HoloLens apps.
Creating 3D Objects in Unity
You can create basic shapes in Unity by going opening the GameObject menu, going to 3D Object and choosing the 3D object you want.

Choosing a sphere creates a basic sphere shape in your scene, which you can then manipulate, animate and control.
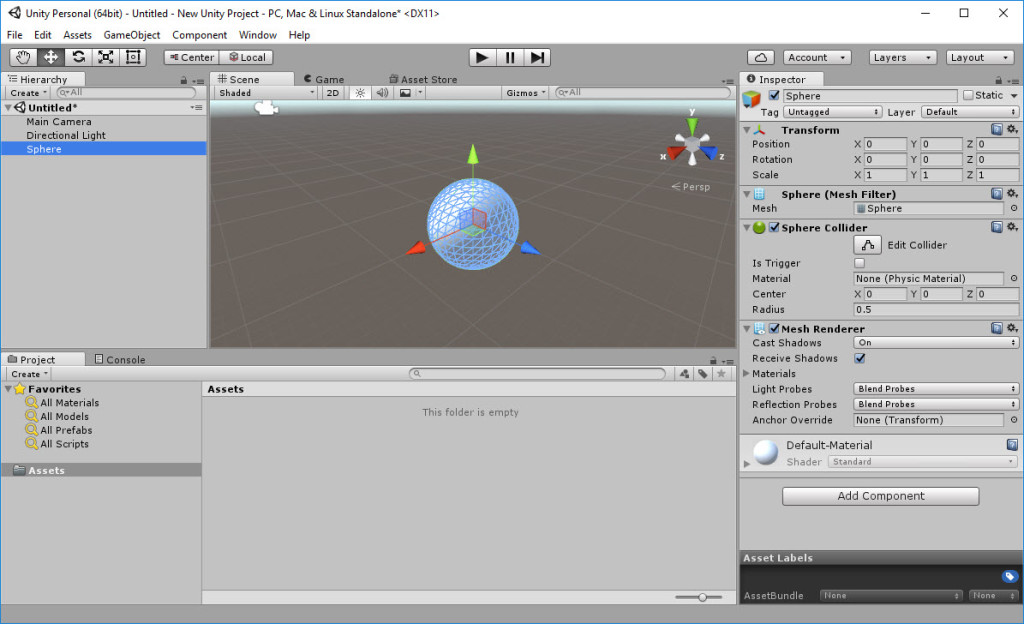
The main way to interact with the 3D objects in a holographic experience is to attach scripts to the objects. You do this by creating a new script in Unity.

You can edit this script in Visual Studio by double-clicking it.
using UnityEngine;
using System.Collections;

public class SphereBehaviour : MonoBehaviour {

    // Use this for initialization
    void Start () {

    }

    // Update is called once per frame
    void Update () {

    }
}
The Start method is called when the app starts and sets up any events or initialization code. Update is called once per frame and is where you detect interactions such as collisions, RayCast hits and other user interactions.
To attach the script to an object in Unity, drag and drop it on to it. The code in the script will execute appropriately when the methods are called. This could be on start, when a user speaks a voice command or any other event in your holographic experience.
To run the holographic app, you need to import the project into Visual Studio and Unity can create a full UWP app solution for you. Use the following build settings from the Build Settings menu.
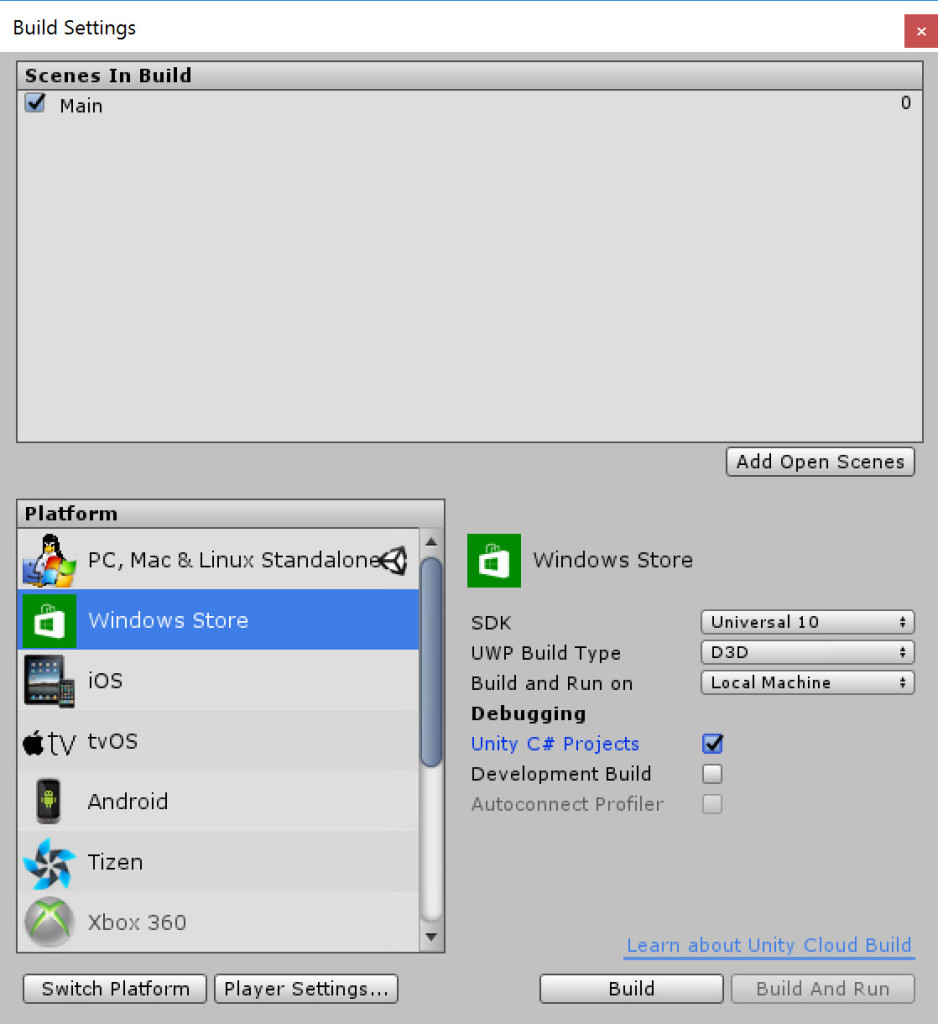
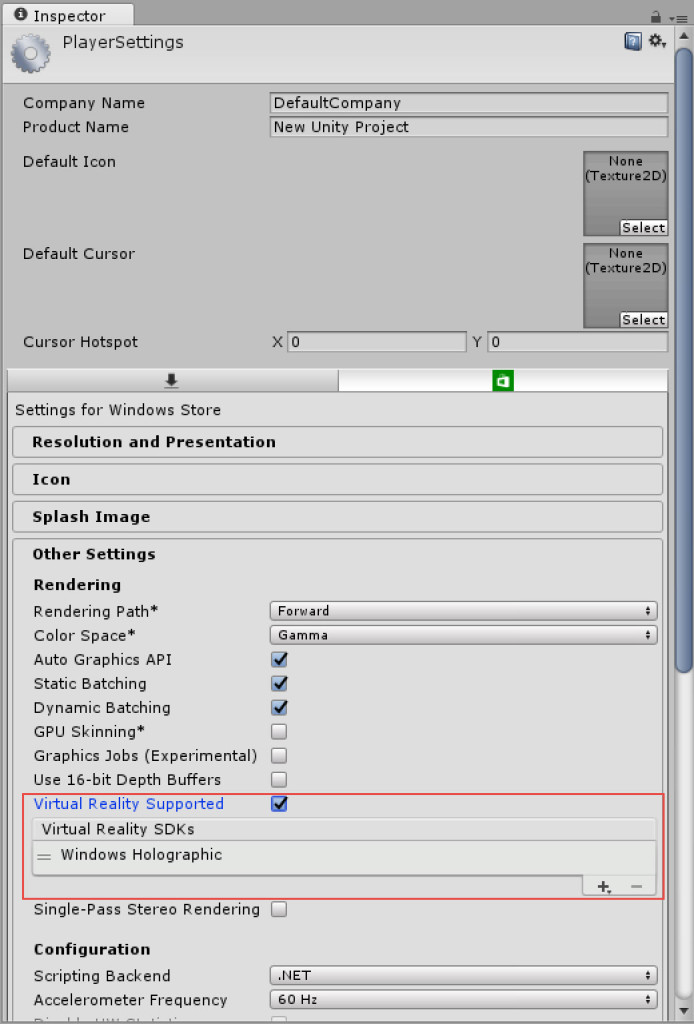
Make sure you open Player Settings, select Virtual Reality Supported, and make sure the Windows Holographic SDK is present.
When you hit Build, Unity will create a full UWP app solution in a folder you choose. You can open this solution in Visual Studio.
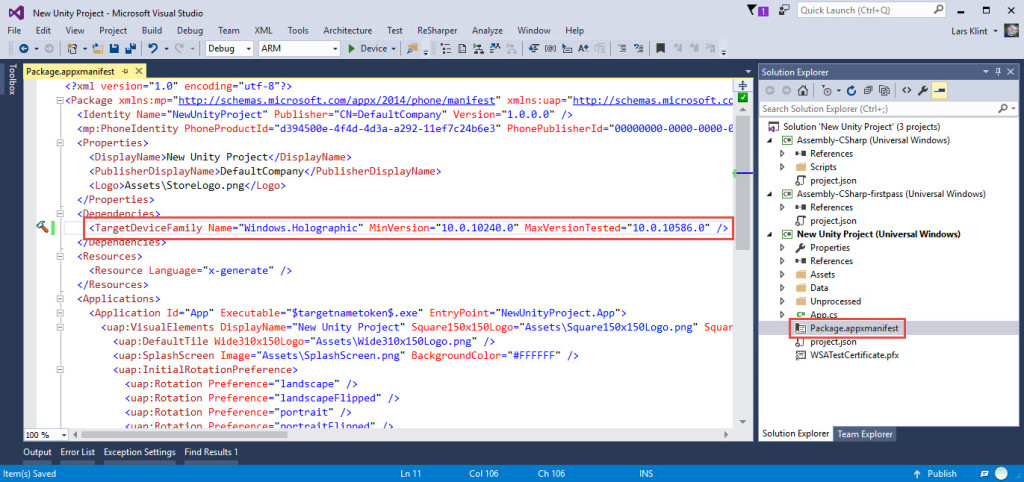
By default, Universal Windows Platform apps exported from Unity will run on any Windows 10 device. Because HoloLens is different, the app should take advantage of features that are only available on HoloLens. To do this, you need to set the TargetDeviceFamily to “Windows.Holographic” in the Package.appxmanifest file in Visual Studio as shown below.
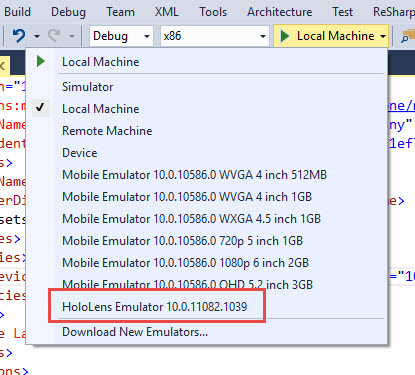
And now you can run the solution in the HoloLens Emulator.

Now that you know the workflow for creating a 3D workspace, can add models and apply scripts to these models, it’s time to look at the main areas of interaction with holograms in HoloLens apps.
Gaze Input
The gaze is the first form of input into HoloLens apps and is how you put focus on holograms. It is the center of the field of view when a user looks through the HoloLens, and is essentially a “mouse cursor”. You can design this cursor any way you want, so it could be contextual to your app, a company logo or any other 3D shape.
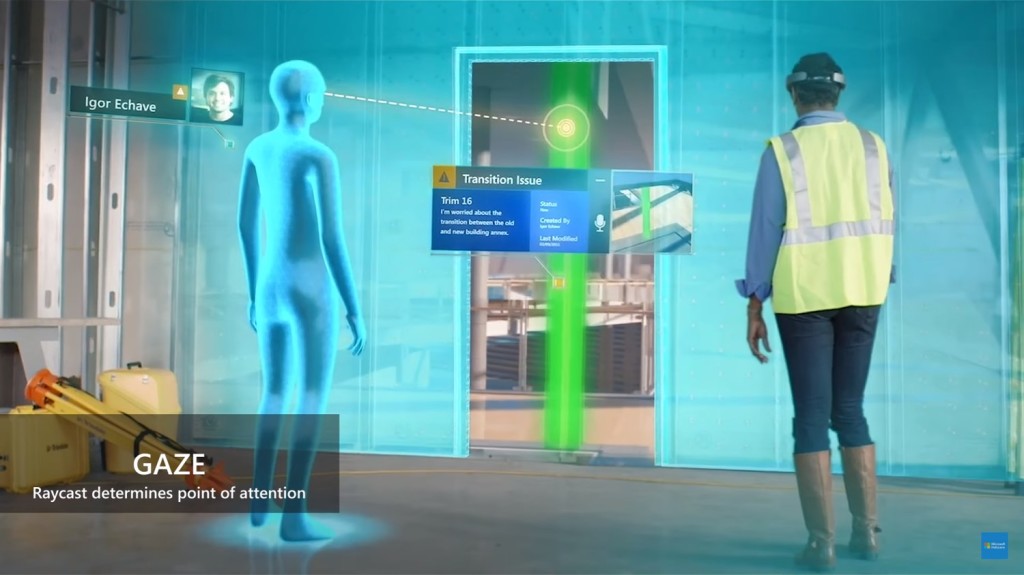
Bear in mind that HoloLens uses the position and orientation of your user’s head, not their eyes, to determine their gaze vector. It’s like a laser pointer that comes straight out from the center of the HoloLens.
The cursor is a 3D object as well, and you need to code it to behave like the cursor. Create a new script in Unity and attach it to your model, then use code similar to the below:
using UnityEngine;

public class WorldCursor : MonoBehaviour
{
  private MeshRenderer meshRenderer;

  // Use this for initialization
  void Start()
  {
    // Grab the mesh renderer that's on the same object as this script.
    meshRenderer = this.gameObject.GetComponentInChildren<MeshRenderer>();
  }

  // Update is called once per frame
  void Update()
  {
    // Do a raycast into the world based on the user's
    // head position and orientation.
    var headPosition = Camera.main.transform.position;
    var gazeDirection = Camera.main.transform.forward;

    RaycastHit hitInfo;

    if (Physics.Raycast(headPosition, gazeDirection, out hitInfo))
    {
      // If the raycast hit a hologram...
      // Display the cursor mesh.
      meshRenderer.enabled = true;

      // Move the cursor to the point where the raycast hit.
      this.transform.position = hitInfo.point;

      // Rotate the cursor to hug the surface of the hologram.
      this.transform.rotation = Quaternion.FromToRotation(Vector3.up, hitInfo.normal);
    }
    else
    {
      // If the raycast did not hit a hologram, hide the cursor mesh.
      meshRenderer.enabled = false;
    }
  }
}
The important part of the code is the RayCast object. This is the “laser beam” mentioned above and is the test to see if your user is looking at an object. If there is a hit, you show the cursor and make it “hug” whatever surface it is on.
Gesture Input
Once you have targeted an object with gaze that you wish to interact with, you can use gestures to perform the actual interaction. The most common gesture and one that comes free is the “tap”. This is like clicking the left mouse button to invoke an action on the object. It’s possible to perform more complex gestures, such as “tap and hold” to move objects in 3D space.
Create another script in Unity and include code similar to the below. The script is then linked to the root of your project, as you want gestures to be global in the app and interact with any 3D object.
using UnityEngine;
using UnityEngine.VR.WSA.Input;

public class GazeGestureManager : MonoBehaviour
{
  public static GazeGestureManager Instance { get; private set; }

  // Represents the hologram that is currently being gazed at.
  public GameObject FocusedObject { get; private set; }

  GestureRecognizer recognizer;

  // Use this for initialization
  void Start()
  {
    Instance = this;

    // Set up a GestureRecognizer to detect Select gestures.
    recognizer = new GestureRecognizer();
    recognizer.TappedEvent += (source, tapCount, ray) =>
    {
      // Send an OnSelect message to the focused object and its ancestors.
      if (FocusedObject != null)
      {
        FocusedObject.SendMessageUpwards("OnSelect");
      }
    };
    recognizer.StartCapturingGestures();
  }

  // Update is called once per frame
  void Update()
  {
    // Figure out which hologram is focused this frame.
    GameObject oldFocusObject = FocusedObject;

    // Do a raycast into the world based on the user's
    // head position and orientation.
    var headPosition = Camera.main.transform.position;
    var gazeDirection = Camera.main.transform.forward;

    RaycastHit hitInfo;
    if (Physics.Raycast(headPosition, gazeDirection, out hitInfo))
    {
      // If the raycast hit a hologram, use that as the focused object.
      FocusedObject = hitInfo.collider.gameObject;
    }
    else
    {
      // If the raycast did not hit a hologram, clear the focused object.
      FocusedObject = null;
    }

    // If the focused object changed this frame,
    // start detecting fresh gestures again.
    if (FocusedObject != oldFocusObject)
    {
      recognizer.CancelGestures();
      recognizer.StartCapturingGestures();
    }
  }
}
The main object to notice in this snippet is the GestureRecognizer. It’s in charge of recognizing the gestures that users of your app perform. Here you register the TappedEvent to pass up the OnSelect event to an object whenever tapped.
The Update method continually checks if any object is being gazed on and sets the object in focus, to send a tapped event to the object if tapped.
Voice Input
My favorite way of interacting with the HoloLens (or at least the emulator) is to use voice. As well as the “See it Say it” rule, you can create your own phrases the HoloLens will recognize. When the app recognizes a particular phrase, an event fires, which you can use to handle what the action for the phrase is.
using System.Collections.Generic;
using System.Linq;
using UnityEngine;
using UnityEngine.Windows.Speech;

public class SpeechManager : MonoBehaviour
{
  KeywordRecognizer keywordRecognizer = null;
  Dictionary<string, System.Action> keywords = new Dictionary<string, System.Action>();

  // Use this for initialization
  void Start()
  {
    keywords.Add("Reset world", () =>
    {
      // Call the OnReset method on every descendant object.
      this.BroadcastMessage("OnReset");
    });

    keywords.Add("Drop Object", () =>
    {
      var focusObject = GazeGestureManager.Instance.FocusedObject;
      if (focusObject != null)
      {
        // Call the OnDrop method on just the focused object.
        focusObject.SendMessage("OnDrop");
      }
    });

    // Tell the KeywordRecognizer about our keywords.
    keywordRecognizer = new KeywordRecognizer(keywords.Keys.ToArray());

    // Register a callback for the KeywordRecognizer and start recognizing!
    keywordRecognizer.OnPhraseRecognized += KeywordRecognizer_OnPhraseRecognized;
    keywordRecognizer.Start();
  }

  private void KeywordRecognizer_OnPhraseRecognized(PhraseRecognizedEventArgs args)
  {
    System.Action keywordAction;
    if (keywords.TryGetValue(args.text, out keywordAction))
    {
      keywordAction.Invoke();
    }
  }
}
The object that does all the heavy lifting here is KeywordRecognizer, whose constructor takes the keywords as an Array. Every time it recognizes a phrase, the OnPhraseRecognized event is raised and the action of the keyword invoked. When a user says “Reset World” the message OnReset is broadcast and when “Drop Object” is said, the OnDrop event is sent to the object being gazed at.
Audio Input
The last main part of creating holographic experiences is immersive audio. It isn’t a way for users to provide input, but is a way to show to users what is happening in the experience and what they should pay attention to.
Adding audio is technically not difficult, but adding audio that is both appropriate and relevant to the experience is hard. The SDK will take care of positioning the sound in relation to where the user is looking through the HoloLens, but too many sounds can be confusing, and too few can leave the user wondering what to do next.
The snippet below adds two sounds, one for an impact of an object and one for an object (such as your sphere) rolling.
using UnityEngine;

public class SphereSounds : MonoBehaviour
{
  AudioSource audioSource = null;
  AudioClip impactClip = null;
  AudioClip rollingClip = null;

  bool rolling = false;

  void Start()
  {
    // Add an AudioSource component and set up some defaults
    audioSource = gameObject.AddComponent<AudioSource>();
    audioSource.playOnAwake = false;
    audioSource.spatialize = true;
    audioSource.spatialBlend = 1.0f;
    audioSource.dopplerLevel = 0.0f;
    audioSource.rolloffMode = AudioRolloffMode.Custom;

    // Load the Sphere sounds from the Resources folder
    impactClip = Resources.Load<AudioClip>("Impact");
    rollingClip = Resources.Load<AudioClip>("Rolling");
  }

  // Occurs when this object starts colliding with another object
  void OnCollisionEnter(Collision collision)
  {
    // Play an impact sound if the sphere impacts strongly enough.
    if (collision.relativeVelocity.magnitude >= 0.1f)
    {
      audioSource.clip = impactClip;
      audioSource.Play();
    }
  }

  // Occurs each frame that this object continues to collide with another object
  void OnCollisionStay(Collision collision)
  {
    Rigidbody rigid = this.gameObject.GetComponent<Rigidbody>();

    // Play a rolling sound if the sphere is rolling fast enough.
    if (!rolling && rigid.velocity.magnitude >= 0.01f)
    {
      rolling = true;
      audioSource.clip = rollingClip;
      audioSource.Play();
    }
    // Stop the rolling sound if rolling slows down.
    else if (rolling && rigid.velocity.magnitude < 0.01f)
    {
      rolling = false;
      audioSource.Stop();
    }
  }

  // Occurs when this object stops colliding with another object
  void OnCollisionExit(Collision collision)
  {
    // Stop the rolling sound if the object falls off and stops colliding.
    if (rolling)
    {
      rolling = false;
      audioSource.Stop();
    }
  }
}
The OnCollisionEnter, OnCollisionStay and OnCollisionExit events determine when to start the audio clip, whether to continue the audio clip and when to stop the audio clip. This is just one way of adding sound that is triggered upon a collision event, but you can also add ambient audio, such as music that plays throughout the experience or voice clips triggered by progress events. Adding audio makes your experience more believable and immerses the user fully.
Code snippets are from https://developer.microsoft.com/en-us/windows/holographic/holograms_101e
Your HoloDeck Future
If you are a software developer producing traditional software for desktop, mobile and corporate environments, creating apps and experiences for HoloLens is a step into the unknown. The way you need to think about experiences in a 3D space will challenge your traditional perception of app development.
The good thing about building apps for HoloLens is that you don’t have to part with US$3,000 to buy a HoloLens to get started. All the tooling is free and you can use the emulator for almost all the scenarios you want to develop, testing on a real device later.
HoloLens runs Windows 10 so your existing UWP apps will work and you can choose to extend them to give a full holographic experience when run on the HoloLens.
The future for digital realities is bright and getting a grasp on it early will allow you to take full advantage of the platform once consumers come on board.
I woud love to hear your questions and comments below.
Frequently Asked Questions (FAQs) on Microsoft HoloLens Development
What are the prerequisites for developing applications for Microsoft HoloLens?
To start developing applications for Microsoft HoloLens, you need to have a basic understanding of C# programming and Unity3D. Unity3D is a powerful cross-platform 3D engine and a user-friendly development environment. Easy enough for beginners and powerful enough for experts, Unity should interest anybody who wants to easily create 3D games and applications for mobile, desktop, the web, and consoles. Also, you need to install the HoloLens Emulator which will allow you to test holographic apps on your PC without a physical HoloLens and comes with the HoloLens development toolset.
How can I install the HoloLens Emulator?
The HoloLens Emulator can be installed from the official Microsoft website. You need to download and install the HoloLens Emulator and the HoloLens Development Tools. The HoloLens Development Tools include Visual Studio 2019, Unity 2019.4.18f1 LTS, and Windows 10 SDK. After installing these tools, you can start developing applications for HoloLens.
What is the role of Unity in HoloLens development?
Unity is a cross-platform game engine developed by Unity Technologies. It is used to develop video games for web plugins, desktop platforms, consoles, and mobile devices. For HoloLens development, Unity is used to create 3D environments and interactions. It provides a visual editor for creating scenes, scripting behaviors, and building the final application.
How can I debug my HoloLens application?
Debugging a HoloLens application is similar to debugging other applications in Visual Studio. You can use breakpoints, step through code, inspect variables, and analyze the call stack. You can also use the HoloLens Emulator to test your application without a physical HoloLens device.
Can I develop HoloLens applications on a Mac?
While you can use Unity and Visual Studio for Mac to create and test your application, you will need a Windows machine to build and deploy your application to the HoloLens or the HoloLens Emulator. This is because the HoloLens development tools and the HoloLens Emulator are only available for Windows.
What is the HoloLens 2 Development Edition?
The HoloLens 2 Development Edition is a package that includes the HoloLens 2 hardware and a range of tools and resources to help developers create mixed reality applications. It includes $500 in Azure credits and 3-month free trials of Unity Pro and the Unity PiXYZ Plugin for CAD data.
What are some resources for learning HoloLens development?
Microsoft provides a range of resources for learning HoloLens development. This includes documentation, tutorials, sample code, and a community forum. You can also find tutorials and courses on websites like Udemy, Coursera, and LinkedIn Learning.
Can I use other programming languages for HoloLens development?
While C# is the recommended language for HoloLens development, you can also use JavaScript and C++ with the Windows Mixed Reality APIs. However, using C# with Unity is the most common approach as it provides a more user-friendly development environment.
What are some common use cases for HoloLens applications?
HoloLens applications are used in a variety of industries including education, healthcare, manufacturing, and entertainment. They can be used for training and simulation, remote assistance, design and visualization, and interactive entertainment.
How can I publish my HoloLens application?
You can publish your HoloLens application to the Microsoft Store. You will need to create a developer account, submit your application for certification, and then publish it to the store. You can also distribute your application directly to users or organizations using sideloading.

