

Key Takeaways
- Connect is an extensible HTTP server framework for Node.js that allows developers to write modular and reusable components using middleware plugins. These plugins either process and pass on requests, or handle the requests directly.
- Middleware components are created using functions that accept request, response, and next parameters. The ‘next’ parameter represents the next handler in the chain. These components are then used in the Connect server using the use() function.
- Multiple middleware components can be used in Connect, with each component performing specific functions such as logging request details or providing responses. The order of middleware use is important, as they are executed in the sequence they are added to the server.
- Connect allows for the addition of authentication handlers for specific sections of a website. This is achieved by using the use() function, which can take the first parameter as the path in request.url for the handler to get invoked. The authentication handler checks the authorization header, decodes the username/password pair, and checks it against a JSON file for authorization.
If you need to write modular and reusable components, Connect could be the best solution for you. It deals with an extensible HTTP server framework for Node.js using “plugins” known as middleware.
A middleware component is a plugin that gets a request and then does some processing, after which it might handle and end the requests or pass them on the next middleware plugin. The plugins that process the request and pass it on the next handlers are called filters, while the ones that actually handle the request are known as providers. In the first group we can find request logging plugin or authentication plugin, just to mention a few examples. As for the providers, they would mainly be part of the business logic of your application.
In this article you’ll see how to get started and use the Connect middleware framework in your Node.js applications.
Setting up Connect
For Node.js the package dependency is done with npm, which lets you specify and get the dependent packages required for your application. The package dependencies for npm are defined in a file called package.json. Though this file can be written by hand, it would better and strongly recommended to use the npm command to create it.
To achieve this task, run the following command:
$ npm init
And then eply to the questions it’ll show (such as package name and so on). Once done, your “package.json” file should appear in the root folder with content that resembles the one below:
{

  "name": "nodejs-connect-demo",

  "version": "1.0.0",

  "description": "Demo on how to use connect framework for Node.js",

  "main": "server.js",

  "scripts": {

    "test": "echo \"Error: no test specified\" && exit 1"

  },

  "repository": {

    "type": "git",

    "url": "https://github.com/abbassoftware/nodejs-connect-demo.git"

  },

  "keywords": [

    "connect"

  ],

  "author": "Abbas",

  "license": "",

  "bugs": {

    "url": "https://github.com/abbassoftware/nodejs-connect-demo/issues"

  },

  "homepage": "https://github.com/abbassoftware/nodejs-connect-demo"

}
This file already contains information about the project, but it has no dependencies declared. To declare Connect as dependency, you need to add the dependency value in your “package.json” file and update it as follows:
{

  ...

  "dependencies": {

        "connect": "3.x"

  },

  ...

}
Alternatively, you could run the command:
npm install connect --save
At this point, we can run the following npm command to download all the dependencies (only Connect in this case):
$ npm install
Creating a “Hello World” Component to Respond to Requests
Once the dependencies have been specified, we can move on creating a middleware provider which responds to all the requests using the Hello Connect response. To do that, create a “server.js” file in your Node.js project directory and add the following code:
var connect = require("connect");

var app = connect();
function sayHello(req, res, next) {

    res.setHeader('Content-Type', 'text/plain');

    res.end('Hello Connect');

}
app

   .use(sayHello)

   .listen(3031);
console.log("Server is listening");
In the above code, we first load the Connect module using Node.js require() function, and then create a server using the return value of the function. Secondly, we create a middleware component, that is nothing but a function, which takes three parameters: request, response, and next. next represents the next handler in the chain. The sayHello() function sets the header and the response text in the response object. Afterward we use this middleware component thanks to the use() function. Finally, we allow the server to listen on port 3031.
Now, we can run our Connect app using the command below:
node server
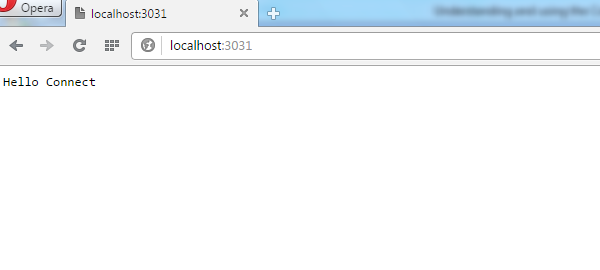
If we point our browser to localhost:3031, we should be able to see the output as follows:
The Request and Response objects
In this section, we’ll delve into the request, response, and next parameters we mentioned in the previous section. The request object holds the details about the incoming request. Some of the most important information in the request objects are:
method: contains the type of the request: GET, POST, and so on.url: contains the complete URL of the request. You can parse this URL to get the query parameters for GET requests.headers: it’s the property that you can use to the request headers.
The response object holds the response that will be sent back. You can add headers and data to it depending on your application. Some important functions of the response object are:
setHeader(): This method adds a header to the response.removeHeader(): This method removes a header to the response.write(): It’s useful to write a partial response to theresponseobject.end(): It’s a method used to mark the end of the response.
Using Multiple Middleware Components in Connect
In the last section we have created a middleware provider which responds with ‘Hello connect’ to all the requests. Now we’ll add one more filter middleware which logs the details of the incoming request. Then, we’ll pass the request to our sayHello() that will return the response. To achieve this other task, we’ll update our “server.js” file with the following code:
var connect = require("connect");

var url = require('url');

var app = connect();
function sayHello(req, res, next) {

    res.setHeader('Content-Type', 'text/plain');

    res.write('Write first chunk. ');

    res.write('Write second chunk. ');

    res.end('Hello Connect');

}
function loggingMiddleware(req, res, next) {

    console.log("The request method is: " + req.method );

    console.log("The request url is: " + req.url );

    var queryData = url.parse(req.url, true).query;

    console.log("The query parameters are : " + queryData.name );

    next();

}
app

   .use(loggingMiddleware)

   .use(sayHello)

   .listen(3031);
console.log("Server is listening");
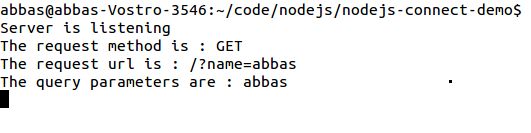
In the above code we have added one more middleware component using the loggingMiddleware() function. It logs the URL and the method of the request, and parses the URL to print a possible name parameter provided. Then, it calls the next() function which will pass the request to the next handler.
When we make the Connect server listen to the port, firstly we use loggingMiddleware() and then sayHello(). Now, if we start the Node.js server and run the following command:
curl http://localhost:3031?name=abbas
we’ll see the following messages:
Adding an Authentication Handler
The next thing to do is to add an authentication to the admin section of our website using the Basic access authentication of HTTP. To do that, we have to explore how can we run a handler just for the admin section of our server. Connect’s use() function can take the first parameter as what should be the path in request.url for the handler to get invoked. So, if we want the authentication handler exclusively for the admin section, we need to update the “server.js” file as follows:
var connect = require("connect");

var url = require('url');

var app = connect();

var authJsonObj = require("./authDetails.json");
function sayHello(req, res, next) {

    res.setHeader('Content-Type', 'text/plain');

    res.write('Write first chunk. ');

    res.write('Write second chunk. ');

    res.end('Hello Connect');

}
function loggingMiddleware(req, res, next) {

    console.log("The request method is : " + req.method );

    console.log("The request url is : " + req.url );

    var queryData = url.parse(req.url, true).query;

    console.log("The query parameters are : " + queryData.name );

    next();

}
function authenticateAdmin(req, res, next) {

    console.log("authenticateAdmin");

    var authorization = req.headers.authorization;

    //if the Authorization header is not present return error.

    if (!authorization) return returnAuthError(res);
    var parts = authorization.split(' ');
    //Check the Authorisation header contains both the parts.

    if (parts.length !== 2) return returnAuthError(res);
    //Check the Authorization header Scheme is correct.

    var scheme = parts[0];

    if ('Basic' != scheme) return returnAuthError(res);
    //Credentials will be base64 encoded. After decoding they will be in the format username:password

    var credentials = new Buffer(parts[1], 'base64').toString()

    var index = credentials.indexOf(':');
    var user = credentials.slice(0, index)

    var pass = credentials.slice(index + 1);
    //If the password does not match return error.

    if(authJsonObj[user] != pass) return returnAuthError(res);
    //Auth is complete pass to the next handler.

    next();

}
function returnAuthError(res) {

  res.statusCode = 401;

  res.end('Unauthorized');

};
app

   .use(loggingMiddleware)

   .use('/admin', authenticateAdmin)

   .use(sayHello)

   .listen(3031);
console.log("Server is listening");
Then we need to create a “authDetails.json” file in the same directory of “server.js” with the following content:
{

   "abbas":"pass123",

   "admin":"pass456"

}
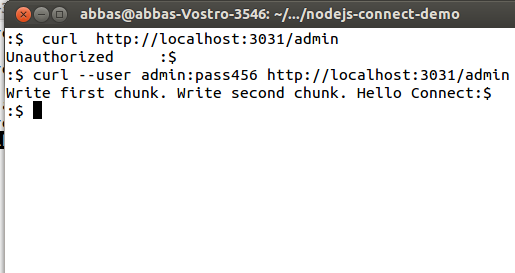
In the above code we load a JSON file called “authDetails.json” (the one just created) which will include a JSON object containing the username and password lists of the authorized users. Then we add one more Connect handler called authenticateAdmin used only for the admin section of the website. The previously mentioned handler checks the authorization header and then decodes the username/password pair, and checks it against the JSON file contents for authorization. In case the request is not authorized, an unauthorized response with response code 401 is sent to the client.
With this update, if we make requests to the admin section of the site, the output will be the following:
Conclusions
In this article we have deepened the features of a small and powerful Node.js’ module called Connect. It can help you building middleware components to easily handle requests. Using Connect and middleware plugins will reduce your efforts and transform your application in a more structured and usable project.
What about you? Have you ever tried it? Let’s start a discussion.
Frequently Asked Questions (FAQs) about Connect
What is the main purpose of Connect in Node.js?
Connect is a middleware framework for Node.js. It is a simple, flexible, and powerful tool that provides a collection of high-level plugins known as middleware. These middleware components perform various tasks such as logging, serving static files, and managing sessions. Connect essentially acts as a pipeline that processes HTTP requests and responses. It allows developers to add additional functionality to their server by plugging in different middleware components.
How does Connect differ from Express.js?
While both Connect and Express.js are middleware frameworks for Node.js, Express.js is built on top of Connect. This means that Express.js includes all the features of Connect, plus additional features. Express.js provides a more robust feature set for web and mobile applications, including template engines, simplified multiple routing, and a middleware interface.
How do I install Connect?
To install Connect, you need to have Node.js and npm (Node Package Manager) installed on your system. Once you have these, you can install Connect by running the following command in your terminal: npm install connect.
How do I use middleware in Connect?
Middleware in Connect is used by calling the use() method on a Connect application. The use() method takes a middleware function as an argument. This middleware function is then added to Connect’s stack of middleware and will be executed in the order it was added whenever a request is made to the server.
Can I create my own middleware in Connect?
Yes, you can create your own middleware in Connect. A middleware is simply a function that has access to the request object, the response object, and the next middleware function in the application’s request-response cycle. This function can perform any operations on the request and response objects, and then call the next middleware function in the stack.
What is the role of the next() function in Connect middleware?
The next() function is a function in the Connect middleware that, when called, passes control to the next middleware function in the stack. If a middleware function does not call next() within it, the request-response cycle will be halted. It will not proceed to any other middleware or route handlers.
How can I handle errors in Connect?
Connect provides a built-in middleware function for error handling. This middleware function takes four arguments instead of the usual three: (err, req, res, next). When you call the next() function with an error argument, Connect will skip all remaining middleware in the stack and proceed to this error handling middleware.
Can I use Connect with other Node.js frameworks?
Yes, Connect is designed to work seamlessly with most Node.js web frameworks. In fact, many popular frameworks like Express.js are built on top of Connect. This means you can use Connect middleware within these frameworks.
How can I serve static files using Connect?
Connect provides a built-in middleware function for serving static files. You can use this middleware function to serve files from a specified directory. For example, to serve static files from a directory named ‘public’, you would use the following code: app.use(connect.static('public')).
Is Connect still maintained and updated?
As of the time of writing, Connect is not actively maintained and updated. The last update was made several years ago. However, it is still widely used and its functionality is stable. For a more actively maintained middleware framework, you might consider using Express.js, which is built on top of Connect and includes additional features.