

This article was peer reviewed by Jérémy Heleine and Marc Towler. Thanks to all of SitePoint’s peer reviewers for making SitePoint content the best it can be!
When speaking of workflow tools, there’s no doubt that both Trello and Zapier play a significant role in the lives of many developers. Trello manages tasks while Zapier automates them. This makes this pair a powerful combination. By the end of this article, we’ll have wired up a form that posts to a MongoDB instance set up on MongoHQ. Additionally, we’ll tie it to Zapier, so that it creates a new Trello card every time there’s an addition into our users’ collections.
Key Takeaways
- Trello and Zapier can be combined to create a powerful workflow management tool. Trello is used for managing tasks while Zapier automates them.
- The tutorial demonstrates how to create a form that posts to a MongoDB instance and is linked to Zapier, which creates a new Trello card every time there’s an addition to the users’ collections.
- The M.E.A.N. stack (MongoDB, Express.js, AngularJS, and Node.js) is used to build the application. The Yeoman generator, generator-angular-fullstack, is used to create the application.
- The tutorial also covers how to set up a MongoDB instance, create an endpoint to post user documents, and configure the client-side code for the application.
- The final part of the tutorial explains how to set up Zapier to trigger Trello to create a card every time a new document is added to a collection in MongoDB.
Introducing Trello
Trello is a task manager that excels in providing assets such as markdown support or shortcuts. It makes managing tasks an overall easier process. Here at SitePoint, we rely on Trello each day in order to effectively develop content from an idea to an article. Throughout the editorial process, we make use of a number of different boards, which are an essential part of Trello. We have a card for each article. These cards often include outlines, links, and other things relevant to the subject. With that in mind, there are tons of different ways in which Trello can provide benefits in the form of organizing information relevant to your life.
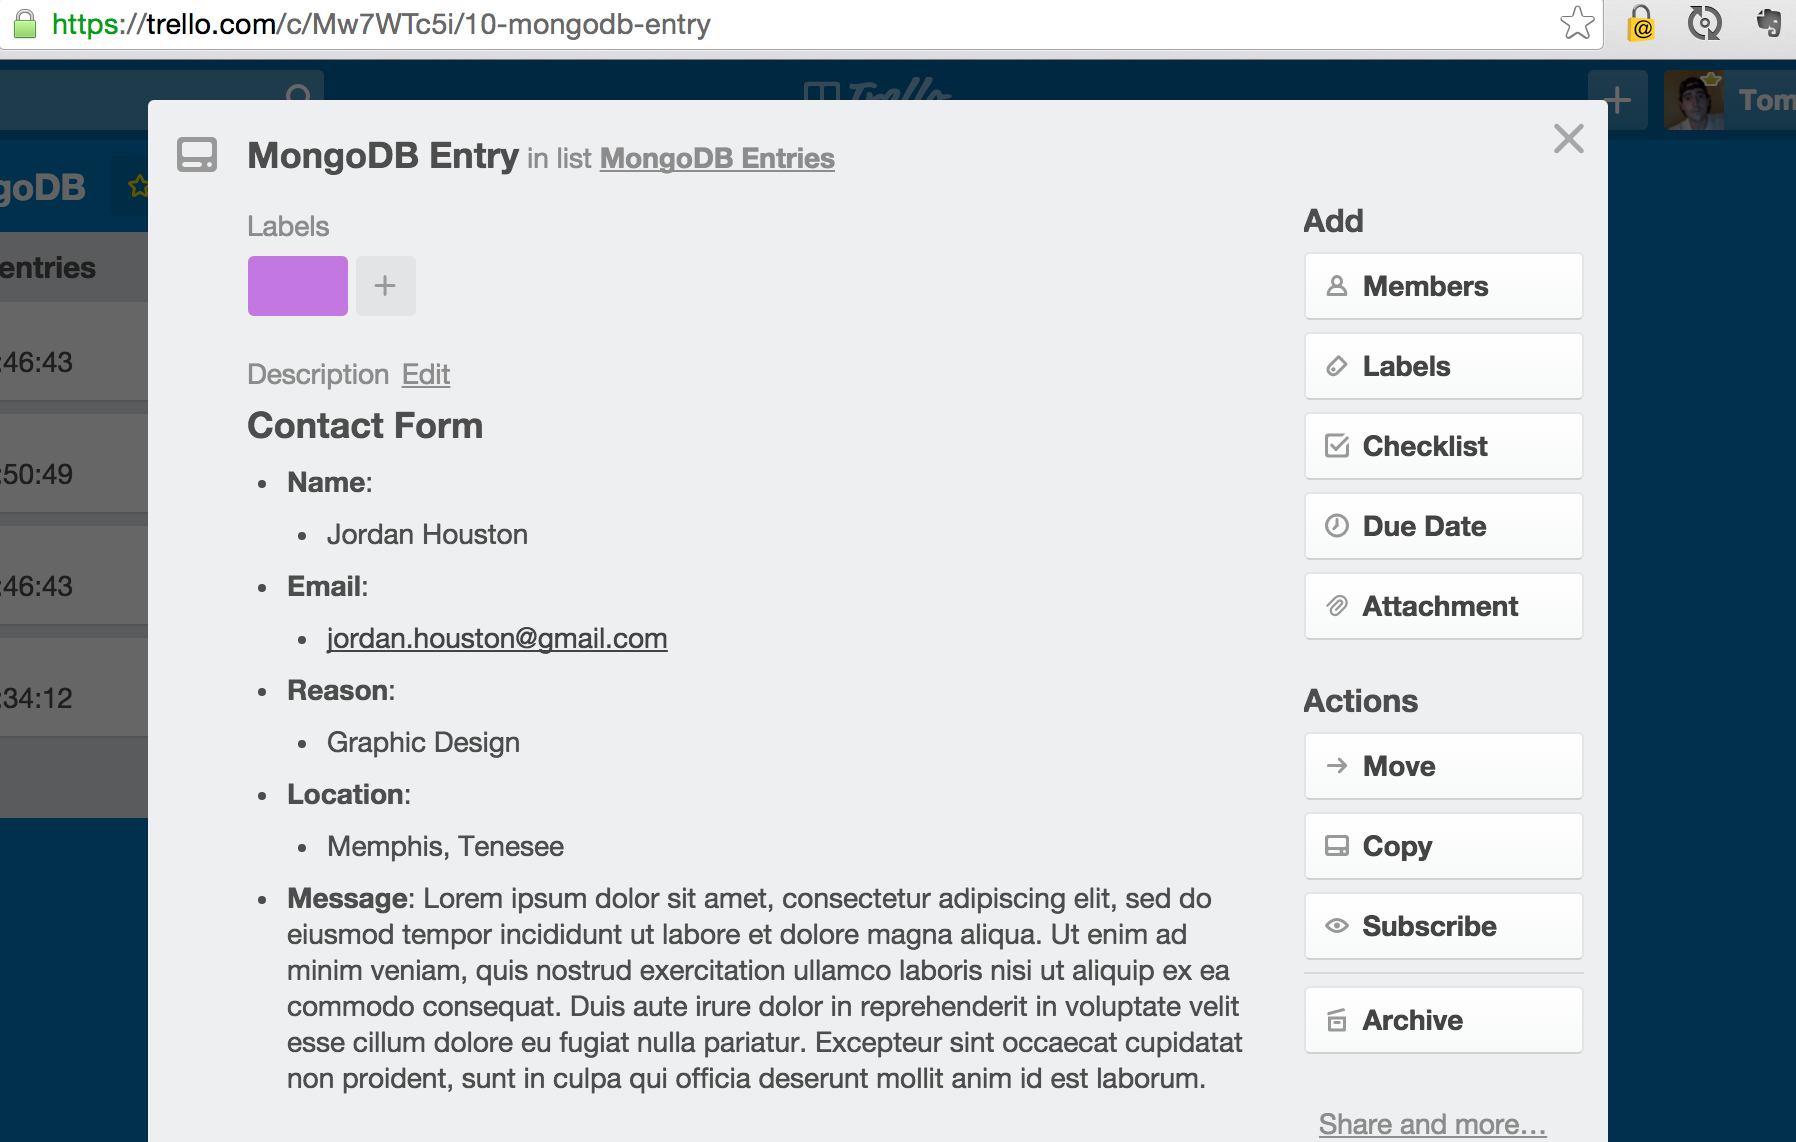
Today, we’re going to make use of Trello, combine it with Zapier, and create something that will amaze you. By the end of this tutorial, we’ll have a form that creates a card from the information passed into it. Below we can see an example of a card that will be generated using the data sent to our form.
For those of you who don’t have a Trello account, you can create one in a few minutes. When registered, we’ll create a new board and a list soon, and we’ll generate items inside this list in the form of Trello cards.
Generator Fullstack
We’ll use a generator fullstack to build this application. A basic knowledge of the M.E.A.N. stack would be beneficial but it isn’t necessary to complete this tutorial. Those of you who are new to the M.E.A.N. stack will soon see how easy it is to build a full stack application with the help of this Yeoman generator. To install the required generator, generator-angular-fullstack, we can run the command:
npm install -g generator-angular-fullstack
After that, write on the CLI:
yo angular-fullstack
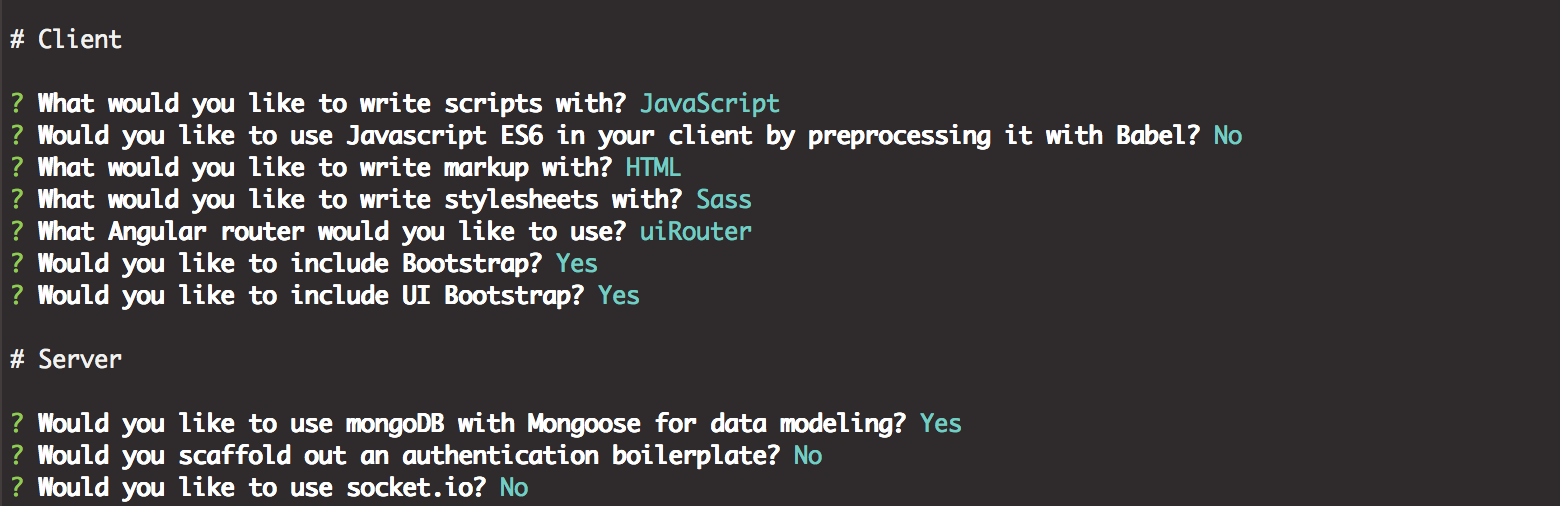
When running this command, we’re asked a series of questions about our project. The way you configure these ones, it’s up to you. However, we want to make sure that we enable mongoose for data modeling. Below, we can see a screenshot of the command line in the process of build our example application.
Once angular-fullstack creates our app, we have to make few changes. Firstly, we add a mongoDB instance to our application. We’re going to use grunt serve to run our application, so it’s going to look for a local database configured inside of server/confi/development.js file. After all, this command is going to start a complete environment for developing M.E.A.N. start applications. Nevertheless, we need our application to interact with a database hosted at mongolab.com, which is a well-known MongoDB provider. Signing up for an account is extremely easy. Those who don’t have done it yet, should do now.
Once logged in, we need to do two things:
- Create a database.
- Add a user to this database.
When creating a new database, we’ll have to request the amount of space we want our application to hold. In this tutorial, we just need to create a single cluster database.

Below is an image on the mongolab dashboard. It shows a database named user-db. There are few things we need to note in this page. First the Mongo URL, that we’re going to pass into our application so that any requests to a database interact with this instance. To make use of this database, we also need to create a user for it. Additionally, the username and password for our database user are important because they’ll be needed to add this instance to our application.

Server Side Code
Once a database has been created, we need to set it up so that we can make a successful call to it. To start, we modify the development.js file that we mentioned earlier, which is located inside our server/config directory. When successful, the file should look like the code below.
'use strict';
// Development specific configuration

module.exports = {

  // MongoDB connection options

  mongo: {

    uri: 'mongodb://:@ds029630.mongolab.com:29630/user-db'

  },

  seedDB: true

};
The next thing we want to do is create an endpoint to post our user documents too. When using the generator we’re using, we can easily generate different pieces of code for both the client and server side of our application. In this instance, we’re going to use this tool to command to generate an endpoint for our application.
By running the following command, we can generate the files we need to interact with data located in the user collection.
yo angular-fullstack:endpount user
When prompted with any questions, we can just hit enter and use the default setup. The result will be a user endpoint located at api/users.
Additionally, we have generated a new folder located in the server/api directory called user. Inside this directory, the angular-fullstack has created a schema we can post data to. Do you remember when you’ve been asked if including Mongoose for Data modeling or not? Well, here is where we’ll use it.
Mongoose is an npm module for modeling data. By taking a look at the code below, we see that Schema has been set to equal mongoose.Schema. As a result, the UserSchema variable can be used to handle data. Inside of the newSchema({}) object we need to modify some of the properties. We’re going to remove all the current properties (with the exception of name), and add additional fields named email, location, reason, and message. Like name, all of these properties are going to be strings, so the end result should look like the snippet below:
var UserSchema = new Schema({

    name: String,

    email: String,

    location: String,

    reason: String,

    message: String

});
Great! We have created an endpoint, made the correct modifications to our schema, and we are ready to go!
We learned before that we can use grunt serve to start out app. If everything goes well, Grunt will open up a browser and allow us to make modifications to our files without having to restart the server. It’s important to note that this would usually require us to run a local instance of a MongoDB using the mongod command, however we modified the development.js file to reference our database hosted via MongoLab.com. That said, let’s continue on and configure the client side code for our app.
Client Side
We can easily generate a new route by running yo angular-fullstack:route <route-name> inside our project. However, we’re going to keep it simple and work with the files inside of the main directory this application came installed with. Specifically, we’re going to make changes to the controller for the main state, as well as the template file. By default, generator-fullstack includes some API calls inside this controller. Although they’re not necessary for this example, they do show live examples of Angular’s http module, and help to provide the users with a solid start point. The choice to keep or remove this code does not matter, however we need to add some code.
We would usually pass the HTTP module into our controller, but since this application is already interacting with our API, we can begin writing our post call right away.
By taking a look at the code below, we can see that there is now a sendForm() function inside this controller.
angular.module('yoTrelloApp')

    .controller('MainCtrl', function($scope, $http) {

$scope.sendForm = function() {

            var data = ({

                name: $scope.fullName,

                email: $scope.email,

                location: $scope.userLocation,

                reason: $scope.reason,

                message: $scope.message

            });

            $http.post('/api/users', data)

                .success(function(data) {

                    $scope.data = data;

                });

            $scope.name = '';

            $scope.email = '';

            $scope.location = '';

            $scope.reason = '';

            $scope.message = '';

        };

    });

});
Let’s break down exactly what is going on here.
- A variable named data is created. Inside this variable we set the
$scopeof all the properties we defined inside our schema on the server. This will allow us to access these properties using theng-modeldirective. - A
http.postcall is made to the/api/user/route, which is the location that we specified while generating the user endpoint. This ties the post call to the new input data, so every time thesendForm()function fires off, this call is going to add a new user to the users’ collection. - The last thing we do is reset our form by setting the
$scopeof all the properties in our schema to an empty array. It might seem a hacky method, but it’ll be fine.
Now that all our client-side JavaScript is present, we need to add a form that will make a post request to our MonogoDB. Ro do so, we’ll apply some changes to our main.html file.
Firstly, we’ll remove all the content inside our container. Inside our opening form tag, we need to include the ng-submit directive and give it the value of sendForm(). Then, we need to tie this form to our data models. To do this, we’òò create few input fields which will hold our ng-model directive. Additionally, each ng-model will be passed in the name of the property it corresponds to. Finally, for the sendForm function to be executed we need to create an onsubmit event. To achieve this goal, we’ll add a button to the bottom of our form and declare it as type="submit".
Once finished, our code should look like this CodePen, also reported below:
See the Pen yeojBr by SitePoint (@SitePoint) on CodePen.
Taken for granted that all our code is correct, we should be able to fill this form out and make a post request to our database. If successful, we’ll see the POST /api/users 201 displayed inside our command line. Additionally, this will also result in the users collection.
Setting Up Zapier
Now it’s time to sprinkle Zapier into the mix. We’ll need a Zapier account in order to make this thing work, and we can create it for free at Zapier.com. When signed in, we’ll see a dashboard panel that will allow us to Make a New Zap. Choosing this will prompt us to do two things, described in the next section.
Step 1
- Choose a trigger app
- Choose an action app
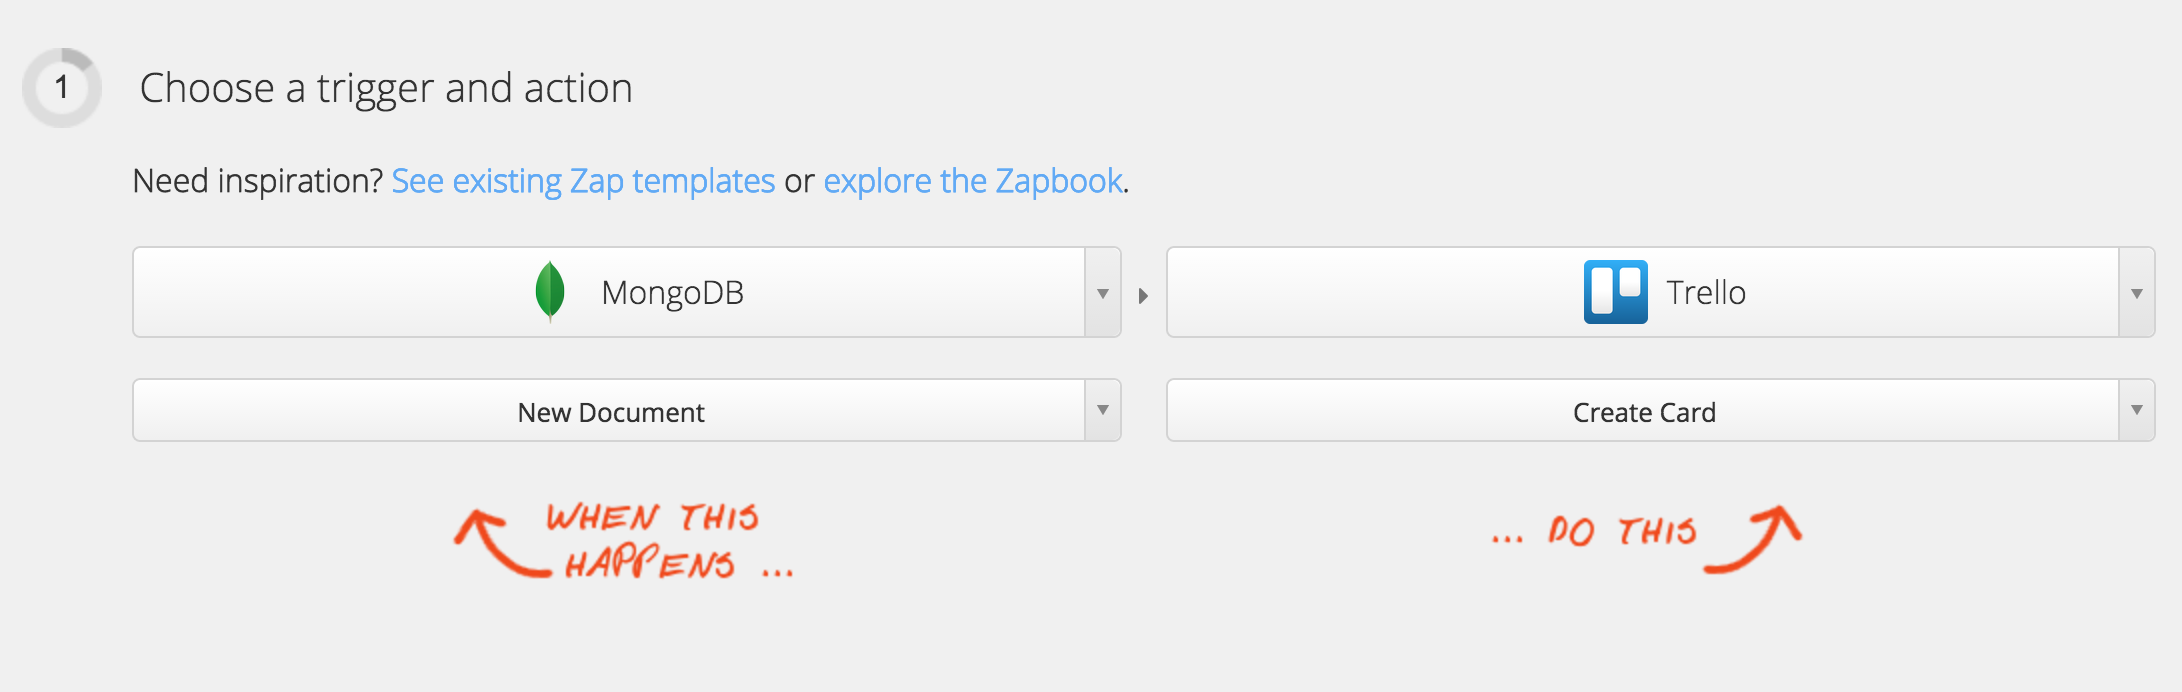
If we select both the trigger and action applications, we’ll see that Zapier provides the ability to tie a number of different technologies together. In this instance, we want MongoDB to trigger Trello to create a card every time there is a new document added to a collection.
Steps 2 and 3
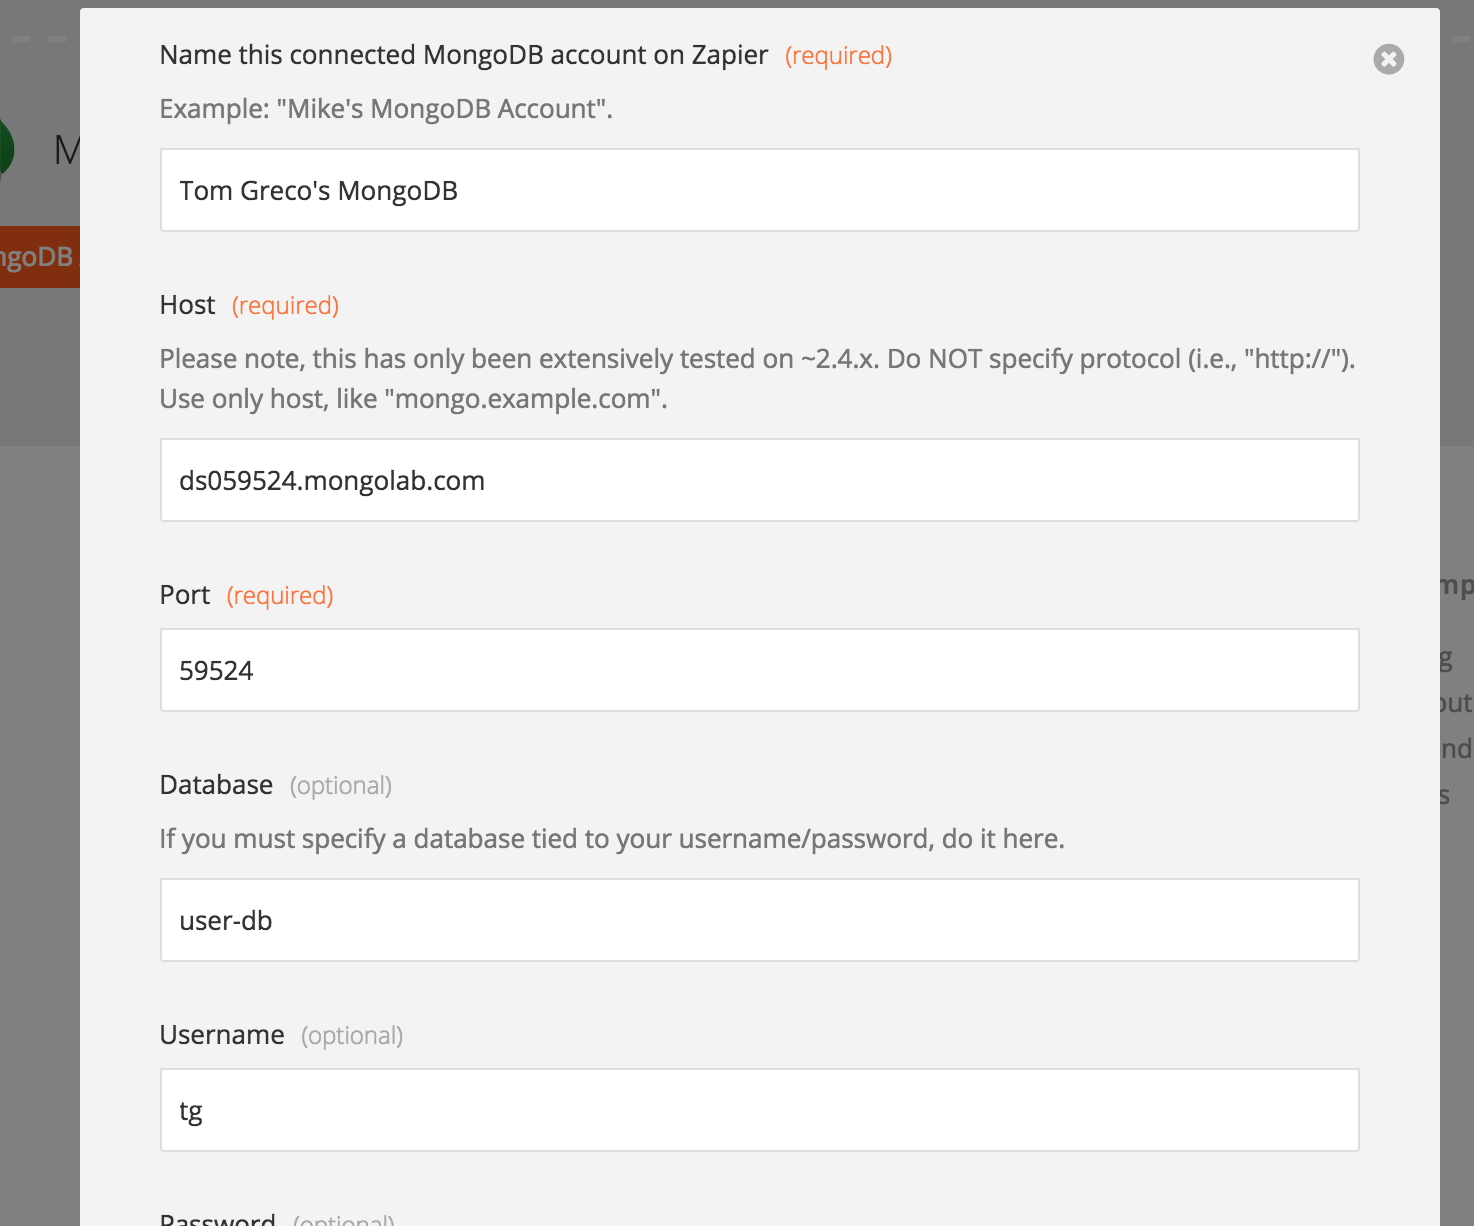
We need to sign into both our Mongo and Trello accounts in order to make this happen. I have included an image below to provide an example of how the Mongo instance should be set up.
Additionally, it would be a good idea to test these connections and make sure they’re working fine.
Step 4
We should have already specified the database in step 3, so now we just need to specify Zapier to watch the users collection.
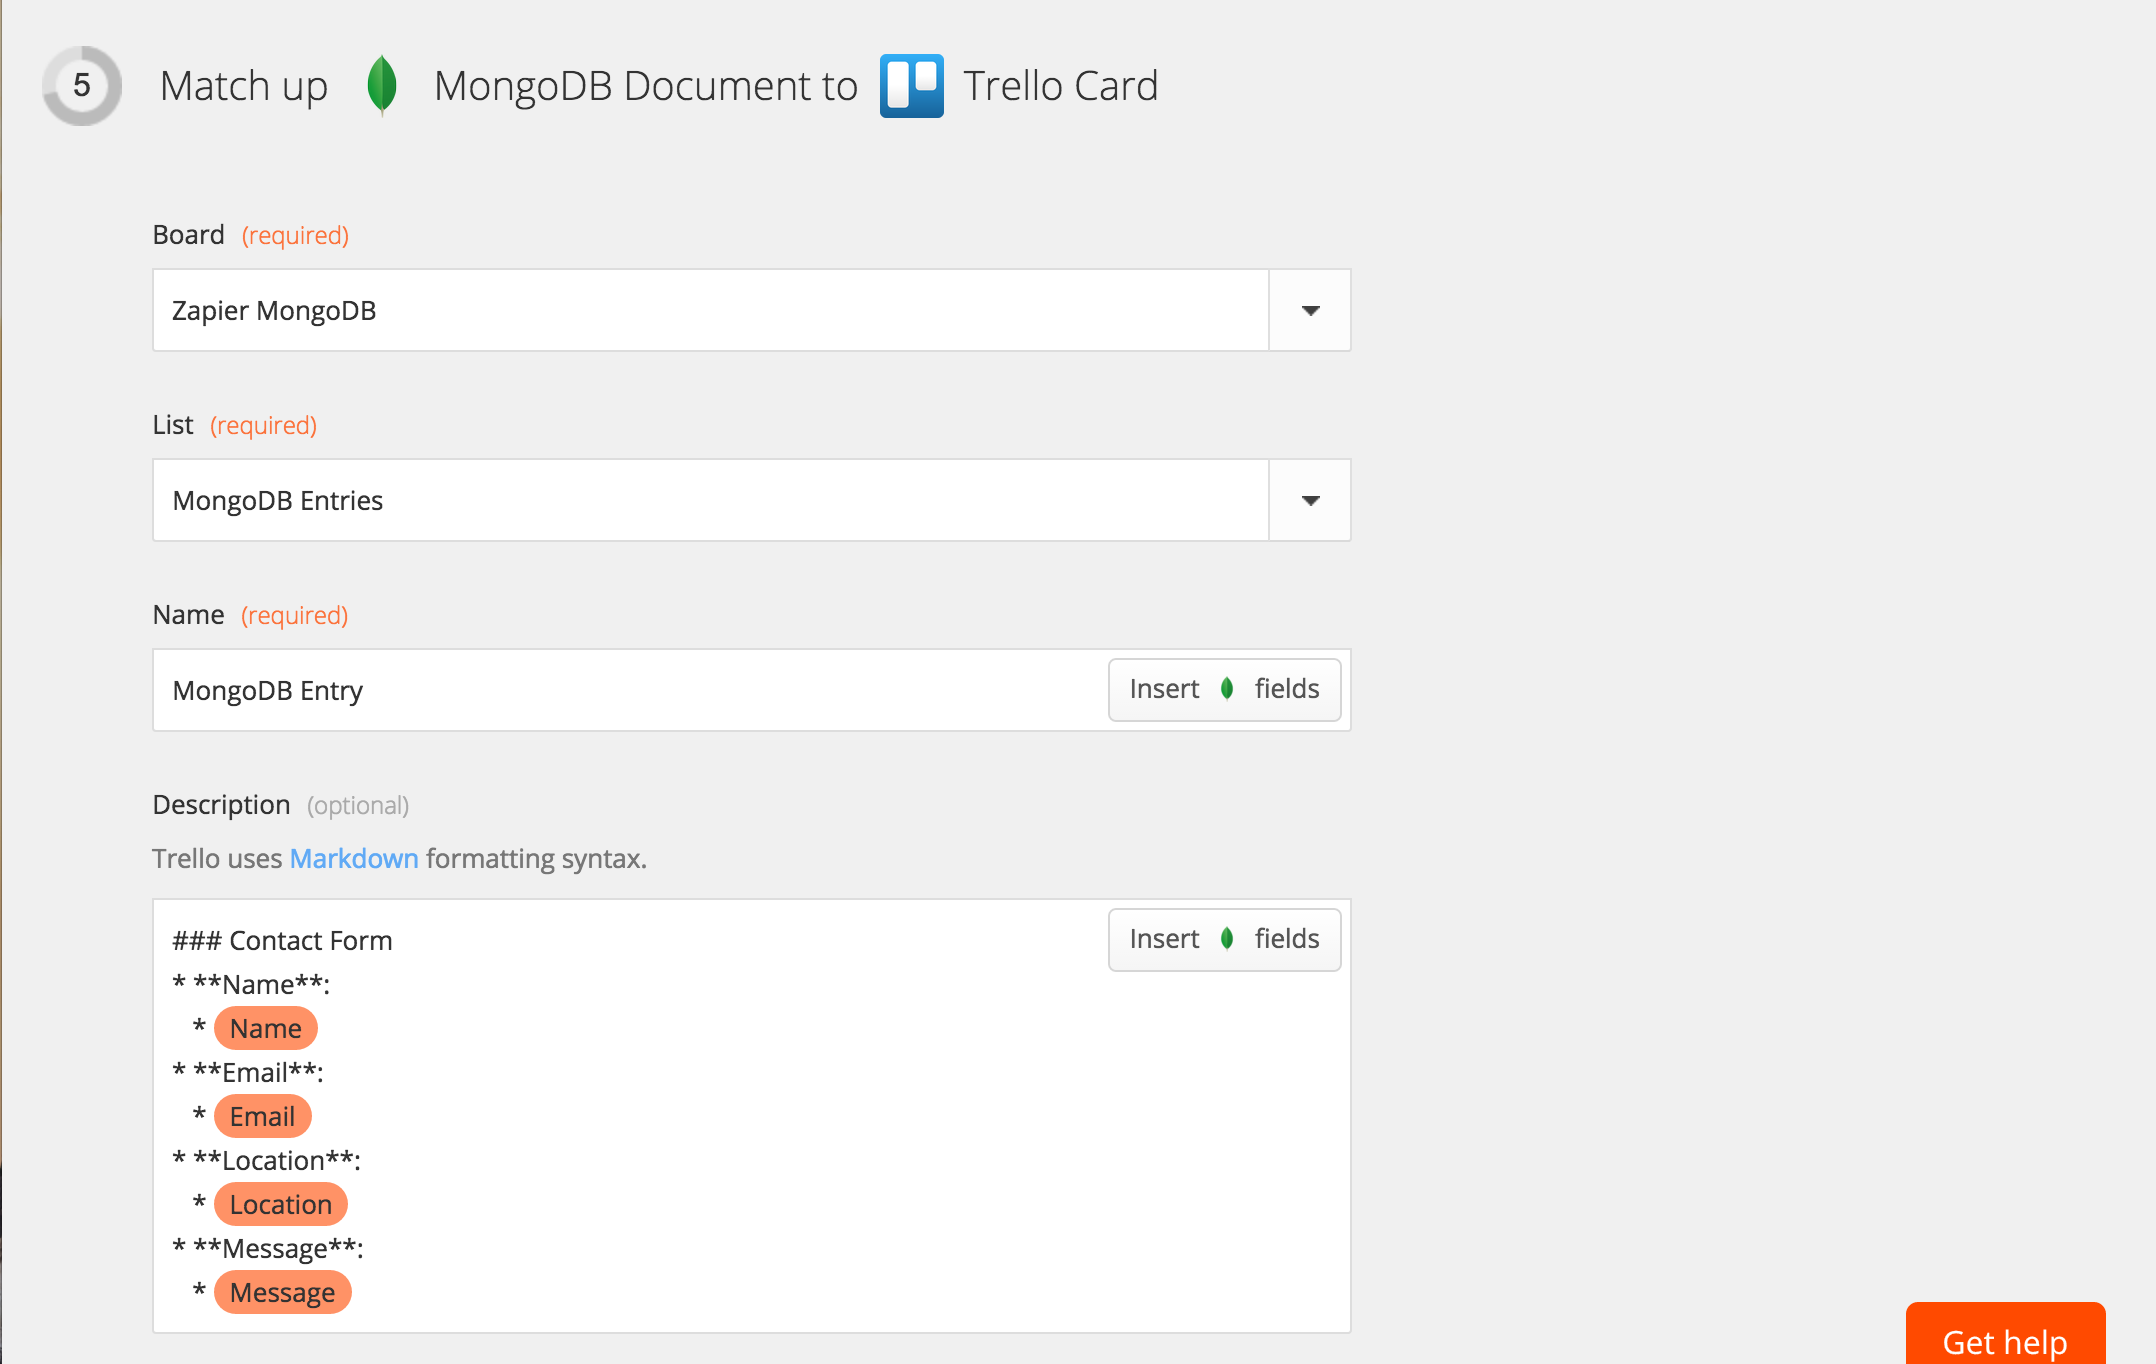
Step 5
This is the step that allows us to define the style of our card. Additionally, we can see the Markdown syntax I used to create the example we saw at the beginning of this tutorial. By clicking the Insert Fields button, Zapier will allow us to choose exactly what data to include. The most powerful part of this step lies within the description. Since Trello allows the Markdown syntax, we can make easily readable cards each time we are contacted.
Testing it out
Although there are a number of things we can add to this card, we’ll leave it as it is and go on with testing. At the bottom of the page we see that Zapier gives us the ability to try this new ‘Zap’ out, so we should go ahead and do it.
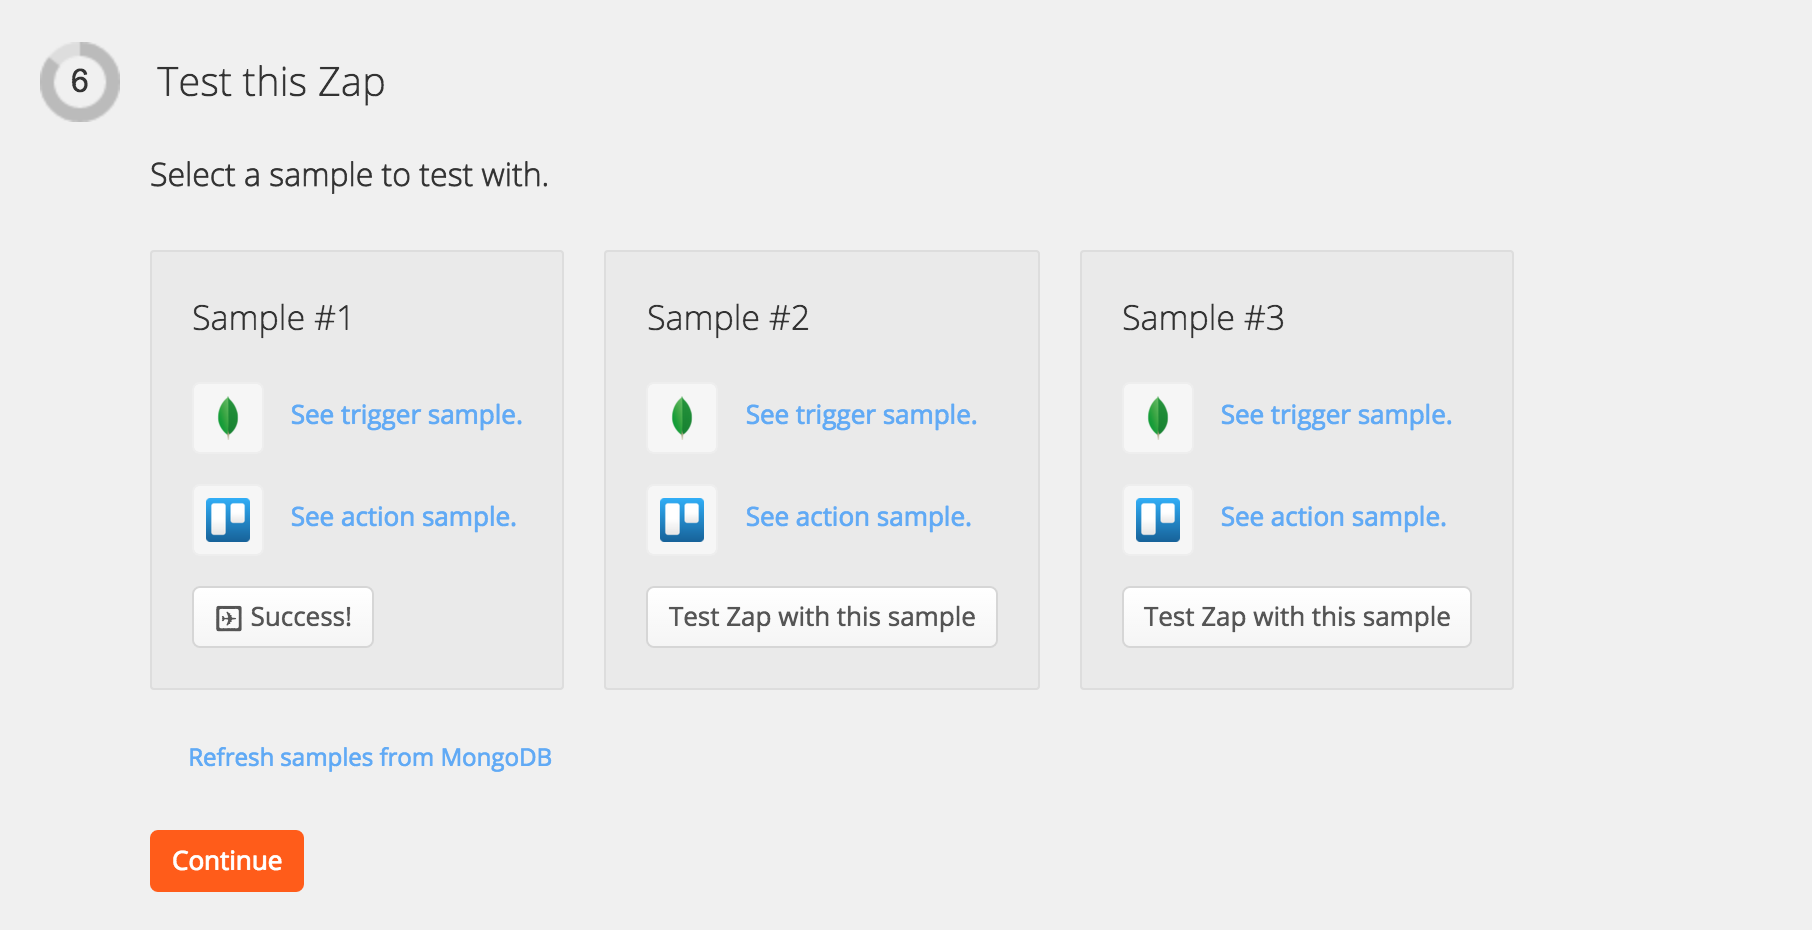
If successful (as it should be), we’ll be able to see a new card added to whichever board we’ve specified in step one. Again, this calls for another pat on the back as we did a really good job!
Conclusions
In this tutorial we have learned a lot about two useful development tools: Trello and Zapier. Hopefully you’ve gained some new insight on these technologies and understood that the Web provides us with so much great resources that it would be a shame to waste them! As always, feel free to reach out if you have any questions and share your thoughts in the section below.
Frequently Asked Questions about Integrating Trello and Zapier
How can I integrate Trello with Zapier?
Integrating Trello with Zapier is a straightforward process. First, you need to have accounts on both platforms. Once you have these, log into Zapier and click on the ‘Make a Zap’ button. You will be prompted to choose an app to start with – select Trello. Then, you will need to choose a trigger event, which is an action that will start your Zap. After this, you will be asked to sign into Trello to connect your account. Once connected, you can customize your trigger event and test it to ensure it’s working correctly.
What are some useful Trello and Zapier integrations?
There are numerous ways to integrate Trello and Zapier to automate your workflow. For instance, you can create a Zap that automatically creates a Trello card whenever you receive a new email in Gmail. Another useful integration is setting up a Zap to add new Trello cards to Google Calendar as events. You can also create a Zap to post updates to Slack whenever a Trello card is moved to a different list.
Can I use Zapier to automate repetitive tasks in Trello?
Absolutely! Zapier is designed to automate repetitive tasks between different apps, including Trello. For example, you can set up a Zap to automatically move Trello cards to a specific list when they reach a due date, or to send you a notification when a card is updated. This can save you a significant amount of time and ensure that nothing slips through the cracks.
How can I use MongoDB with Trello and Zapier?
MongoDB can be used with Trello and Zapier to store and manage data. For instance, you can set up a Zap to automatically save new Trello cards to MongoDB as documents. This can be useful for keeping a record of your Trello activity, or for analyzing your workflow.
What are the benefits of integrating Trello with Zapier?
Integrating Trello with Zapier can greatly enhance your productivity and efficiency. It allows you to automate repetitive tasks, saving you time and reducing the risk of errors. It also enables you to connect Trello with other apps you use, creating a seamless workflow across multiple platforms. Furthermore, it can provide you with valuable insights into your workflow, helping you to identify areas for improvement.
Can I integrate Trello with other apps using Zapier?
Yes, Zapier supports integrations between Trello and over 2,000 other apps. This includes popular apps like Gmail, Google Calendar, Slack, and many more. This means you can create a highly customized and automated workflow that suits your specific needs.
Is it possible to sync Trello and Google Calendar using Zapier?
Yes, you can use Zapier to sync Trello and Google Calendar. You can set up a Zap to automatically add new Trello cards to Google Calendar as events, or to update events in Google Calendar when Trello cards are moved or updated. This can help you to keep track of your tasks and deadlines more effectively.
How can I troubleshoot issues with my Trello and Zapier integration?
If you’re experiencing issues with your Trello and Zapier integration, there are several steps you can take. First, check that your Trello and Zapier accounts are connected correctly. If they are, try testing your Zap to see if it’s working as expected. If you’re still having issues, you may need to check the settings of your trigger and action steps, or consult the Zapier help center for further assistance.
Can I use Zapier to send notifications from Trello to Slack?
Yes, you can use Zapier to send notifications from Trello to Slack. You can set up a Zap to automatically send a message to a Slack channel whenever a Trello card is moved to a different list, or when a new card is created. This can be a great way to keep your team updated on your progress.
Is it possible to integrate Trello with Zapier without coding knowledge?
Yes, one of the great things about Zapier is that it doesn’t require any coding knowledge to use. The platform uses a simple, user-friendly interface that guides you through the process of setting up integrations, or ‘Zaps’, step by step. This makes it accessible to users of all levels of technical ability.

