How to Present Code Listings on Kindle Devices: 3 Solutions

Amazon’s Kindle e-readers are great for presenting fiction. However, they’re problematic when displaying technical content. One problem is that code listings often look terrible, causing many developers to shy away from using Kindle as a distribution medium.
In this article, I first review the problem of poorly formatted code listings. I then offer three strategies for presenting nicely formatted code. I rely on the Kindle Previewer’s e-reader simulators to show results.
Key Takeaways
- Kindle devices can struggle to display technical content such as code listings due to varying screen dimensions and font size adjustments. This often results in poorly formatted and difficult-to-read code.
- One solution is to replace code listings with images, however, this can lead to issues with fixed font sizes, size limitations for images, and potential delivery fees from Amazon for larger files.
- Another strategy is to use placeholder images and links, where a small placeholder image for the listing is presented, and clicking on it opens the full code in the device’s browser. This reduces the e-book size and leverages the device’s browser for better code viewing.
- The use of media queries, CSS, and links is a third solution. This allows for nicely formatted code listings on devices with wider screens, while presenting placeholder images and clickable links for devices with narrower screens. Using Amazon’s CSS media queries can distinguish between different Kindle devices and adjust presentation accordingly.
First: A Note on PDFs
Instead of creating a native e-book, you could create a PDF that all but the oldest Kindles can display. However, there’s a problem with PDFs: Although code listings and other content are nicely formatted, PDFs are hard to read. Either the font is too small when a PDF page fits completely on the screen or a larger font is required that necessitates excessive horizontal scrolling.
The Problem with Kindle Code Listings
Amazon has released several Kindle devices with varying screen dimensions. Also, Kindle lets users change the device font size. Because the amount of horizontal and vertical space varies widely, it’s impossible to create a code listing that looks good for all devices/configurations.
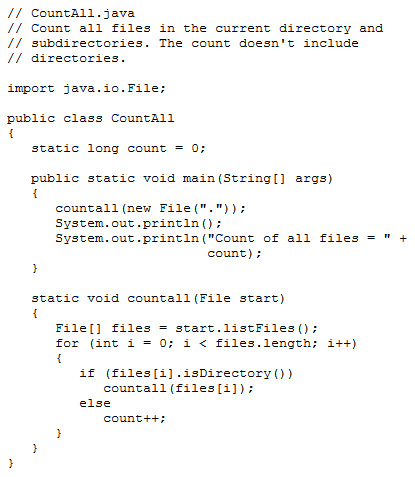
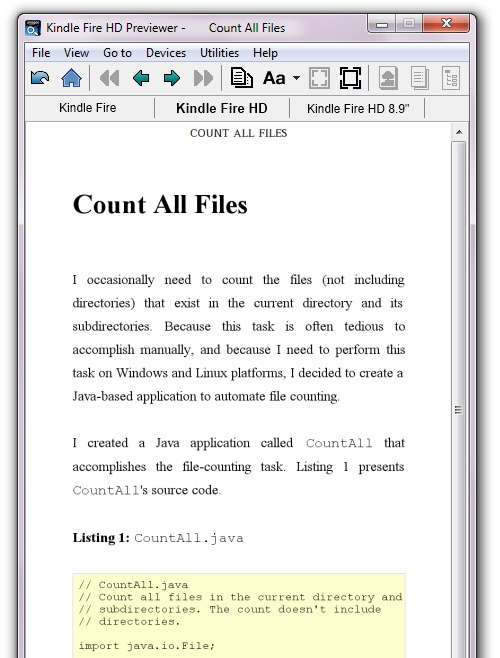
Lines of code often wrap from one line to the next, making the code hard to read, especially at larger font sizes where there’s more wrapping from line to line. For example, the image below shows a code listing with wrapped lines in the Kindle Previewer’s simulator for the Kindle e-ink device.

In the image above, you can see the source code to a Java application called CountAll — Java source files have a .java file extension. You’ll notice that the source code wraps around from the end of one line to the start of the next line, which looks messy.
In this article, I explore three strategies for improving the look of CountAll.java’s source code. First, however, check out the code below, which presents the HTML that led to the image shown above.
<pre>// CountAll.java
// Count all files in the current directory and
// subdirectories. The count doesn't include
// directories.
import java.io.File;
public class CountAll
{
static long count = 0;
public static void main(String[] args)
{
countall(new File("."));
System.out.println();
System.out.println("Count of all files = " +
count);
}
static void countall(File start)
{
File[] files = start.listFiles();
for (int i = 0; i &lt; files.length; i++)
{
if (files[i].isDirectory())
countall(files[i]);
else
count++;
}
}
}</pre>You can see the full HTML document in the download link at the bottom of this article. I’ll modify the section you see above in order to demonstrate each of the solutions I present in this article.
Solution 1: Use Images
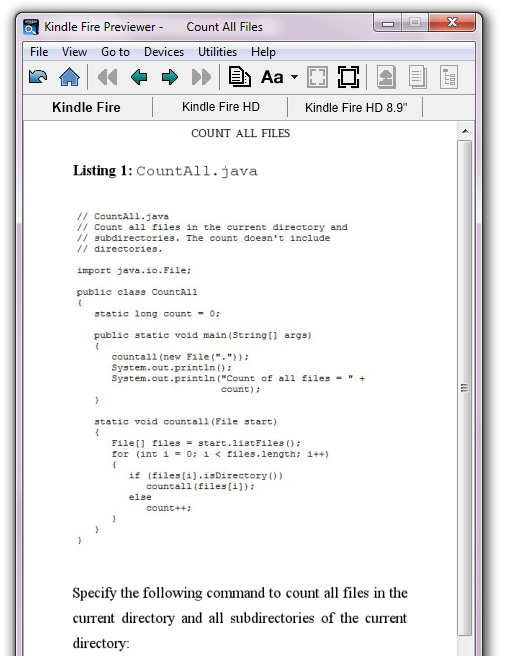
Perhaps the simplest strategy for improving a code listing’s formatting is to replace it with an image of the code listing. This means you would simply take a screenshot of the code listing and embed the resulting image in the e-book. For example, the following image reveals a screenshot of CountAll.java.
CountAll.java code listing is replaced by this image.To include this screenshot as our code listing, we can simply remove the <pre> tags and all their content and replace them with an image, like this:
<img src="countall.png" alt="countall">The screenshot below shows how the image looks in the Kindle Previewer’s simulator for the Kindle Fire e-ink device.
CountAll.java code listing is replaced by an image of the listing.Although simple to implement, this solution is problematic:
- The font size of the image text is fixed. Although the user can adjust the font size for regular text, this adjustment doesn’t apply to images. Users with poor eyesight will have trouble reading this text.
- Amazon states that “the Kindle file format internally supports JPEG and GIF images of up to 127KB in size”, although some have observed that you can exceed this size. You need to make sure that individual images aren’t much bigger, which can be a problem for very detailed images.
- Compressing an image to reduce its size is likely to introduce compression artifacts. Also, the text may appear fuzzy or blurry making it hard to read and leading to eye strain.
- An image of a lengthy vertical listing may be presented at the top of a subsequent page, leaving lots of vertical whitespace on the previous page. Such unsightly gaps may annoy readers.
- Amazon charges a delivery fee that’s typically 15 cents per megabyte. A book with many images may mushroom in size, resulting in a delivery fee that could consume your profit on each book sale.
Placing a few high-quality images in a book typically isn’t a problem. However, relying on this solution for presenting all of your code listings will probably cost you.
Solution 2: Use Placeholder Images and Links
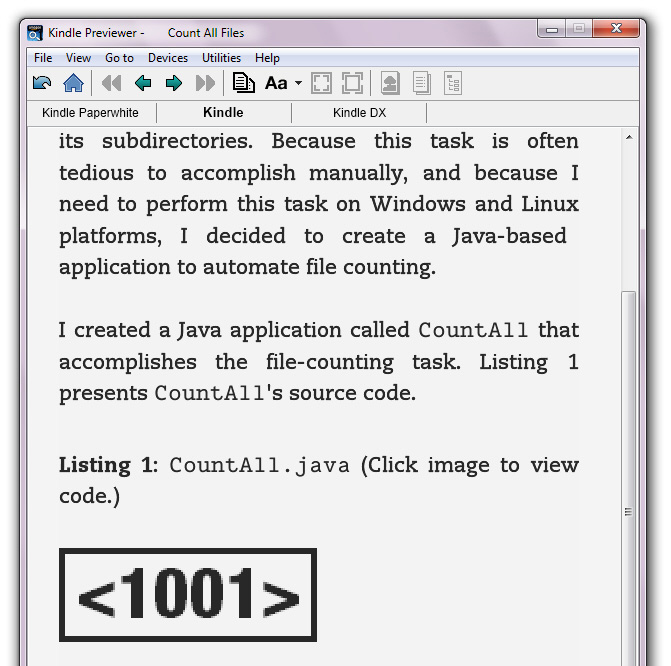
Despite its various problems, the previous image strategy has some merit. However, instead of replacing code listings with images of these listings, consider creating a small placeholder image for the listing and presenting this image to the user, as shown below:
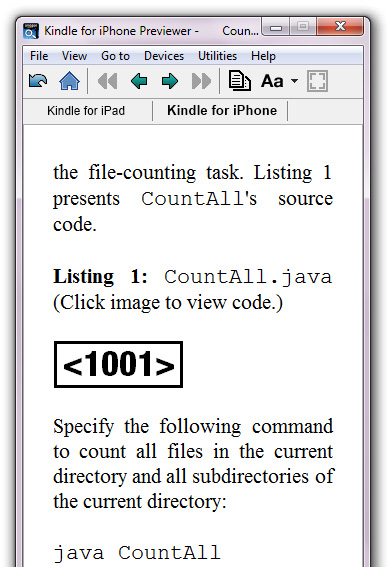
Here we see a small placeholder image (<1001>) for a code listing in the context of the iPhone simulator. Clicking the image causes the device’s browser to run and present the code, which you would host on your website, as shown here:

CountAll.java code that’s hosted on my website.To alter our HTML to use this method, again we would either replace the <pre> section in the original code, or replace the image we used in our first solution:
<a href="http://tutortutor.ca/articles/3psfkcl/countall.html"><img src="code.png" alt="code"></a>Here we include a linked placeholder image, which is stored in code.png. When you click this image, the device’s browser presents the contents of http://tutortutor.ca/articles/3psfkcl/countall.html.
Solution 3: Use Media Queries, CSS, and Links
Introducing a clickable placeholder image in lieu of individual code listing images is an improvement. Not only is the resulting e-book smaller (thus minimizing the Amazon delivery charge), that solution lets you leverage the device’s browser to better view the code.
But I think we can do even better. For example, we could present code listings on the Kindle Paperwhite and Kindle Fire devices, which have wider screens, and we could present placeholder image/clickable links for other Kindle devices (with narrower screens).
Newer Kindles offer better CSS styling support, which lets you present nicely-formatted code listings. You can determine whether a newer or older Kindle is being used by leveraging Amazon’s CSS media queries.
Amazon supports the following media queries for distinguishing between Kindle Fire-class devices and other Kindle devices:
@media amzn-kf8: This media query applies to the Kindle Format 8 (KF8) format, which was introduced for the Kindle Fire devices, and is also supported by Kindle Paperwhite devices.@media amzn-mobi: This media query applies to the Mobi format, which is supported by other devices.
You would use these media queries when setting up CSS styling for a Web page. For example, check out the following CSS:
.kf8content { display: block; }
.mobicontent { display: none; }
@media amzn-mobi {
.kf8content { display: none; }
.mobicontent { display: block; }
}
@media amzn-kf8 {
pre {
background: #ffffcc;
border: thin solid #ccccff;
clear: both;
color: black;
font-family: monospace;
font-size: small;
line-height: 100%;
margin: 0;
padding: 0.5em;
text-align: left;
word-wrap: normal;
overflow: hidden
}
}
This chunk of CSS introduces kf8content and mobicontent class selectors (the names, of course, are arbitrary). Any element whose class attribute is set to kf8content will be displayed as a block element. In contrast, elements set to mobicontent will not be visible.
Two media queries are introduced next. The amzn-mobi media query applies to devices that don’t support KF8 (such as the original Kindle e-ink device). This ensures that elements belonging to the mobicontent class are displayed while elements belonging to the kf8content class are hidden.
The amzn-kf8 media query, on the other hand, applies to KF8-supported devices only. This adds styling to the <pre> element so that code listings appear in a thin bordered area and have a pale yellow background, which will be seen on Kindle Fire devices only (the Kindle Paperweight shows a light grey background).
The overflow:hidden declaration prevents excess horizontal text from wrapping to the start of the next line. Instead, any extra text is cut off on the right side of the border. This is especially useful when the user increases the size of the device font.
The following code fragment shows you how these media queries would be used in a CountAll context:
<div class="mobicontent">
<b>Listing 1:</b> <code>CountAll.java</code> (Click image to view code.)
<br><br>
<a href="http://tutortutor.ca/articles/3psfkcl/countall.html"><img src="code.png" alt="code"></a>
</div>
<div class="kf8content">
<b>Listing 1:</b> <code>CountAll.java</code>
<br><br>
<pre>// CountAll.java
// Count all files in the current directory and
// subdirectories. The count doesn't include
// directories.
import java.io.File;
public class CountAll
{
static long count = 0;
public static void main(String[] args)
{
countall(new File("."));
System.out.println();
System.out.println("Count of all files = " +
count);
}
static void countall(File start)
{
File[] files = start.listFiles();
for (int i = 0; i < files.length; i++)
{
if (files[i].isDirectory())
countall(files[i]);
else
count++;
}
}
}</pre>
</div>
This code fragment shows that our HTML page is divided using two <div> elements: The first <div> (with a class of mobicontent) applies to Mobi devices and the second <div> (with a class of kf8content) applies to KF8 devices.
Note: I don’t use paragraph elements (<p>) in the body because they don’t leave blank line separators on all Kindles. Also, some Kindle devices/apps indent each paragraph. Rather than having to style these elements to omit the indentation (e.g., <p style="text-indent: 0">), I’ve opted to use <br> elements.
If the current device is a Mobi device, the first <div> will be visible. If the device is KF8, the second <div> will be visible. The first <div> reveals the clickable placeholder image strategy, whereas the second <div> reveals a code listing inside of <pre> tags.
The image below shows you what you would see on the Kindle e-ink device simulator:
And the next image shows you what you would see on the Kindle Fire HD device simulator.
Conclusion
In this article, we looked at 3 strategies for viewing nicely formatted code listings on Kindle devices. Each has its pros and cons, and depending on your situation you might prefer one over the others based on the factors we’ve discussed here.
For brevity, I didn’t explore other possible strategies. If you know of another solution, please share it in the comments.
You can download all the code for these three solutions at this location.
Frequently Asked Questions (FAQs) about Code Listings for Kindle Devices
How Can I Convert My Code Listings for Kindle Devices?
Converting your code listings for Kindle devices is a straightforward process. You can use Amazon’s KindleGen software, which is a free tool that converts your files into a format that can be read on Kindle devices. You can download KindleGen from Amazon’s official website. Once you have downloaded and installed the software, you can use it to convert your code listings into a .mobi file, which is the file format used by Kindle devices.
What Are the Best Practices for Formatting Code Listings for Kindle Devices?
When formatting code listings for Kindle devices, it’s important to keep in mind that Kindle devices have a limited display size. Therefore, you should avoid using long lines of code that may not fit on the screen. Instead, break up your code into smaller, more manageable chunks. Additionally, use a monospaced font for your code listings to ensure that all characters are evenly spaced, making your code easier to read.
Can I Use Color in My Code Listings for Kindle Devices?
Kindle devices primarily use e-ink technology, which displays text in grayscale rather than in color. Therefore, any color coding in your code listings will not be visible on a Kindle device. Instead, you should use other methods to differentiate different parts of your code, such as indentation or different styles of brackets.
How Can I Test My Code Listings on a Kindle Device?
After converting your code listings into a .mobi file using KindleGen, you can transfer the file to your Kindle device for testing. Connect your Kindle device to your computer using a USB cable, then drag and drop the .mobi file into the ‘documents’ folder on your Kindle device. You can then open the file on your Kindle device to see how your code listings appear.
Are There Any Alternatives to KindleGen for Converting Code Listings?
Yes, there are several alternatives to KindleGen for converting code listings. One popular option is Calibre, a free and open-source e-book management tool that can convert a wide range of file formats into .mobi files. Another option is Sigil, a free and open-source e-book editor that can also convert files into .mobi format.
Can I Include Images in My Code Listings for Kindle Devices?
Yes, you can include images in your code listings for Kindle devices. However, keep in mind that Kindle devices display images in grayscale, so any color images will be converted to black and white. Also, due to the limited display size of Kindle devices, it’s best to use simple, clear images that can be easily viewed on a small screen.
How Can I Optimize My Code Listings for Kindle Devices?
To optimize your code listings for Kindle devices, you should focus on readability. Use a clear, monospaced font and break up long lines of code into smaller chunks. Avoid using color coding, as this will not be visible on Kindle devices. Instead, use indentation and different styles of brackets to differentiate different parts of your code.
Can I Use HTML and CSS to Format My Code Listings for Kindle Devices?
Yes, you can use HTML and CSS to format your code listings for Kindle devices. However, keep in mind that not all HTML and CSS features are supported on Kindle devices. Therefore, it’s best to stick to basic HTML and CSS formatting options to ensure that your code listings display correctly.
What File Formats Can I Convert into .mobi Files for Kindle Devices?
KindleGen and other conversion tools can convert a wide range of file formats into .mobi files for Kindle devices. These include .txt, .pdf, .epub, .html, .doc, .docx, and many others. However, the conversion process may not preserve all formatting features, so it’s best to test your .mobi files on a Kindle device to ensure they display correctly.
Can I Share My Code Listings with Other Kindle Users?
Yes, you can share your code listings with other Kindle users. After converting your code listings into a .mobi file, you can send the file to other Kindle users via email or other file sharing methods. The recipient can then transfer the file to their Kindle device and view your code listings.
Jeff Friesen is a freelance tutor and software developer with an emphasis on Java and mobile technologies. In addition to writing Java and Android books for Apress, Jeff has written numerous articles on Java and other technologies for SitePoint, InformIT, JavaWorld, java.net, and DevSource.


Published in
·Conversion·Design·Design & UX·Entrepreneur·Prototypes & Mockups·Testing·UI Design·Usability·UX·March 29, 2016