
If you would like to know more about Laravel, watch our Laravel live lesson with Isaac Castillo, teacher of our recent Laravel course.
In the previous part, we’ve bootstrapped our Laravel CRUD application by creating the database, some controllers, basic routes and simple views. In this part, we’ll wrap things up and implement proper CRUD.
![]()
If you’d like to follow along through this interactive walk through Laravel’s docs, please catch up by reading the first part now.
Key Takeaways
- Laravel’s CRUD functionality is essential for building applications, allowing the creation, reading, updating, and deletion of records in a database.
- Utilizing Laravel’s form-model binding simplifies the process of updating records by pre-populating forms with existing data.
- Integration of validation in Laravel ensures that all fields are required before submission, enhancing data integrity and user feedback with error messages.
- Flash messages in Laravel provide immediate feedback to users upon successful creation, updating, or deletion of records.
- Eloquent ORM in Laravel simplifies database interactions, making tasks like inserting, updating, or deleting records straightforward.
- Laravel’s blade templating engine, along with partials and form facades, streamlines the development process by reducing repetitive code and improving maintainability.
Creating A Record
Continuing right where we left off, let’s create the page where we’ll actually perform this action. In our TasksController, let’s return a view like this:
public function create()

{

    return view('tasks.create');

}
And now, in our views directory, let’s create tasks/create.blade.php, and enter some starter content:
@extends('layouts.master')
@section('content')
<h1>Add a New Task</h1>

<p class="lead">Add to your task list below.</p>

<hr>
@stop
At this point, we could manually create a form, but Laravel offers a package to lighten this load for us – Illuminate/Html. Let’s pull that in quickly by running the following command:
composer require illuminate/html
Now, inside our config/app.php file, let’s add the service provider to the list:
'Illuminate\Html\HtmlServiceProvider',
Let’s add the aliases:
'Form'      => 'Illuminate\Html\FormFacade',

'Html'      => 'Illuminate\Html\HtmlFacade',
We can now easily create a form in our create.blade.php file. Let’s go ahead and do that using the form facade and blade syntax:
{!! Form::open([

    'route' => 'tasks.store'

]) !!}
<div class="form-group">

    {!! Form::label('title', 'Title:', ['class' => 'control-label']) !!}

    {!! Form::text('title', null, ['class' => 'form-control']) !!}

</div>
<div class="form-group">

    {!! Form::label('description', 'Description:', ['class' => 'control-label']) !!}

    {!! Form::textarea('description', null, ['class' => 'form-control']) !!}

</div>
{!! Form::submit('Create New Task', ['class' => 'btn btn-primary']) !!}
{!! Form::close() !!}
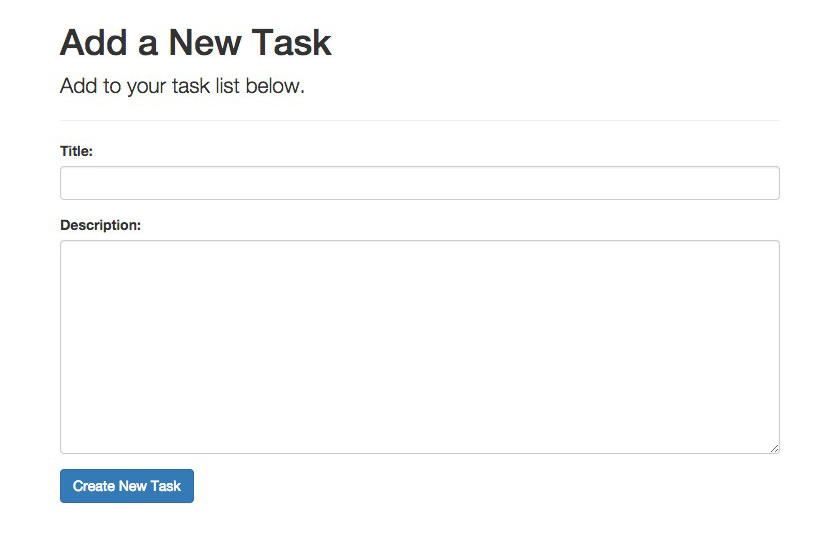
Check out this screenshot of our create view so far.
One important thing to note here is that I’ve specified the route on which we will POST to, according to our resourceful routes list. We’ll use the store method to process the data, so let’s head back to our TasksController, and start processing that data.
Let’s turn our heads to requests in Laravel.
The Request facade will grant you access to the current request that is bound in the container.
We can obtain our request instance in two ways, according to the documentation. Let’s stick with the dependency injection method. Our store method should now look like this:
public function store(Request $request)

{

    //

}
Now, we can dump out the information to see what gets posted. We’ll use the helper function, dd(), which is included by default in Laravel. It combines Symphony’s VarDupmer component, and the PHP die function. Add the following to the store method:
dd($request->all());
Now submit the empty form, and you’ll see the data. Go back and fill in some dummy data in the form, and you’ll see the request updated. If we’re not interested in any validation, then saving the new task to the database is easy. In the docs for Eloquent, we’ll notice that we can call the create method to create a new row in our table. Let’s do that by adding the following to our store method. We’ll also redirect back to where we came from:
public function store(Request $request)

{

    $input = $request->all();
    Task::create($input);
    return redirect()->back();

}
We’re ready to create a new task now. Let’s go ahead and enter some dummy data and submit it. Uh oh… there’s a MassAssignmentException. Laravel by default prevents mass assignment, which is a good thing. This just means that we have to declare which fields are mass-assignable. I suggest you read up on this, but here’s what our updated Task model will look like:
class Task extends Model {
    /**

     * Fillable fields

     *

     * @var array

     */

    protected $fillable = [

        'title',

        'description'

    ];
}
Now, let’s try to add our task again. If we were successful, we should be redirected back to where we came from, i.e. the “create task” page. There’s no indication right now as to whether the task was successfully added, but let’s check the database through the command line:
sqlite3 storage/database.sqlite

select * from tasks;
We should see the table returned with our new entry. Sweet! What about success messages and validation? Let’s first validate our input, to make sure all fields are required. Laravel ships with a really easy-to-use Validator class, and a quick read should have us going in no time. We’re validating in our controller, so let’s look at that section. Let’s validate our input by adding this to the beginning of the store method:
$this->validate($request, [

    'title' => 'required',

    'description' => 'required'

]);
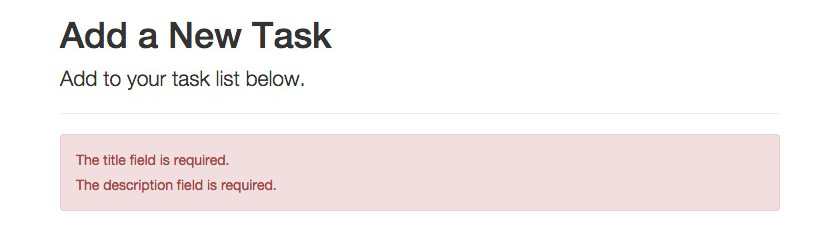
Notice now that if we leave out any of our input, the rest of our method doesn’t execute, and we remain on the page with whatever input has already been entered. Laravel will automatically throw an error, which we can access in our blade template. Let’s insert the following snippet above our form:
@if($errors->any())

    <div class="alert alert-danger">

        @foreach($errors->all() as $error)

            <p>{{ $error }}</p>

        @endforeach

    </div>

@endif
Now, we’ll see the errors neatly written out for us.
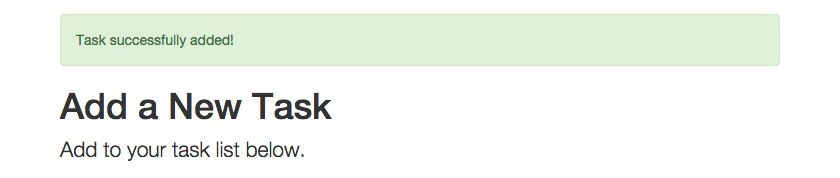
What about a success message? Well, if our validator passes, the rest of our code will execute, and we can redirect back with a Session flash message. Update the store method to create a new flash message:
public function store(Request $request)

{

    $this->validate($request, [

        'title' => 'required',

        'description' => 'required'

    ]);
    $input = $request->all();
    Task::create($input);
    Session::flash('flash_message', 'Task successfully added!');
    return redirect()->back();

}
Now, we can add this to our blade template:
@if(Session::has('flash_message'))

    <div class="alert alert-success">

        {{ Session::get('flash_message') }}

    </div>

@endif
Here’s what we should see.
We’re now validating and adding tasks, as well as passing data back to the view for output. Excellent. We still need a way to actually see our records.
Reading Records
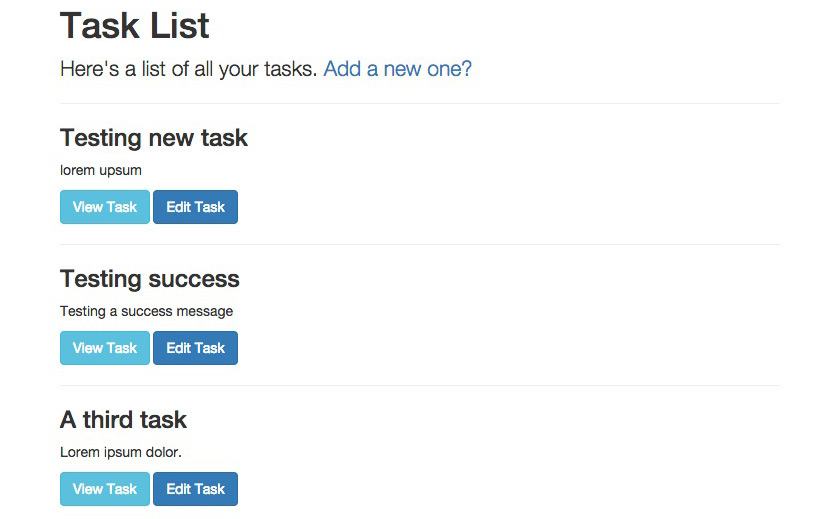
Back in our index method, we can now output all tasks that we’ve created so far. Add this to the index method:
public function index()

{

    $tasks = Task::all();
    return view('tasks.index')->withTasks($tasks);

}
We can access and output the tasks like this:
@foreach($tasks as $task)

    <h3>{{ $task->title }}</h3>

    <p>{{ $task->description}}</p>

    <p>

        <a href="{{ route('tasks.show', $task->id) }}" class="btn btn-info">View Task</a>

        <a href="{{ route('tasks.edit', $task->id) }}" class="btn btn-primary">Edit Task</a>

    </p>

    <hr>

@endforeach
Here’s a screenshot for the index view.
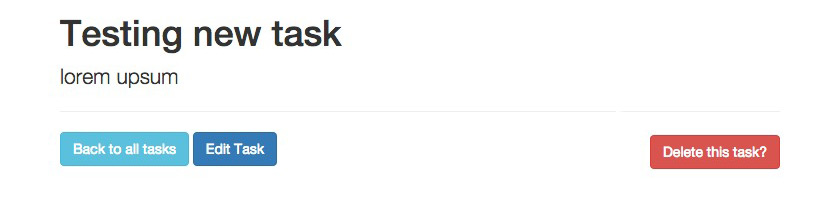
Let us now figure out how we’re going to display a single record. In this current app, it’s probably not necessary because we’re already outputting all the information, but we’ll do it anyway. If we look at our routes list, it’s apparent that the tasks.show route is the way to go. It accepts a wildcard in the URL, and for our app, we’ll use the ID of the task. As before, we’ll create a show.blade.php file and extend our master layout:
@extends('layouts.master')
@section('content')
<h1>{{ $task->title }}</h1>

<p class="lead">{{ $task->description }}</p>

<hr>
<a href="{{ route('tasks.index') }}" class="btn btn-info">Back to all tasks</a>

<a href="{{ route('tasks.edit', $task->id) }}" class="btn btn-primary">Edit Task</a>
<div class="pull-right">

    <a href="#" class="btn btn-danger">Delete this task</a>

</div>
@stop
Now, let’s update our show method:
public function show($id)

{

    return view('tasks.show');

}
If we navigate to a URL with a random wildcard – /tasks/320918 – we should see our dummy template. Let’s actually fetch the correct task. Using Eloquent, we can search for a record with the matching ID, and if none are found, we’ll throw a ModelNotFoundException which we can catch. If the record is found, we can access it in our view. Here’s the updated method:
public function show($id)

{

    $task = Task::findOrFail($id);
    return view('tasks.show')->withTask($task);

}
Now in our view, we can output the record properly like this:
<h1>{{ $task->title }}</h1>

<p class="lead">{{ $task->description }}</p>
Navigate to tasks/1, and you should see the output.
Back in our index view, we can now output the links to each individual task:
<a href="{{ route('tasks.show', $task->id) }}">view</a>
Notice that we passed in the correct wildcard based on the task ID. You should now be able to click through nicely! Let’s move on to editing.
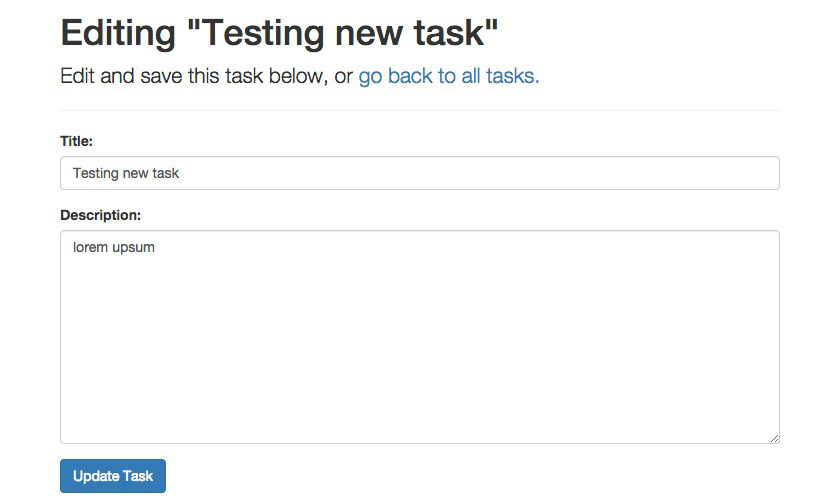
Updating A Record Using Form-Model Binding
By now, you probably realize how easy it is to get a new view ready for our RESTful app. It’s no different this time, so we’ll create the edit.blade.php file, pull in the master layout, and link the corresponding controller method to it. Here’s the edit method:
public function edit($id)

{

    return view('tasks.edit');

}
And here’s the view to match:
@extends('layouts.master')
@section('content')
<h1>Edit Task - Task Name </h1>

<p class="lead">Edit this task below. <a href="{{ route('tasks.index') }}">Go back to all tasks.</a></p>

<hr>
@stop
If you look at the routes list, you’ll notice that the edit route also accepts a wildcard. We’ll be consistent and use the ID. Navigating to /tasks/gibberish/edit will display the dummy page, but let’s pull in the proper content. First of all, we can update all our “edit” links on the index and show views like this:
<a href="{{ route('tasks.edit', $task->id) }}">edit</a>
Notice again how we’re calling the correct route and passing in the corresponding wildcard. In our edit template, we’re going to want a similar form to the one we used to create a task, but it would be pretty useful if the form was already populated with the existing fields. Thanks to Laravel’s form-model binding, this is a piece of cake. We’ll copy over the create form, although a better practice would be to extract this to a partial of some sort. In any case, we’ll copy it over, and bind our model to it:
{!! Form::model($task, [

    'method' => 'PATCH',

    'route' => ['tasks.update', $task->id]

]) !!}
<div class="form-group">

    {!! Form::label('title', 'Title:', ['class' => 'control-label']) !!}

    {!! Form::text('title', null, ['class' => 'form-control']) !!}

</div>
<div class="form-group">

    {!! Form::label('description', 'Description:', ['class' => 'control-label']) !!}

    {!! Form::textarea('description', null, ['class' => 'form-control']) !!}

</div>
{!! Form::submit('Update Task', ['class' => 'btn btn-primary']) !!}
{!! Form::close() !!}
Notice how we’re using a PATCH request in the form to stay in line with our RESTful resource. Notice also how we are calling on the variable $task, binding it to the model, and referencing the ID which will be used to look up the table. This means that we have to pass in the correct task. In the TasksController, we can update the edit method to this:
public function edit($id)

{

    $task = Task::findOrFail($id);
    return view('tasks.edit')->withTask($task);

}
Just like before, if an ID isn’t found, we’ll get the ModelNotFoundException. We can, at this point, copy over our errors snippet again, but this isn’t very DRY at all. Don’t worry, we can fix that easily by leveraging partials. Blade allows us to reference any file by using the @include() directive. First, let’s create a folder in our views directory called partials. In there, I’ll create a sub-directory called alerts, and then a file called errors.blade.php. Let’s copy over our errors snippet into this new file:
@if($errors->any())

    <div class="alert alert-danger">

        @foreach($errors->all() as $error)

            <p>{{ $error }}</p>

        @endforeach

    </div>

@endif
Now, we can reference it in any of our files like this:
@include('partials.alerts.errors')
We can now replace the original snippet in our create.blade.php template with this partial reference, and reference it in our edit template as well. The whole edit view should look like this now:
@extends('layouts.master')
@section('content')
<h1>Editing "{{ $task->title }}"</h1>

<p class="lead">Edit and save this task below, or <a href="{{ route('tasks.index') }}">go back to all tasks.</a></p>

<hr>
@include('partials.alerts.errors')
@if(Session::has('flash_message'))

    <div class="alert alert-success">

        {{ Session::get('flash_message') }}

    </div>

@endif
{!! Form::model($task, [

    'method' => 'PATCH',

    'route' => ['tasks.update', $task->id]

]) !!}
<div class="form-group">

    {!! Form::label('title', 'Title:', ['class' => 'control-label']) !!}

    {!! Form::text('title', null, ['class' => 'form-control']) !!}

</div>
<div class="form-group">

    {!! Form::label('description', 'Description:', ['class' => 'control-label']) !!}

    {!! Form::textarea('description', null, ['class' => 'form-control']) !!}

</div>
{!! Form::submit('Update Task', ['class' => 'btn btn-primary']) !!}
{!! Form::close() !!}
@stop
Here’s a screenshot of the view when we’re editing a task.
Let’s jump into our update method now, which will receive the data from the form submission, and try to update our record. Like before, we’ll validate our input, and log the errors in our view if any exist. If validation passes, we’ll grab the input, update the task, save it, and redirect back with a success message. Here’s what the method looks like:
public function update($id, Request $request)

{

    $task = Task::findOrFail($id);
    $this->validate($request, [

        'title' => 'required',

        'description' => 'required'

    ]);
    $input = $request->all();
    $task->fill($input)->save();
    Session::flash('flash_message', 'Task successfully added!');
    return redirect()->back();

}
Try it out and see for yourself, it works! You can now create, read, and update records, but let’s cross the final hurdle.
Deleting A Record
Deleting a record RESTfully actually requires a DELETE request. You can get around this outside the controller with JavaScript, but that’s a bit beyond the scope of this article. If we view a single task, you’ll notice that I left a placeholder button there to delete it. We actually need to change this into a form that sends a DELETE request to the destroy method, and handle the record deletion there. Here’s our updated show template incorporating the delete form:
@extends('layouts.master')
@section('content')
<h1>{{ $task->title }}</h1>

<p class="lead">{{ $task->description }}</p>

<hr>
<div class="row">

    <div class="col-md-6">

        <a href="{{ route('tasks.index') }}" class="btn btn-info">Back to all tasks</a>

        <a href="{{ route('tasks.edit', $task->id) }}" class="btn btn-primary">Edit Task</a>

    </div>

    <div class="col-md-6 text-right">

        {!! Form::open([

            'method' => 'DELETE',

            'route' => ['tasks.destroy', $task->id]

        ]) !!}

            {!! Form::submit('Delete this task?', ['class' => 'btn btn-danger']) !!}

        {!! Form::close() !!}

    </div>

</div>
@stop
Inside our TaskController, we can handle the request in the destroy method, rounding off our RESTful controller. Once again, Eloquent makes this a breeze. We’ll fetch the associated record in the table, delete it, and redirect back to the task list:
public function destroy($id)

{

    $task = Task::findOrFail($id);
    $task->delete();
    Session::flash('flash_message', 'Task successfully deleted!');
    return redirect()->route('tasks.index');

}
At this point, let’s refactor our flash message into the master layout file so that it shows up on every template whenever a flash message is posted. We can remove it from the create and edit templates, and keep it only in the master layout like this:
<main>

    <div class="container">

        @if(Session::has('flash_message'))

            <div class="alert alert-success">

                {{ Session::get('flash_message') }}

            </div>

        @endif
        @yield('content')

    </div>

</main>
Now, navigate to a task, and delete it. You’ll be redirected back to the task list with a flash message informing you that the task has successfully been deleted. Of course, your task list will be updated to match.
Wrapping Up
We’ve tapped into a lot of core concepts in this tutorial, and touched on a lot of neat Laravel functionality. By building up this CRUD application from scratch, we’ve gotten our taste buds wet with the Laravel workflow.
You should have a solid base and understanding to go on and build something yourself. I highly recommend checking out the various parts of the documentation to see what’s available, and just experimenting around as well. Use this as a building block, and get out there and show off your artisanal spirit. Feedback? Comments? Leave them below!
Continue learning about Laravel with our Laravel live lesson. One teacher, one lesson, followed by your Laravel questions.
Frequently Asked Questions (FAQs) about CRUD Operations in Laravel
How Can I Implement Pagination in Laravel CRUD Operations?
Laravel provides a simple, convenient way to implement pagination in CRUD operations. You can use the paginate() method on the Eloquent query builder. For instance, if you have a Users model and you want to display 10 users per page, you can use the following code: $users = User::paginate(10);. This will automatically take care of setting the limit and offset based on the current page being viewed by the user. You can then pass the $users variable to your view and use the links() method to display the pagination links: {{ $users->links() }}.
How Can I Validate Data in Laravel CRUD Operations?
Laravel provides several different ways to validate your data. One of the most common ways is to use the validate method on the Request object that is automatically passed to your controller methods. This method accepts an array of validation rules. For example, if you want to validate that a required name is less than 255 characters, you can use the following code: $request->validate(['name' => 'required|max:255']);. If the validation fails, Laravel will automatically redirect the user back to their previous location. The errors will also be flashed to the session so they are available for display.
How Can I Handle Errors in Laravel CRUD Operations?
Laravel provides several ways to handle errors. One of the most common ways is to use try-catch blocks around your code. If an exception is thrown within the try block, the catch block will be executed. You can then handle the error in the catch block. For example, you might log the error and display a user-friendly message to the user. Laravel also provides a global error handler that you can use to handle all uncaught exceptions.
How Can I Implement Search Functionality in Laravel CRUD Operations?
Implementing search functionality in Laravel is straightforward. You can use the where method on the Eloquent query builder to add where clauses to your queries. For example, if you have a Users model and you want to search for users by name, you can use the following code: $users = User::where('name', 'like', '%' . $request->input('name') . '%')->get();. This will return all users where the name column contains the search term.
How Can I Implement Sorting in Laravel CRUD Operations?
Laravel’s Eloquent ORM makes it easy to sort your results. You can use the orderBy method on the query builder to sort your results by a specific column. For example, if you want to sort users by their created_at date, you can use the following code: $users = User::orderBy('created_at', 'desc')->get();. This will return all users, sorted by the created_at column in descending order.
How Can I Implement Filtering in Laravel CRUD Operations?
Laravel’s Eloquent ORM provides a powerful query builder that you can use to add where clauses to your queries, allowing you to easily implement filtering. For example, if you want to filter users by a specific role, you can use the following code: $users = User::where('role', $request->input('role'))->get();. This will return all users where the role column matches the input role.
How Can I Implement Authorization in Laravel CRUD Operations?
Laravel provides a simple, powerful authorization system. You can use the authorize method in your controller methods to ensure that the current user is authorized to perform a given action. For example, if you want to ensure that the current user is authorized to update a given user, you can use the following code: $this->authorize('update', $user);. If the current user is not authorized to update the user, a 403 HTTP response will be generated.
How Can I Implement File Uploads in Laravel CRUD Operations?
Laravel makes it easy to handle file uploads. You can use the file method on the Request object to retrieve an uploaded file. You can then use the store method to store the uploaded file on disk. For example, if you have a form with a file input named photo, you can use the following code to store the uploaded file: $path = $request->file('photo')->store('photos');.
How Can I Implement Soft Deletes in Laravel CRUD Operations?
Laravel’s Eloquent ORM provides a convenient way to implement soft deletes. You can use the softDeletes method in your migration to add a deleted_at column to your table. You can then use the SoftDeletes trait in your model. This will automatically set the deleted_at column to the current date and time when you delete a model. To retrieve soft deleted models, you can use the withTrashed method on the query builder.
How Can I Implement Relationships in Laravel CRUD Operations?
Laravel’s Eloquent ORM provides a simple, powerful way to define relationships between your models. You can use methods like hasOne, hasMany, belongsTo, and belongsToMany to define your relationships. For example, if a User has many Posts, you can define this relationship like so: public function posts() { return $this->hasMany('App\Post'); }. You can then retrieve the related posts like so: $posts = $user->posts;.