
Sentiment analysis helps you in understanding what people think about a certain topic. The sentiment analysis app we are going to build will take in a keyword(s) and will fetch the matching tweets from Twitter. Then, it will run each tweet through an AFINN powered sentiment analysis Node module. This module will score the tweet text, and finally will display the relevant statistics.
Before we get started, you can take a look at the demo here. You can download the complete source code from here.
Key Takeaways
- Utilize Node.js, Express, and jQuery to build a sentiment analysis application that fetches and analyzes tweets based on user-input keywords.
- Implement a RESTful service to manage interactions with the Twitter API and store results using a lightweight disk-based database, diskDB.
- Enhance the application’s functionality by integrating a sentiment analysis module that utilizes the AFINN-165 wordlist to score tweets.
- Design a user-friendly client-side interface using AJAX for form submission and JavaScript micro-templating to dynamically display tweet sentiment analysis results.
- Provide options for extending the application by integrating other social media platforms and refining sentiment scoring through customized training data.
Technology Stack
This app is built on top of Nodejs. We will be using Express as our server side framework and jQuery for DOM manipulation on the client side. To make things easy for us, we will be using a Slush generator named slush-express (written by me) to scaffold a new Express app for us. We will be using a light weight disk based DB named diskDB (also written by me) to store the results.
We will be using the Twitter module to interact with Twitter and Sentiment module to perform the analysis.
So, let’s get started.
Setup the App
Create a new folder named sentimentAnalysisApp and open a new terminal/prompt here. First, we are going to install Gulp, Slush, and Express generator using the following command.
npm i -g gulp slush slush-express
Once the above modules are installed, we will scaffold a new Express app using this command:
slush express
Slush will ask you to pick a view engine and a style sheet engine. Answer as shown below.
[?] Select a View Engine: HTML

[?] Select a Stylesheet Engine: CSS
It will take slush a couple of minutes to scaffold the application and install the dependencies. The resulting scaffolded folder structure will look like this:
sentimentAnalysisApp

├── Gulpfile.js

├── app.js

├── bin

│   └── www

├── bower.json

├── package.json

├── public

│   └── stylesheets

│       └── style.css

├── routes

│   ├── index.js

│   └── users.js

└── views

    ├── error.html

    └── index.html
Here is a quick explanation of the different files and folders.
- bin/www – The server initiation and the
portis configured here. - app.js – The server configuration, the routes, and the view engine is configured here.
- gulpFile.js – The task runner for our project.
- /public – Consists of the static files dispatched to the UI.
- /routes – Consists of the app routes.
- /views – Consists of the app views.
You can run the app by executing the command gulp. This will start the Express server on port 3000. Navigate to http://localhost:3000 and you can see the sample home page.
Server Side Development
First, we will install the application level dependencies using the following command:
npm i twitter sentiment --save
Next, create a new folder named logic at the root of the project. Create two files named twitterSearch.js and sentimentAnalysis.js. These files consist of the logic for fetching tweets from Twitter and performing analysis, respectively. Create another folder named db, which will store the data.
Next, open routes/index.js in your favorite editor. We will add a new route, POST /search. The user entered search text will be submitted to this end point. Update routes/index.js as shown below.
'use strict';

var express = require('express');

var router = express.Router();

var twitterSearch = require('../logic/twitterSearch');
/* GET home page. */

router.get('/', function(req, res) {

  res.render('index');

});
router.post('/search', function(req, res) {

  twitterSearch(req.body.search, function (data) {

    res.json(data);

  });

});
module.exports = router;
The twitterSearch() function is expected to take in the search terms and fetch matching tweets from Twitter. These tweets will then be fed into the sentiment analysis module and the results will be returned as a callback. Simple, right?
Next, open logic/twitterSearch.js and add the following code.
//includes

var util = require('util'),

    twitter = require('twitter'),

    sentimentAnalysis = require('./sentimentAnalysis'),

    db = require('diskdb');
db = db.connect('db', ['sentiments']);

//config

var config = {

  consumer_key: 'xxxxxxxxxxxxxxxxxxxxxxxxxxx',

  consumer_secret: 'xxxxxxxxxxxxxxxxxxxxxxxxxxx',

  access_token_key: 'xxxxxxxxxxxxxxxxxxxxxxxxxxx-xxxxxxxxxxxxxxxxxxxxxxxxxxx',

  access_token_secret: 'xxxxxxxxxxxxxxxxxxxxxxxxxxx'

};
module.exports = function(text, callback) {

  var twitterClient = new twitter(config);

  var response = [], dbData = []; // to store the tweets and sentiment
  twitterClient.search(text, function(data) {

    for (var i = 0; i < data.statuses.length; i++) {

      var resp = {};
      resp.tweet = data.statuses[i];

      resp.sentiment = sentimentAnalysis(data.statuses[i].text);

      dbData.push({

        tweet: resp.tweet.text,

        score: resp.sentiment.score

      });

      response.push(resp);

    };

    db.sentiments.save(dbData);

    callback(response);

  });

}
For us to fetch the tweets, we need to first register a new app with Twitter. Then we will generate the required keys and tokens to be used while making a request.
Navigate to Twitter apps and click on Create New App. Fill the form on the next page. Once the app is created, we will generate the required tokens. Click on the API Keys tabs, and scroll down to the bottom of the page. There click on Create my access token. Once this is done, you will see a message to refresh the page, go ahead and do that. Now you can see an API key, API secret, Access token, and Access token secret and fill the config object like this:
var config = {

  consumer_key: 'API key',

  consumer_secret: 'API secret',

  access_token_key: 'Access token',

  access_token_secret: 'Access token secret'

};
If you face issues, please refer to this discussion.
Next, open logic/sentimentAnalysis.js and add the following code.
var sentiment = require('sentiment');
module.exports = function(text) {

  return sentiment(text);

};
The logic is very simple. we take in the tweet text and return the sentiment object. This wraps up our server. Now, let us build the client.
Client Side Development
First create a new folder named scripts inside the public folder. Inside scripts, create a new file named app.js and open it up in your favorite editor. app.js is responsible for submitting the form via Ajax to the /search endpoint and displaying the results on the page.
We are going to use John Resig’s JavaScript Micro-Templating library for building the markup from server data (a small scale MV* if you may). I have modified the templating library, so that we can use {{ }} instead of <% %> syntax. This way we can use ejs as our server side templating to render HTML extension pages. The completed app.js is shown below.
$(document).ready(function() {

  // handle the form submit

  $('#searchText').on('keypress', function(e) {

    if (e.which == 13 || e.keyCode == 13) {

      if ($(this).val().trim().length > 0) {

        // initiate an Ajax call to send the data

        fireAJAX($(this).val().trim());

      }

    }

  });
  function fireAJAX(text) {

    $.ajax({

      type: 'POST',

      url: '/search',

      data: {

        search: text

      },

      beforeSend: function(xhr) {

        $('.tweet-results').html('');

        $('.results').show();

        enableState();

      },

      success: parseData,

      error: oops

    });

  }
  function parseData(data) {

    disableState();

    var html = '';

    for (var i = 0; i < data.length; i++) {

      var s = data[i].sentiment,

          t = data[i].tweet;
      var _o = {

        imgSrc: t.user.profile_image_url,

        tweetLink: 'http://twitter.com/' + t.user.screen_name + '/status/' + t.id_str,

        tweet: t.text,

        score: s.score ? s.score : '--',

        comparative: s.comparative ? s.comparative : '--',

        favorited: t.favorite_count ? t.favorite_count : 0,

        retweet: t.retweet_count ? t.retweet_count : 0,

        wordsMatched: s.words && s.words.length ? s.words : '--',

        positiveWords: s.positive && s.positive.length ? s.positive : '--',

        negativeWords: s.negative && s.negative.length ? s.negative : '--'

      };
      html += tmpl('tweet_tmpl', _o);

    };

    $('.tweet-results').html(html);

  }
  function oops(data) {

    $('.error').show();

    disableState();

  }
  function disableState() {

    $('.loading').hide();

    $('#searchText').prop('disabled', false);

  }
  function enableState() {

    $('.loading').show();

    $('#searchText').prop('disabled', true);

  }

});
// Simple JavaScript Templating

// John Resig - http://ejohn.org/ - MIT Licensed

(function() {

  var cache = {};
  this.tmpl = function tmpl(str, data) {

    // Figure out if we're getting a template, or if we need to

    // load the template - and be sure to cache the result.

    var fn = !/\W/.test(str) ?

      cache[str] = cache[str] ||

      tmpl(document.getElementById(str).innerHTML) :
    // Generate a reusable function that will serve as a template

    // generator (and which will be cached).

    new Function("obj",

      "var p=[],print=function(){p.push.apply(p,arguments);};" +
      // Introduce the data as local variables using with(){}

      "with(obj){p.push('" +
      // Convert the template into pure JavaScript

      str

      .replace(/[\r\t\n]/g, " ")

      .split("{{").join("\t") // modified

      .replace(/((^|\}\})[^\t]*)'/g, "$1\r") // modified

      .replace(/\t=(.*?)}}/g, "',$1,'") // modified

      .split("\t").join("');")

      .split("}}").join("p.push('") // modified

      .split("\r").join("\\'") + "');}return p.join('');");
    // Provide some basic currying to the user

    return data ? fn(data) : fn;

  };

})();
Next, open views/index.html and add the following code.
<!DOCTYPE html>

<html>
<head>

  <title>Sentiment Analysis App</title>

  <link rel='stylesheet' href='/stylesheets/style.css' />

</head>
<body>

  <h1>Sentiment Analysis App</h1>

  <hr/>

  <input type="text" id="searchText" placeholder="Enter the text you would like to see the analysis for and hit return">

  <div class="results">

    <h3>Results</h3>

    <lable class="loading">Loading.. Please wait</lable>

    <br/>

    <lable class="error">Oops.. Something went wrong</lable>

    <br/>

  </div>

  <section class="tweet-results">

  </section>
  <script src="//code.jquery.com/jquery-1.11.0.min.js"></script>

  <script type="text/javascript" src="scripts/app.js"></script>

  <script type="text/html" id="tweet_tmpl">

    <article>

      <div class="left">

        <img src="{{=imgSrc}}">

        <p>{{=tweet}}

        <a href="{{=tweetLink}}" target="_blank">Link</a></p>

      </div>

      <div class="right">

        <table>

          <tr>

            <td>Score</td>

            <td>{{=score}}</td>

          </tr>

          <tr>

            <td>Comparative</td>

            <td>{{=comparative}}</td>

          </tr>

          <tr>

            <td>Favorited</td>

            <td>{{=favorited}}</td>

          </tr>

          <tr>

            <td>Retweeted</td>

            <td>{{=retweet}}</td>

          </tr>

          <tr>

            <td>Words Matched</td>

            <td>{{=wordsMatched}}</td>

          </tr>

          <tr>

            <td>Positive Words</td>

            <td>{{=positiveWords}}</td>

          </tr>

          <tr>

            <td>Negative Words</td>

            <td>{{=negativeWords}}</td>

          </tr>

        </table>

      </div>

    </article>

  </script>

</body>

</html>
Here, we are referring jQuery and app.js. We have also created a template (tweet_tmpl), that will be used to show the results. Finally, open stylesheets/style.css and add the following classes.
body {

  padding: 50px;

  font: 14px"Lucida Grande", Helvetica, Arial, sans-serif;

  background: #eee;

}

a {

  color: #00B7FF;

}

input {

  width: 98%;

  padding: 9px;

  font-size: 17px;

}

.results {

  display: none;

}

.error {

  color: red;

  display: none;

}

.tweet-results {

  width: 100%;

  overflow: hidden;

  padding-right: 18px;

}

.left {

  float: left;

  width: 39%;

}

.right {

  float: right;

  width: 55%;

  border-left: 1px dashed;

  padding-left: 21px;

}

article {

  background: #fff;

  display: block;

  padding: 18px;

  border: 1px solid #eee;

  margin-top: 21px;

  margin-bottom: 21px;

  overflow: hidden;

  box-shadow: 6px 4px 9px 1px rgba(119, 119, 119, 0.75);

  -moz-box-shadow: 6px 4px 9px 1px rgba(119, 119, 119, 0.75);

  -webkit-box-shadow: 6px 4px 9px 1px rgba(119, 119, 119, 0.75);

}

article img {

  width: 64px;

  float: left;

  margin:0 5px 0 0;

}

.right table {

  width: 100%;

}

.right table, .right table td {

  border: 1px solid;

}

.right table td {

  width: 50%;

}
That is it, we are done with our development. Let us run the app and test it. Back in the terminal, run the gulp command to start the server. Navigate to http://localhost:3000/ and you should see the search bar. Enter “This is Awesome” and hit return and you should see something like this:
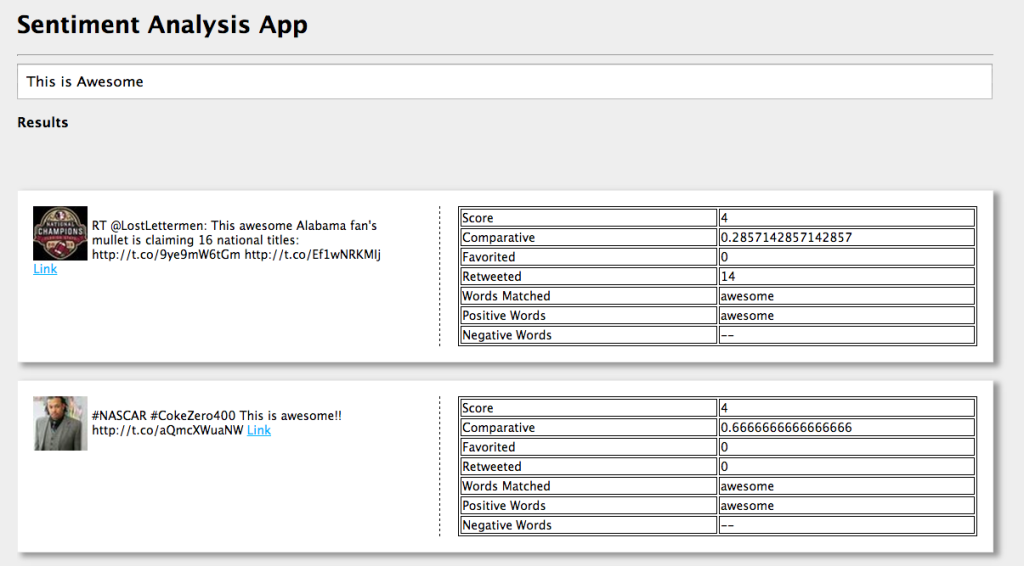
Here, Score is the sum of scores for each word present in the tweet matching the AFINN source. Comparative is equal to score/total words. Words Matched show how many words from the tweet matched the AFINN words while processing. Positive Words are the matched positive words and Negative Words are the matched negative words. This data should give you enough information to make a decision and understand the sentiment.
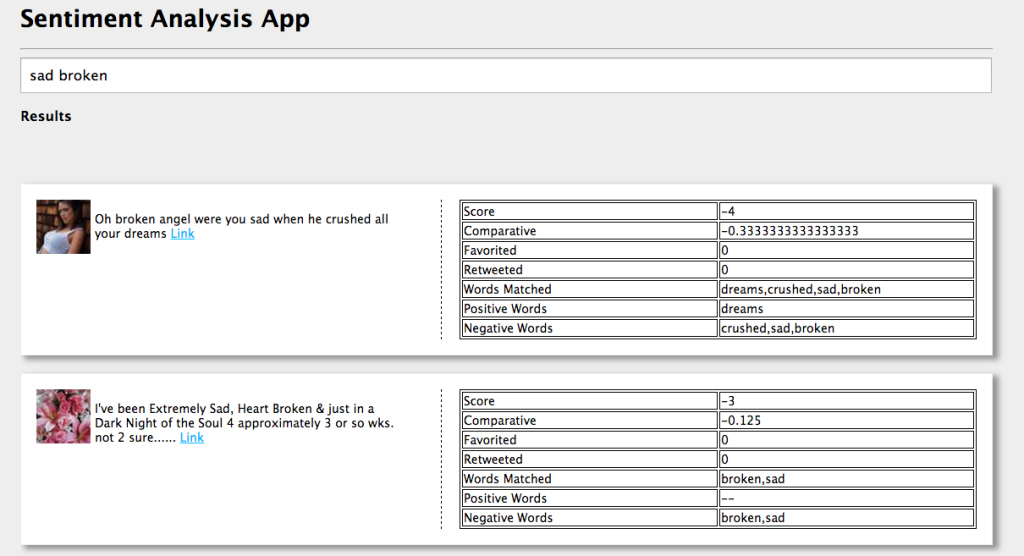
Clear the search bar and enter sad broken and hit return. Your results should look something like this:
Simple and easy right? Now you can search a few words and see how the results turn out.
Training Your Data
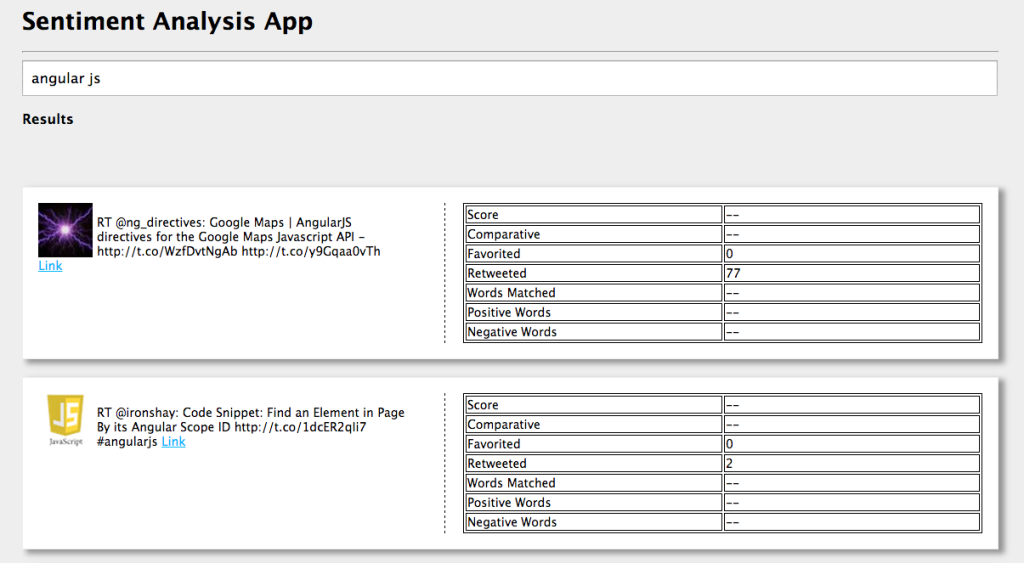
You must have noticed by now that not all tweets return results. This is because, if none of the words in the tweet match the AFINN words, the score would be 0. For example:
If you would like to fix this, you can train the sentiment module. Create a new file inside the logic folder named training.js and add the following code.
module.exports = {

  directives: 4,

  angular: 5,

  code: 3,

  scope: 3

};
Here, we are training the module to use the above scores for the mentioned words. Next, update logic/sentimentAnalysis.js like this:
var sentiment = require('sentiment');

var trainedData = require('./training.js');

module.exports = function(text) {

  return sentiment(text, trainedData);

}
After training, the results will look like this:

This is very a powerful technique, so make sure you assign proper values to the keywords, else you may see results which may not make sense. Refer to AFINN for further information.
Creating a RESTful Service
You can build a real time dashboard that will show tweets and results. You can run an async job, that will hit the Twitter API from time to time, fetch the data, and save it using diskDB. Then, you can expose this file as a RESTful end point. Add the following code to routes/index.js.
router.get('/data', function(req, res) {

  res.json(require('diskdb')

    .connect('db', ['sentiments'])

    .sentiments.find());

});
Now, when you access http://localhost:3000/data you can see the complete data saved so far. A live example is available here.
Integrate Social Media
Similar to Twitter, you can integrate Facebook, Google+, and other social media data. All you need to do is pass the text you would like to analyze to logic/sentimentAnalysis.js, and you can see the score for it.
Conclusion
I hope you got a basic idea on how to perform sentiment analysis using this app. Thanks for reading! Do comment, please.
Frequently Asked Questions (FAQs) on Creating a Sentiment Analysis Application Using Node.js
What is Sentiment Analysis and why is it important?
Sentiment Analysis, also known as opinion mining, is a sub-field of Natural Language Processing (NLP) that involves the use of algorithms to extract and understand the sentiment expressed in various forms of text data. It’s important because it allows businesses to understand the social sentiment of their brand, product, or service while monitoring online conversations. It can also be used to detect polarity (positive, negative, neutral) in customer reviews, social media, discussion forums and more, which can provide valuable insights for decision-making.
How does Sentiment Analysis work in Node.js?
In Node.js, sentiment analysis can be performed using various NLP libraries such as ‘sentiment’ and ‘natural’. These libraries use a technique called ‘bag of words’ where the text is broken down into individual words. Each word is assigned a score that indicates whether it’s positive, negative, or neutral. The overall sentiment of the text is determined by summing up the scores of all words.
How can I install the ‘sentiment’ library in Node.js?
You can install the ‘sentiment’ library in Node.js using npm (Node Package Manager). Open your terminal and type the following command: npm install sentiment. This will download and install the ‘sentiment’ library in your Node.js project.
How can I use the ‘sentiment’ library to analyze text in Node.js?
After installing the ‘sentiment’ library, you can use it in your Node.js application by requiring it at the top of your file: const Sentiment = require('sentiment');. Then, create a new instance of Sentiment: const sentiment = new Sentiment();. Now, you can analyze any text by calling the analyze method on the sentiment instance: const result = sentiment.analyze('your text here');.
What is the structure of the result object returned by the ‘analyze’ method?
The ‘analyze’ method returns an object that contains several properties. The ‘score’ property indicates the overall sentiment of the text (positive values for positive sentiment, negative values for negative sentiment, and zero for neutral sentiment). The ‘comparative’ property is the average sentiment score per word in the text. The ‘calculation’ property is an array of each word in the text and its individual score.
Can I customize the sentiment scores of specific words?
Yes, you can customize the sentiment scores of specific words by passing an options object when creating a new instance of Sentiment. The options object should have a ‘extras’ property that is an object of words and their corresponding scores.
How can I handle negations in sentiment analysis?
The ‘sentiment’ library in Node.js automatically handles negations. If a negation word (like ‘not’) precedes a word, the sentiment score of that word is reversed.
Can I use the ‘sentiment’ library to analyze non-English text?
The ‘sentiment’ library supports multiple languages. You can specify the language by passing an options object when creating a new instance of Sentiment. The options object should have a ‘language’ property that is the ISO 639-1 code of the language.
How can I handle emojis in sentiment analysis?
The ‘sentiment’ library in Node.js automatically handles emojis. Each emoji has a predefined sentiment score in the library.
Can I use other NLP libraries for sentiment analysis in Node.js?
Yes, there are several other NLP libraries available for Node.js such as ‘natural’, ‘franc-min’, ‘compromise’, and ‘nlp.js’. These libraries offer various NLP functionalities including sentiment analysis.