

Key Takeaways
- The tutorial guides through the process of creating a password manager application using Cordova, jQuery Mobile for UI, and CryptoJS for encrypting passwords.
- The password manager app will include features like storing and encrypting passwords with a master password, creating an access screen, home screen, add password page and a password list page.
- The application will use AES symmetric encryption for encrypting passwords and store the encrypted passwords in HTML5 local storage.
- The tutorial also provides code snippets for creating different screens and functionalities of the app, including storing and encrypting passwords, displaying a list of stored passwords, and decrypting a password associated with a name.
A password manager is an application that’s used to store and organize passwords. Passwords are encrypted and stored using a master password as an encryption key. Passwords are decrypted using the same master password.
In this tutorial I will show how to create a password manager app using Cordova. We will use jQuery Mobile for UI and CryptoJS for encrypting passwords.
To give you an idea of what we’re working towards, here’s a video preview and the final code can be found on GitHub here.
Starting
In the starting template we need to include jQuery, jQuery mobile and CryptoJS. I wont cover installing and creating a Cordova Application here, if you haven’t done this before, read the getting started guide. Give the Application an appropriate name and add the platforms you want to support. You will find instructions in how to build and run the application on the same page. We are using Cordova’s Notification plugin in this tutorial, you will need to add that, find instructions here.
Inside the index.html file, add the following JavaScript and CSS:
<style>

        @-ms-viewport { width: 100vw ; zoom: 100% ; }

        @viewport { width: 100vw ; zoom: 100% ; }

        @-ms-viewport { user-zoom: fixed ; }

        @viewport { user-zoom: fixed ; }

    </style>
    <link rel="stylesheet" href="https://code.jquery.com/mobile/1.4.5/jquery.mobile-1.4.5.min.css">
    <script src="https://code.jquery.com/jquery-1.11.2.min.js"></script>

    <script src="https://code.jquery.com/mobile/1.4.5/jquery.mobile-1.4.5.min.js"></script>
    <script src="http://crypto-js.googlecode.com/svn/tags/3.1.2/build/rollups/aes.js"></script>
Creating the Access Screen
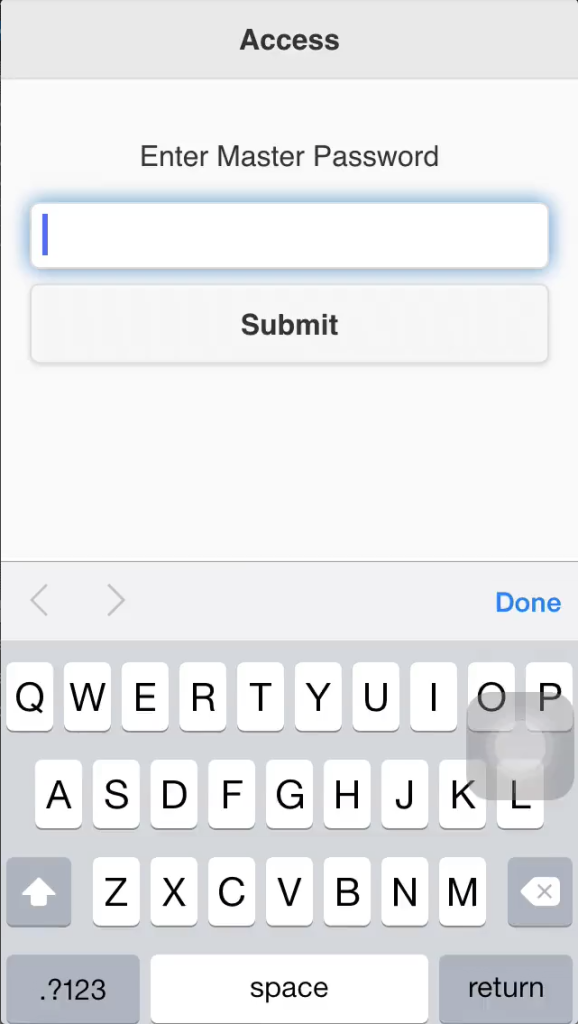
The Access page will be the first page displayed when a user opens the app. On the access page we need to display a form for the user to enter the master password.
Here is the code for the access screen, add it to index.html, inside the body tags.
<div data-role="page" id="pageone">

    <div data-role="header">

        <h1>Access</h1>

    </div>
    <div data-role="main" class="ui-content">

        <p style="text-align: center">Enter Master Password</p>

        <input type="password" id="master_password" />

        <a target="_blank" href="javascript:store_master_password()" style="text-decoration: none"><button>Submit</button></a>

    </div>

</div>
We a user clicks on the submit button the master password is stored in a variable so that we can later use it as key for encryption and decryption.
Here is the code for the store_master_password function which stores the master password, add this into js/index.js.
var master_password = "";
$(document).on("pageshow","#pageone",function(){

    master_password = "";

});
function store_master_password()

{

    master_password = document.getElementById("master_password").value;
    if(master_password == "")

    {

        navigator.notification.alert("Please enter master password");

        return;

    }
    $.mobile.changePage($("#pagetwo"), "slide", true, true);

}
Once the master password is stored we move the user to the home page (code below).
We clear the stored master password every time this page loads so that we can build logout functionality later.
Here is how the access screen should look:
Creating Home Screen
The user is taken to the home page after the master password is stored successfully.
In our home screen we will display two buttons, an add new password button and show passwords button.
Here is the code for the home page, add this to index.html:
<div data-role="page" id="pagetwo">

    <div data-role="header">

        <h1>Home</h1>

        <a target="_blank" href="#pageone" class="ui-btn ui-btn-right ui-icon-action ui-btn-icon-right">Logout</a>

    </div>
    <div data-role="main" class="ui-content">

        <a target="_blank" href="#pagethree" style="text-decoration: none"><button>Add New Password</button></a>

        <a target="_blank" href="javascript:display_list();" style="text-decoration: none"><button>Show Password List</button></a>

    </div>

</div>
Depending on which button was pressed, the user is taken to the respective page. We have a log out button on top right which takes the user to the access page.
When a user presses “Show Password List” we need to retrieve the encrypted passwords from local storage, decrypt them and then construct the HTML list to display them.
Here is the implementation for the display_list function, add this to js/index.js:
function populate_list()

{

    var list = "";

    for(var key in localStorage)

    {

        list = list + "<li><a target="_blank" href='javascript:name_password(\"" + key + "\")'>" + key + "</a></li>";

    }

    document.getElementById("ul_list").innerHTML = list;

}
function display_list()

{

    populate_list();

    $.mobile.changePage($("#pagefour"), "slide", true, true);

}
Here is how the home page should look:

Creating the Add Password Page
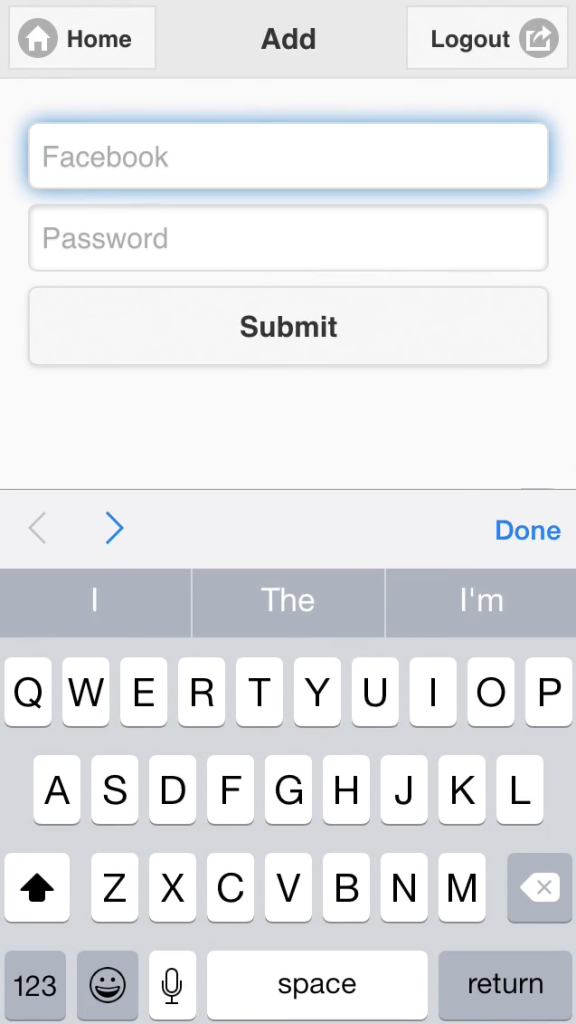
A user is taken to the add password page when they click the add password button on the home page.
On our add password page we need to display two text fields to take a password and name as input and a button for submitting the values.
Here is the code for the add password page, add this to index.html:
<div data-role="page" id="pagethree">

    <div data-role="header">

        <a target="_blank" href="#pagetwo" class="ui-btn ui-icon-home ui-btn-icon-left">Home</a>

        <h1>Add</h1>

        <a target="_blank" href="#pageone" class="ui-btn ui-btn-right ui-icon-action ui-btn-icon-right">Logout</a>

    </div>
    <div data-role="main" class="ui-content">

        <input type="text" placeholder="Facebook" id="new_name" />

        <input type="text" placeholder="Password" id="new_password" />

        <input type="submit" placeholder="Add to List" onclick="new_entry();" value="Submit" />

    </div>

</div>
When user clicks the submit button we run the new_entry JavaScript function. This function is responsible for encrypting and storing password.
Here is the new_entry function, add this to js/index.js:
function new_entry()

{

    var name = document.getElementById("new_name").value;

    var password = document.getElementById("new_password").value;
    if(name == "" || password == "")

    {

        navigator.notification.alert("Name and Password are Required");

        return;

    }
    var options = { mode: CryptoJS.mode.CBC, padding: CryptoJS.pad.Pkcs7 };

    var encrypted_password = CryptoJS.AES.encrypt(password, master_password, options);
    localStorage.setItem(name, encrypted_password);
    populate_list();
    $.mobile.changePage($("#pagefour"), "slide", true, true);

}
We are using AES symmetric encryption for encrypting passwords. It requires the master password as a key. We are storing the encrypted passwords in HTML5 local storage.
Here is how the add password page looks:
Create the Password List Page
A user is taken to the password list page when they click on the “Show Password List” button on the home page.
On this page we will display a list of the stored passwords. When a user clicks on an item we show the password associated with it.
Here is the code for the password list page, add it to index.html:
<div data-role="page" id="pagefour">

    <div data-role="header">

        <a target="_blank" href="#pagetwo" class="ui-btn ui-icon-home ui-btn-icon-left">Home</a>

        <h1>List</h1>

        <a target="_blank" href="#pageone" class="ui-btn ui-btn-right ui-icon-action ui-btn-icon-right">Logout</a>

    </div>
    <div data-role="main" class="ui-content">

        <form class="ui-filterable">

            <input id="myFilter" data-type="search">

        </form>

        <ul id="ul_list" data-role="listview" data-filter="true" data-input="#myFilter" data-inset="true">

        </ul>

    </div>

</div>
When a user clicks on a list item we execute the name_password function which decrypts the password associated with that name and shows it in an alert box.
Here is the implementation of the name_password function, add it to js/index.js:
function name_password(name)

{

    var options = { mode: CryptoJS.mode.CBC, padding: CryptoJS.pad.Pkcs7 };

    var decrypted_password = CryptoJS.AES.decrypt(localStorage.getItem(name), master_password, options);
    navigator.notification.alert("Password is: " + decrypted_password.toString(CryptoJS.enc.Utf8));

}
We also want to refresh the list UI on the page whenever it is loaded. Here is the code for that, add it to js/index.js.
$(document).on("pageshow","#pagefour",function(){ // When entering pagetwo

  $("#ul_list").listview("refresh");

});
Final Thoughts
Currently we have a functional, but basic App that can be deployed easily to multiple platforms. Some next steps to try are storing passwords server side, syncing passwords to the cloud and copying passwords. Let me know your experiences trying this tutorial and ideas for expanding it.
Frequently Asked Questions (FAQs) about Creating a Password Manager App with Cordova
How can I add a specific version of Android platform in Cordova?
To add a specific version of Android platform in Cordova, you need to use the ‘add’ command followed by the platform name and the ‘@’ symbol with the version number. For example, if you want to add Android version 7.0.0, you would use the command ‘cordova platform add android@7.0.0’. This command will download and install the specified version of Android platform in your Cordova project.
What is the purpose of the ‘cordova-create’ package?
The ‘cordova-create’ package is a utility module used by the Cordova CLI to create new Cordova projects. It provides a simple API for creating new Cordova projects programmatically. You can use it to create a new Cordova project with a specific template, package name, and app name.
How can I use Cordova CLI to build my app?
To build your app using Cordova CLI, you need to use the ‘build’ command followed by the platform name. For example, if you want to build your app for Android, you would use the command ‘cordova build android’. This command will compile your app and create an APK file that you can install on your Android device.
Can I use Cordova to create a password manager app?
Yes, you can use Cordova to create a password manager app. Cordova provides a set of APIs that allow you to access native device functionalities such as secure storage, which is essential for storing passwords securely. You can also use various Cordova plugins to enhance the functionality of your app.
How can I debug my Cordova app?
You can debug your Cordova app using the Chrome Developer Tools. To do this, you need to enable USB debugging on your Android device and connect it to your computer. Then, you can use the ‘inspect’ command in the Chrome Developer Tools to debug your app.
What are the prerequisites for creating a Cordova app?
Before you can create a Cordova app, you need to have Node.js and npm installed on your computer. You also need to install the Cordova CLI using the command ‘npm install -g cordova’. Additionally, if you want to build your app for a specific platform, you need to have the platform SDK installed on your computer.
How can I add a plugin to my Cordova app?
To add a plugin to your Cordova app, you need to use the ‘plugin add’ command followed by the plugin name. For example, if you want to add the Cordova camera plugin, you would use the command ‘cordova plugin add cordova-plugin-camera’. This command will download and install the specified plugin in your Cordova project.
Can I use Cordova to create cross-platform apps?
Yes, you can use Cordova to create cross-platform apps. Cordova allows you to write your app once using HTML, CSS, and JavaScript, and then deploy it on multiple platforms such as Android, iOS, and Windows.
How can I update Cordova to the latest version?
To update Cordova to the latest version, you need to use the ‘npm update -g cordova’ command. This command will update Cordova to the latest version available on npm.
How can I remove a platform from my Cordova project?
To remove a platform from your Cordova project, you need to use the ‘platform rm’ command followed by the platform name. For example, if you want to remove Android from your project, you would use the command ‘cordova platform rm android’. This command will remove the specified platform from your Cordova project.