Create Interesting Effects By Applying Brush Strokes To Your Vector Paths In Photoshop
One of the great advantages of using vectors is that they produce beautiful clean and smooth lines that you can scale to any size without loss of quality. Sometimes though, the clean lines can be too clean or too smooth so in this tutorial I’ll show you how to easily apply texture to a path using a textured brush tip. Let’s start by making a vector path out of some text.
1. Create a new Photoshop document 600 x 300 pixels and add some text. I used Arial Bold, size 200 pixels and set the foreground color to red. At this point it doesn’t really matter what color you choose because you can pick a color later when you use the paintbrush.
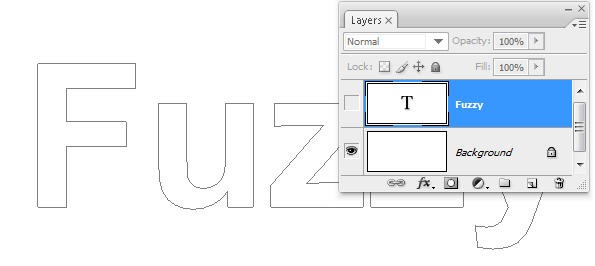
2. Now we’ll make a path out of the text. Choose Layer > Type > Create Work Path. Then turn off the visibility of your text layer so that you only see the outline shape of the letters.
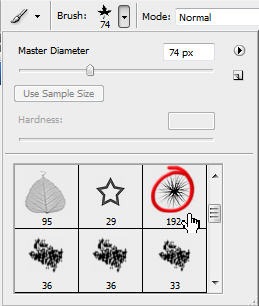
3. Select the Brush Tool (BE) from the toolbar and from the Brush options bar at the top of the screen choose the “Fuzzball” brush tip. Set the diameter of the brush to about 70 pixels.
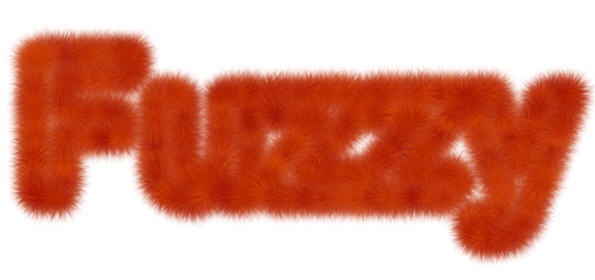
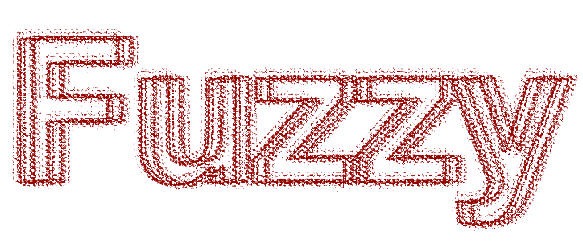
4. Now we’ll make some additional changes to the brush before we apply it as a stroke to the vector path. You can make dramatic changes to brushes by playing around with the settings in the Brushes palettes. Sometimes you might change one or two settings, and for some effects you might like to go completely bananas and make lots of changes. For this example I want to make the text look furry and fuzzy, so I’m making changes to the Fuzzball brush tip.
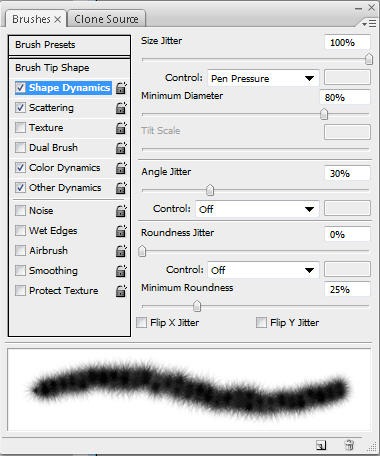
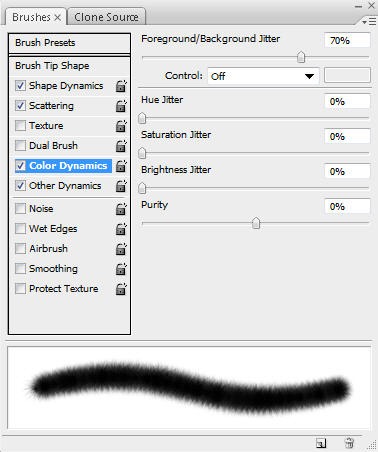
Open up the Brushes palette by choosing Window > Brushes or pressing F5. Click on the words “Shape Dynamics” on the left hand side of the Brushes palette. Set the Size Jitter to 100%, the Minimum Diameter to 80% and the Angle Jitter to 30%. As you make changes to the settings you’ll see the effect in the preview in the pane at the bottom of the Brushes palette.
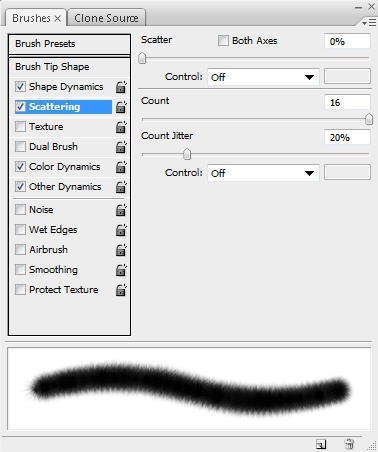
5. Now click on the word “Scattering”. Set the Scatter to 0% and set Count to 16%.
6. Click on the word Color Dynamics. Set the Foreground/Background Jitter to about 70%. This setting affects how the foreground and background colors mix together when we use the brush.
OK, that’s our fuzzy brush set up.
7. On the toolbar set up a foreground color – I used red `#990000 – and background color – I used orange #FF6600, but you can of course pick whatever colors you like.
8. All we need to do now is apply a stoke using our brush to our vector path. The stroke we apply will be pixels so we need a layer to put the pixels on. On the Layer palette, click on the New Layer icon to create a new layer above your text layer (which should be invisible).
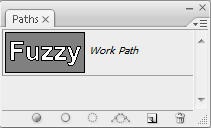
9. Open the Paths palette by choosing Windows > Paths. You should see a thumbnail with the outline of the word Fuzzy.
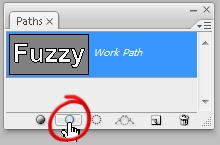
10. Click on the Work Path to select it. You should see the path outline on your document window. Now click on the Stroke Path icon at the bottom of the Paths palette and your brush will be applied to the path.
If you can still see the path outline just click anywhere on the grey area inside the Paths palette.
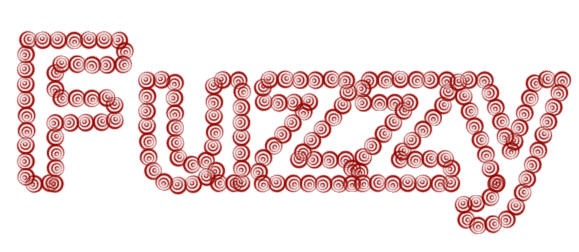
We spent a bit of time setting up our brush in this example, but in some cases you might just want to stroke the path using a default brush tip. Here’s a few more example using the same vector path and some of Photoshop’s brushes.
33 pixel Pastel On Canvas
35 Pixel Watercolor Fat Tip
25 Pixel Hypno Lines (in special effects brushes)
5 Pixel Heavy Stipple (in wet media brushes)
Don’t forget you can apply strokes to any vector path, whether you draw it with the Pen Tool, a Custom Shape or converting a selection to a path.
Frequently Asked Questions about Applying Brush Strokes to Vector Paths in Photoshop
How can I add a brush stroke to the pen tool in Photoshop?
To add a brush stroke to the pen tool in Photoshop, first, select the pen tool from the toolbar. Draw your path and then select the brush tool. Choose the brush style you want to use. After that, go back to the pen tool, right-click on your path, and select ‘Stroke Path’. A dialog box will appear, select ‘Brush’ from the drop-down menu and click ‘OK’. Your path will now be stroked with the brush style you selected.
Where can I find free brush stroke vectors for Photoshop?
There are several online platforms where you can find free brush stroke vectors for Photoshop. Websites like Vecteezy, Brusheezy, and Freepik offer a wide range of free brush stroke vectors that you can download and use in your projects. Always remember to check the licensing terms before using any free resources.
How can I create interesting effects with brush strokes in Photoshop?
Creating interesting effects with brush strokes in Photoshop involves experimenting with different brush styles, sizes, and colors. You can also play around with the blending modes and opacity levels to create unique effects. Additionally, using the brush strokes on different layers and applying layer masks can give you more control over the final look.
What are some tips for using brush strokes effectively in Photoshop?
Some tips for using brush strokes effectively in Photoshop include varying the size and hardness of the brush for different effects, using a graphics tablet for more control over the brush strokes, and experimenting with different brush settings in the Brush Panel. Also, remember to use different layers for different brush strokes to maintain flexibility in your design.
How can I customize my brush strokes in Photoshop?
You can customize your brush strokes in Photoshop by adjusting the settings in the Brush Panel. Here, you can change the size, hardness, spacing, angle, and roundness of the brush. You can also adjust the scattering, texture, dual brush, color dynamics, and transfer settings to further customize your brush strokes.
Can I use brush strokes to create a painting effect in Photoshop?
Yes, you can use brush strokes to create a painting effect in Photoshop. By using different brush styles, sizes, and colors, and by varying the direction and pressure of the brush strokes, you can create an effect that resembles a traditional painting.
How can I apply brush strokes to text in Photoshop?
To apply brush strokes to text in Photoshop, first, create your text using the Text Tool. Then, create a new layer and use the brush tool to paint over the text. You can then use the Clipping Mask feature to apply the brush strokes only to the text.
Can I save my custom brush strokes for future use in Photoshop?
Yes, you can save your custom brush strokes for future use in Photoshop. After customizing your brush, go to the Brush Panel menu and select ‘New Brush Preset’. Give your brush a name and click ‘OK’. Your custom brush will now be available in the Brush Preset Picker.
How can I create a grunge effect with brush strokes in Photoshop?
To create a grunge effect with brush strokes in Photoshop, you can use grunge brush presets or create your own by adjusting the texture and dual brush settings in the Brush Panel. Applying the brush strokes on a separate layer and adjusting the blending mode can also help achieve a grunge effect.
Can I use brush strokes to create a watercolor effect in Photoshop?
Yes, you can use brush strokes to create a watercolor effect in Photoshop. There are watercolor brush presets available, or you can create your own by adjusting the scattering, texture, and transfer settings in the Brush Panel. Applying the brush strokes on a separate layer and reducing the opacity can also help achieve a watercolor effect.
Jennifer Farley is a designer, illustrator and design instructor based in Ireland. She writes about design and illustration on her blog at Laughing Lion Design.

