

Key Takeaways
- Creating a vintage badge in Photoshop involves using a variety of tools such as the ellipse tool to create the main shape, the text tool for adding text, and the brush tool for adding texture and details.
- The process includes creating and centering multiple circles, duplicating and rotating them, adding text and custom shapes like stars, and adding color and texture for a vintage feel.
- To add text to the badge, the text tool is used, and to curve the text around the badge, the Warp Text function is used. The Direct Selection tool can be used to adjust the positioning of the text along the path.
- The final steps involve adding color to the badge, adding texture using a grunge texture overlay, and using layer masks to ensure the color and texture only apply to the badge shape.
Everyone enjoys recognition and achievement, but badges can do a lot more than offer congratulations. Badges can also convey trust and integrity, such as when a product or service comes with a guarantee, or when a company or individual is certified. Badges play a vital role in design, because they can be used as a symbol of trust, credibility and accomplishment. There are different styles of badges out there: some are gold symbolizing worth, and some are more playful, such as badges that you earn for playing games. They come in all shapes and sizes, and today we are going to create a vintage badge in Photoshop.
(Download the finished, layered Photoshop file.)
First, Create a document that is 600px x 600px. This will give us plenty of room to work. Select the ellipse tool and create a large circle. In the alignment tools within the options bar at the top of your screen, click on both the vertical and horizontal center alignment icons. This places your circle in the center of your canvas.
![]()
Next, create a new circle on another layer. Use the align panel to center your circle to the canvas. Make sure that it is roughly 120px in diameter. 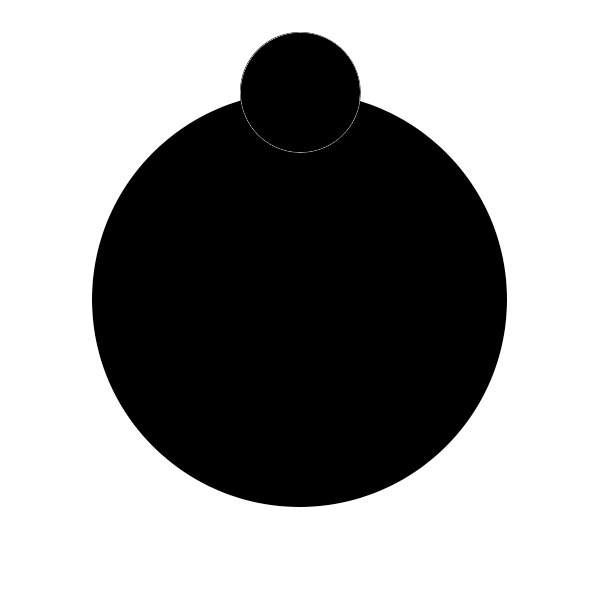
Use the Command/Ctrl key and click on the background layer and the small circle layer. This will make sure that you center the small circle within the large one and that both are in the center of the canvas.
Next, we will create the circles around the perimeter of the main circle. With the starting circle at the top and centered with the other circle, click on the center registration point of the circle. You can click and drag this wherever you want. Knowing this, it also is the rotation point when you choose to rotate the active object in transform mode. Our document is 600px x 600px, so we need to place the registration point in the exact center, which has an X and Y coordinate of 300. When you click and drag the registration point, the tool tip will display its X and Y coordinates.
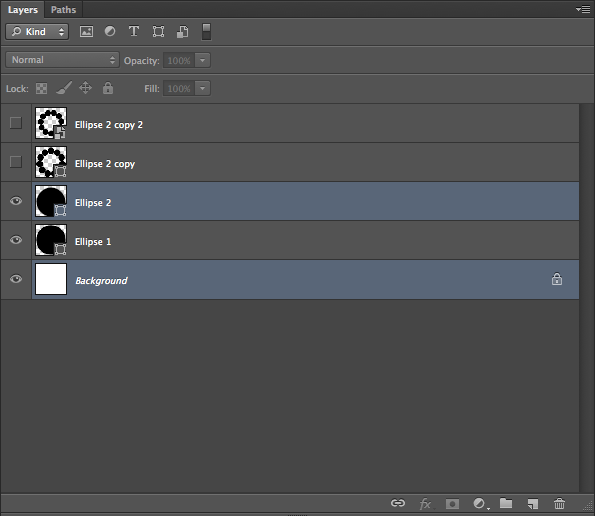
Hit Command/Ctrl +Alt/Option + “T” to transform a copy of the small circle and drag the center rotation to the center point of the large circle. Rotate the small circle around until the sides of the two circles barely touch. Then, to repeat the process, simply hit Command/Ctrl + Alt/Opt + Shift + “T”. This will duplicate your last transformation action, creating a copy of the circle and rotate it the same amount of space as the last one. Repeat this until you have small circles all the way around the large circle. Look below for clarity.
Select all of the small circles and hit Command/Ctrol + “E” to merge the small circles. Next, hit Command/Ctrl + “J” to duplicate the circles layer. Hit Command/Ctrl + “T” to transform the duplicate circles layer and, while holding Shift, rotate the circles 45°. You should have a shape like the one shown below.![]()
Now that we have our main badge shape, we can begin to add the details to our badge. Grab the ellipse tool and hold Shift to draw a circle out from the center of the badge. In the options bar at the top of the Photoshop interface, you will see options for Fill and Stroke. Choose “No fill” and create a white stroke at a size of 1px. ![]()
Next, we will add small dots around the outer edge of the white circle. Create a new layer and draw a small circle with a white fill slightly above the circle that we just created. Make sure that it is centered within the canvas. We are going to repeat the rotation process that we used earlier to duplicate and rotate these small circles around the the large white circle.
An important note: For some reason, when you create small objects in Photoshop, you cannot select and move the center point without holding down Option/Alt first. Otherwise, you’ll just end up moving the circle itself around and that isn’t what we want. Also, to make moving the center point more precise, you can dial in the coordinates in the options bar at the top of your interface. Hit Command/Ctrl + Alt/Option+ “T” to transform a copy of the small circle. Then, Hold Alt/Option to click and drag the center point to the center of your canvas, hold Shift to rotate the circle copy, and hit enter. Then, hit Command/Ctrl+Alt/Option + Shift + “T” to duplicate this action until it comes back around the entire circumference of the circle, as you can see below.
![]()
Next, we need to choose a typeface to go with our vintage look. For this tutorial, I am choosing Rothman, which is a tall vintage font. I typed “Design Festival” in all caps and “Photoshop Tutorial” all lowercase, because both versions look different but work well together. I enlarged the tracking so that “Photoshop Tutorial” would be the same width as the title text.
![]()
Next, we will add some stars on the sides. Select the Custom Shape Tool and choose a star shape. If you don’t have one, check the other shape libraries, or search online. We could just arrange the star shapes by hand, but if we want them to be uniform, we can use the same technique that we did earlier for the dots. Create a small star and center it horizontally, arranging it to where it is just below the thin white circle in the center. Hit Command/Ctrl + Alt/Opton + “T” to transform a copy, aligning the registration point with the center of the canvas itself. Hold Shift to rotate the star where you want it. Then, hit Command/Ctrl + Alt/Option + Shift + “T” to duplicate the transformation until you have stars all the way around the circle. ![]()
Next, add a layer mask and with a solid black brush; paint with black to mask out the stars that you don’t want. Your results should look like the result below. ![]()
Next, select the ellipse tool and create an ellipse that is roughly the same size as the circle of stars, but with no stroke or fill. Select the text tool and hover over the circle path. Your cursor with change to a wavy line, which will allow you to place type on a path. Type your message and resize the text to fit the area along the bottom. The text will fall in line with the stars.
![]()
Make another circle and repeat the process for text across the top of the badge as well. For type on a path, you can switch to the direct selection tool and hover over the end or the beginning of the text, and the cursor will change. If you click and drag, you can alter the positioning of the text along the path. ![]()
Select the custom shape tool and click the flyout menu. Choose ornaments, click and drag out the Fleur De Lis custom shape and drag it out onto the canvas. Center it horizontally and place it below the top arched text. Select Ornament 5, drag it out n the canvas, and hit Command + “T” to transform the text, rotating it 180°. Center it above the bottom arched text. The results should look like the example below.
![]()
Let’s add some color to our badge. Create a new layer above the original shape layers for the badge. Fill the layer with a muted color. I chose a muted blue (#375f81). To select the badge shape only, Command/Ctrl + Shift + <click on each of the shape layers that make up your badge>. This includes the main circle, and the two smaller circle layers. This will load their shapes as a selection. Click on the layer fill with blue and hit the layer mask icon. This will mask out everything except the badge shape. ![]()
Next, we will add some texture to our badge. Scroll down to the base shape layers for the badge and place a grunge texture above your muted color layer. Change the blend mode to “Color Dodge.” You can copy the layer mask from the color layer and paste it into a layer mask on the texture layer so that it only takes the shape of the badge. ![]()
You badge should now look like the final result below.
![]()
Conclusion
By mixing a few vintage elements and shape with a few Photoshop techniques, you can create a vintage badge in Photoshop. With a couple of custom shapes that are built into Photoshop, you can create a vintage inspired design that looks authentic.
How did your vintage badge turn out? Leave your thoughts in the comments section below. Also, you can download the source files from the link below.
Download the source files now (broken link).
Frequently Asked Questions about Creating a Vintage Badge in Photoshop
What are the basic tools I need to create a vintage badge in Photoshop?
To create a vintage badge in Photoshop, you will need to familiarize yourself with several tools. These include the Shape tool for creating the basic shape of the badge, the Text tool for adding text, and the Brush tool for adding texture and details. You will also need to use the Layers panel to manage different elements of your design, and the Color Picker to choose the right colors for your badge.
How can I add a vintage effect to my badge in Photoshop?
Adding a vintage effect to your badge in Photoshop can be achieved by using a combination of texture overlays, color adjustments, and filters. For instance, you can use the Noise filter to add a grainy texture to your badge, or the Sepia tone to give it an old-timey feel. You can also use texture overlays to add scratches or wear and tear to your badge, making it look aged and worn out.
Can I use custom shapes for my vintage badge in Photoshop?
Yes, you can use custom shapes for your vintage badge in Photoshop. The Custom Shape tool in Photoshop allows you to choose from a variety of pre-made shapes, or you can create your own using the Pen tool. Once you have your shape, you can use the Direct Selection tool to adjust the points and curves of your shape to fit your design.
How can I add text to my vintage badge in Photoshop?
Adding text to your vintage badge in Photoshop is simple with the Text tool. You can choose from a variety of fonts, adjust the size and color, and even apply effects like drop shadow or stroke. To curve your text around the shape of your badge, you can use the Warp Text function.
How can I save and export my vintage badge in Photoshop?
Once you’re satisfied with your vintage badge design in Photoshop, you can save it by going to File > Save As, and choosing the format you want. If you want to use your badge on a website or in a digital design, it’s best to save it as a PNG or JPEG. If you’re planning to print your badge, a TIFF or PDF format would be more suitable.
Can I create a vintage badge in Photoshop without any design experience?
Yes, even without any design experience, you can create a vintage badge in Photoshop. The software is user-friendly and there are numerous tutorials available online that can guide you through the process step by step. However, it might take some time and practice to get used to the tools and functions.
How can I make my vintage badge design stand out?
To make your vintage badge design stand out, consider using contrasting colors, unique fonts, and interesting shapes. Adding texture and details can also make your badge more visually appealing. Remember, the key to a great design is balance, so make sure all elements of your badge work well together.
What are some common mistakes to avoid when creating a vintage badge in Photoshop?
Some common mistakes to avoid when creating a vintage badge in Photoshop include using too many fonts or colors, not aligning elements properly, and overcomplicating the design. It’s also important to keep in mind the purpose and audience of your badge to ensure it communicates the right message.
Can I use Photoshop to create other types of badges or logos?
Yes, Photoshop is a versatile design tool that can be used to create all types of badges, logos, and other graphic designs. You can use the same basic techniques and tools to create different styles and themes, depending on your needs and preferences.
Where can I find more resources to improve my Photoshop skills?
There are many resources available online to help you improve your Photoshop skills. These include tutorial websites, YouTube channels, online courses, and forums where you can ask questions and get advice from other Photoshop users. You can also practice by experimenting with different tools and techniques in Photoshop.

