
In Web pages, it’s possible to create instances of objects that can be used to perform various tasks, using ‘ActiveX controls’ and ‘Java Applets’. These objects are inserted into the Web page using the <OBJECT> HTML tag. Each object has a 32-bit unique identifier that is inserted in the CLASSID attribute of the <OBJECT> tag.
Key Takeaways
- The Tabular Data Control is a Microsoft ActiveX control built into Internet Explorer that can extract ordered contents from an ASCII file into HTML elements, acting like a small database for small amounts of data that require frequent updates.
- The ActiveX control is initialized using the
- The Tabular Data Control can be manipulated using JavaScript, allowing for dynamic data extraction and display. For example, the moveNext() method can be used to point to the next data item in a data file, and the moveFirst() and moveLast() methods can be used to point to the first and last data items, respectively.
Tabular Data Control
The “Tabular Data Control” is a Microsoft ActiveX control that’s built into Microsoft Internet Explorer. Using this object, it is possible to extract ordered (delimited) contents from an ASCII (normally we use the .txt extension) file into HTML elements.
For example, if we have a text file that contains 3 fields (synonymous with columns in a database), and these fields are delimited by a character, then it is possible to extract the values of the fields into an HTML page.
This object is very useful if we have relatively small amounts of data, we need to update this data frequently, and we require client-side scripting. In this situation, the control can act like a small database.
The tabular data control is available in Internet Explorer 4 upwards. The only disadvantage of this control is that, it being an ActiveX control, only Internet Explorer supports it (Netscape requires a plug-in).
Throughout the examples below, you’ll note I’ve referred to specific file names. These refer to files included in the code archive for this tutorial, which you can download here.
Implementation
The ActiveX control is initialized using the <OBJECT> tag. The CLASSID (unique identifier) for the tabular data control is:
CLSID:333C7BC4-460F-11D0-BC04-0080C7055A83Thus we initialize this control in a Web page as follows:
<OBJECT ID="SomeID" CLASSID="CLSID:333C7BC4-460F-11D0-BC04-0080C7055A83">

.....

.....

.....

</OBJECT>
Any object, like an applet, has a number of parameters, which are specified using the <PARAM> tag. The tabular data control has around 7 parameters, but here, I’ll discuss only the more important of these:
DataURL– The path of the file that contains the data, for e.g. “data.txt”.UseHeader– When set totrue, it indicates that we want to use the field names to reference a particular field. Normally we set it totrue, but in some applications the field names (headers) may not be required. The default value isfalse.TextQualifier– The character at the beginning and end of a string of text that qualifies that text. For e.g., Here,~My name is Premshree~, theTextQualifieris ‘~‘.FieldDelim– The Field Delimiter is used to distinguish between the different data fields of the data file. For example, consider a data file where we have the fields name, age and sex. The values for these fields will be written as*SomeName*|*SomeAge*|*SomeSex*. Here, the field delimiter used is ‘|‘, and I’ve used ‘*‘ as the text qualifier.
Thus, the complete initialization will look like this:
<OBJECT ID="SomeID" CLASSID="CLSID:333C7BC4-460F-11D0-BC04-0080C7055A83">

  <PARAM NAME="DataURL" VALUE="YourDataFile.txt">

  <PARAM NAME="UseHeader" VALUE="TRUE">

  <PARAM NAME="TextQualifier" VALUE="~">

  <PARAM NAME="FieldDelim" VALUE="|">

</OBJECT>
The parameter names are not case sensitive.
The TextQualifier and FieldDelim parameters can be any character. Choose a character that you’re less likely to use in your text.
Examples
In these examples, I will use the text qualifier as “~” and field delimiter as “|“. I use the .txt extension for the data files, but you can use any extension you like.
First, let us consider a simple example where I store my name and age in the text file data1.txt. Now, I will display my name and age using the <SPAN> tag. This is how it’s done:
name|age

~Premshree Pillai~|~19~
Now, I will extract this data and display it in the Web page, data1.htm, as follows:
<OBJECT ID="data1" CLASSID="CLSID:333C7BC4-460F-11D0-BC04-0080C7055A83">

  <PARAM NAME="DataURL" VALUE="data1.txt">

  <PARAM NAME="UseHeader" VALUE="TRUE">

  <PARAM NAME="TextQualifier" VALUE="~">

  <PARAM NAME="FieldDelim" VALUE="|">

</OBJECT>


<SPAN DATASRC="#data1" DATAFLD="name"></SPAN>


<SPAN DATASRC="#data1" DATAFLD="age"></SPAN>
The output will display: Premshree 19
Note the attributes wthe SPAN tags. DATASRC specifies the data source to use, which is same as the ID of the object we have initialized (here, ‘data1‘). The DATAFLD attribute specifies the field of the data we want to display. The data file data1.txt had two fields ‘name’ and ‘age’ as you can see. Specifying the DATAFLD as ‘name‘ will display the name.
Note that using the method above, you can extract data from a text file into any HTML element; but the above method is inefficient in that if our data file contains more than 1 entry, we won’t be able to extract all the values directly.
In these cases we use the <TABLE> tag. The TABLE tag has a special property, as we’ll see in the following example.
Consider a simple example where we store the name, age and sex of 3 persons in a text file. Now, we want to extract this data and display it on the Web page in a tabular form.
The text file, data2.txt looks like this:
name|age|sex

~Premshree Pillai~|~19~|~male~

~Vinod~|~18~|~male~

~Usha~|~19~|~female~
Now, we can extract all the above data and display it in (via data2.htm) a tabular form as follows:
<OBJECT ID="data2" CLASSID="CLSID:333C7BC4-460F-11D0-BC04-0080C7055A83">

  <PARAM NAME="DataURL" VALUE="data2.txt">

  <PARAM NAME="UseHeader" VALUE="TRUE">

  <PARAM NAME="TextQualifier" VALUE="~">

  <PARAM NAME="FieldDelim" VALUE="|">

</OBJECT>


<TABLE DATASRC="#data2" BORDER="2">

<THEAD>

  <TH>Name :</TH>

  <TH>Age :</TH>

  <TH>Sex :</TH>

</THEAD>

<TR>

  <TD><SPAN DATAFLD="name"></SPAN></TD>

  <TD><SPAN DATAFLD="age"></SPAN></TD>

  <TD><SPAN DATAFLD="sex"></SPAN></TD>

</TR>

</TABLE>
The output will look like this :
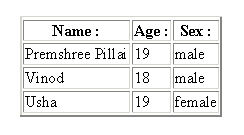
Thus, we have specified the three data fields (DATAFLD) in 3 different <TD> tags (columns) only once. The Web page automatically displays all the 3 sets of values (3 rows).
We can add as much content as we want to the text file, and we need not make any modifications to the HTML code that extracts these values.
Tabular Data Control and JavaScript
It is possible to manipulate the tabular data control object using JavaScript. In the first example, the <SPAN> element displayed the first entry of the data file. Now, suppose we add another entry to the file; the data file (data1.txt) now looks like this:
name|age

~Premshree Pillai~|~19~

~Vinod~|~18~
Now, if we want to see the second entry (i.e. Vinod 18), we can do it like this:
<OBJECT ID="data1" CLASSID="CLSID:333C7BC4-460F-11D0-

BC04-0080C7055A83">

  <PARAM NAME="DataURL" VALUE="data1.txt">

  <PARAM NAME="UseHeader" VALUE="TRUE">

  <PARAM NAME="TextQualifier" VALUE="~">

  <PARAM NAME="FieldDelim" VALUE="|">

</OBJECT>


<SCRIPT LANGUAGE="JavaScript">

/* Get the complete data record set */

var dataSet=data1.recordset;


/* Go to next data */

dataSet.moveNext();

</SCRIPT>


<SPAN DATASRC="#data1" DATAFLD="name"></SPAN>


<SPAN DATASRC="#data1" DATAFLD="age"></SPAN>
Now, the output will be: Vinod 18
The above script is fairly self explanatory. Initially we store the entire data of the data file in a variable dataset using the recordset method. The moveNext() method points to the next data item (next row). Some of other methods that can be used are:
moveFirst()– Point to the first data item (first row)moveLast()– Point to the last data item (last row)EOF -This property is used to check whether we’ve reached the end of the file.
Now, I’ll wrap up this article with a more dynamic example. I’ll create a JavaScript Ticker that displays a number of messages with each message pointing to a particular URL. Here, the ticker will read its messages and the corresponding URL from a text file (tickerData.txt from the archive). For a full understanding of this code, you must be familiar with dynamic HTML techniques.
Here’s the tickerData.txt file:
~message~|~messageURL~

~SitePoint.com~|~http://www.sitepoint.com~

~WebmasterBase~|http://www.webmasterbase.com~

~BBC News~|http://www.bbc.co.uk~
And the tickerStyle.css file:
.tickerStyle{font-family:verdana,arial,helvetica; color:#666699;

font-weight:bold; font-size:8pt; background:#EEEEFF;

border-right:#666699 solid 2px; border-left:#666699 solid 1px;

border-top:#666699 solid 1px; border-bottom:#666699 solid 2px;

padding:3px; width:400px; text-align:center; text-decoration:none}


.tickerStyle:hover{font-family:verdana,arial,helvetica;

color:#666699; font-weight:bold; font-size:8pt; background:#DDDDEE;

border-right:#666699 solid 1px; border-left:#666699 solid 2px;

border-top:#666699 solid 2px; border-bottom:#666699 solid 1px;

padding:3px; width:400px; text-align:center; text-decoration:none}
And lastly, ticker.htm:
<html>

<head>

<title>JavaScript Ticker (using Tabular Data Control)</title>

<link rel="stylesheet" href="tickerStyle.css">

<script language="JavaScript">

// JavaScript Ticker

// - using Tabular Data Control

// By Premshree Pillai


/*

  The Ticker function

  objName : the ID of the object to be used as data source

  maxMsgs : the number of messages in the data file

  counter : to keep count of the messages

  timeOut : delay (in milliseconds)

*/


function TDC_Ticker(objName, counter, maxMsgs, timeOut)

{

  try

  {

    eval('tickerSet=' + objName + '.recordset');

    if(!tickerSet.EOF && counter<maxMsgs-1)

    {

      tickerSet.MoveNext();

      counter++;

    }

    else

    {

      counter=0;

      tickerSet.MoveFirst();

    }

    setTimeout("TDC_Ticker('"+objName+"','"+counter+"',

'"+maxMsgs+"','"+timeOut+"')", timeOut);

  }

  catch(e)

  {

    alert('This Ticker works with IE 4+ only.');

  }

}

</script>

<!-- END JAVASCRIPT TICKER USING TABULAR DATA CONTROL -->

</head>

<body bgcolor="#FFFFFF">


<!-- BEGIN TICKER PLACEMENT -->

<center>

<object id="ticker" classid="CLSID:333C7BC4-460F-11D0-BC04-0080C7055A83">

  <param name="DataURL" value="tickerData.txt">

  <param name="UseHeader" value="TRUE">

  <param name="TextQualifier" value="~">

  <param name="FieldDelim" value="|">

</object>

<a href="" datasrc="#ticker" datafld="messageURL" class="tickerStyle">

  <span id="tickerDiv" datasrc="#ticker" datafld="message"></span>

</a>

<script language="JavaScript">

var tickerMaxMsgs=3; // Maximum Messages in the Data File

var tickerCount=tickerMaxMsgs;

new TDC_Ticker('ticker',tickerCount,tickerMaxMsgs,2000); // Set the Ticker

</script>

</center>

<!-- END TICKER PLACEMENT -->


</body>

</html>
Frequently Asked Questions (FAQs) about Internet Explorer Control
What is Internet Explorer Control and how does it work?
Internet Explorer Control is a feature that allows developers to embed the functionalities of Internet Explorer into their applications. It works by using the WebBrowser ActiveX control, which can be added to any application and programmed using languages like C# or VB.NET. This control provides a range of functionalities, including navigation, history, and favorites, among others. It also allows developers to interact with the HTML document loaded in the control, enabling them to manipulate web pages or extract information.
How can I add the WebBrowser control to my application?
To add the WebBrowser control to your application, you need to open your project in Visual Studio, go to the Toolbox, and find the WebBrowser control under the “Common Controls” section. You can then drag and drop the control onto your form. Once added, you can start programming the control using the Properties window or directly in your code.
How can I navigate to a web page using the WebBrowser control?
To navigate to a web page using the WebBrowser control, you can use the Navigate method. This method takes a string parameter, which is the URL of the web page you want to navigate to. For example, to navigate to Google, you would use the following code: webBrowser1.Navigate("http://www.google.com");
How can I interact with the HTML document loaded in the WebBrowser control?
The WebBrowser control provides the Document property, which gives you access to the HTML document loaded in the control. This property returns an HtmlDocument object, which you can use to interact with the HTML elements in the page. For example, you can use the GetElementById method to find an element by its ID, and then manipulate its properties.
Can I use JavaScript with the WebBrowser control?
Yes, you can use JavaScript with the WebBrowser control. The control provides the InvokeScript method, which allows you to execute JavaScript code in the context of the loaded web page. This method takes a string parameter, which is the JavaScript code you want to execute.
How can I handle navigation events in the WebBrowser control?
The WebBrowser control provides several events that you can handle in your code. For example, the Navigating event is raised before the control navigates to a new web page, and the Navigated event is raised after the navigation is complete. You can handle these events to perform actions before or after navigation, such as showing a loading indicator or updating the address bar.
Can I control the Internet Explorer settings from my application?
Yes, you can control some of the Internet Explorer settings from your application. The WebBrowser control uses the same settings as the Internet Explorer application, so any changes you make to the settings will affect both the control and the application. However, keep in mind that this might not be desirable in all cases, as it could affect the user’s experience when using Internet Explorer.
How can I display HTML content directly in the WebBrowser control?
The WebBrowser control provides the DocumentText property, which you can use to display HTML content directly in the control. This property takes a string parameter, which is the HTML content you want to display. For example, you can use the following code to display a simple HTML page: webBrowser1.DocumentText = "<html><body>Hello, world!</body></html>";
Can I use the WebBrowser control to download files?
Yes, you can use the WebBrowser control to download files. The control provides the Navigate method, which you can use to navigate to the URL of the file you want to download. The file will be downloaded in the same way as if the user had clicked on a download link in a web page.
Are there any limitations or issues I should be aware of when using the WebBrowser control?
One limitation of the WebBrowser control is that it uses the Internet Explorer rendering engine, which is not as modern or standards-compliant as the engines used by other browsers like Chrome or Firefox. This means that some web pages might not display correctly in the control. Also, the control might not work correctly if the user has disabled Internet Explorer on their system.