


It’s IoT Week at SitePoint! All week we’re publishing articles focused on the intersection of the internet and the physical world, so keep checking the IoT tag for the latest updates.
The Internet fuels an ever increasing part of our lives. We are more connected than ever, with fast and virtually unlimited access to information. Our phones where the accelerators of this push, giving us all the information we need from weather reports, news, music, videos, games and everything in-between. The desire for connectivity has given rise to wearables. Small devices such as watches that connect to a phone or directly to the internet. While these platforms are still in their infancy, they provide a new way for users to access small pieces of information right when it’s needed most. In this tutorial I’m going show how to build a native Android Wear app and connect it to a web service to pull the latest tidal information. This is perfect for a wearable app as you can quickly open it, connect to the API and get a snapshot of the info you need.
Launcher icon / colours courtesy of Elio
You can find the final project on GitHub.
Build Targets and Versions
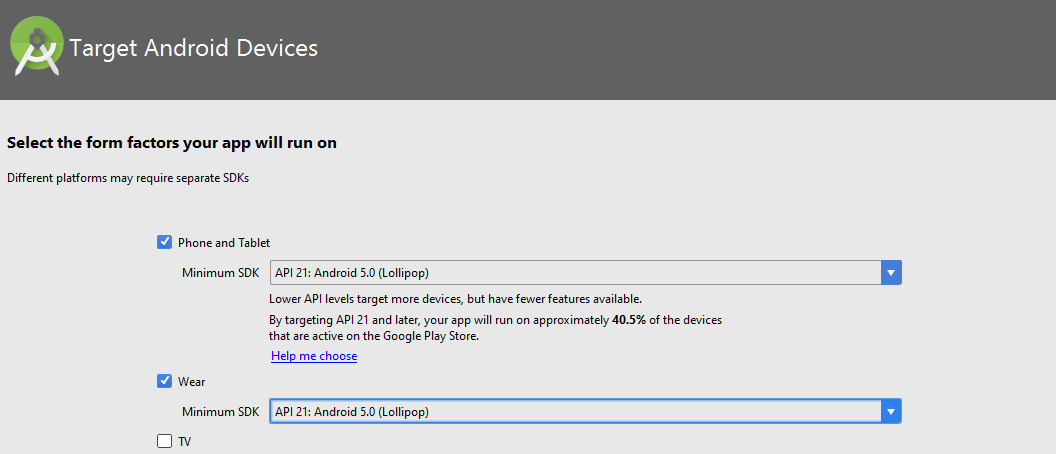
I created the project with Android Studio 2.1 and compiles against Android 5.0 (API 21) on Mobile and Android 5.0 (API 21) on Wear.
Because you will be sending data messages you need Google Play Services on both profiles.
Note: Both the mobile and wearable need to have compatible API versions to be able to send and receive data. The minimum supported version is Android 4.3 (API 18) on a mobile device.
You will need a physical mobile phone. If you have both a phone and a physical android wear watch the process will easier. Currently you can’t connect an emulated phone and watch together.
Considerations and Limitations
The example uses an activity implementation of the DataAPI to let the two profiles exchange information. This means that for the process to work, both devices need to be open at the same time. A better option would be to implement your own background listener using the WearableListenerService, so you can exchange data without both apps needing to be open.
At time of writing Android Wear (version 1.6) has no ability to directly connect with the internet. If you query a wear device for it’s active connections it will return false. This makes sense as technically the wearable doesn’t have any connection to the internet, it gets its connection from it’s connected mobile device. This means you need to relay all queries to a mobile device, perform calculations and then return the results to wear. A lot of this tutorial is dedicated to setting up the connection between the profiles to exchange data.
When Android Wear 2.0 is released and new cellular powered devices are common, the process should be hopefully more streamlined, without the need to funnel information back and forth from a mobile device.
An Overview of the Process
The goal is to use the wear app to connect to an API to give the user tidal information.
Here are the steps in the process
- Create a button on the wearable that initiates the process.
- Create the first data message and send it to the mobile device, used as a trigger to kick start processing.
- Catch the message on mobile and start processing. Set up the information so it can connect to the API, building the final URL.
- So as not to lock the UI, create an Asynchronous Task to connect to the API in the background. Inside the Async task, check that the user is online and then connect to the API to pull data. Pass the information forward and create a message sent back to the mobile device. This will either be a failure message or the tidal data.
- On the wear profile, collect the data request and process it, showing either the tidal information or an error message.
As the whole process is complex, I recommend you refer to the complete working copy of the app on GitHub. Because of the complexity and scale of the project I will focus on the important parts. I have skipped several steps such as setting up color values, string resources and vector icons to focus on core functionality.
Connecting Mobile Phone to Physical Watch
If you have both a mobile and wear device you can connect them together for testing purposes. All Android wear watches will support debugging over bluetooth. Google provides a helpful “Debugging Over Bluetooth” guide. As a summary here is how I connect my devices together for use in Android Studio
- Enable USB debugging on the mobile device (refer to the debugging guide above for detailed steps).
- On the wearable enable Bluetooth debugging inside the developer options.
- Open the Android Wear app on your mobile and select settings in the top right. Inside settings enable debugging over bluetooth.
- Scroll to the bottom of Android Wear and set Device to Debug to be your wearable (not the server).
- On the command line open the platform tools directory in Android studio. You can find this by opening the SDK manager and looking at the Android SDK Location field. For example my path is C:\Users\simon\AppData\Local\Android\sdk\platform-tools
- Using the command line you can now access the
adbcommand. Type the following
adb forward tcp:4444 localabstract:/adb-hub
adb connect localhost:4444
If you get an error when you connect, try your local IP address. This has happened several times to me and worked for me.
adb connect 127.0.0.1:4444
Connecting a Physical Mobile to an Emulated Watch
If you don’t have both physical devices, you can still use the Android emulator to emulator a wear device.
Once you have your wearable emulator setup you need to connect your phone to the emulator.
- Connect your phone to your computer via USB and enable USB Debugging in the developer options
- Navigate to the platform tools directory so you can access the
adbcommand line tool. - Issue the command
adb -d forward tcp:4444 tcp:4444. This will port forward your phone to Android studio and connect your emulator. After a few moments your apps and notifications should start syncing with the emulator.
Sometimes the emulator can be temperamental and either not sync all your content or randomly disconnect. This should be rare, but if it happens start the process again.
If you need further information there are guides to help you with the emulator.
Create a New Project
Create a new Android project, choose a name and set the minimum phone SDK you want to target. For this example I’ve selected Android 5.0 for both mobile and wear.
Create an empty activity for your mobile layout and a blank activity for wear. Android Wear will want you to define both square and circular layouts. Leave these for now and press next, but note that you will delete these layouts soon as you want one layout for both square and circle shapes.
When you’ve completed all the set-up you will have two folders, one for mobile and one for wear as below:
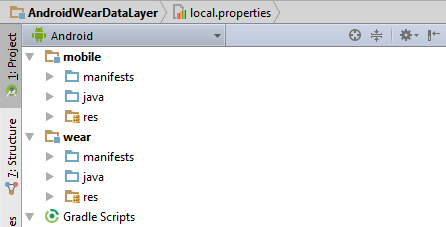
You will be working across both mobile and wear layouts for this project.
Setting up the DataApi for Activities
Because wearables don’t have direct access to the internet you need to use the mobile profile as a go-between. You need to pass a request from the wearable to the mobile device which it will then process and return back. It’s a simple need, but requires coordination.
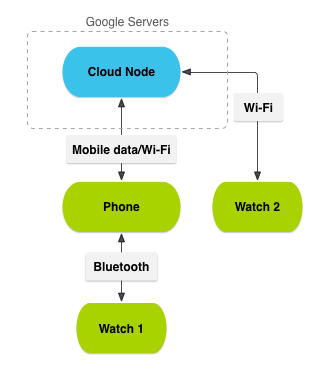
All messages / data are sent from the device to Google’s sever to be re-distributed back to all other ‘nodes’ for updates.
To get this communication working you need to implement the GoogleAPIClient class in both wear and mobile activities. This class connects your app directly to Google Play Services and is the foundation of all communication. Once your app connects to Google Play Services you will be able send and receive messages via the DataApi.
Setting up Google Play Services
Inside the onCreate method of your activities set up the GoogleApiClient builder class. It’s purpose is to create a connection to Google Play Services and connect together the listeners for when you connect, disconnect or fail to reach the service.
//set up google play services client
googleClient = new GoogleApiClient.Builder(this)
    .addApi(Wearable.API)
    .addConnectionCallbacks(this)
    .addOnConnectionFailedListener(this)
    .build();
The this component passed into the builder object refers to the MainActivity class. To reduce the complexity you will add interfaces to group the necessary methods together.
Setting up Interfaces
You will now implement Interfaces. They might seem like a complex process but all the interface requires is for your activity to implement the mandatory methods of the interface. This means you can create one large super class that handles different things. For example connecting to Google Play Services and listening for data.
Implement the GoogleApiClient.ConnectionCallbacks, GoogleApiClient.OnConnectionFailedListener and DataApi.DataListener interfaces on the activities as follows:
//Mobile Profile activity
public class MainActivity extends AppCompatActivity implements
  DataApi.DataListener,
  GoogleApiClient.ConnectionCallbacks,
  GoogleApiClient.OnConnectionFailedListener{
}
When the GoogleApiClass object is looking for it’s listeners it will use this class. The mandatory methods you must handle are the onConnected , onConnectionSuspended, onConnectionFailed and onDataChanged methods.
//on successful connection to play services, add data listner
public void onConnected(Bundle connectionHint) {
    Wearable.DataApi.addListener(googleClient, this);
}

//on suspended connection, remove play services
public void onConnectionSuspended(int cause) {
     Wearable.DataApi.removeListener(googleClient, this);
}

//On failed connection to play services, remove the data listener
public void onConnectionFailed(ConnectionResult result) {
    Wearable.DataApi.removeListener(googleClient, this);
}
//function triggered every time there's a data change event
public void onDataChanged(DataEventBuffer dataEvents) {
    //To be explained in further detail later
}
As soon as you connect to Google Play Services, the onConnected listener will fire. Since you’ve connected, you want to add your listener to look for changed data. Pass in the GoogleApiClient object and this class as it’s arguments. If you can’t connect at all or disconnect you want to remove the listener. There’s no point in listening if you aren’t connected.
Starting Google Play Services
Now that you’ve created the GoogleApiClient object, you want to connect as soon as the activity comes to the screen and remove it as soon as it goes away. Add both the onResume and onPause event listeners as below:
//on resuming activity, connect to play services
public void onResume(){
    super.onResume();
    googleClient.connect();
}

//On leave activity, disconnect from play services and remove data listener
public void onPause(){
    super.onPause();
    Wearable.DataApi.removeListener(googleClient, this);
    googleClient.disconnect();
}
The onResume method will call the connect method and attempt to connect to Google Play Services. If it does connect, it will then trigger the onConnected method, which will set up the data listener. This will trigger every time the app starts (directly after onCreate) or is returned to the screen. It ensures that you’re always trying to connect to play services.
If you exit the app or navigate away, the onPause method will be called. When it’s called you want to trigger the disconnect method for Google Play Services. When play services disconnects it will trigger the onConnectionSuspended method created earlier, removing the data listener. All this ensures that when the app closes you don’t waste time looking for data.
Sending Data between Devices
Sending data between the activities and Google Play Services happens via the PutDataMapRequest and PutDataRequest classes.
Create a new PutDataMapRequest request object:
PutDataMapRequest putDataMapRequest = PutDataMapRequest.create("/apiurl");
This sets the unique URI for the resource, and is what you will check later.
Then add all the data you want to this object by calling its getDataMap method, and the various put methods to add strings, integers or other values.
putDataMapRequest.getDataMap().putString("message", "This message will go to our mobile layout");
When you have all the data loaded into this object, create a new PutDataRequest object and use the asPutDataRequest method of the PutDataMapRequest object. This loads the data into this new network object.
PutDataRequest putDataRequest = putDataMapRequest.asPutDataRequest();
Call the setUrgent method to ensure the data is sent as soon as it can without delay:
putDataRequest.setUrgent();
Now you can create a new PendingResult for the data item and use the DataApi to push the message onto the network to be received by all devices on the network.
PendingResult<DataApi.DataItemResult> pendingResult = Wearable.DataApi.putDataItem(googleClient, putDataRequest);
The Google Documents on Syncing Data are useful and outline how the process works.
For the process you will push two messages onto the network. The first is the initial message from the wearable to start the mobile layout and processing. The second is initiated from the mobile layout to pass back tidal data from the API.
To catch these messages you need to look for them inside the onDataChanged method you implemented in your activity.
Watching for Data Changes
Both activities will implement the onDataChanged method, meaning they will both be able to look for changed data / messages. The onDataChanged method is passed a collection of EventDataBuffer objects which represent the events this listener has collected. All listeners collect all messages so you need to search through them and activate your functionality when needed.
Loop through the collection and extract the dataItem. These items can contain a list of data called a DataMapItem. It’s inside this object that you access string, integers and other values passed through to Google Play Services with the DataApi.
The most important part is checking the path value of the data item as this is its unique identifier. This is how you check to see when you should trigger functionality. Every node on the network gets these messages so you need to use this as a way to know when you can trigger your processing.
In the example you want to trigger processing on the mobile layout when you receive a data item from the wearable layout. Inside each of the data event items you check to see if they match the string /apiurl using the following:
//check if we received message from wearable
DataItem item = event.getDataItem();
if(item.getUri().getPath().equals("/apiurl")){
    //perform actions here
}
You will look at this in more detail inside the MainActvity class of both profiles.
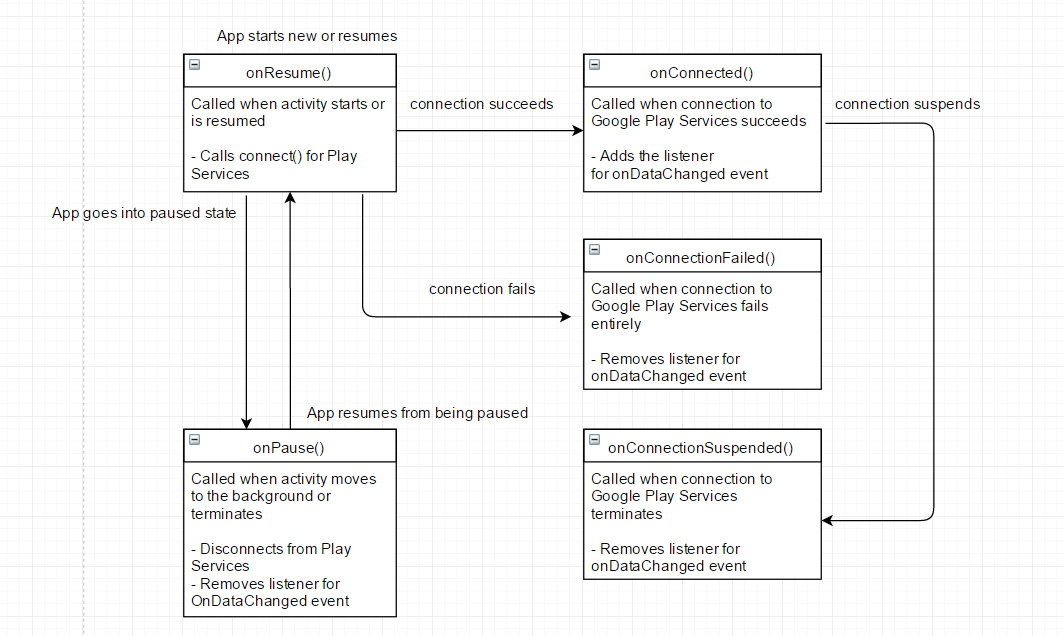
Concept Illustration
If all this seems confusing, here’s a diagram of how the methods interact with each other to manage the state of connection to Google Play Services and the status of the data listener.
Create Android Wear Layout
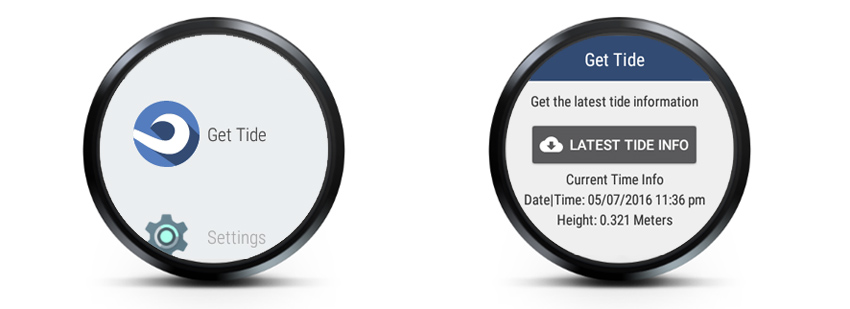
The wearable UI is where a user will spend most of their time. The layout includes a title, subtitle and a basic button to trigger processing. When you press the button you trigger an overlay UI that shows a progress counter and a TextView to let the user know something is happening.
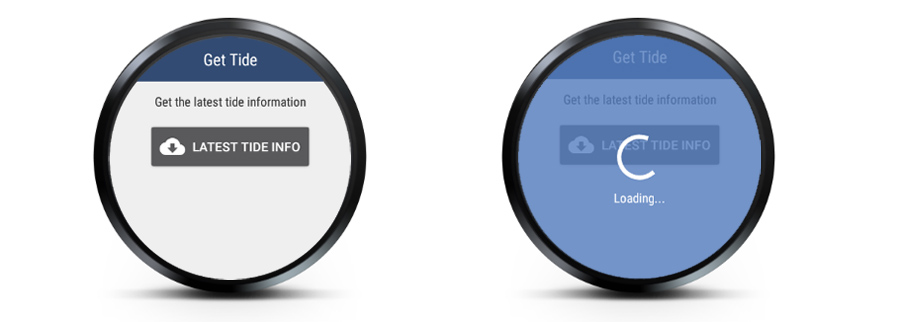
Our standard layout on the left and the active layout on the right (shown while retrieving data)
When you created your project you will have both a rectangle and circle layout inside the res/layout folder. Remove them so all you have the is activity_main.xml layout file. Open activity_main.xml and add the following:
<RelativeLayout xmlns:android="http://schemas.android.com/apk/res/android"
    xmlns:app="http://schemas.android.com/apk/res-auto"
    xmlns:tools="http://schemas.android.com/tools"
    android:layout_width="match_parent"
    android:layout_height="match_parent"
    android:orientation="vertical"
    tools:context="com.example.simon.androidweardatalayer.MainActivity"
    tools:deviceIds="wear">

    <!--Main Layout, displayed on load-->
    <LinearLayout
        android:id="@+id/mainContainer"
        android:layout_width="match_parent"
        android:layout_height="match_parent"
        android:orientation="vertical"
        android:background="#efefef">

        <TextView
            android:id="@+id/title"
            android:layout_width="match_parent"
            android:layout_height="wrap_content"
            android:layout_gravity="center"
            android:padding="10dp"
            android:textAlignment="center"
            android:textSize="18sp"
            android:text="@string/app_name"
            android:background="@color/color_blue_dark"
            android:textColor="@color/text_light" />

        <TextView
            android:id="@+id/subtitle"
            android:layout_width="match_parent"
            android:layout_height="wrap_content"
            android:textColor="#333"
            android:textAlignment="center"
            android:textSize="14sp"
            android:text="@string/subtitle"
            android:padding="10dp"/>

        <Button
            android:id="@+id/apiButton"
            android:text="@string/button_text"
            android:layout_centerHorizontal="true"
            android:layout_width="wrap_content"
            android:textAlignment="center"
            android:drawableLeft="@drawable/ic_cloud"
            android:drawablePadding="7dp"
            android:layout_gravity="center"
            android:layout_height="wrap_content"/>

        <LinearLayout
            android:id="@+id/apiContainer"
            android:layout_width="match_parent"
            android:layout_height="wrap_content"
            android:orientation="vertical">

            <TextView
                android:id="@+id/apiMessage"
                android:layout_width="match_parent"
                android:layout_height="wrap_content"
                android:textColor="#333"
                android:textAlignment="center"/>

            <TextView
                android:id="@+id/apiDate"
                android:layout_width="match_parent"
                android:layout_height="wrap_content"
                android:textColor="#333"
                android:textAlignment="center"/>

            <TextView
                android:id="@+id/apiHeight"
                android:layout_width="match_parent"
                android:layout_height="wrap_content"
                android:textColor="#333"
                android:textAlignment="center"/>
        </LinearLayout>
    </LinearLayout>

    <!--Overlay, displayed only when a user touches the button-->
    <RelativeLayout
        android:id="@+id/overlay"
        android:layout_width="match_parent"
        android:layout_height="match_parent"
        android:orientation="vertical"
        android:background="@color/color_blue_light_trans"
        android:visibility="invisible">

        <ProgressBar
            android:id="@+id/progressBar"
            android:layout_width="wrap_content"
            android:layout_height="wrap_content"
            android:layout_centerInParent="true"
            android:indeterminate="true"
            android:indeterminateTint="@color/text_light"
            android:layout_marginBottom="5dp"/>

        <TextView
            android:id="@+id/progressMessage"
            android:layout_width="wrap_content"
            android:layout_height="wrap_content"
            android:layout_below="@id/progressBar"
            android:textAlignment="center"
            android:layout_centerHorizontal="true"
            android:text="@string/loading_text"/>

    </RelativeLayout>

</RelativeLayout>
The layout is nested with the mainContainer LinearLayout sitting in the forefront and the secondary overlay RelativeLayout container set in the background. The overlay is initially invisible and when a user clicks the button, toggle this overlay visible so the user can’t select anything until the request completes.
Wearable MainActivity
Open the mainActivity class for your wearable profile. The primary responsibility for this profile is to handle the click event that kicks off the process, alongside interactions for the UI such as displaying the overlay container and eventual updates of the UI to display tidal information.
//Wearable Layout
public class MainActivity extends Activity implements
        DataApi.DataListener, GoogleApiClient.ConnectionCallbacks, GoogleApiClient.OnConnectionFailedListener{

    private GoogleApiClient googleClient;

    private LinearLayout mainContainer;
    private TextView apiMessage;
    private TextView apiDate;
    private TextView apiHeight;
    private RelativeLayout overlay;
    private Button apiButton;

    //on successful connection to play services, add data listner
    public void onConnected(Bundle connectionHint) {
        Wearable.DataApi.addListener(googleClient, this);
    }

    //on resuming activity, reconnect play services
    public void onResume(){
        super.onResume();
        googleClient.connect();
    }

    //on suspended connection, remove play services
    public void onConnectionSuspended(int cause) {
        Wearable.DataApi.removeListener(googleClient, this);
    }

    //pause listener, disconnect play services
    public void onPause(){
        super.onPause();
        Wearable.DataApi.removeListener(googleClient, this);
        googleClient.disconnect();
    }

    //On failed connection to play services, remove the data listener
    public void onConnectionFailed(ConnectionResult result) {
        Wearable.DataApi.removeListener(googleClient, this);
    }


    protected void onCreate(Bundle savedInstanceState) {
        super.onCreate(savedInstanceState);
        setContentView(R.layout.activity_main);
        getWindow().addFlags(WindowManager.LayoutParams.FLAG_KEEP_SCREEN_ON);

        //set up google play services client
        googleClient = new GoogleApiClient.Builder(this)
                .addApi(Wearable.API)
                .addConnectionCallbacks(this)
                .addOnConnectionFailedListener(this)
                .build();

        //find all UI elements
        apiMessage = (TextView) findViewById(R.id.apiMessage);
        apiDate = (TextView) findViewById(R.id.apiDate);
        apiHeight = (TextView) findViewById(R.id.apiHeight);
        mainContainer = (LinearLayout) findViewById(R.id.mainContainer);
        overlay =  (RelativeLayout) findViewById(R.id.overlay);
        apiButton = (Button) findViewById(R.id.apiButton);

        //click action for button, connect to mobile
        apiButton.setOnClickListener(new View.OnClickListener() {
            @Override
            public void onClick(View v) {

                //bring the loading overlay to the front
                overlay.setVisibility(View.VISIBLE);
                overlay.bringToFront();

                //start API request to phone
                PutDataMapRequest putDataMapRequest = PutDataMapRequest.create("/apiurl");
                putDataMapRequest.getDataMap().putString("message", "This is a message from Android Wear, connect to the API");
                putDataMapRequest.getDataMap().putLong("time", new Date().getTime());
                PutDataRequest putDataRequest = putDataMapRequest.asPutDataRequest();
                putDataRequest.setUrgent();

                PendingResult<DataApi.DataItemResult> pendingResult = Wearable.DataApi.putDataItem(googleClient, putDataRequest);
            }
        });

        //click listenr for the overlay, touch to dismiss it in case the API fails or takes too long
        overlay.setOnClickListener(new View.OnClickListener() {
            @Override
            public void onClick(View v) {
                overlay.setVisibility(View.INVISIBLE);
                mainContainer.bringToFront();
            }
        });
    }


    //function triggered every time there's a data change event
    public void onDataChanged(DataEventBuffer dataEvents) {
        for(DataEvent event: dataEvents){

            //data item changed
            if(event.getType() == DataEvent.TYPE_CHANGED){

                DataItem item = event.getDataItem();
                DataMapItem dataMapItem = DataMapItem.fromDataItem(item);

                //RESPONSE back from mobile message
                if(item.getUri().getPath().equals("/responsemessage")){

                    //received a response back, turn overlay off and bring main content back to front
                    overlay.setVisibility(View.INVISIBLE);
                    mainContainer.bringToFront();

                    //collect all info
                    String error = dataMapItem.getDataMap().getString("error");
                    String unixTime = dataMapItem.getDataMap().getString("unixTime");
                    String height = dataMapItem.getDataMap().getString("height");

                    //success
                    if(error == null){
                        apiMessage.setText("Current Time Info");
                        apiDate.setText("Date|Time: " + unixTime);
                        apiHeight.setText("Height: "+ height + " Meters");
                    }
                    //error
                    else {
                        apiMessage.setText(error);
                    }

                }
            }
        }
    }

}
There are several elements to focus on here:
- The click event handler for the button is what starts the data connection process. When pressed it brings the overlay to the foreground, creates a data item (with request message) and then passes it to Google Play Services.
- The
onDataChangedmethod listens for the return data sent from the mobile device on completion. When you receive the information, disable the overlay and update the wearables UI to show the latest tide information.
Next update the AndroidManifest.xml file for the wear profile, adding the com.google.android.gms.version meta tag inside the <activity>.
<meta-data android:name="com.google.android.gms.version" android:value="@integer/google_play_services_version" />
Mobile Layout
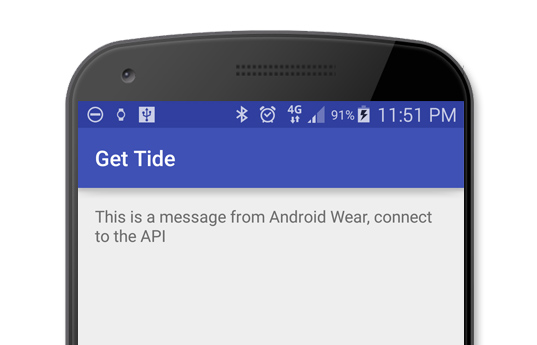
The mobile profile isn’t exciting. It’s only element is a TextView component at the top of the view which acts as a container for the API message. As soon as the phone receives the data event from the wearable, it passes the initial message to the phone to display it in the container.
<?xml version="1.0" encoding="utf-8"?>
<RelativeLayout xmlns:android="http://schemas.android.com/apk/res/android"
    xmlns:tools="http://schemas.android.com/tools"
    android:layout_width="match_parent"
    android:layout_height="match_parent"
    android:paddingBottom="@dimen/activity_vertical_margin"
    android:paddingLeft="@dimen/activity_horizontal_margin"
    android:paddingRight="@dimen/activity_horizontal_margin"
    android:paddingTop="@dimen/activity_vertical_margin"
    tools:context="com.example.simon.androidweardatalayer.MainActivity">

    <TextView
        android:id="@+id/messageContainer"
        android:layout_width="match_parent"
        android:layout_height="wrap_content"
        android:text="No Message yet"/>

</RelativeLayout>
Mobile MainActivity
The MainActivity class in the mobile profile is where the heavy lifting happens. Because of the limitation of wearables, it’s up to the mobile to connect with the API and extract the information. The MainActivity class is similar to the wearable activity with connections for the DataApi and Google Play Services. It also has other classes and methods attached to prepare, connect to, and process the results from the API.
At the end of the process, where the mobile layout does the processing, the wearable should receive it’s data back and update it’s display.
//Mobile Profile
public class MainActivity extends AppCompatActivity implements
        DataApi.DataListener, GoogleApiClient.ConnectionCallbacks, GoogleApiClient.OnConnectionFailedListener{

    private Activity activity;
    private GoogleApiClient googleClient;
    private TextView messageContainer;

    //on successful connection to play services, add data listner
    public void onConnected(Bundle connectionHint) {
        Wearable.DataApi.addListener(googleClient, this);
    }

    //on resuming activity, reconnect play services
    public void onResume(){
        super.onResume();
        googleClient.connect();
    }

    //on suspended connection, remove play services
    public void onConnectionSuspended(int cause) {
        Wearable.DataApi.removeListener(googleClient, this);
    }

    //pause listener, disconnect play services
    public void onPause(){
        super.onPause();
        Wearable.DataApi.removeListener(googleClient, this);
        googleClient.disconnect();
    }

    //On failed connection to play services, remove the data listener
    public void onConnectionFailed(ConnectionResult result) {
        Wearable.DataApi.removeListener(googleClient, this);
    }

    protected void onCreate(Bundle savedInstanceState) {
        super.onCreate(savedInstanceState);
        setContentView(R.layout.activity_main);
        this.activity = this;

        //data layer
        googleClient = new GoogleApiClient.Builder(this)
                .addApi(Wearable.API)
                .addConnectionCallbacks(this)
                .addOnConnectionFailedListener(this)
                .build();

        messageContainer = (TextView) findViewById(R.id.messageContainer);

    }

    //watches for data item
    public void onDataChanged(DataEventBuffer dataEvents) {
        for(DataEvent event: dataEvents){

            //data item changed
            if(event.getType() == DataEvent.TYPE_CHANGED){

                DataItem item = event.getDataItem();
                DataMapItem dataMapItem = DataMapItem.fromDataItem(item);

                if(item.getUri().getPath().equals("/apiurl")){

                    Log.d("debug", "caught message passed to me by the wearable");

                    String message = dataMapItem.getDataMap().getString("message");


                    Log.d("debug", "here is the message: " + message);
                    messageContainer.setText(message);

                    //BUILD API ARGUMENTS
                    //populate API information, in preparation for API call
                    APIInformation apiInformation = setUpAPIInformation();


                    //EXECUTE ASYNC TASK
                    APIAsyncTask asyncTask = new APIAsyncTask();
                    asyncTask.execute(apiInformation);

                }
            }
        }
    }
    //`isOnline`,`setUpAPIInformation` methods along with the `APIAsyncTask` class to go in here
}
The onDataChanged method is where you start most of the processing. When you pick up a data item with the /apiurl ID, start the process.
Testing the Connection to the Internet
Before you can connect to the API you need to know if there is internet available or not. To test this, create an isOnline method inside MainActivity.
//checks to see if we are online
protected boolean isOnline(){
    ConnectivityManager connectivityManager = (ConnectivityManager) activity.getSystemService(Context.CONNECTIVITY_SERVICE);
    NetworkInfo networkInfo = connectivityManager.getActiveNetworkInfo();

    boolean connected = false;
    if((networkInfo != null) && (networkInfo.isConnected())){
        connected = true;
    }

    return connected;
}
Get the ConnectivityManager object from the getSystemService method in the activity. You request the connectivity service so you can query what access you have.
Create a NetworkInfo object from the connectivity service and check if you’re connected, returning true or false.
If you don’t have connectivity, don’t connect to the API.
Note: Ensure you have the correct permissions to access both the network state and the internet. Open the AndroidManifest.xml file for the mobile profile and ensure you have the following permissions before the <application> tag.
<uses-permission android:name="android.permission.INTERNET"/>
<uses-permission android:name="android.permission.ACCESS_NETWORK_STATE"/>
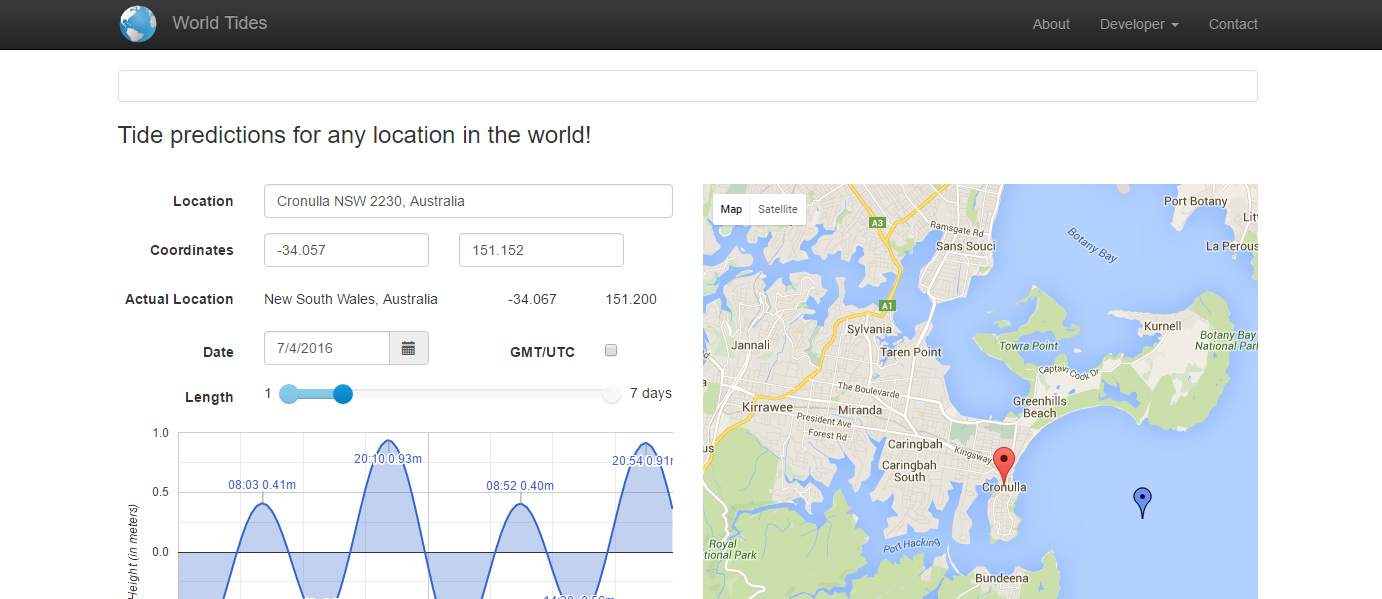
API of Choice – World Tides
To pull in the tide data you need a good API, and the World Tides website is perfect. All you want is the latest tide height and date, and the API provides customization options to configure.
All the API requires is a direct URL and it will return a JSON encoded string of values. For example to get a single latest tide reading you could use the following endpoint
https://www.worldtides.info/api?heights⪫=34.057&lon=151.152&length=21600&step=21600&key=af967f62-eb62-4574-b75e-a9056859055e
All you need is a single current value to return to the wearable.
Getting Ready for API Call and Populating Data
Before you can connect to the API, you need build the final endpoint, the URL loaded in an attempt to collect the data. To make the process cleaner add a new class called APIInformation which will handle the setting and getting of properties.
/*Class that holds information for API call*/
public class APIInformation {

   private String APIEndpoint;
   private Map<String, String> APIArguments = new HashMap<>();
   private String APIUrl;

   //endpoint (main url to the target API)
   public void setAPIEndpoint(String endpoint){
       this.APIEndpoint = endpoint;
   }
   public String getAPIEndpoint(){
       return APIEndpoint;
   }

   //set a single API argument to the arg list
   public void setAPIArgument(String key, String value){
       this.APIArguments.put(key, value);
   }
   //gets a single API argument from the arg list
   public String getAPIArgument(String key){
       String value = APIArguments.get(key);
       return value;
   }

   //set a bunch of API arguments to the arg list
   public void setAPIArguments(HashMap<String, String> arguments){
       this.APIArguments = arguments;
   }

   //gets all the API arguments as a HashMap
   public Map<String, String> getAPIArguments(){
       return APIArguments;
   }

   //creates the final API url based on endpoint, key and arguments
   public void setAPIUrl(){
       StringBuilder builder = new StringBuilder();

       builder.append(this.APIEndpoint);

       //loop through all arguments
       Map<String,String> arguments = this.getAPIArguments();
       if(arguments.size() != 0){

           Integer counter = 1;
           builder.append("?");
           for ( Map.Entry<String, String> entry : arguments.entrySet()){
               String key = entry.getKey();
               String value = entry.getValue();

               //check for empty keys or values (some arguments don't need values passed)
               if(value.isEmpty() && !key.isEmpty()){
                   builder.append(key);
               }else{
                   builder.append(key + "=" + value);
               }

               if(counter != arguments.size()){
                   builder.append("&");
               }

               counter++;
           }
       }

       this.APIUrl = builder.toString();
   }

   //gets the final API url to call
   public String getAPIUrl(){
       return this.APIUrl;
   }
}
The class handles the creation of the final API endpoint by adding together all the passed arguments and combining them with the API base. An easier way would be to hardcode the final URL to bypass the need for another class. While that would work, the purpose of a separate class is to create sets of information to perform a series of other connections to the API. For example you might want to collect all the closest reporting stations and then fetch their predicted tidal heights for a day.
For the example create a new method called setUpAPIInformation inside the MainActivity which will populate a new APIInformation object.
//populates information for API
protected APIInformation setUpAPIInformation(){

    APIInformation apiInformation = new APIInformation();

    apiInformation.setAPIEndpoint("http://www.worldtides.info/api");
    HashMap arguments = new HashMap<String, String>();

    arguments.put("key", "1d3d0a79-5d7d-48d3-9e80-a5383e53eba2");
    arguments.put("heights",""); //we want the heights only
    arguments.put("lat", "-34.057440"); //cronulla sydney
    arguments.put("lon", "151.152190"); //cronulla sydney
    arguments.put("step", "21600"); //6 hours
    arguments.put("length", "21600"); //6 hours

    //determine the next time period (after right now)
    Long currentTime = System.currentTimeMillis();
    String time = String.valueOf(currentTime / 1000L);
    arguments.put("start", time);

    apiInformation.setAPIArguments(arguments);
    apiInformation.setAPIUrl();

    return apiInformation;
}
Even better is that you are getting the next tidal period by padding the current system date into the API.
Once you have all these settings ready, execute it inside the custom AsyncTask to connect to the API and pull information.
Connecting to the API with the Async Task
So as not to lock the UI, you need to execute the API request in a background thread.
You can use the AsyncTask class to execute tasks in a background thread. You don’t use AsyncTask directly, but instead extend your own class. To simplify the process, create an APIAsyncTask class as an inner class of MainActivity, this will give easy access to the UI for updates.
Discussing AsyncTask is a whole topic entirely, but at it’s core are three important methods:
OnPreExecute: Not used in this exampledoInBackground: Executes the background thread and connects to the API, retrieving information to process.OnPostExecute: Executes once the background task completes. Here you collect data from the API and form the response message with the DataApi and push it to the Google Play Network for the wearable to collect.
//main async task to connect to API and collect a response
public class APIAsyncTask extends AsyncTask<APIInformation, String, HashMap> {

    //execute before we start
    protected void onPreExecute() {
        super.onPreExecute();
    }

    //execute background task
    protected HashMap doInBackground(APIInformation... params) {

        APIInformation apiInformation = params[0];
        boolean isOnline = isOnline();
        HashMap result;

        if(isOnline()){

            //perform a HTTP request
            APIUrlConnection apiUrlConnection = new APIUrlConnection();

            //get the result back and process
            result = apiUrlConnection.GetData(apiInformation.getAPIUrl());

        }else{
            //we're not online, flag the error
            Log.d("debug", "Error, not currently online, cant connect to API");
            result = new HashMap();
            result.put("type", "failure");
            result.put("data", "Not currrently online, can't connect to API");
        }
        return result;
    }

    //update progress
    protected void onProgressUpdate(String... values) {
        super.onProgressUpdate(values);
    }

    //Execute once we're done
    protected void onPostExecute(HashMap result) {
        super.onPostExecute(result);

        //build message back to the wearable (either with data or a failure message)
        PutDataMapRequest putDataMapRequest = PutDataMapRequest.create("/responsemessage");
        putDataMapRequest.getDataMap().putLong("time", new Date().getTime());

        //success (we collected data from the API)
        if(result.get("type") == "success"){
            //get the json response data string
            String data = (String) result.get("data");

            //create a new json object
            try{
                JSONObject jsonObject = new JSONObject(data);
                if(jsonObject.has("heights")){

                    JSONArray heights = (JSONArray) jsonObject.get("heights");
                    //loop through all 'heights' objects to get data

                    for(int i = 0; i < heights.length(); i++){
                        JSONObject heightObject = heights.getJSONObject(i);
                        Integer unixTime = Integer.parseInt(heightObject.getString("dt"));
                        String height = heightObject.getString("height");

                        //need to process the values to make them readable.
                        String heightTrimmed = height.substring(0, 5);

                        //convert date unix string to a human readable format
                        Date date = new Date(unixTime * 1000L);
                        DateFormat format = new SimpleDateFormat("dd/MM/yyyy hh:mm a");
                        String dateFormatted = format.format(date);

                        //add data to be passed back to the wearable
                        putDataMapRequest.getDataMap().putString("unixTime", dateFormatted);
                        putDataMapRequest.getDataMap().putString("height", heightTrimmed);
                    }
                }else{
                    Log.d("error", "there was no height parm returned from the API");
                    putDataMapRequest.getDataMap().putString("error", "There was an issue processing the JSON object returned from API");
                }

            }catch(Exception e){
                Log.d("error", "error creating the json object: " + e.getMessage());
                putDataMapRequest.getDataMap().putString("error", "There was an issue processing the JSON object returned from API");
            }

        }
        //failure (couldn't connect to the API or collect data)
        else if(result.get("type") == "failure"){
            Log.d("error", "There was an issue connecting to the API.");
            putDataMapRequest.getDataMap().putString("error", result.get("error").toString());
        }


        //finalise message and send it off (either success or failure)
        PutDataRequest putDataRequest = putDataMapRequest.asPutDataRequest();
        putDataRequest.setUrgent();
        PendingResult<DataApi.DataItemResult> pendingResult = Wearable.DataApi.putDataItem(googleClient, putDataRequest);
    }
}
Inside the doInBackgroundTask method, use the APIUrlConnection class to connect to the API’s final endpoint.
APIUrlConnection apiUrlConnection = new APIUrlConnection();
result = apiUrlConnection.GetData(apiInformation.getAPIUrl());
Collect the information or error message and pass it into the onPreExecute method for processing.
When you return from the GetData method, you have a hashmap with two keys. The first key, type, represents if we succeeded or failed connecting to the API. The second key, data, contains either the error message or a long JSON encoded string of returned content to refine further.
Getting the API Response with HttpUrlConnection
Once you have a final API endpoint, you can start the connection. To connect to web services Android provides the HttpUrlConnection class in combination with the BufferedReader object to pull data. This process will pull in the result from the API character by character and line by line until there is no more to read. Once you have all information you can pass it to the onPostExecute method of AsyncTask to process and convert into a JSON object.
/*takes an API request (url) and performs it*/
public class APIUrlConnection {

  //gets data based on URL, passed back something
  public HashMap GetData(String url){

      HashMap result = new HashMap<String, String>();
      BufferedReader bufferedReader = null;
      try{
          //use the URL to create a new connection and read content
          URL APIUrl = new URL(url);
          HttpURLConnection httpURLConnection = (HttpURLConnection) APIUrl.openConnection();

          StringBuilder stringBuilder = new StringBuilder();
          bufferedReader = new BufferedReader(new InputStreamReader(httpURLConnection.getInputStream()));
          int responseCode = httpURLConnection.getResponseCode();
          String responseMessage = httpURLConnection.getResponseMessage();

          String line;
          while ((line = bufferedReader.readLine()) != null){
              stringBuilder.append(line);
          }

          //add back result data
          result.put("type", "success");
          result.put("data", stringBuilder.toString());

      }catch(Exception e){

          e.printStackTrace();
          //return error
          result.put("type", "failure");
          result.put("data", "there was an error reading in data from the API: " + e.getMessage());

      }finally {
          //close input steam and finish
          if(bufferedReader != null){
              try{
                  bufferedReader.close();
              }
              catch(Exception e){
                  e.printStackTrace();
              }
          }
      }

      return result;
  }
}
Converting the Result into JSON and Processing
The next stage is converting the JSON string into an object. Cast the top level element into an object with JSONObect. Because this could potentially have several returned sets of information inside this object, you need to convert the sub-results into a JSONArray. Then loop through each of the results to extract tide information.
 try{
     JSONObject jsonObject = new JSONObject(data);
     if(jsonObject.has("heights")){

          JSONArray heights = (JSONArray) jsonObject.get("heights");

          //loop through all 'heights' objects to get data
          for(int i = 0; i < heights.length(); i++){
              //get the specific object from the set
              JSONObject heightObject = heights.getJSONObject(i);
              //get time and height values
              Integer unixTime = Integer.parseInt(heightObject.getString("dt"));
              String height = heightObject.getString("height");
           }
      }
}catch(Exception e){
    //error processing
}
It’s from this point you are dealing directly with the API source. This process will be distinctly different depending on what API provides. Generally they will provide documentation on responses so you can figure out how to process data.
In this case you’re collecting the date time and height information of the next wave. You’re given the date in raw Unix format and the height as a long integer, so you need to refine them both into something useful to pass back to the wearable.
Passing Information Back to the Wearable
Once you’ve converted the information, add them to the putDataMapRequest object ready to send back to the wearable. You should have a date string and the height above sea-level for the tidal period. Both of these will be passed to the wearable via the DataApi and the putString method
//add data to be passed back to the wearable
putDataMapRequest.getDataMap().putString("unixTime", dateFormatted);
putDataMapRequest.getDataMap().putString("height", heightTrimmed);
Now send the data item ready for it to be collected from the wearable.
//finalise message and send it off (either success or failure)
PutDataRequest putDataRequest = putDataMapRequest.asPutDataRequest();
putDataRequest.setUrgent();
PendingResult<DataApi.DataItemResult> pendingResult = Wearable.DataApi.putDataItem(googleClient, putDataRequest);
Next Steps with Android Wear
As platforms evolve, connecting to web services and processing micro-data will be core parts of the wearable experience. As more people embrace wearables and IoT in general, a range of great new hardware devices will appear that take full advantage of the Internet.
While the app is only concerned with pulling tidal data, you can adapt the concepts to any web service. You might want to build an app that connects to timetable information to plan and coordinate your train schedules (with notifications and vibrations to ensure you never miss a train again). Wearable devices have the advantage of providing the bare essentials, meaning that a user is generally a click away from data.
If you’re interested in Android Wear development there are several ways to expand upon the ideas I have used in this tutorial.
- Implement a listener service for the mobile and the wear layouts so that neither needs to be open to synchronize data.
- Pull in a range of content and provide a scrollable list of information. For example a range of tide periods with a simple graph.
- Pre-fetch the information pieces on load. You could store your results so that you can access them offline without having to be connected to a mobile for new information.
- Take advantage of extended notifications and wearable specific functions to make your app more interactive.
If you have any questions or comments, I would love to hear them below.
Frequently Asked Questions (FAQs) on Connecting to Web Services with Android Wear
What are the prerequisites for connecting to web services with Android Wear?
Before you start connecting to web services with Android Wear, you need to have a few things in place. First, you need to have Android Studio installed on your computer. This is the official IDE for Android development and it’s where you’ll be writing your code. Second, you need to have an Android Wear device or emulator for testing your applications. Lastly, you need to have a basic understanding of Android development, including how to create an Android project, how to use the Android SDK, and how to work with the Android Wear API.
How do I set up my Android Wear device for development?
Setting up your Android Wear device for development involves enabling developer options on the device. To do this, go to the Settings menu on your device, then tap on ‘About’. In the ‘About’ section, tap on the ‘Build number’ seven times. This will enable developer options. Once developer options are enabled, you can then enable USB debugging, which allows your device to communicate with your computer for development purposes.
How do I create a new Android Wear project in Android Studio?
To create a new Android Wear project in Android Studio, start by launching Android Studio. On the welcome screen, click on ‘Start a new Android Studio project’. In the ‘New Project’ window, select ‘Wear OS’ as the category, then select ‘Wear OS Blank Activity’ as the project template. Next, enter a name for your project, select a save location, and choose a language (either Java or Kotlin). Finally, click on ‘Finish’ to create your project.
How do I connect my Android Wear device to a web service?
Connecting your Android Wear device to a web service involves making HTTP requests from your device to the web service. This can be done using the HttpURLConnection class in Android. To make a request, you first need to create a URL object with the URL of the web service. Then, you can open a connection to the URL using the openConnection() method. Once the connection is open, you can read the response from the web service using an InputStream.
How do I handle errors when connecting to a web service?
When connecting to a web service, errors can occur for a variety of reasons, such as a network failure or a server error. To handle these errors, you can use a try-catch block in your code. In the try block, you write the code that could potentially cause an error. In the catch block, you write the code that will be executed if an error occurs. This could include logging the error, displaying an error message to the user, or taking some other action to recover from the error.
How do I parse JSON data from a web service?
Parsing JSON data from a web service involves converting the JSON data into a format that your Android Wear device can understand. This can be done using the JSONObject class in Android. To parse JSON data, you first need to create a JSONObject with the JSON data. Then, you can use the get() method to retrieve values from the JSONObject.
How do I display data from a web service on my Android Wear device?
Displaying data from a web service on your Android Wear device involves updating the UI of your device with the data. This can be done using the TextView class in Android. To display data, you first need to find the TextView in your layout using the findViewById() method. Then, you can set the text of the TextView to the data using the setText() method.
How do I test my Android Wear application?
Testing your Android Wear application involves running the application on your Android Wear device or emulator. To run your application, you first need to build the application in Android Studio. Then, you can click on the ‘Run’ button in Android Studio to launch the application on your device or emulator.
How do I debug my Android Wear application?
Debugging your Android Wear application involves identifying and fixing problems in your code. This can be done using the debugging tools in Android Studio. To debug your application, you first need to set breakpoints in your code where you want the execution to pause. Then, you can start a debugging session by clicking on the ‘Debug’ button in Android Studio. Once the execution pauses at a breakpoint, you can inspect the values of variables, step through the code, and perform other debugging tasks.
How do I publish my Android Wear application?
Publishing your Android Wear application involves preparing the application for release and distributing it to users. This can be done using the publishing tools in Android Studio and the Google Play Console. To publish your application, you first need to create a signed APK or AAB file of your application in Android Studio. Then, you can upload the file to the Google Play Console, fill out the necessary information about your application, and submit it for review. Once your application is approved, it will be available for users to download and install from the Google Play Store.