

Key Takeaways
- To conditionally apply a CSS class in Vue.js, you can bind a JavaScript object to the class. The object’s properties correspond to the CSS classes, and their values, which are JavaScript expressions, determine whether the class is applied.
- Vue.js offers two syntax options for creating class bindings: object syntax and array syntax. While the object syntax is more compact, the array syntax can result in cleaner template code. The choice between the two comes down to personal preference.
- Vue.js allows for conditional class binding using the ternary operator, binding multiple classes conditionally using an object syntax, using computed properties for conditional class binding, combining static and bound classes, and binding inline styles conditionally.
There are times you need to change an element’s CSS classes at runtime. But when changing classes, it’s sometimes best to apply style details conditionally. For example, imagine your view has a pager. Pagers are often used to navigate larger sets of items. When navigating, it can be helpful to show the user the page they’re currently on. The style of the item is conditionally set, based on the current page that’s being viewed.
A pager in this case may look something like this:
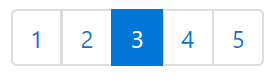
In this example, there are five pages. Only one of these pages is selected at a time. If you built this pager with Bootstrap, the selected page would have a CSS class named active applied. You’d want this class applied only if the page was the currently viewed page. In other words, you’d want to conditionally apply the active CSS class. Luckily, Vue provides a way to conditionally apply a CSS class to an element, which I’m going to demonstrate in this article.
To conditionally apply a CSS class at runtime, you can bind to a JavaScript object. To successfully complete this task, you must complete two steps. First, you must ensure that your CSS class is defined. Then, you create the class bindings in your template. I’m going to explain each of these steps in detail in the rest of this article.
Step 1: Define Your CSS Classes
Imagine, for a moment, that the five page items shown in the image above were defined using the following HTML:
<div id="myApp">
  <nav aria-label="Page navigation example">
    <ul class="pagination">
      <li class="page-item"><a class="page-link" href="#">1</a></li>
      <li class="page-item"><a class="page-link" href="#">2</a></li>
      <li class="page-item active"><a class="page-link" href="#">3</a></li>
      <li class="page-item"><a class="page-link" href="#">4</a></li>
      <li class="page-item"><a class="page-link" href="#">5</a></li>
    </ul>
  </nav>
</div>
Notice that each page in this code snippet has a list-item element (<li …). That element references the page-item CSS class. In the code for this article, this class is defined in the Bootstrap CSS framework. However, if it weren’t defined there, it would be your responsibility to ensure that it was defined somewhere. The second CSS class is the one that’s most relevant to this article, though.
The active CSS class is used to identify the currently selected page. For this article, this CSS class is also defined in the Bootstrap CSS. As shown in the snippet above, the active class is only used in the third list item element. As you can probably guess, this is the CSS class that you want to apply conditionally. To do that, you need to add a JavaScript object.
Step 2: Create Your Class Bindings
Let’s build on the code snippet shown in step 1. When creating class bindings in your template, there are two primary choices: using the object syntax or using the array syntax. I’m going to show you how to use both approaches in the remainder of this article.
Binding using object syntax
To create a class binding using the object syntax, you have to use a JavaScript expression. The expression we’ll be using can be seen in the code associated with this article here. That relevant code looks like this:
<div id="myApp">
  <nav aria-label="An example with pagination">
    <ul class="pagination">
      <li v-for="page in totalPages" v-bind:class="{'page-item':true, 'active':(page === currentPage)}">
        <a class="page-link" href="#">{{ page }}</a>
      </li>
    </ul>
  </nav>
</div>
I’ve reduced the amount of code by using Vue’s baked-in v-for directive. This directive is used to render items in a loop. The items in this example are the pages themselves. Beyond the use of the v-for directive, notice the use of the v-bind directive.
The v-bind directive connects the element’s class attribute to the Vue instance. That instance of Vue is defined like this:
var app = new Vue({
  el: '#myApp',
  data: {
    totalPages: 5,
    currentPage: 3
  }
});
This Vue instance is straight to the point. The data object above includes a property named currentPage. If you revisit the HTML template defined above, you’ll notice that this property is being referenced. In fact, the JavaScript object associated with each class binding looks something like this:
{'page-item':true, 'active':(page === currentPage)}
This object defines two properties: page-item and active. Notably, these are the names of the two CSS classes discussed in Step 1. In Step 2, these two class references have become property names in a JavaScript object. The values associated with these property names are JavaScript expressions. If the expression evaluates as truthy, the CSS class will be included. If the expression evaluates to false, the CSS class will not be included. With these rules in mind, let’s look at each property.
The first property, page-item, has a value of true. This hard-coded value is used because we always want to include the page-item class. The second property, active, uses a JavaScript expression. When this expression is true, the active class will be applied. This empowers us to conditionally apply the active class based on the value of currentPage. Another way to conditionally apply the active class is by binding to an Array.
Binding using array syntax
Vue lets you apply a list of CSS classes by binding to an Array. If you wanted to use the Array syntax, the HTML shown in Step 1 would become this:
<div id="myApp">
  <nav aria-label="An example with pagination">
    <ul class="pagination">
        <li v-for="page in totalPages" v-bind:class="[pageItemClass, (page === currentPage) ? activeClass : '']">
          <a class="page-link" href="#">{{ page }}</a>
        </li>
    </ul>
  </nav>
</div>
A running version with the Array syntax can be seen here. The only difference is the use of an Array on the class binding. This alternative approach expects two additional properties to exist in your Vue’s data object. Those two properties are: pageItemClass and activeClass. The updated Vue initialization code with these properties looks like this:
var app = new Vue({
  el: '#myApp',
  data: {
    totalPages: 5,
    currentPage: 3,
    pageItemClass: 'page-item',
    activeClass: 'active'
  }
});
As you can see, the data object has grown in size, but the code in the template is slightly cleaner when using the Array syntax. The object syntax is a little bit more compact. The choice between the object syntax and the Array syntax comes down to personal preference.
Both approaches may seem to make your HTML template more complicated. However, there’s actually more going on here. In reality, we’re separating concerns. We’re creating a template that is driven by data. This makes the view easier to test and easier to maintain as the app grows.
Wrap Up
I hope you found this article valuable. If you’d like to learn more about Vue.js, why not check out some of our other Vue content here on SitePoint. Otherwise, you can find me on Twitter @chadcampbell. Once again, thank you!
Frequently Asked Questions on Conditionally Applying CSS Class in Vue.js
How Can I Use Ternary Operator for Conditional Class Binding in Vue.js?
In Vue.js, you can use the ternary operator for conditional class binding. This is a simple and effective way to toggle between two classes based on a condition. Here’s an example:<div v-bind:class="[condition ? 'classA' : 'classB']"></div>
In this example, ‘classA’ will be applied if the condition is true, and ‘classB’ will be applied if the condition is false. The condition can be any valid JavaScript expression.
How Can I Bind Multiple Classes Conditionally in Vue.js?
Vue.js allows you to bind multiple classes conditionally using an object syntax. This is useful when you want to apply more than one class based on different conditions. Here’s an example:<div v-bind:class="{ classA: conditionA, classB: conditionB }"></div>
In this example, ‘classA’ will be applied if ‘conditionA’ is true, and ‘classB’ will be applied if ‘conditionB’ is true. Both ‘conditionA’ and ‘conditionB’ can be any valid JavaScript expressions.
Can I Use Computed Properties for Conditional Class Binding in Vue.js?
Yes, you can use computed properties for conditional class binding in Vue.js. Computed properties are very useful when the logic for determining the class is complex. Here’s an example:<div v-bind:class="computedClass"></div>
In your Vue instance, you would define ‘computedClass’ as a computed property:computed: {
computedClass: function() {
// complex logic here
return 'classA'; // or 'classB', 'classC', etc.
}}
In this example, the ‘computedClass’ computed property will return the class name based on the complex logic defined within it.
How Can I Combine Static and Bound Classes in Vue.js?
In Vue.js, you can combine static and bound classes. This is useful when you want to always apply a certain class, but also conditionally apply other classes. Here’s an example:<div class="staticClass" v-bind:class="{ classA: conditionA, classB: conditionB }"></div>
In this example, ‘staticClass’ will always be applied, and ‘classA’ and ‘classB’ will be applied based on ‘conditionA’ and ‘conditionB’, respectively.
How Can I Bind Inline Styles Conditionally in Vue.js?
Vue.js allows you to bind inline styles conditionally using an object syntax. This is useful when you want to apply certain styles based on a condition. Here’s an example:<div v-bind:style="{ color: conditionA ? 'red' : 'blue', fontSize: conditionB ? '12px' : '16px' }"></div>
In this example, the color will be ‘red’ if ‘conditionA’ is true and ‘blue’ if ‘conditionA’ is false. Similarly, the font size will be ’12px’ if ‘conditionB’ is true and ’16px’ if ‘conditionB’ is false.