

In this article, you’ll learn how to work with the Google Calendar API in PHP. You’ll do it by building a calendar app that allows users to add new calendars, add events, and sync calendars to Google Calendar. If you want to follow along, I recommend you to set up Homestead so you can easily get an environment for running the app.

Setting up a Google Console Project
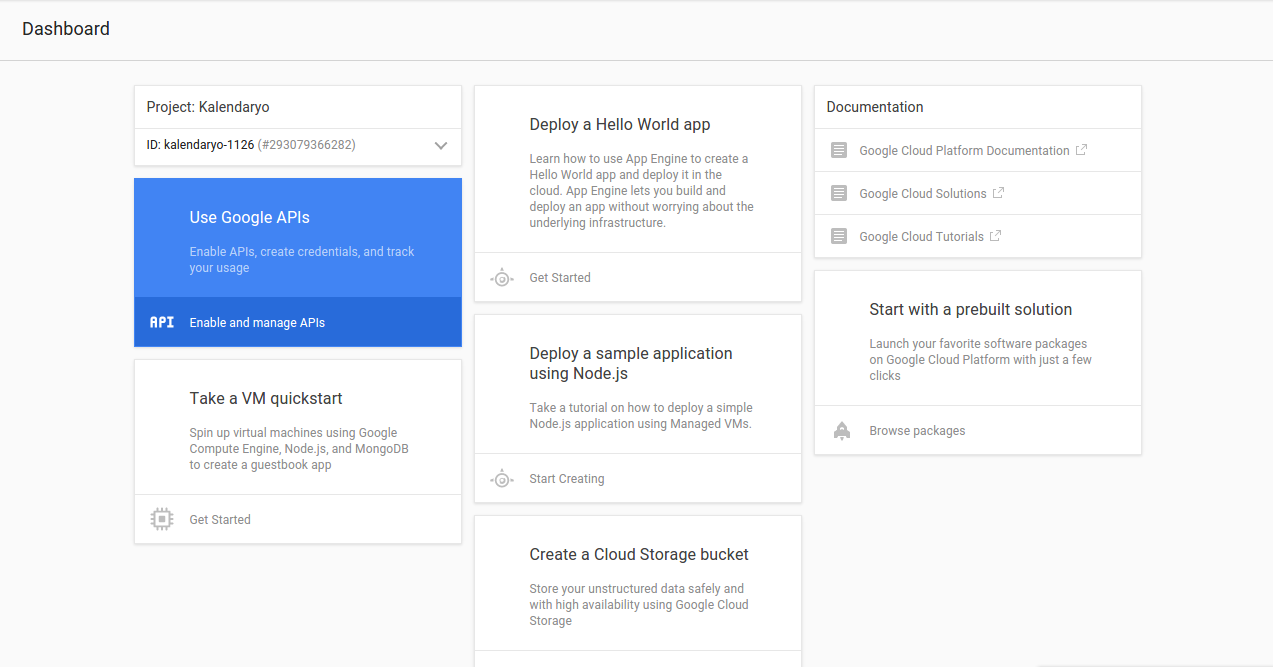
The first thing that you need to do is to create a new project in the Google Developers Console.

Once the project is created, click on the enable and manage APIs link on the dashboard.
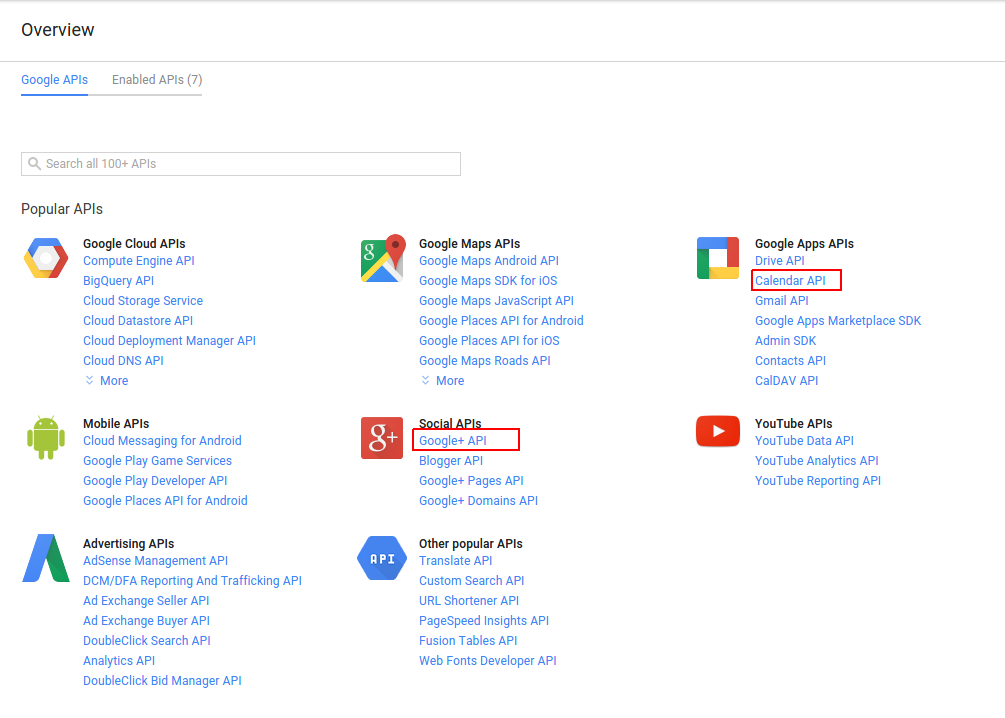
On the google APIs page, select and enable the Calendar API and Google+ API.
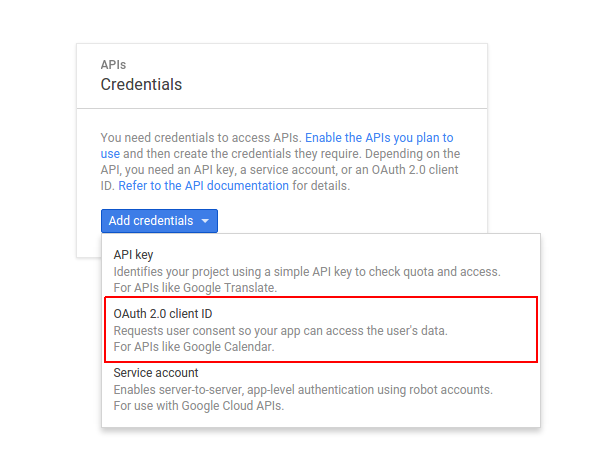
Once enabled, go back to the Google APIs page and click the Credentials link, then the add credentials button and select OAuth 2.0 client ID.
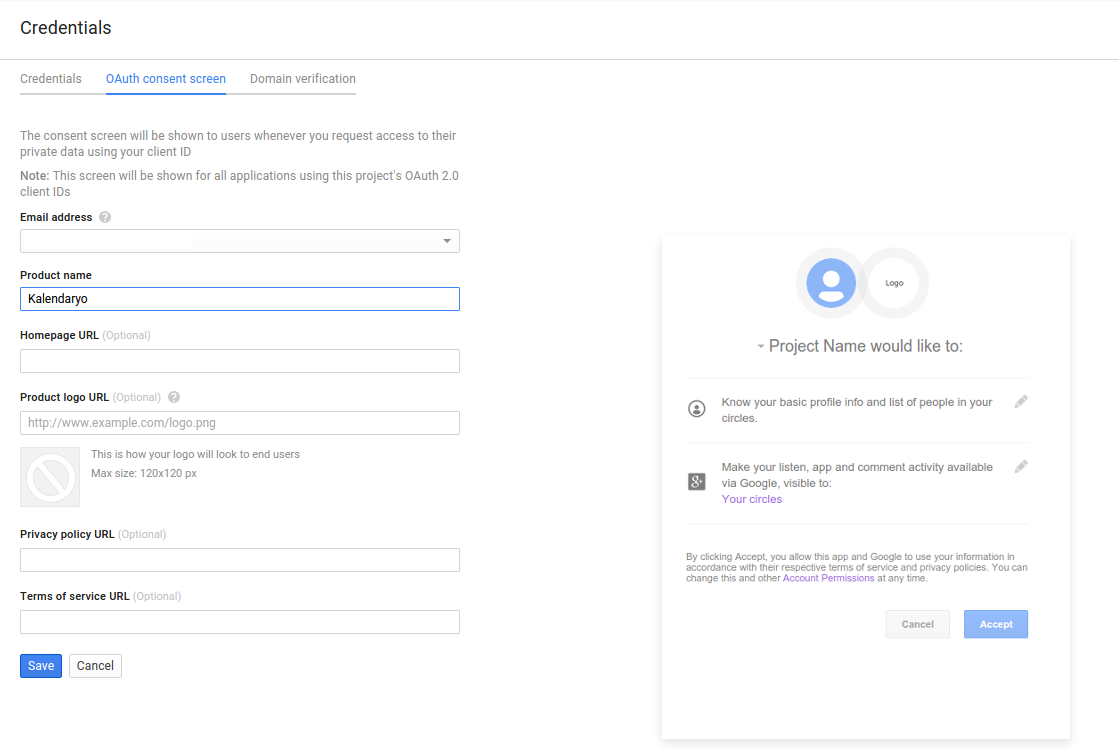
This will ask you to configure the consent screen. Click the configure consent screen to do so.
Select your preferred email address, add the product name, then click save.
Create a Web Application.

This will give you the client ID and client secret
Building the App
We’ll use Laravel via Composer.
Installing Dependencies
composer create-project --prefer-dist laravel/laravel kalendaryo
This will create a new folder named kalendaryo which will serve as your project’s directory.
Let’s install some other dependencies:
composer require nesbot/carbon google/apiclient
You will be using the Google Client for talking with the Google+ API for the sign in process, and the Google Calendar API for working with Google Calendar.
Configuring the App
Open the .env file at the root of the project directory and supply the lacking details, like so:
APP_ENV=local
APP_DEBUG=true
APP_KEY=base64:iZ9uWJVHemk5wa8disC8JZ8YRVWeGNyDiUygtmHGXp0=
APP_URL=http://localhost

DB_CONNECTION=mysql
DB_HOST=127.0.0.1
DB_PORT=3306
DB_DATABASE=kalendaryo
DB_USERNAME=root
DB_PASSWORD=secret

SESSION_DRIVER=file

APP_TITLE=Kalendaryo
APP_TIMEZONE="Asia/Manila"

GOOGLE_CLIENT_ID="YOUR GOOGLE CLIENT ID"
GOOGLE_CLIENT_SECRET="YOUR GOOGLE CLIENT SECRET"
GOOGLE_REDIRECT_URL="http://kalendaryo.dev/login"
GOOGLE_SCOPES="email,profile,https://www.googleapis.com/auth/calendar"
GOOGLE_APPROVAL_PROMPT="force"
GOOGLE_ACCESS_TYPE="offline"
The configuration values that you need to add are DB_DATABASE, DB_USERNAME, DB_PASSWORD, APP_TIMEZONE, GOOGLE_CLIENT_ID, GOOGLE_CLIENT_SECRET, and GOOGLE_REDIRECT_URL.
For APP_TIMEZONE, you can use any value from the PHP timezones page.
For the database details, create a new MySQL database and use the database name as value for DB_DATABASE. DB_USERNAME and DB_PASSWORD are the login credentials for that database. If on Homestead Improved, you can just use the pre-created DB homestead with the credentials homestead / secret.
For the Google config, replace the value for the GOOGLE_CLIENT_ID, GOOGLE_CLIENT_SECRET and GOOGLE_REDIRECT_URL with the credentials that you got from Google console earlier. GOOGLE_SCOPES are the permissions that your app is going to need. What you put in there will show up in the consent screen. The user has to agree in order for the app to have access to the specific data that you’re asking for.
If you’re wondering where I got those, you can check out oauthplayground and select the Google+ API and Google Calendar API. The URLs that show up in the dropdown are basically the permissions. email and profile are just shorthand for https://www.googleapis.com/auth/userinfo.email and https://www.googleapis.com/auth/userinfo.profile. Each permission is separated by a comma because you will be converting it into an array later on.
Creating a Service Container for the Google Client
Next, take a look at the service container for the Google client. Create an app/Googl.php file and add the following:
<?php
namespace App;

class Googl
{
    public function client()
    {
        $client = new \Google_Client();
        $client->setClientId(env('GOOGLE_CLIENT_ID'));
        $client->setClientSecret(env('GOOGLE_CLIENT_SECRET'));
        $client->setRedirectUri(env('GOOGLE_REDIRECT_URL'));
        $client->setScopes(explode(',', env('GOOGLE_SCOPES')));
        $client->setApprovalPrompt(env('GOOGLE_APPROVAL_PROMPT'));
        $client->setAccessType(env('GOOGLE_ACCESS_TYPE'));
        return $client;
    }
}
In the above code, you set the client ID, client secret, redirect URL, scopes (permissions), approval prompt and access type. You are loading all those values from the .env file that you created earlier. Once everything is set, return the new instance. Later on, you’ll just call the client method to initialize the Google client.
Routes
Open the app/Http/routes.php file then add the routes for the different pages in the app:
Route::group(
    ['middleware' => ['admin']],
    function(){

        Route::get('/dashboard', 'AdminController@index');

        Route::get('/calendar/create', 'AdminController@createCalendar');
        Route::post('/calendar/create', 'AdminController@doCreateCalendar');

        Route::get('/event/create', 'AdminController@createEvent');
        Route::post('/event/create', 'AdminController@doCreateEvent');

        Route::get('/calendar/sync', 'AdminController@syncCalendar');
        Route::post('/calendar/sync', 'AdminController@doSyncCalendar');

        Route::get('/events', 'AdminController@listEvents');

        Route::get('/logout', 'AdminController@logout');
});

Route::get('/', 'HomeController@index');
Route::get('/login', 'HomeController@login');
In the above code, you’re using a custom route middleware called admin. You’ll be creating it shortly. Using middleware in a route group means that it’s going to be activated for every route in the group.
Route::group(
    ['middleware' => ['admin']],
    function(){
        ...
    }
);
Inside the callback function, you have the different routes that belong to the group. They’re all self-explanatory. The route that respond to POST requests are used to perform write operations, while GET routes are read-only.
Route::get('/dashboard', 'AdminController@index');

Route::get('/calendar/create', 'AdminController@createCalendar');
Route::post('/calendar/create', 'AdminController@doCreateCalendar');

Route::get('/event/create', 'AdminController@createEvent');
Route::post('/event/create', 'AdminController@doCreateEvent');

Route::get('/calendar/sync', 'AdminController@syncCalendar');
Route::post('/calendar/sync', 'AdminController@doSyncCalendar');

Route::get('/events', 'AdminController@listEvents');

Route::get('/logout', 'AdminController@logout');
Admin Route Middleware
As mentioned earlier, route middlewares is used to execute code when a specific route is accessed. In the case of the admin middleware, it is used to check whether or not a user is currently logged in.
Create the admin middleware at app/Http/Middleware/AdminMiddleware.php and add the following:
<?php
namespace App\Http\Middleware;

use Closure;

class AdminMiddleware
{
    public function handle($request, Closure $next)
    {
        if ($request->session()->has('user')) {
            return $next($request);
        }

        return redirect('/')
            ->with(
                'message',
                ['type' => 'danger', 'text' => 'You need to login']
            );
    }
}
Most route middleware has one thing in common: they have a handle method used for handling the request. This is executed before any method for responding to a route. Inside the method, you check if a user has been set in the current session. If it has, proceed with processing the request.
if ($request->session()->has('user')) {
    return $next($request);
}
Otherwise, redirect the user to the home page and pass on a message to the session saying that they need to login.
return redirect('/')
            ->with(
                'message',
                ['type' => 'danger', 'text' => 'You need to login']
            );
Make the middleware available for use by adding it to the app/Http/Kernel.php file under the $routeMiddleware array:
'admin' => \App\Http\Middleware\AdminMiddleware::class
Database
The app uses three tables: user, calendar and event. To save time, you can just grab the migrations from the repository, and paste them into the same path in your own project. Execute php artisan migrate in the root of your project to actually create the tables in the database.
After that, copy the contents of User.php, Calendar.php, and Event.php into the app directory. These files are the models that you will use later on to talk to the database.
Home Pages
Create an app/Http/Controllers/HomeController.php file and add the following:
<?php
namespace App\Http\Controllers;

use App\Googl;
use App\User;
use App\Calendar;
use Illuminate\Http\Request;

class HomeController extends Controller
{
   public function index()
   {
        return view('login');
   }

   public function login(Googl $googl, User $user, Request $request)
   {
        $client = $googl->client();
        if ($request->has('code')) {

            $client->authenticate($request->get('code'));
            $token = $client->getAccessToken();

            $plus = new \Google_Service_Plus($client);

            $google_user = $plus->people->get('me');

            $id = $google_user['id'];

            $email = $google_user['emails'][0]['value'];
            $first_name = $google_user['name']['givenName'];
            $last_name = $google_user['name']['familyName'];

            $has_user = $user->where('email', '=', $email)->first();

            if (!$has_user) {
                //not yet registered
                $user->email = $email;
                $user->first_name = $first_name;
                $user->last_name = $last_name;
                $user->token = json_encode($token);
                $user->save();
                $user_id = $user->id;

                //create primary calendar
                $calendar = new Calendar;
                $calendar->user_id = $user_id;
                $calendar->title = 'Primary Calendar';
                $calendar->calendar_id = 'primary';
                $calendar->sync_token = '';
                $calendar->save();
            } else {
                $user_id = $has_user->id;
            }

            session([
                'user' => [
                    'id' => $user_id,
                    'email' => $email,
                    'first_name' => $first_name,
                    'last_name' => $last_name,
                    'token' => $token
                ]
            ]);

            return redirect('/dashboard')
                ->with('message', ['type' => 'success', 'text' => 'You are now logged in.']);

        } else {
            $auth_url = $client->createAuthUrl();
            return redirect($auth_url);
        }
   }
}
Breaking down the code above, you have the index method which returns the login view.
public function index()
{
    return view('login');
}
You can create the login view in the resources/views/login.blade.php file:
@extends('layouts.default')

@section('content')
<form method="GET" action="/login">
    <button>Login with Google</button>
</form>
@stop
The login view is a form with a login button that’s used for logging into Google. This view extends the default template (resources/views/layouts/default.blade.php) which contains the following:
<!DOCTYPE html>
<html lang="en">
<head>
    <meta charset="UTF-8">
    <title>{{ env('APP_TITLE') }}</title>
    <link rel="stylesheet" href="{{ url('assets/lib/picnic/picnic.min.css') }}">
    <link rel="stylesheet" href="{{ url('assets/lib/picnic/plugins.min.css') }}">

    <link rel="stylesheet" href="{{ url('assets/css/style.css') }}">
</head>
<body>
    <div class="container">
        <header>
            <h1>{{ env('APP_TITLE') }}</h1>
        </header>
        @include('partials.alert')
        @yield('content')
    </div>
</body>
</html>
In the above template, picnic CSS is used to beautify things. The stylesheets are stored under the public/assets directory. Install it manually or with something nice like BowerPHP.
The part which has @yield('content') is where the login form is shown.
You’re also including the partials.alert, which you can define in the resources/views/partials/alert.blade.php file. This is used to display messages and form validation errors to the user:
@if(session('message'))
    <div class="alert alert-{{ session('message.type') }}">
        {{ session('message.text') }}
    </div>
@endif

@if($errors->any())
    <div class="alert alert-danger">
        <ul>
            @foreach($errors->all() as $error)
                <li>{{ $error }}</li>
            @endforeach
        </ul>
    </div>
@endif
Going back to the HomeController, next is the login method. Type-hinting is used so that you can use the service container for the Google client. The same is done with the User model.
public function login (Googl $googl, User $user)
{
    ...
}
Inside the login method, create a new instance of the Google client, then check if a code is passed in as a query parameter to the URL.
If you haven’t implemented OAuth in any of your projects before, the way it works is that the user has to click a link which leads to the login page of the service. In this case, it’s Google, so the user is redirected to Google’s login page. Once logged in, the user is asked for specific permissions. Once the user agrees, they are redirected back to the website with a unique code in the URL. This is then used to acquire an access token which can be used by the app to perform requests to the API.
The code that you’re checking here is the code used to exchange for an access token. If it doesn’t exist, then redirect the user to the Google login page:
$client = $googl->client();
if ($request->has('code')) {
    ...
} else {
    $auth_url = $client->createAuthUrl();
    return redirect($auth_url);
}
If it exists, authenticate the user with that code:
$client->authenticate($request->get('code'));
This allows you to get the access token and initialize the request to the Google+ service:
$token = $client->getAccessToken();
$plus = new \Google_Service_Plus($client);
Next, get the currently logged in user and extract their info:
$google_user = $plus->people->get('me');
$id = $google_user['id'];

$email = $google_user['emails'][0]['value']; //email
$first_name = $google_user['name']['givenName']; //first name
$last_name = $google_user['name']['familyName']; //last name
Check if the user already exists in the database:
$has_user = $user->where('email', '=', $email)->first();
If the user doesn’t exist, create a new user and save the entry to the database. Also create the default calendar for the user. This is the primary calendar in Google calendar. You’re basically making a copy so that the events (appointments) will have a container once you begin syncing the data from the Google calendar service.
if (!$has_user) {
    //not yet registered
    $user->email = $email;
    $user->first_name = $first_name;
    $user->last_name = $last_name;
    $user->token = $token;
    $user->save();
    $user_id = $user->id;

    //create primary calendar
    $calendar = new Calendar;
    $calendar->user_id = $user_id;
    $calendar->title = 'Primary Calendar';
    $calendar->calendar_id = 'primary';
    $calendar->sync_token = '';
    $calendar->save();
}
If the user already exists, assign a value to the $user_id so that you can set it in the session:
$user_id = $has_user->id;
Save the user details into the session:
session([
    'user' => [
        'id' => $user_id,
        'email' => $email,
        'first_name' => $first_name,
        'last_name' => $last_name,
        'token' => $token
    ]
]);
Finally, redirect the user to the admin dashboard page:
return redirect('/dashboard')
                ->with('message', ['type' => 'success', 'text' => 'You are now logged in.']);
Admin Pages
Next, create the controller for the admin pages in the app/Http/Controllers/AdminController.php file:
<?php
namespace App\Http\Controllers;

use App\Googl;
use App\User;
use App\Calendar;
use App\Event;
use Carbon\Carbon;
use Illuminate\Http\Request;

class AdminController extends Controller
{

   private $client;

   public function __construct(Googl $googl)
   {
        $this->client = $googl->client();
        $this->client->setAccessToken(session('user.token'));
   }


   public function index(Request $request)
   {
        return view('admin.dashboard');
   }


   public function createCalendar(Request $request)
   {
        return view('admin.create_calendar');
   }


   public function doCreateCalendar(Request $request, Calendar $calendar)
   {
        $this->validate($request, [
            'title' => 'required|min:4'
        ]);

        $title = $request->input('title');
        $timezone = env('APP_TIMEZONE');

        $cal = new \Google_Service_Calendar($this->client);

        $google_calendar = new \Google_Service_Calendar_Calendar($this->client);
        $google_calendar->setSummary($title);
        $google_calendar->setTimeZone($timezone);

        $created_calendar = $cal->calendars->insert($google_calendar);

        $calendar_id = $created_calendar->getId();

        $calendar->user_id = session('user.id');
        $calendar->title = $title;
        $calendar->calendar_id = $calendar_id;
        $calendar->save();

        return redirect('/calendar/create')
            ->with('message', [
                'type' => 'success', 'text' => 'Calendar was created!'
            ]);
   }


   public function createEvent(Calendar $calendar, Request $request)
   {
        $user_id = session('user.id');
        $calendars = $calendar
            ->where('user_id', '=', $user_id)->get();
        $page_data = [
            'calendars' => $calendars
        ];
        return view('admin.create_event', $page_data);
   }


   public function doCreateEvent(Event $evt, Request $request)
   {
        $this->validate($request, [
            'title' => 'required',
            'calendar_id' => 'required',
            'datetime_start' => 'required|date',
            'datetime_end' => 'required|date'
        ]);

        $title = $request->input('title');
        $calendar_id = $request->input('calendar_id');
        $start = $request->input('datetime_start');
        $end = $request->input('datetime_end');

        $start_datetime = Carbon::createFromFormat('Y/m/d H:i', $start);
        $end_datetime = Carbon::createFromFormat('Y/m/d H:i', $end);

        $cal = new \Google_Service_Calendar($this->client);
        $event = new \Google_Service_Calendar_Event();
        $event->setSummary($title);

        $start = new \Google_Service_Calendar_EventDateTime();
        $start->setDateTime($start_datetime->toAtomString());
        $event->setStart($start);
        $end = new \Google_Service_Calendar_EventDateTime();
        $end->setDateTime($end_datetime->toAtomString());
        $event->setEnd($end);

        //attendee
        if ($request->has('attendee_name')) {
            $attendees = [];
            $attendee_names = $request->input('attendee_name');
            $attendee_emails = $request->input('attendee_email');

            foreach ($attendee_names as $index => $attendee_name) {
                $attendee_email = $attendee_emails[$index];
                if (!empty($attendee_name) && !empty($attendee_email)) {
                    $attendee = new \Google_Service_Calendar_EventAttendee();
                    $attendee->setEmail($attendee_email);
                    $attendee->setDisplayName($attendee_name);
                    $attendees[] = $attendee;
                }
            }

            $event->attendees = $attendees;
        }

        $created_event = $cal->events->insert($calendar_id, $event);

        $evt->title = $title;
        $evt->calendar_id = $calendar_id;
        $evt->event_id = $created_event->id;
        $evt->datetime_start = $start_datetime->toDateTimeString();
        $evt->datetime_end = $end_datetime->toDateTimeString();
        $evt->save();

        return redirect('/event/create')
                    ->with('message', [
                        'type' => 'success',
                        'text' => 'Event was created!'
                    ]);
   }


   public function syncCalendar(Calendar $calendar)
   {
        $user_id = session('user.id');
        $calendars = $calendar->where('user_id', '=', $user_id)
            ->get();

        $page_data = [
            'calendars' => $calendars
        ];
        return view('admin.sync_calendar', $page_data);
   }


   public function doSyncCalendar(Request $request)
   {
        $this->validate($request, [
            'calendar_id' => 'required'
        ]);

        $user_id = session('user.id');
        $calendar_id = $request->input('calendar_id');

        $base_timezone = env('APP_TIMEZONE');

        $calendar = Calendar::find($calendar_id);
        $sync_token = $calendar->sync_token;
        $g_calendar_id = $calendar->calendar_id;

        $g_cal = new \Google_Service_Calendar($this->client);

        $g_calendar = $g_cal->calendars->get($g_calendar_id);
        $calendar_timezone = $g_calendar->getTimeZone();

        $events = Event::where('id', '=', $calendar_id)
            ->lists('event_id')
            ->toArray();

        $params = [
            'showDeleted' => true,
            'timeMin' => Carbon::now()
                ->setTimezone($calendar_timezone)
                ->toAtomString()
        ];

        if (!empty($sync_token)) {
            $params = [
                'syncToken' => $sync_token
            ];
        }

        $googlecalendar_events = $g_cal->events->listEvents($g_calendar_id, $params);


        while (true) {

            foreach ($googlecalendar_events->getItems() as $g_event) {

                $g_event_id = $g_event->id;
                $g_event_title = $g_event->getSummary();
                $g_status = $g_event->status;

                if ($g_status != 'cancelled') {

                    $g_datetime_start = Carbon::parse($g_event->getStart()->getDateTime())
                        ->tz($calendar_timezone)
                        ->setTimezone($base_timezone)
                        ->format('Y-m-d H:i:s');

                    $g_datetime_end = Carbon::parse($g_event->getEnd()->getDateTime())
                        ->tz($calendar_timezone)
                        ->setTimezone($base_timezone)
                        ->format('Y-m-d H:i:s');

                    //check if event id is already in the events table
                    if (in_array($g_event_id, $events)) {
                        //update event
                        $event = Event::where('event_id', '=', $g_event_id)->first();
                        $event->title = $g_event_title;
                        $event->calendar_id = $g_calendar_id;
                        $event->event_id = $g_event_id;
                        $event->datetime_start = $g_datetime_start;
                        $event->datetime_end = $g_datetime_end;
                        $event->save();
                    } else {
                        //add event
                        $event = new Event;
                        $event->title = $g_event_title;
                        $event->calendar_id = $g_calendar_id;
                        $event->event_id = $g_event_id;
                        $event->datetime_start = $g_datetime_start;
                        $event->datetime_end = $g_datetime_end;
                        $event->save();
                    }

                } else {
                    //delete event
                    if (in_array($g_event_id, $events)) {
                        Event::where('event_id', '=', $g_event_id)->delete();
                    }
                }

            }

            $page_token = $googlecalendar_events->getNextPageToken();
            if ($page_token) {
                $params['pageToken'] = $page_token;
                $googlecalendar_events = $g_cal->events->listEvents('primary', $params);
            } else {
                $next_synctoken = str_replace('=ok', '', $googlecalendar_events->getNextSyncToken());

                //update next sync token
                $calendar = Calendar::find($calendar_id);
                $calendar->sync_token = $next_synctoken;
                $calendar->save();

                break;
            }

        }

        return redirect('/calendar/sync')
            ->with('message',
                [
                    'type' => 'success',
                    'text' => 'Calendar was synced.'
                ]);

   }


   public function listEvents()
   {
        $user_id = session('user.id');
        $calendar_ids = Calendar::where('user_id', '=', $user_id)
            ->lists('calendar_id')
            ->toArray();

        $events = Event::whereIn('calendar_id', $calendar_ids)->get();

        $page_data = [
            'events' => $events
        ];

        return view('admin.events', $page_data);
   }


   public function logout(Request $request)
   {
        $request->session()->flush();
        return redirect('/')
            ->with('message', ['type' => 'success', 'text' => 'You are now logged out']);
   }

}
Let’s break down the above code.
Inside the controller, the $client variable stores the reference to the new Google client that you initialized in the constructor. This way, you don’t need to initialize it every time you need it.
private $client;

public function __construct(Googl $googl)
{
    $this->client = $googl->client();
    $this->client->setAccessToken(session('user.token'));
}
The index method returns the admin dashboard (resources/views/admin/dashboard.blade.php) view.
public function index(){
    return view('admin.dashboard');
}
The admin dashboard contains the links to the different pages which allow the user to perform various operations:
@extends('layouts.admin')

@section('content')
<h3>What do you like to do?</h3>
<ul>
    <li><a href="/calendar/create">Create Calendar</a></li>
    <li><a href="/event/create">Create Event</a></li>
    <li><a href="/calendar/sync">Sync Calendar</a></li>
    <li><a href="/events">Events</a></li>
    <li><a href="/logout">Logout</a></li>
</ul>
@stop
This view extends the followingt admin layout (resources/views/layouts/admin.blade.php):
<!DOCTYPE html>
<html lang="en">
<head>
    <meta charset="UTF-8">
    <title>{{ env('APP_TITLE') }}</title>
    <link rel="stylesheet" href="{{ url('assets/lib/picnic/picnic.min.css') }}">
    <link rel="stylesheet" href="{{ url('assets/lib/picnic/plugins.min.css') }}">

    @yield('jquery_datetimepicker_style')

    <link rel="stylesheet" href="{{ url('assets/css/style.css') }}">
</head>
<body>
    <div class="container">
        <header>
            <h1>{{ env('APP_TITLE') }}</h1>
        </header>
        @include('partials.alert')
        @yield('content')
    </div>

    @yield('attendee_template')

    @yield('jquery_script')

    @yield('handlebars_script')

    @yield('jquery_datetimepicker_script')

    @yield('create_event_script')

</body>
</html>
In the above code, you’re yielding a few templates aside from the main content. These templates are passed in from different views. It simply returns nothing if a view hasn’t defined the section that it’s yielding.
Creating a Calendar
Going back to the AdminController, here’s the method that returns the view for creating a new calendar:
public function createCalendar(Request $request)
{
    return view('admin.create_calendar');
}
The create calendar view contains a form which asks for the title of the calendar. There’s also a hidden field used for preventing CSRF (Cross-site Request Forgery).
@extends('layouts.admin')

@section('content')
<form method="POST">
    <input type="hidden" name="_token" value="{{{ csrf_token() }}}" />
    <p>
        <label for="title">Title</label>
        <input type="text" name="title" id="title" value="{{ old('title') }}">
    </p>
    <button>Create Calendar</button>
</form>
@stop
Once the form is submitted, the doCreateCalendar method is called. Inside the method, validate if there’s a value supplied to the title field and if it has a minimum of 4 characters.
$this->validate($request, [
    'title' => 'required|min:4'
]);
Initialize the Google calendar client:
$cal = new \Google_Service_Calendar($this->client);
Create a new calendar. Set the title to the title supplied by the user and the timezone to the default app timezone:
$google_calendar = new \Google_Service_Calendar_Calendar($this->client);
$google_calendar->setSummary($title);
$google_calendar->setTimeZone($timezone);

$created_calendar = $cal->calendars->insert($google_calendar);
Get the ID of the calendar:
$calendar_id = $created_calendar->getId();
Save the newly created calendar to the database:
$calendar->user_id = session('user.id');
$calendar->title = $title;
$calendar->calendar_id = $calendar_id;
$calendar->save();
Redirect the user back to the page for creating a new calendar:
return redirect('/calendar/create')
            ->with('message', [
                'type' => 'success', 'text' => 'Calendar was created!'
            ]);
Creating an Event
Next comes the method that returns the view for creating a new event. Here you’re passing in the calendars that the user has already created because the user has to pick which calendar to add the event to.
public function createEvent(Calendar $calendar, Request $request)
{
    $user_id = session('user.id');
    $calendars = $calendar
        ->where('user_id', '=', $user_id)->get();
    $page_data = [
        'calendars' => $calendars
    ];
    return view('admin.create_event', $page_data);
}
The admin.create_event (resources/views/admin/create_event.blade.php) view includes jQuery, handlebars and the jQuery datetimepicker styles and scripts.
You’re using jQuery to listen for events in the DOM, handlebars for creating new HTML and the jQuery datetimepicker to turn the date fields into date and time pickers. Inside the form, you have a field for entering the title of the event, selecting the calendar in which to add the event, the start and end date and time, and the fields for entering the attendee’s name and email. Below the form, you have the handlebars template for the attendee row. This row would be appended to the attendees container (<div id="attendees">...</div>).
@extends('layouts.admin')

@section('jquery_datetimepicker_style')
<link rel="stylesheet" href="{{ url('assets/lib/jquery-datetimepicker/jquery.datetimepicker.min.css') }}">
@stop

@section('content')
<form method="POST">
    <input type="hidden" name="_token" value="{{{ csrf_token() }}}" />
    <p>
        <label for="title">Title</label>
        <input type="text" name="title" id="title" value="{{ old('title') }}">
    </p>
    <p>
        <label for="calendar_id">Calendar</label>
        <select name="calendar_id" id="calendar_id">
            @foreach($calendars as $cal)
            <option value="{{ $cal->calendar_id }}">{{ $cal->title }}</option>
            @endforeach
        </select>
    </p>
    <p>
        <label for="datetime_start">Datetime Start</label>
        <input type="text" name="datetime_start" id="datetime_start" class="datetimepicker" value="{{ old('datetime_start') }}">
    </p>
    <p>
        <label for="datetime_end">Datetime End</label>
        <input type="text" name="datetime_end" id="datetime_end" class="datetimepicker" value="{{ old('datetime_end') }}">
    </p>
    <div id="attendees">
        Attendees
        <div class="attendee-row">
            <input type="text" name="attendee_name[]" class="half-input name" placeholder="Name">
            <input type="text" name="attendee_email[]" class="half-input email" placeholder="Email">
        </div>
    </div>
    <button>Create Event</button>
</form>
@stop


@section('attendee_template')
<script id="attendee-template" type="text/x-handlebars-template">
    <div class="attendee-row">
        <input type="text" name="attendee_name[]" class="half-input name" placeholder="Name">
        <input type="text" name="attendee_email[]" class="half-input email" placeholder="Email">
    </div>
</script>
@stop

@section('jquery_script')
<script src="{{ url('assets/lib/jquery.min.js') }}"></script>
@stop

@section('handlebars_script')
<script src="{{ url('assets/lib/handlebars.min.js') }}"></script>
@stop

@section('jquery_datetimepicker_script')
<script src="{{ url('assets/lib/jquery-datetimepicker/jquery.datetimepicker.min.js') }}"></script>
@stop

@section('create_event_script')
<script src="{{ url('assets/js/create_event.js') }}"></script>
@stop
In the template above, you’re also including the create_event.js file. This file is responsible for making the date fields into datetime pickers and also listening for the blur event on the attendee email text field. Once the blur event is fired and the attendee name and email for that row are filled by the user, it will generate a new row in which the user can enter another attendee.
var attendee_template = Handlebars.compile($('#attendee-template').html());

$('.datetimepicker').datetimepicker();

$('#attendees').on('blur', '.email', function(){

    var attendee_row = $('.attendee-row:last');
    var name = attendee_row.find('.name').val();
    var email = attendee_row.find('.email').val();

    if(name && email){
        $('#attendees').append(attendee_template());
    }
});
Next is the method that will be executed once the create event form is submitted:
public function doCreateEvent(Event $evt, Request $request)
{
    ...
}
Inside the method, validate the form and get the data from the fields:
$this->validate($request, [
    'title' => 'required',
    'calendar_id' => 'required',
    'datetime_start' => 'required|date',
    'datetime_end' => 'required|date'
]);

$title = $request->input('title');
$calendar_id = $request->input('calendar_id');
$start = $request->input('datetime_start');
$end = $request->input('datetime_end');
Convert the start and end datetime to date objects so it can be easily formatted:
$start_datetime = Carbon::createFromFormat('Y/m/d H:i', $start);
$end_datetime = Carbon::createFromFormat('Y/m/d H:i', $end);
Create a new Google Calendar event and set its summary to the title entered by the user:
$event = new \Google_Service_Calendar_Event();
$event->setSummary($title);
Set the start and end datetime. Note that the Google Calendar API expects the date and time to be formatted as an atom string so you’re using the toAtomString() method provided by Carbon to format the $start_datetime and $end_datetime.
$start = new \Google_Service_Calendar_EventDateTime();
$start->setDateTime($start_datetime->toAtomString());
$event->setStart($start);

$end = new \Google_Service_Calendar_EventDateTime();
$end->setDateTime($end_datetime->toAtomString());
$event->setEnd($end);
Check if the user has added any attendees:
if ($request->has('attendee_name')) {
    ...
}
If so, ssign them to variables:
$attendees = [];
$attendee_names = $request->input('attendee_name');
$attendee_emails = $request->input('attendee_email');
Loop through each of them and if the user has entered both name and email, create a new event attendee in Google calendar and set their email and name. Then, push the created attendee to the $attendees array.
foreach ($attendee_names as $index => $attendee_name) {
    $attendee_email = $attendee_emails[$index];
    if (!empty($attendee_name) && !empty($attendee_email)) {
        $attendee = new \Google_Service_Calendar_EventAttendee();
        $attendee->setEmail($attendee_email);
        $attendee->setDisplayName($attendee_name);
        $attendees[] = $attendee;
    }
}
After looping through each of the attendees, attach the $attendees array to the event’s attendees:
$event->attendees = $attendees;
Save the event to Google Calendar:
$created_event = $cal->events->insert($calendar_id, $event);
Also save the event to the database:
$evt->title = $title;
$evt->calendar_id = $calendar_id;
$evt->event_id = $created_event->id;
$evt->datetime_start = $start_datetime->toDateTimeString();
$evt->datetime_end = $end_datetime->toDateTimeString();
$evt->save();
Redirect back to the event creation page:
return redirect('/event/create')
            ->with('message', [
                'type' => 'success',
                'text' => 'Event was created!'
            ]);
Syncing a Calendar
Next is the function that would return the view for syncing the calendar (resources/views/admin/sync_calendar.blade.php). Here you pass in the calendars created by the user as the data for this view.
public function syncCalendar(Calendar $calendar)
{
    $user_id = session('user.id');
    $calendars = $calendar->where('user_id', '=', $user_id)
        ->get();

    $page_data = [
        'calendars' => $calendars
    ];
    return view('admin.sync_calendar', $page_data);
}
Below is the code for the admin.sync_calendar view. This allows the user to select which calendar to sync. What this does once submitted is add any events which haven’t been added to the database, delete cancelled events, and update the updated ones since the last sync.
@extends('layouts.admin')

@section('content')
<form method="POST">
    <input type="hidden" name="_token" value="{{{ csrf_token() }}}" />
    <p>
        <label for="calendar_id">Calendar</label>
        <select name="calendar_id" id="calendar_id">
            @foreach($calendars as $cal)
            <option value="{{ $cal->id }}">{{ $cal->title }}</option>
            @endforeach
        </select>
    </p>
    <button>Sync Calendar</button>
</form>
@stop
Once the user submits the calendar sync form, the doSyncCalendar method gets executed:
public function doSyncCalendar(Request $request)
{
    ...
}
Inside the function, find the calendar in the database:
$calendar = Calendar::find($calendar_id);
$sync_token = $calendar->sync_token;
$g_calendar_id = $calendar->calendar_id;
Create a new instance of the Google calendar service and get the calendar based on its ID. Also get the timezone of the Calendar. This allows you to set in which timezone the dates and times of the events are expressed. This way, you can easily convert to the timezone used by the app.
$g_cal = new \Google_Service_Calendar($this->client);

$g_calendar = $g_cal->calendars->get($g_calendar_id);
$calendar_timezone = $g_calendar->getTimeZone();
Get the IDs of the events that belong to the calendar selected by the user. This will be used for checking if a specific event has already been added before. From there, you can determine what to do with the event. If it’s already in the database and the status is not cancelled, then it requires an update, otherwise delete it from the database. If it’s not yet in the database then it requires adding.
$events = Event::where('id', '=', $calendar_id)
            ->lists('event_id')
            ->toArray();
Specify a default filter for first sync. The showDeleted option allows you to return the deleted events and the timeMin option allows you to specify the minimum datetime to be used in the request. This way, past events wouldn’t get returned.
$params = [
    'showDeleted' => true,
    'timeMin' => Carbon::now()
        ->setTimezone($calendar_timezone)
        ->toAtomString()
];
The Google Calendar sync works by making use of a sync token which changes every time a change is made to the calendar (e.g. an event is added). This token then needs to be saved in the database, so that when the token in Google’s server is the same as the token that you have, it means that nothing has changed. If it’s different, that’s the only time that you perform an update. After the update, the token also needs to be updated in the database.
If the sync token is not empty, use that instead of the default filters. This allows you to return only those events that have been updated or added.
if (!empty($sync_token)) {
    $params = [
        'syncToken' => $sync_token
    ];
}
Fetch the events:
$googlecalendar_events = $g_cal->events->listEvents($g_calendar_id, $params);
Next is an infinite loop which will only stop executing once you have fetched all the updates for the calendar that the user has selected.
while (true) {
    ...
}
Inside the infinite loop, loop through the events returned by the API and extract all the relevant data:
foreach ($googlecalendar_events->getItems() as $g_event) {

    $g_event_id = $g_event->id;
    $g_event_title = $g_event->getSummary();
    $g_status = $g_event->status;
    ...
}
Check the event status. If it’s cancelled, then delete the event from the database:
if ($g_status != 'cancelled') {
    ...
} else {
    //delete event
    if (in_array($g_event_id, $events)) {
        Event::where('event_id', '=', $g_event_id)->delete();
    }
}
If the event is not cancelled, extract the start and end datetime of the event and convert it to the timezone of the app.
$g_datetime_start = Carbon::parse($g_event->getStart()
    ->getDateTime())
    ->tz($calendar_timezone)
    ->setTimezone($base_timezone)
    ->format('Y-m-d H:i:s');

$g_datetime_end = Carbon::parse($g_event->getEnd()->getDateTime())
    ->tz($calendar_timezone)
    ->setTimezone($base_timezone)
    ->format('Y-m-d H:i:s');
If the event ID is found in the array of event IDs, it means the event has been updated so you also perform an update to the database:
if (in_array($g_event_id, $events)) {
    //update event
    $event = Event::where('event_id', '=', $g_event_id)->first();
    $event->title = $g_event_title;
    $event->calendar_id = $g_calendar_id;
    $event->event_id = $g_event_id;
    $event->datetime_start = $g_datetime_start;
    $event->datetime_end = $g_datetime_end;
    $event->save();

}
If it’s not yet in the array, it means it’s a new event so you add a new entry to the database:
else {
    //add event
    $event = new Event;
    $event->title = $g_event_title;
    $event->calendar_id = $g_calendar_id;
    $event->event_id = $g_event_id;
    $event->datetime_start = $g_datetime_start;
    $event->datetime_end = $g_datetime_end;
    $event->save();
}
After looping through the events, get the token for the next page. Note that this isn’t the same as the sync token from earlier. The page token is used solely for pagination. Here you’re just checking if there are any more pages in the current result set.
$page_token = $googlecalendar_events->getNextPageToken();
If it has a next page, set it as the pageToken for the next request and then proceed with the request for fetching events:
if ($page_token) {
   $params['pageToken'] = $page_token;
   $googlecalendar_events = $g_cal->events->listEvents('primary', $params);
}
If there are none, it means that you’ve got all the results, so perform a request to get the next sync token and then update the database with that value. At this point, you can exit out of the infinite loop.
else {
    $next_synctoken = str_replace('=ok', '', $googlecalendar_events->getNextSyncToken());

    //update next sync token
    $calendar = Calendar::find($calendar_id);
    $calendar->sync_token = $next_synctoken;
    $calendar->save();

    break; //exit out of the inifinite loop
}
Redirect to the calendar sync page and inform the user that the calendar was synced:
return redirect('/calendar/sync')
        ->with('message',
            [
                'type' => 'success',
                'text' => 'Calendar was synced.'
            ]);
Listing Events
Next is the method for showing all the events that the user has synced:
public function listEvents()
{
    $user_id = session('user.id');
    $calendar_ids = Calendar::where('user_id', '=', $user_id)
        ->lists('calendar_id')
        ->toArray();

    $events = Event::whereIn('calendar_id', $calendar_ids)->get();

    $page_data = [
        'events' => $events
    ];

    return view('admin.events', $page_data);
}
The events view (resources/views/admin/events.blade.php) contains the following:
@extends('layouts.admin')

@section('content')
@if(count($events) > 0)
<table>
    <thead>
        <tr>
            <th>Title</th>
            <th>Datetime Start</th>
            <th>Datetime End</th>
        </tr>
    </thead>
    <tbody>
        @foreach($events as $event)
        <tr>
            <td>{{ $event->title }}</td>
            <td>{{ $event->datetime_start }}</td>
            <td>{{ $event->datetime_end }}</td>
        </tr>
        @endforeach
    </tbody>
</table>
@endif
@stop

@stop
Logging Out
Finally, there’s the logout method which gets executed once the user clicks on the logout link in the admin dashboard. This deletes all session data and redirects the user back to the home page.
public function logout(Request $request)
{
    $request->session()->flush();
    return redirect('/')
        ->with('message', ['type' => 'success', 'text' => 'You are now logged out']);
}
Conclusion
That’s it! In this tutorial, you’ve taken a look at how to build a PHP app which integrates with the Google Calendar API. By doing so, you’ve learned how to manipulate a Google calendar using PHP.
Have you taken advantage of Google’s APIs to build your own calendar app? Were these instruction easy/hard to follow? All feedback is welcome!
Frequently Asked Questions (FAQs) about Google Calendar API in PHP
How Can I Create a Google Calendar Event Using PHP?
Creating a Google Calendar event using PHP involves several steps. First, you need to set up a project in the Google Cloud Console and enable the Google Calendar API. Then, you need to create credentials for your project and download the JSON file. This file contains the necessary information to authenticate your application with the Google API.
Next, you need to install the Google Client Library for PHP using Composer. This library provides the necessary functions to interact with the Google Calendar API. Once the library is installed, you can use it to authenticate your application and create a new Google_Service_Calendar object.
Finally, you can use the insert method of the Google_Service_Calendar_Events resource to create a new event. This method requires an event object, which you can create using the Google_Service_Calendar_Event class. The event object should contain the necessary information for the event, such as the start and end times, the summary, and the description.
How Can I Retrieve Events from a Google Calendar Using PHP?
To retrieve events from a Google Calendar using PHP, you first need to authenticate your application with the Google API, as described in the previous question. Once your application is authenticated, you can create a new Google_Service_Calendar object.
Next, you need to use the listEvents method of the Google_Service_Calendar_Events resource. This method requires the ID of the calendar from which you want to retrieve events. You can get this ID from the Google Calendar web interface.
The listEvents method returns a list of event objects, which you can iterate over to retrieve the information for each event. Each event object contains information such as the start and end times, the summary, and the description.
How Can I Update an Event in a Google Calendar Using PHP?
Updating an event in a Google Calendar using PHP involves several steps. First, you need to retrieve the event you want to update. You can do this using the get method of the Google_Service_Calendar_Events resource, which requires the ID of the calendar and the ID of the event.
Once you have the event object, you can modify its properties, such as the start and end times, the summary, and the description. After modifying the event, you can update it using the update method of the Google_Service_Calendar_Events resource. This method requires the ID of the calendar, the ID of the event, and the updated event object.
How Can I Delete an Event from a Google Calendar Using PHP?
To delete an event from a Google Calendar using PHP, you first need to retrieve the event you want to delete. You can do this using the get method of the Google_Service_Calendar_Events resource, which requires the ID of the calendar and the ID of the event.
Once you have the event object, you can delete it using the delete method of the Google_Service_Calendar_Events resource. This method requires the ID of the calendar and the ID of the event.
How Can I Handle Errors When Using the Google Calendar API in PHP?
When using the Google Calendar API in PHP, you may encounter various errors, such as authentication errors, quota errors, and invalid request errors. You can handle these errors by wrapping your API calls in a try-catch block and catching the appropriate exceptions.
For example, you can catch the Google_Service_Exception to handle errors returned by the API, and the Google_Auth_Exception to handle authentication errors. In the catch block, you can log the error message and take appropriate action, such as retrying the request or displaying an error message to the user.
How Can I Use the Google Calendar API in PHP Without User Authentication?
The Google Calendar API requires user authentication to access private calendars. However, you can access public calendars without user authentication by using an API key instead of OAuth 2.0.
To use an API key, you need to create a new project in the Google Cloud Console, enable the Google Calendar API, and create an API key. Then, you can use this key to authenticate your requests to the API.
Note that API keys do not provide the same level of access as OAuth 2.0. With an API key, you can only read public events from public calendars. You cannot create, update, or delete events, or access private calendars.
How Can I Use the Google Calendar API in PHP to Create Recurring Events?
To create recurring events with the Google Calendar API in PHP, you need to use the recurrence property of the event object. This property is an array of strings, each representing a recurrence rule in the iCalendar format.
For example, to create a weekly event that occurs every Monday, you would set the recurrence property to [“RRULE:FREQ=WEEKLY;BYDAY=MO”]. You can specify multiple recurrence rules to create more complex recurring events.
How Can I Use the Google Calendar API in PHP to Invite Attendees to an Event?
To invite attendees to an event with the Google Calendar API in PHP, you need to use the attendees property of the event object. This property is an array of attendee objects, each representing an attendee.
Each attendee object should have an email property, which is the email address of the attendee, and an optional responseStatus property, which is the attendee’s response status. The response status can be “needsAction”, “declined”, “tentative”, or “accepted”.
After adding the attendees to the event, you can create or update the event as usual. The attendees will receive an email invitation to the event.
How Can I Use the Google Calendar API in PHP to Set Reminders for an Event?
To set reminders for an event with the Google Calendar API in PHP, you need to use the reminders property of the event object. This property is an object that has two properties: useDefault and overrides.
The useDefault property is a boolean that indicates whether to use the default reminders for the calendar. The overrides property is an array of reminder objects, each representing a custom reminder.
Each reminder object should have a method property, which is the method of the reminder, and a minutes property, which is the number of minutes before the start of the event when the reminder should be sent. The method can be “email” or “popup”.
After setting the reminders for the event, you can create or update the event as usual.
How Can I Use the Google Calendar API in PHP to Set the Color of an Event?
To set the color of an event with the Google Calendar API in PHP, you need to use the colorId property of the event object. This property is a string that represents the color of the event.
The colorId corresponds to one of the predefined colors in the Google Calendar color palette. You can get the list of available colors by calling the get method of the Google_Service_Calendar_Colors resource.
After setting the color of the event, you can create or update the event as usual. The color of the event will be displayed in the Google Calendar web interface.