
In a previous article we talked about the basics of creating an OctoberCMS plugin. In this one, we’re going to go deeper, and we’ll explore how we can extend the OctoberCMS backend using widgets.

Key Takeaways
- Utilize the `php artisan create:plugin` command to scaffold a new OctoberCMS widget plugin, setting the foundation for further development.
- Extend the User model within the plugin’s `boot` method to establish a relationship with the newly created Note model, enabling user-specific functionalities.
- Implement various widget types, including Report Widgets, to enhance the backend dashboard, using the `QuickNoteWidget` class to display and manage user notes.
- Configure and manage the widget’s properties through the `defineProperties` method, allowing customization such as hiding the note list or changing the widget title.
- Leverage OctoberCMS controllers and models to handle form submissions, list notes, and provide interactive functionalities like adding, updating, and deleting notes.
What We Are Going To Build
I will assume that many of you have used WordPress. On the dashboard, we have a quick draft widget. In this article, we’re going to see how we can build a similar one for OctoberCMS.

Plugin Registration
To start building our plugin, we’ll use a command utility for scaffolding.
php artisan create:plugin RAFIE.quicknote
The command will create a Plugin.php file and an updates folder containing the version.yaml file.
public function pluginDetails(){

   return [

       'name'        => 'Quick Note Widget',

       'description' => 'Add and manage some drafts when you\'re in a hurry.',

       'author'      => 'RAFIE Younes',

       'icon'        => 'icon-pencil'

   ];

}
After registering our plugin we need to update our version.yaml file.
// uploads/version.yaml

1.0.1: First version of quicknote

1.0.2:

  - Created Notes Table

  - create_notes_table.php
Using Models
To create our migration and model files we can use the php artisan create:model RAFIE.quicknote Note command. Our updates/create_notes_table.php migration file handles the creation of the notes table, and will have the following structure.

Because every note belongs to a user, we have a user_id field. Our migration file will look like this:
public function up(){

    Schema::create('rafie_quicknote_notes', function($table){

        $table->engine = 'InnoDB';

        $table->increments('id');

        $table->string('title', 255);

        $table->text('description')->nullable();

        $table->integer('user_id')->unsigned()->index();

        $table->timestamps();

    });

}
public function down(){

    Schema::dropIfExists('rafie_quicknote_notes');

}
After updating the file we need to refresh our plugin to reflect the changes using the following command, which will reinstall the plugin and create our database table.
artisan plugin:refresh RAFIE.quicknote
If you are a Laravel fan, you know that every model class must extend the Illuminate\Database\Eloquent\Model to use eloquent, yet OctoberCMS has an October\Rain\Database\Model class that extends the Eloquent model class, and provides more extensibility, like the extend method.
public function boot(){

    User::extend(function($model){

        $model->hasMany['notes'] = ['RAFIE\Quicknote\Models\Notes'];

    });

}
Inside the Plugin.php file, we override the boot method, which gets called on every request, and extend the User model to have many notes.
class Note extends Model{

    // used for automatic validation using the defined rules.

    use \October\Rain\Database\Traits\Validation;
    public $table = 'rafie_quicknote_notes';
    protected $guarded = ['*'];
    protected $rules = [

        'title'         => 'required|min:4'

    ];
    public $belongsTo = [ 'user' => [ 'Backend\Models\User' ] ];

}
Inside our models/Note.php files we have a basic model definition. Also, the belongsTo attribute defines our model relationship. The validation is automatically handled by the validation trait using the defined rules.
OctoberCMS Widgets
OctoberCMS widgets are blocks of content that can be integrated in different ways to your font-end or back-end. There are three different kinds of widgets.
Generic Widgets
Generic widgets are bundles functionality that can be injected to the page. They behave like components and are stored inside the widgets folder. You can read more in the docs.
Form Widgets
Form widgets are a bit special, they allow you to create new types of controls that can be used by other plugins or by the CMS itself. A good example from the docs is the CodeEditor control used for creating pages, and there is also the search box used in many places, and integrated by default inside our notes management page.
Report Widgets
Report widgets are the most known type of widgets. They add content on a specific context, in this case the dashboard. On a fresh installation of OctoberCMS we have a SYSTEM STATUS widget displaying available updates and the website status.
Scaffolding Our Widget
To begin, let’s create a QuickNoteWidget.php file where we can define our QuickNote widget, and we need also to register our widget inside our Plugin.php file.
// Plugin.php
public function registerReportWidgets(){

    return [

        'RAFIE\QuickNote\QuickNoteWidget' => [

            'label'     => 'Quick Notes',

            'context'   => 'dashboard'

        ]

    ];

}
class QuickNoteWidget extends ReportWidgetBase{
   public function render(){

       $notes = BackendAuth::getUser()->notes;
       return $this->makePartial('notes', [ 'notes' => $notes ]);

   }

}
Report widgets must extend the ReportWidgetBase class and override the render method.
The BackendAuth::getUser method returns the logged in user, which has the associated list of notes. This is only possible because we’ve defined the relation inside our models.
OctoberCMS will look for our assets inside a directory with the same name as our widget file name lowercased. The partials directory holds our views and they must start with an underscore.
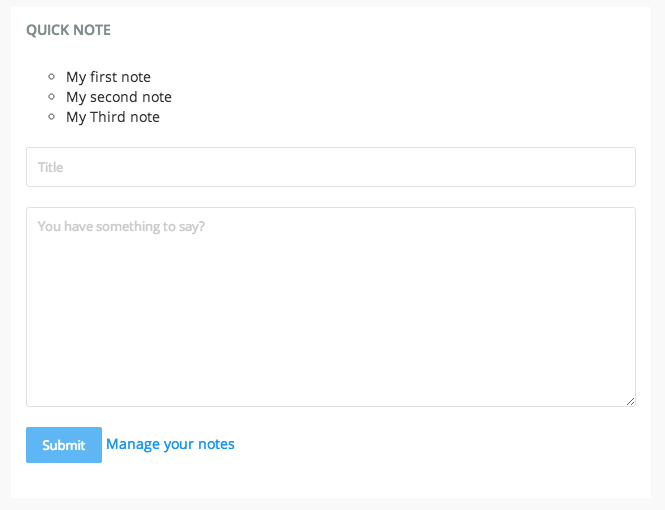
//quicknotewidget/partials/_notes.htm

<div class="report-widget">

    <h3>Quick Note</h3>
    <div class="pane">

    <ul class="list-nostyle">

        <?php foreach( $notes as $note ): ?>

            <li class="list-group-item"><?= $note->title ?></li>

        <?php endforeach ?>

    </ul>

    </div>
    <br/>
    <?= Form::open([

            'url'       => Backend::url('rafie/quicknote/notes/store'),

            'method'    => 'POST'

        ]);

    ?>

    <div class="form-group">

        <input class="form-control" type="text" name="title" placeholder="Title" required />

    </div>
    <div class="form-group">

        <textarea class="form-control" name="description" id="" cols="30" rows="10" placeholder="You have something to say?"></textarea>

    </div>
    <div class="form-group">

        <input type="submit" class="btn btn-primary" value="Submit" />

        <a href="<?= Backend::url('rafie/quicknote/notes/index') ?>">Manage your notes</a>

    </div>
    <?= Form::close(); ?>

</div>
The widget’s HTML code must be contained within a report-widget class and optionally have an <h3> for the widget title. After that we loop through the list of user notes and show a form for creating a new note.
The Backend::url('rafie/quicknote/notes/store') will generate a link to our notes controller where we can process our form data. We could have used OctoberCMS’ Ajax framework for the form, but to keep things simple we’re going to normally submit the form and talk about using AJAX later.
Using Controllers
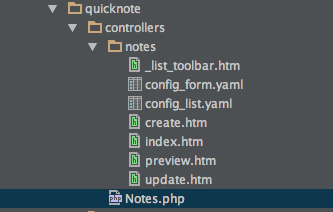
Controllers are stored within the controllers folder, and can be generated using a scaffolding command.
php artisan create:controller RAFIE.quicknote Notes
Creating Notes
The folder contains our controller class, and another folder for our assets. When someone hits a URL, it’s parsed as the following: author/plugin/controllerClass/method. In our case, it’s rafie/quicknote/notes/store, if no method is specified, the index method is fired by default.
public function store(){

    $note = new Models\Note;

    $note->title = Input::get('title');

    $note->description = Input::get('description', null);

    $note->user_id = BackendAuth::getUser()->id;
    if( $note->save() ) {

	\Flash::success('Note added successfully.');

    }

    else{

        \Flash::error('Validation error' );

    }
    return \Redirect::to( Backend::url() );

}
We create a new note using our model and save it to the database. The Flash::success() will display a flash message to the user to confirm the insertion.
You may have noticed the Manage your notes link pointing to the rafie/quicknote/notes/index url. This is where we’re going to list our notes so that the user can add, edit, and delete notes.
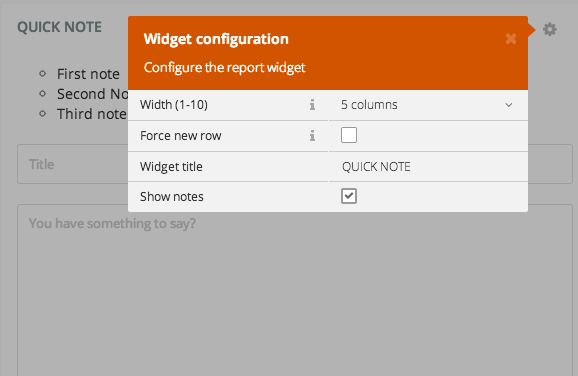
Widget Configuration
Let’s say that we want to give the user the ability to choose how the widget renders. We can give him the choice to hide the list of notes from the dashboard widget, and keep just the form and the link, and even change the widget title.
// QuickNoteWidget.php
public function defineProperties(){

    return [

        'title'     => [

            'title'     => 'Widget title',

            'default'   => 'QUICK NOTE'

        ],

        'showList'  => [

            'title'     => 'Show notes',

            'type'      => 'checkbox'

        ]

    ];

}
If you don’t know what properties are, be sure to check my article about How to build an OctoberCMS plugin. After defining the properties we can retrieve them inside our view.
// quicknotewidget/partials/_notes.htm
<h3><?= $this->property('title') ?></h3>
<?php if( $this->property('showList') ): ?>

    <ul class="list-nostyle">

        <?php foreach( $notes as $note ): ?>

            <li class="list-group-item"><?= $note->title ?></li>

        <?php endforeach ?>

    </ul>
    <br/>

<?php endif; ?>
Using Controllers
Up until now, we talked about rendering a report widget and submitting it to the controller. Now, we’re going to build the listing page and talk about extending the OctoberCMS backend by creating the listing and management part.
Listing Notes
Every controller has a config_list.yaml file where you can define your listing, and it’s also mapped to a model using some configuration attributes.
// controllers/notes/config_list.yaml
# Model List Column configuration

list: $/rafie/quicknote/models/note/columns.yaml
# Model Class name

modelClass: RAFIE\Quicknote\Models\Note
# List Title

title: Manage Notes
# Link URL for each record

recordUrl: rafie/quicknote/notes/update/:id
# Message to display if the list is empty

noRecordsMessage: backend::lang.list.no_records
# Records to display per page

recordsPerPage: 20
# Displays the list column set up button

showSetup: true
# Displays the sorting link on each column

showSorting: true
# Default sorting column

 defaultSort:

     column: created_at

     direction: desc
# Display checkboxes next to each record

showCheckboxes: true
# Toolbar widget configuration

toolbar:

	# Partial for toolbar buttons

	buttons: list_toolbar
	# Search widget configuration

	search:

	    prompt: backend::lang.list.search_prompt
The attributes are generally well explained, but let’s add more clarification to some:
- list: path to the list columns definition.
- showSetup: little button to toggle the columns display.
- showCheckboxes: show a checkbox for every row, used for bulk actions.
- toolbar -> button: partial name, if you want to show some controls above the table, like
NeworDelete.
// rafie/quicknote/models/note/columns.yaml
columns:

    id:

        label: ID
    title:

        label: TITLE

        searchable: true
    description:

        label: DESCRIPTION

        searchable: true
    created_at:

        label: CREATED AT

        type: date

        invisible: true
    updated_at:

        label: UPDATED AT

        type: date

        invisible: true
The columns.yaml file maps our database table to the list using label, searchable, etc. Check the docs for the full list of attributes.
// controllers/Notes.php
public function index(){

    $this->makeLists();

    $this->makeView('index');

}
// controllers/notes/index.htm
<?= $this->listRender() ?>
Inside our Notes@index method we parse the list configuration and we render it inside our index view. You can also add some extra markup if you have any extra fields.
If you hit the index controller you’ll see a basic listing of our notes. The list configuration is pulling all notes from the table including other users notes, and that’s not what we want, but we can extend the listExtendQueryBefore method from the ListController class and filter user notes.
// controllers/Notes.php
public function listExtendQueryBefore($query){

    $user_id = BackendAuth::getUser()->id;
    $query->where('user_id', '=', $user_id);

}
Now you should see that the list is filtered by the logged in user, and just to get familiar with it, let’s try to distinguish the notes that have no description by extending our columns using the listOverrideColumnValue method.
// controllers/Notes.php
public function listOverrideColumnValue($record, $columnName){

  if( $columnName == "description" && empty($record->description) )

         return "[EMPTY]";

}
You can combine the listOverrideColumnValue with listExtendColumns to add new columns and insert new values, like adding a ‘mark as read’ button for each row, etc.
public function listExtendColumns($list){

    $list->addColumns([

        'action' => [

            'label'     => 'Actions',

            'sortable'  => false

        ]

    ]);

}
If you remember, inside our config_list.yaml we had a list_toolbar field:
// controllers/notes/_list_toolbar.htm
<div data-control="toolbar">

    <a href="<?= Backend::url('rafie/quicknote/notes/create') ?>" class="btn btn-primary oc-icon-plus">New Note</a>
    <button

            id = "remove_notes"

            class="btn btn-primary oc-icon-trash-o"

            data-request="onDelete"

            data-trigger-type="enable"

            data-trigger = ".list-checkbox input[type='checkbox']"

            data-trigger-condition="checked"

            data-request-success="$el.attr('disabled', 'disabled');"

            disabled

            >

        Remove Note(s)</button>

</div>
<script>

    $("#remove_notes").click(function(){

        $(this).data('request-data', {

            notes: $('.list-checkbox input[type=\'checkbox\']').listWidget('getChecked')

        })

    });

</script>
New Notes
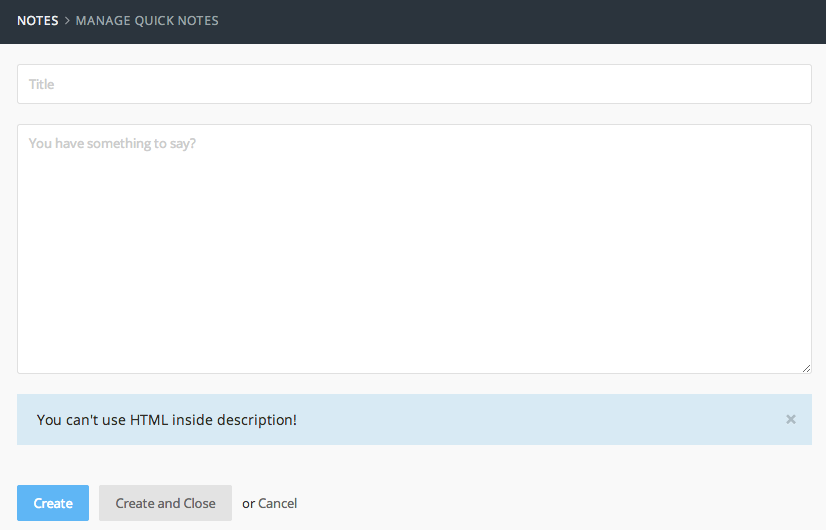
I know that we’ve already created a form for adding new notes, but let’s see the other way of mapping forms to models.
The controllers/notes/config_form.yaml file is responsible for displaying the create/update form using the specified model, and it can also be configured using the models/note/fields.yaml file.
// controllers/notes/config_form.yaml
# Record name

name: Note
# Model Form Field configuration

form: $/rafie/quicknote/models/note/fields.yaml
# Model Class name

modelClass: RAFIE\Quicknote\Models\Note
# Default redirect location

defaultRedirect: rafie/quicknote/notes
# Create page

create:

    title: Create Notes

    redirectClose: rafie/quicknote/notes
# Update page

update:

    title: Edit Notes

    redirectClose: rafie/quicknote/notes
Configuration attributes are self descriptive. The form attribute maps to the models/note/fields.yaml which decides how the form should be displayed. You can read about the available attribute in the docs.
fields:

  title:

    placeholder: Title
  description:

    type: textarea

    size: huge

    placeholder: You have something to say?
  important:

    type: hint

    path: @/plugins/rafie/quicknote/models/note/partials/create_note_hint.htm
We are creating only one text input for the title and a huge textarea for the description. The hint is a partial that you can use to display notifications to the user.
If you noticed the page url rafie/quicknote/notes/create, you may be wondering where we rendered the form? The answer is the Backend\Behaviors\FormController implemented by our controller – it takes care of displaying the form using our configuration files.
After creating your new note, you can visit the database to verify records. You’ll find that the user_id is set to 0 and that’s not what we want!
public function formBeforeCreate($model){

	$model->user_id = BackendAuth::getUser()->id;

}
The FormController class provides a set of methods to hook into form events. The formBeforeCreate method is used to update the model before saving, and you can also hook to the formAfterCreate to fire some special events.
Updating Notes
For the update form, we won’t need any modification because we mapped the form fields to our note model. However, you may need to add some functionality. If you have some code that needs to be executed, you can use the update method and call the parent update method as an extension. Be sure to explore the FormController class to see the list of available methods.
public function update($recordId, $context = null)

{

	//some code here
    return $this->asExtension('FormController')->update($recordId, $context);

}
Removing Notes
We have two ways to implement the remove action:
- Using the update form:
When using the update form you have a trash icon at the bottom right of the browser and it’s already configured for you. - Using a bulk action:
You remember that we’ve set theshowCheckboxestotrueinside theconfig_list.yamlfile. We only need to configure the remove notes button.
The _list_toolbar.htm partial is where we have our New Note button. We will add our remove notes button using OctoberCMS’ Ajax framework. If you’re not familiar with the AJAX framework, be sure to check my building OctoberCMS theme article.
// controllers/notes/_list_toolbar.htm
<button

    id = "remove_notes"

    class="btn btn-primary oc-icon-trash-o"

    data-request="onDelete"

    data-trigger-type="enable"

    data-trigger = ".list-checkbox input[type='checkbox']"

    data-trigger-condition="checked"

    data-request-success="$el.attr('disabled', 'disabled');"

    disabled

    >

Remove Note(s)</button>
The only special attributes are:
– data-trigger: add an event listener on the specified element.
– data-trigger-condition: the condition can be checked or a value if value[myvalue] is set. Check the trigger api for more info.
– data-request-success: JavaScript code to be executed after a successful request.
// controllers/notes/_list_toolbar.htm
<script>

    $("#remove_notes").click(function(){

        $(this).data('request-data', {

            notes: $('.list-checkbox input[type=\'checkbox\']').listWidget('getChecked')

        })

    });

</script>
On click events, we need to pass the selected IDs to the request-data attribute so that we can process them on the server side. Our controller must have an onDelete method to handle the request.
// controllers/Notes.php
public function onDelete(){

    $user_id = BackendAuth::getUser()->id;

    $notes = post("notes");
    Note::whereIn('id', $notes)

			->where('user_id', '=', $user_id)

			->delete();
    \Flash::success('Notes Successfully deleted.');
    return $this->listRefresh();

}
After deleting the notes we show a flash message to the user as a feedback, and we refresh the list using listRefresh, which regenerates the list and shows the new one on the page.
Conclusion
OctoberCMS’ widget system is powerful and flexible, and it provides a set of components to create and extend other plugins. You can take a look at the final result on Github, and if you have any question or opinions let me know in the comments!
Frequently Asked Questions (FAQs) about Building OctoberCMS Widget Plugin
What is OctoberCMS and why should I use it for my website?
OctoberCMS is a free, open-source, self-hosted CMS platform based on the Laravel PHP Framework. It provides a simple and intuitive interface that makes it easy for developers to create and manage content on their websites. It’s highly customizable, allowing you to build unique websites with a wide range of features. It also has a strong community of developers who contribute to its development and provide support.
How do I install OctoberCMS on my server?
To install OctoberCMS, you need to have a server that meets the minimum requirements, which include PHP 7.0 or higher and MySQL 5.5 or higher. You can download the installation package from the OctoberCMS website and follow the installation instructions provided. You can also use Composer to install OctoberCMS.
How do I create a widget plugin in OctoberCMS?
Creating a widget plugin in OctoberCMS involves several steps. First, you need to create a new plugin using the OctoberCMS plugin scaffolding command. Then, you need to create a new widget class in your plugin directory. This class should extend the WidgetBase class provided by OctoberCMS. You can then define the widget’s properties and methods in this class.
How do I add my widget to a page in OctoberCMS?
To add your widget to a page in OctoberCMS, you need to use the CMS’s backend interface. Navigate to the page where you want to add the widget, and then click on the “Components” tab. From there, you can drag and drop your widget onto the page.
How do I customize the appearance of my widget in OctoberCMS?
You can customize the appearance of your widget in OctoberCMS by creating a custom CSS file in your plugin directory. This file should contain the CSS rules that define the appearance of your widget. You can then include this CSS file in your widget’s render method.
How do I handle user input in my widget in OctoberCMS?
To handle user input in your widget in OctoberCMS, you need to define a handler method in your widget class. This method should take a single argument, which is the input data from the user. You can then process this data as needed.
How do I store data from my widget in OctoberCMS?
To store data from your widget in OctoberCMS, you can use the OctoberCMS database API. This API provides methods for creating, reading, updating, and deleting data in your database.
How do I debug my widget in OctoberCMS?
To debug your widget in OctoberCMS, you can use the OctoberCMS debug mode. This mode enables detailed error messages and logging, which can help you identify and fix problems in your widget.
How do I update my widget in OctoberCMS?
To update your widget in OctoberCMS, you need to modify the widget’s class and/or CSS file as needed. You can then update the widget on your website by refreshing the page.
How do I remove my widget from a page in OctoberCMS?
To remove your widget from a page in OctoberCMS, you need to use the CMS’s backend interface. Navigate to the page where the widget is located, and then click on the “Components” tab. From there, you can remove the widget from the page.