Better Selections In Photoshop With Quick Masks

In Adobe Photoshop, you can make temporary masks, called quick masks. Masks let you isolate and protect parts of an image. When you create a mask based on a selection, the area not selected is masked or protected from editing.
Creating a quick mask
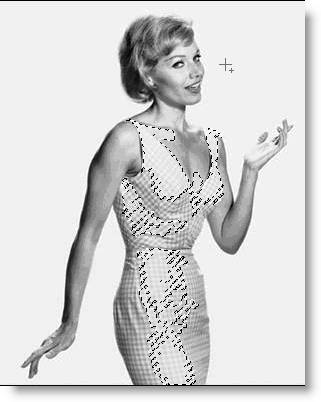
1. Open the image you want to make a selection on.
Sometimes you can make a large chunk of a selection by using the magic wand to begin with.
2. Select the magic wand tool (![]() ).
).
3. Click anywhere on the dress to begin the selection process.
4. To add to the selection, hold down Shift whilst clicking with the magic wand to add to the selection.
The dress is still only partly selected. Now we’re going to add to this selection using a quick mask.
6. Select the Quick Mask mode button (![]() ) in the toolbox. By default, you work in Standard mode. When you click on the Quick Mask button, you will work in Quick Mask mode. If you click this button again you will go back to standard mode.
) in the toolbox. By default, you work in Standard mode. When you click on the Quick Mask button, you will work in Quick Mask mode. If you click this button again you will go back to standard mode.


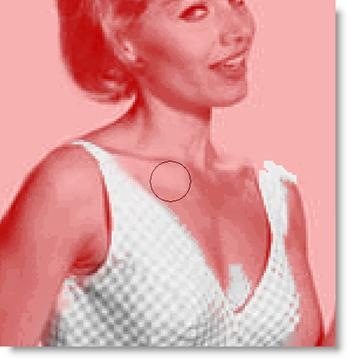
In Quick Mask mode, a red overlay (known as rubylith) appears, to mask and protect the area outside the selection.
Editing a quick mask
Now we need to refine the selection of the dress by adding to or erasing parts of the masked area. We do this by using the brush tool to make changes to your quick mask. The advantage of editing your selection as a mask is that you can use almost any tool or filter to modify the mask.
In Quick Mask mode, Photoshop automatically defaults to Grayscale mode. The foreground colour defaults to black, and the background colour defaults to white. When using a painting or editing tool in Quick Mask mode, keep in mind:
- Painting with white erases the mask (the red overlay) and increases the selected area.
- Painting with black adds to the mask (the red overlay) and decreases the selected area.
Adding to a selection by erasing masked areas
Start by painting with white to increase the selected area within the dress. This erases some of the mask.
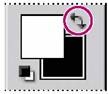
1. To make the foreground color white, select the Switch Foreground and Background Colors icon (![]() ) above the foreground and background colour-selection boxes.
) above the foreground and background colour-selection boxes.
2. Select the brush tool (![]() ).
).
3. In the tool options bar, make sure that the mode is Normal. Then click the arrow to display the Brushes pop-up palette, and select a medium-sized brush.

4. Using the brush tool, begin painting over the red areas within the dress. As you paint with white, the red areas are erased.
Don’t worry if you paint outside the outline of the dress. You can make adjustments later by masking areas of the image as needed.
5. Continue painting with white to erase all of the mask (red) in the dress. As you work, switch back and forth between Quick Mask mode and Standard mode to see how painting in the mask alters the selected area.
Notice that the selection border has increased, selecting more of the dress.

6. Once you’ve erased all of the red areas within the dress, click the Standard mode icon (![]() ) again to view your quick mask as a selection. Don’t worry if the selection extends a bit beyond the dress.
) again to view your quick mask as a selection. Don’t worry if the selection extends a bit beyond the dress. 
7. If necessary, zoom out so that you can see the entire image.
Subtracting from a selection by adding masked areas
If you’ve erased the mask beyond the edges of the dress, part of the background is included in the selection, so you need to return to Quick Mask mode and restore the mask to those edge areas by painting with black.
1. Click the Quick Mask Mode button (![]() ) to return to Quick Mask mode.
) to return to Quick Mask mode.
2. To make the foreground colour black, select the Switch Foreground and Background Colours icon (![]() ) , or press X on the keyboard. Make sure that the black colour box now appears on top. Remember that painting with black will add to the red overlay.
) , or press X on the keyboard. Make sure that the black colour box now appears on top. Remember that painting with black will add to the red overlay.
3. Choose a brush from the Brush pop-up palette. Select a small brush to refine the edges of the selection.
4. Now paint with black to restore the mask (the red overlay) to any of the background area that is still unprotected. Continue working until only the area inside the dress remains unmasked and you are completely satisfied with your mask selection.
5. In the toolbox, switch to Standard mode to view your final dress selection, and continue working this way till you have the selection the way you want it.
I love the quick mask because it allows you to create a very precise selection using familiar and easy to use tools such as the paint brush. Have you made selections using the quick mask before? Do you find it useful or maybe too time-consuming?
Frequently Asked Questions (FAQs) about Quick Masks in Photoshop
What is the difference between a quick mask and a layer mask in Photoshop?
A quick mask and a layer mask in Photoshop serve similar purposes but are used differently. A quick mask is a temporary mask used for making or refining selections in your image. It allows you to paint your selection using a brush, making it easier to include or exclude areas. On the other hand, a layer mask is a permanent, non-destructive way to hide parts of layers. You can alter the visibility of certain parts of a layer by painting black (to hide) or white (to reveal) on the layer mask.
How can I edit a quick mask in Photoshop?
To edit a quick mask, you first need to enter the Quick Mask Mode by pressing the Q key. Once in this mode, you can use the brush tool to paint the areas you want to select. The default color for the quick mask is red, which represents the masked or protected area. If you want to remove areas from the selection, you can paint with white. To exit the Quick Mask Mode and return to the standard mode, press the Q key again.
Can I change the color of the quick mask?
Yes, you can change the color of the quick mask. To do this, double-click on the Quick Mask Mode button in the Tools panel. This will open the Quick Mask Options dialog box. Here, you can change the color and the opacity of the mask.
How can I use the quick mask with other selection tools?
The quick mask is compatible with all the other selection tools in Photoshop. You can start a selection with any tool, like the Lasso or Marquee tool, and then switch to the Quick Mask Mode to refine the selection. This is particularly useful when dealing with complex selections that have irregular shapes.
Can I save my quick mask selection?
Yes, you can save your quick mask selection. After making your selection in the Quick Mask Mode, go to the Select menu and choose Save Selection. This will save your selection as a new channel which you can load later when needed.
Why is my quick mask not working?
If your quick mask is not working, it could be due to several reasons. One common issue is that the mask color is set to the same color as the area you’re trying to select, making it invisible. To fix this, change the mask color in the Quick Mask Options. Another issue could be that the opacity of the mask is set too low, making it hard to see. Increase the opacity in the Quick Mask Options to fix this.
How can I invert my quick mask selection?
To invert your quick mask selection, first exit the Quick Mask Mode by pressing the Q key. Then, go to the Select menu and choose Inverse. This will invert your selection, selecting everything that was not previously selected and deselecting everything that was.
Can I use the quick mask for image adjustments?
Yes, you can use the quick mask for image adjustments. After making your selection with the quick mask, you can apply any adjustment to that selection only. This is a great way to apply adjustments to specific areas of your image without affecting the rest of it.
Can I use the quick mask with the Brush tool?
Yes, the quick mask is designed to be used with the Brush tool. When in Quick Mask Mode, you can use the Brush tool to paint your selection. This allows for a high level of precision and control, especially when working with a graphics tablet.
How can I improve my skills with the quick mask?
The best way to improve your skills with the quick mask is through practice. Try using the quick mask in different scenarios, with different selection tools, and for different purposes. Also, experiment with different brush sizes and hardness levels to see how they affect your selection. Finally, don’t forget to use the zoom and pan tools to get a closer look at your selection and make more precise adjustments.
Jennifer Farley is a designer, illustrator and design instructor based in Ireland. She writes about design and illustration on her blog at Laughing Lion Design.