

To run this simple page as a Flex application, we need to compile our MXML code using the Flex SDK. The result is shown below:
![]()
The first thing you’ll notice is that MXML is an XML format. To indicate to the Flex compiler that we’re defining an application, we use the <mx:Application/> element, in the same way we use the <html></html> tags to define a web page. We can then add other elements within the <mx:Application/> tag. In the above example, we’ve added a <mx:Button/> tag to create a button, just as we’d use an <input type="button" /> tag in a web page form.
As you can see, this is all very similar to constructing a traditional web page, and the framework provides you with everything you might use in XHTML (buttons, lists, etc.) and more. All you have to learn is the properties, methods and the names of the components in the framework, all of which are available from the Adobe Flex 3 language reference.
Of course, the Flex framework doesn’t just consist of user interface components; it also contains actions that your application can utilise. For instance, there’s a component called HTTPRequest, which your application can use to send and receive data from a server-side service (PHP, ASP.NET, etc.). When you run your application, you don’t actually see the HTTPRequest, as it works in the background.
All these components have been bundled together by Adobe to form the Flex framework, so you don’t have to create them from scratch.
Eventually, as you become more experienced with Flex, you’ll want to create your own components that you’ll use over and over. After a while, you’ll have created a little library of your own that extends the Flex core framework to meet your individual needs.
What Do I Need to Get Started?
With the open sourcing of Flex 3, it’s never been easier to begin building RIAs. To get started, you can use one of two options:
- The tool of choice for most serious Flex developers is Adobe Flex Builder 3, the official Flex IDE from Adobe. Flex Builder is also available as a professional version, which includes a Flex charting component. Flex Builder 3 retails for around US$376.00, and the professional version sells for around US$900.00.
- You’ll also need your own programming editor, combined with the Flex 3 SDK, which is free. Yes: free as in beer.
Installing Flex Builder 3 is quite straightforward, as it comes with a user-friendly installer.
The Flex SDK, on the other hand, is a little trickier. To install the Flex SDK, download the zip file and extract it to a folder of your choice. The trick is that that folder should be in your path (meaning you should be able to execute files in that folder from the command prompt, regardless of your current location).
If you’re planning on taking your Flex development seriously, I recommend you go ahead and purchase the Flex Builder 3 IDE. Flex Builder is based on the open-source Eclipse editor, which alone is an extremely powerful IDE. If you want to try before you buy, Flex Builder 3 is available for a 30-day trial. While it’s great that the Flex 3 SDK is free, the benefits that Flex Builder 3 provides for Flex development over a standard text editor are many.
MXML is Easy!
Unlike other markup language acronyms, MXML doesn’t actually stand for anything specific. (Although some people, and I’m one of them, like to think that it should stand for Magic eXtensible Markup Language.)
Macromedia created MXML in March 2004 before the organization was acquired by Adobe. MXML is primarily used to lay out a Flex application. Being a dialect of XML, standard validity rules apply: tags must be closed, and all the other XML rules apply.
Every component in MXML follows the same pattern:
- You declare a namespace that tells Flex where to find a particular component.
- You declare the component class you wish to use (e.g. Button) from that namespace.
- You modify the available properties and methods using attributes, as illustrated below.
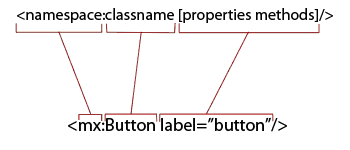
Because they’re defined in the class structure of the component, the properties and methods that can be used from within each component vary.
You style the visual components of your application with Flex Cascading Style Sheets. These styles can be added in the same location as the properties and methods of a component, but discussing Flex Cascading Style Sheets is beyond the scope of this article.
MXML components can have child elements (just like XML). For instance, a container element such as Canvas can have child elements like a Button or a Label. The code below demonstrates this point:
  <mx:Canvas x="53" y="64" width="192" height="94"
      cornerRadius="20" borderStyle="solid"
      backgroundColor="#A9A9A9" id="mainCanvas">

    <mx:Button x="10" y="10" id="newButton"
        label="This is a button"/>

    <mx:Label x="10" y="57" id="newLabel"
        text="This is a label"/>
  </mx:Canvas>
If you compile and run this code, you’d see this web page:
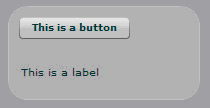
By combining layout containers, such as Canvas, with other components, such as buttons and lists, it’s possible to create great application designs in no time at all.
Frequently Asked Questions (FAQs) about Flex 3.2
What is Flex 3.2 and how does it differ from previous versions?
Flex 3.2 is a powerful, open-source framework for building and maintaining expressive web applications that deploy consistently on all major browsers, desktops, and operating systems. It is an upgrade from previous versions, offering improved performance, better debugging and profiling, enhanced data visualization, and more robust support for testing and automation. It also includes new components and utilities that make it easier to design and develop rich internet applications.
How can I get started with Flex 3.2?
To get started with Flex 3.2, you need to download and install the Flex SDK, which includes the Flex compiler and the Flex class libraries. You also need a text editor or an integrated development environment (IDE) like Adobe Flex Builder or Flash Builder. Once you have these tools, you can start creating your first Flex application by writing MXML and ActionScript code.
What are the main components of a Flex application?
A Flex application typically consists of MXML files, which define the user interface, and ActionScript files, which provide the logic and functionality. It may also include CSS files for styling, and various assets like images, audio, and video. The main components of a Flex application are the Application component, which is the root of the application, and various UI components like buttons, lists, and text fields.
How can I use styles and skins in Flex 3.2?
In Flex 3.2, you can use CSS to style your application. You can define styles in a separate CSS file or inline in your MXML files. You can also create custom skins for your components using graphics and MXML. To apply a style or skin to a component, you simply set its styleName or skinClass property.
How does data binding work in Flex 3.2?
Data binding in Flex 3.2 allows you to automatically update the user interface when the data it displays changes. You can bind data to properties, attributes, and styles of components, as well as to other data. To create a data binding, you use curly braces ({}) in your MXML code.
How can I handle events in Flex 3.2?
In Flex 3.2, you can handle events by adding event listeners to your components. An event listener is a function that gets called when a certain event occurs. You can add event listeners in your MXML code using the on[event] attributes, or in your ActionScript code using the addEventListener method.
What is the role of the Flex compiler?
The Flex compiler translates your MXML and ActionScript code into a SWF file that can be run in the Flash Player. It checks your code for syntax errors, resolves dependencies, and optimizes the code for performance. The Flex compiler is part of the Flex SDK and can be run from the command line or from within an IDE.
How can I debug a Flex application?
To debug a Flex application, you can use the debugging tools provided by your IDE, like breakpoints, watch expressions, and the call stack. You can also use the trace function to output messages to the console. In addition, Flex provides a Debugging API that allows you to programmatically control the debugger and inspect the state of your application.
How can I use Flex with Java?
Flex can be used with Java through the use of BlazeDS or LiveCycle Data Services, which allow you to exchange data between a Flex client and a Java server. You can send and receive data in various formats, including XML, JSON, and AMF, and you can use remote procedure calls (RPC) to invoke Java methods from Flex.
What resources are available for learning more about Flex 3.2?
There are many resources available for learning more about Flex 3.2, including the official Adobe documentation, online tutorials and courses, books, and community forums. You can also explore the source code of the Flex SDK, which is open source and freely available.

